Land Cruiser Prado 120 chain tags
There are two heads in a car engine: right and left (determining the side in the direction of travel). Each includes intake and exhaust camshafts. On the exhaust, the mark is a dent in the gear that shows where the mounting chain link is attached. Clutches are installed on the intake camshafts. On both sides they are identical and also equipped with marks:
When replacing the timing chain for Prado 120 4 l, put on according to the marks so that the teeth between the installation links are located next to the ebbs on the camshaft itself.
The Prado 120 4 liter timing mark on the crankshaft looks like a small depression and is aligned parallel to the cast rib of the engine block. The key on the shaft sprocket should also be located opposite the block ebb.
The chain itself has three installation links: two orange and one yellow. The first two are for the camshafts (left and right), and the last one is for the crankshaft.
When making a replacement, it is important to match the marks on the motor shafts and links correctly to avoid damage.
You need to check and adjust the position of the shafts:
Replacing the timing chain on a Toyota Prado 120 with a 4-liter engine should also be accompanied by placing marks on the shafts.
What is the timing belt replacement interval for Prado 120
Recommendations for replacing the part are specified in the vehicle manufacturer's operating instructions. But in reality, the timing differs due to the conditions in which the machine is used. The company generates its data based on field tests, but the real operating conditions of the car are very different from them.
According to the general regulations, replacing the timing chain with a 1GR-FE engine on a Toyota Prado 120 is carried out once every 150-200 thousand kilometers. However, if the car is driven off-road or used in changing climatic conditions, then this procedure is recommended to be carried out more often - at 100 thousand kilometers.
When the driver notices problems with the machine, an emergency replacement is required.
The fact is that while the engine is running, the chain bends and heats up. This causes sagging. The result is a decrease in strength. The link connections wear out. For this reason, they jump from one gear tooth to another. In this case, it is necessary to quickly replace the part to prevent serious damage.
Replacing the Prado timing belt: what a belt is needed for, how often to change it, common mistakes
Issues discussed in the material:
Before asking yourself the question of replacing the Prado timing belt, you need to understand what kind of mechanism it is and how to service it. The timing, or gas distribution mechanism of the engine, serves to synchronize rotational and translational movements in the engine (i.e., the simultaneous rotation of the crankshaft and camshafts at a known angle corresponds to a certain relative position of the pistons and valves). Most often, torque is transmitted using a chain or belt.
The 4th generation of the Toyota Land Cruiser Prado 150 frame SUV (aka Lexus GX) is equipped with a long-familiar line of engines, among which the 3-liter 1KD-FTV turbodiesel is quite popular. But the weak point of this engine is the timing belt, the breakage of which can be an unpleasant and costly surprise, since there is a possibility of bending the valves, in which case simply replacing it is not enough. Therefore, timely replacement of the Prado 150 diesel 3.0 timing belt is the key to trouble-free operation of your Pradika for many tens of thousands of km.
Instructions for replacing timing belt
The process of replacing the timing chain on a Prado 120 with a diesel engine is labor-intensive and consists of a number of steps. They must be performed consistently and clearly.
The car is prepared for replacement, the battery and protection are disconnected, oil and coolant are drained.
Afterwards, access to the engine is provided so that the timing belt is visible.
The next step is to align the crankshaft pulley according to the dead spots. We must not forget about the belts, viscous coupling, and fan that need to be removed. You will have to remove the cooling radiator, air filters, and intake manifold. Next, you should disconnect the sensors, ignition and injectors from the wiring harnesses to de-energize. They are removed along with the valve covers.
Then you need to remove:
Unscrew the fastening bolts from the pan and the front cover, after which it is removed to the side.
Then the marks are installed, the main chain, tensioner and damper are removed, as well as the chain from the camshafts. Remaining sealant, O-rings and gaskets must be removed.
Only after these stages the new spare part is installed according to the marks.
Then all the parts are assembled in reverse order.
Fatal errors when replacing the timing belt
Many car enthusiasts prefer independent servicing of their car to expensive services. This way they not only save money, but also enjoy the renovation process itself. Many of them can not only do such simple operations as changing the oil, but also try to perform more serious work (for example, those related to the timing belt). Let's figure out how to prevent common mistakes.
The biggest mistake of inexperienced craftsmen is incorrectly aligned marks on the crankshaft and camshaft pulley. Not many of the home-grown auto repairmen know how they should be mutually located. Often, due to dirt in the engine compartment, these marks are simply not visible. The price of inattention can be bent valves. If an error is made in aligning the marks, then even shifting the position of the belt by a couple of teeth will lead to malfunctions in the operation of the motor, or it simply will not start.
Incorrect belt tension is the second most common mistake. Often it turns out to be overtightened and subsequently, experiencing excessive loads, breaks off. Weak tension is no less dangerous. In this case, at high speeds it can jump off or jump over the teeth. An elementary check - try turning the long free part of the belt 90° relative to its axis with your fingers. The force applied should not be excessive.
We recommend
A number of particularly “frugal” motorists can only replace a time-worn belt and leave the old rollers. Usually this kind of savings backfires. If visually the old roller is still normal, then when installing a new belt, the load on it increases, and jamming may simply occur.
Source
When is tensioner replacement required?
The timing chain tensioner is an auxiliary component of the gas distribution mechanism. It provides the required degree of tension along the entire length and does not depend on external factors: temperature, load on the car and wear.
The chain drive is reliable and resistant to extreme driving conditions. The only thing the part is susceptible to is wear due to expansion under the influence of high temperature. Over time, it stretches out and is no longer able to function normally. Uncharacteristic noise and vibration appear, links jump off the sprockets, which leads to the destruction of individual engine mechanisms. The tensioner prevents such problems from occurring. Its functions:
This detail eliminates the need to manually calibrate chain tension. In addition, the tensioner is a unit that removes additional load from other parts, thus reducing wear. If this part malfunctions, serious problems are likely to arise that will require lengthy repairs and financial investments.
A broken tensioner can be seen even by a non-car mechanic. When the limit position of the rod on it is reached, this means that the spare part is not able to work correctly.
The 1GR tensioner on the Prado 120 needs to be replaced along with the chain itself.
Why do you need a timing belt and how does it work?
From the above it follows that it is with the help of the timing belt that the rotation of the crankshaft and camshaft is synchronized. In some motor models, it is also assigned the function of driving auxiliary mechanisms, such as a pump.
To simplify replacement, many designers of modern internal combustion engines place the gas distribution mechanism in the front or side of the engine. For the diesel Prado it is located between the cooling radiator and the engine block. On the Russian market there are usually models with open access, while replacing the Prado150 timing belt in European versions will require removing the protective casing. In any case, on the Prado this operation is not labor-intensive.
Externally, the timing belt is a closed flexible rim of a certain length with the Nth number of teeth on the inside. For each motor, even of the same brand, its specifications are individual. Initially, they were made of rubber, inside of which there were cord threads made of textile material, while now they are made from special fiberglass based on special polymers that are highly durable and resistant to temperature changes.
We recommend
The Prado timing belt resource declared by modern manufacturers before replacement is at least 150 thousand km. This is confirmed by the service station workers. The product maintains such a resource without problems, although this is a mileage that is 2 times less than the service life of the chain. However, in practice, it is often found that drivers forget about the replacement interval or the belt breaks prematurely due to its poor quality or as a result of other negative factors.
How to change the chain tensioner
You can replace the chain tensioner at a service station or at home yourself. The cost of repair work at the service center is 700-800 rubles. Doing the procedure yourself will take 15 minutes, and its price will be halved, since the money will only have to be spent on new spare parts. The delivery set includes a tensioner and a ring that is installed on it.
For the procedure you will need:
First you need to remove the old tensioner from the engine mechanism. To do this, unscrew the fasteners and remove it, prying it with a screwdriver if it does not give in. When installing a new spare part, be sure to pay attention to the stem. It should be pressed in. To secure it, there is a latch on the tensioner itself that must be cocked. After this, the part is installed in place. Next, the crankshaft is turned counterclockwise by the pulley so that the latch comes off and allows the tensioner to take its working position. After this, the crankshaft is rotated in the opposite direction so that the chain is in the right place.
After installing and starting the engine for the first time, an uncharacteristic sound is sometimes heard. Its appearance is caused by the fact that the new spare part is not lubricated with oil. Later, during engine operation, this defect is eliminated by itself.
The timing chain is an important timing component that connects the crankshaft and transfer case. Timely replacement of the chain and tensioner is the key to long and high-quality engine operation.
Source
Functions and design of timing belt
To understand what the timing belt is intended for, you need to know the principle of operation of an internal combustion engine.
The operation of any four-stroke internal combustion engine is based on cyclic phases: injection (suction) of the air-fuel mixture, compression, ignition, combustion (expansion) and further exhaust gas removal. The gas distribution mechanism is responsible for the coherence of these processes.
The timing belt consists of a crankshaft (sometimes not one, but several), intake/exhaust valves and a belt (or chain). The entire system allows certain cylinders to be filled with the air-fuel mixture at a given point in the cycle, and then the exhaust gases are promptly discharged into the exhaust manifold.
The valves open and close under the influence of the camshaft lobes. They are located relative to each other in such a way as to ensure the engine operating phases specified by the designers.
Rotation is transmitted to the camshaft from the crankshaft through a chain or belt. An integral condition for the correct operation of the engine is compliance with the specified relative position (angle of rotation) of the gas distribution mechanism relative to the CPG (cylinder-piston group). These are called phases. The pulleys of the above shafts have marks that must be matched in a given position.
Timing Chain Replacement Guide
Most motorists associate the chain drive of the gas distribution mechanism with reliability, durability and reliability. Such beliefs are confirmed by practice, although exceptions also occur. On some brands of cars it stretches out quite quickly, and sometimes even breaks. If this does not lead to serious consequences, then the car owner is quite capable of replacing the timing chain on his own, although the disassembly procedure is quite lengthy and labor-intensive.
How to determine if a chain drive is faulty
Unlike the timing belt drive, which is located outside the engine, the chain with gears is located inside the power unit and is completely hidden from view. On the one hand, this is a plus: the mechanism makes less noise and is generously lubricated with engine oil, which increases its service life. On the other hand, without removing the valve cover it is impossible to visually assess the technical condition of the unit.
The first sign of a chain drive problem is a rumbling sound coming from under the cover when the power unit is operating. The rumble of a weakened chain cannot be confused with anything; it is heard from the side where the gas distribution mechanism is located.
Loosening with a gap of up to 1 cm allows the chain to jump when starting the engine
Having heard such a sound, the car owner should check the condition of the drive so as not to encounter big troubles associated with engine repair. There are 2 ways: immediately go for diagnostics to the nearest car service center, or remove the valve cover yourself and make sure that the section of the chain near the camshaft gear is loose. Worsening tension is caused by the following reasons:
If an old-style mechanical tensioning device is installed in the car engine, then when the described symptoms appear, the first action is to tighten the chain with its help. To do this, simply loosen the outer nut holding the plunger spring and manually turn the crankshaft 1-2 turns. After which the nut is tightened again.
Old VAZ 2101–07 engines have a mechanical tensioner with a nut
Modern automatic hydraulic tensioners are not designed for manual adjustment and must be replaced if they break. You can verify that the element has failed only by removing it or disassembling the entire timing belt assembly. The same applies to the damper - on most cars, its wear can only be assessed when the mechanism is disassembled.
Ignoring the rumbling noise made by the chain will sooner or later lead to motor failure. The severity of the consequences depends only on your luck.
Consequences of malfunctions
Problems in the timing chain drive lead to the following problems:
Note. Chain drives of the timing unit can be single- or double-row. The former are not as reliable and durable as the latter, and often break down after a run of 50-80 thousand km. Double-row drives break extremely rarely, even when the owner of the car does not pay due attention to it.
Double-row chains also break, but very rarely
The consequences of these problems may be as follows:
This is what the valves look like after meeting the pistons
A chain that has jumped or broken while driving makes itself felt by a sharp loss of power or complete engine failure. If you were able to hear a metallic knock, indicating the meeting of the piston and valve, then you should prepare for serious repairs to the power unit.
And this is a piston pierced by a valve plate
What is the service life of chains according to maintenance regulations and replacement frequency?
On average, a timing chain drive lasts from 200 to 350 thousand kilometers of a car. The indicator varies depending on the driver’s driving style and the quality of the engine oil used to lubricate the links and gears. The operation of the hydraulic tensioner also depends on it.
Reference. In cars from leading German and Japanese manufacturers, a double-row chain often lasts 450-500 thousand km, or even more.
Single row chain drive for Opel vehicles
In contrast to German brands, the two-row drives of Korean small cars from manufacturers KIA and Hyundai work surprisingly little. There have often been cases of stretching and replacing chains with a mileage of 60-90 thousand km on Hyundai Solaris (Hyundai Accent in Ukraine) and KIA Ceed models, which is comparable to the service life of timing belts. Hence the recommendations on when to replace the chain drive:
To avoid troubles associated with timing drive failures, you need to carefully study the car’s operating instructions and the manufacturer’s recommendations for servicing a particular car.
How to choose a new set of spare parts
Like other automobile spare parts, timing chains are counterfeited by handicraft and Chinese manufacturers, after which they go on sale. Cunning businessmen are constantly coming up with new ways to deceive customers, for example, placing their low-quality products in original packaging from well-known brands originally from Western Europe. To avoid running into a fake spare part when purchasing a part, follow these recommendations:
The chain is checked for deflection as follows: take it by one end and hold it flat. The second end should sag no more than 10 mm. If possible, check the hardness of the metal by carefully filing it with a file. The steel in high-quality products is hardened, and therefore is characterized by increased hardness and does not lend itself to filing.
Chain, gears, shoes and tensioner - complete replacement kit
Advice. The main technical characteristics of the chain are its size and number of links, and you need to select the part based on them. If you are in doubt, then do not buy a new spare part without removing the old one with which you can compare it.
If you are updating a chain drive with a significant mileage of the car (150-200 thousand km), then you will have to change all the accompanying elements - gears, tensioner and damper. When the chain has stretched after a run of 50-100 thousand km, it is not necessary to change the gears, but the tensioner must be checked for functionality. Also, don't forget to buy consumables - cover gaskets, O-rings and heat-resistant sealant.
Replacing the timing chain
The complexity of the procedure lies in the dismantling of attachments and disassembling the power unit, which takes up to 3 hours. Removing and installing a new drive is quite simple. If all elements need to be replaced, then before performing work, be sure to delve into the timing drive structure of your car. Example: on the same KIA Ceed, the gear is pressed onto the crankshaft under heat, so you cannot dismantle it at home. Then disassembling the engine makes no sense, since it will be possible to replace one chain.
Among the special tools, you will need a device for fixing camshafts on a 16-valve engine (judger). The rest of the tools are standard:
To work, you will need an inspection ditch and a portable lamp (flashlight). Place the front-wheel drive car on the pit in such a way as to provide access to the front wheel from the timing unit side. A rear-wheel drive car is positioned as conveniently as possible; there is no need to remove the wheels.
The procedure for disassembling and removing a stretched chain
First of all, the following preparatory operations are performed:
Timing diagram of the 8-valve VAZ 2101–07 engine
Note. It is not always necessary to drain the oil, it depends on the make of the car. For example, when replacing a chain on a VAZ 2101-07, the lubricant remains safely in the crankcase and does not interfere with the work.
In a front-wheel drive car, you will have to remove the front wheel from the timing gear side and rest the car on a wooden stand. The jack will be needed later to lift the power unit.
Timing diagram of a 16-valve engine
It makes sense to consider the disassembly procedure using the example of the Korean car Hyundai Solaris 16V; in other cars with front-wheel drive, the principle of work is not much different:
Aligning the marks on the camshaft gears
Note. When disassembling the rear-wheel drive version of the car, you do not need to remove the wheel, lift the engine and unscrew the mount. Instead, you will need to remove the radiator along with the fan.
After disassembly, you need to clean the mounting flange of the cylinder block and the cover from the remains of the old gasket and sealant, and also wipe off any oil and coolant leaks. Then, by turning the crankshaft, align all the marks stamped on the gears with the marks on the engine housing or other landmarks specified in the vehicle documentation.
2.3. Replacing the alternator drive belt
| GENERAL INFORMATION |
Generator drive parts (vehicle without air conditioning)
| 1 – crankshaft pulley mounting bolt; 2 – pulley with torsional vibration damper; 3 – tensioner mounting bolt; 4 – tension device; 5 – generator bracket; | 6, 8 – bracket fastening bolts; 7 – bracket for the lower air duct; 9 – generator; 10 – generator mounting bolt; 11 – generator drive belt |
Generator drive parts (vehicle with air conditioning)
| 1 – crankshaft pulley mounting bolt; 2 – pulley with torsional vibration damper; 3 – generator mounting bolt; 4 – generator; 5 – tension device; 6 – generator bracket; 7 – tensioner mounting bolt; | 8, 10 – bracket fastening bolts; 9 – bracket for the lower air duct; 11 – compressor mounting bolt; 12 – air conditioning compressor; 13 – compressor installation bushings; 14 – generator drive belt |
Engine compartment
| 1, 4 – clamps; 2 – fuel return hose; 3 – fuel supply hose; 5 – coolant supply hose; 6 – upper boost air duct; 7 – expansion tank; 8 – hose |
Engine splash guard
| The shield fastening screws are shown by arrows. |
Bottom charge air duct
| 1 – air duct; 2 – hose; 3 – bolt; 4 – clamp |
Warning
If the belt is not removed for replacement, then before removing, mark the direction of its rotation, since when changing the direction of rotation, the belt will quickly wear out.
| EXECUTION ORDER |
| Models without air conditioning |
| 1. Remove the upper engine casing (see subsection 2.1). |
| 2. For supercharged engines, remove the clamps 4 and the upper air duct 6 with hose 8 from the engine compartment (see Fig. Engine compartment). |
| 3. Using key 1, turn tension roller 6 clockwise to loosen the belt tension. Holding the roller, remove the belt (2 – tensioner; 3 – generator pulley; 4 – generator drive belt; 5 – crankshaft pulley). |
| 4. Check the tightness of the generator and tensioner mounting bolts. Check the ease of rotation of tension roller 6 and generator pulley 3; they should rotate easily, without jamming. |
| 5. Holding the tensioner 2, put the new belt 4 on the pulleys of the crankshaft 5 and generator 3 and release the tensioner. The tensioner will automatically tension the belt. |
| 6. Start the engine and check the operation of the belt. |
| Models with air conditioning |
| 7. Remove the engine mudguard by unscrewing the screws that secure it, shown by arrows in the figure (see Fig. Engine mudguard). |
| 8. Unscrew bolt 3, remove clamps 4 and then lower air duct 1 with hose 2 (see Fig. Lower boost air duct). |
| 9. Using a wrench as shown in the figure, turn the tension roller clockwise to loosen the belt tension. While holding the roller, remove the belt. |
| 10. Check the tightness of the mounting bolts for the generator, air conditioning compressor and tensioner. Check the ease of rotation of the tension roller and pulleys of the generator and compressor; they should rotate easily, without jamming. |
| 11. While holding the tension roller, slide the new belt onto the crankshaft, alternator and compressor pulleys, then release the pulley. The tensioner will automatically tension the belt. |
| 12. Start the engine and check the operation of the belt. |
Prado 120 timing chain stretching
Pages: [ 1 ] 2 3 All Down
Author Topic: State Russian Museum. Does the chain need to be replaced? (Read 19564 times)
The mileage is 142,000 km, except for the preventive flushing of the intake systems, nothing worries me, but I heard that at some point the timing chain needs to be changed... Who has already done this procedure and is it necessary at all?
I control dreams! (I have two Toyotas!))
Subscribe, it’s also interesting. By the way, how do you clean the intake system?
Subscribe, it’s also interesting. By the way, how do you clean the intake system?
Flaps, manifolds, some kind of Unified State Examination valve... I think we washed all the holes, and the ride became faster.
I control dreams! (I have two Toyotas!))
The mileage is 142,000 km, except for the preventive flushing of the intake systems, nothing worries me, but I heard that at some point the timing chain needs to be changed... Who has already done this procedure and is it necessary at all?
The timing chain resource is at least 300 thousand km.
On Mercedes W12 the resource is 220 thousand km.
If the oil is normal and changes frequently, then the chain will not be affected at all.
Checking the timing chain and timing chain tensioner will help you understand the condition of the chain. If the tensioner is “at its limit,” then the chain is stretched and needs to be replaced. Although we must understand that stretching the chain itself can disrupt the valve timing angle (its deviation from the norm). If the deviation of the phase angle from the norm does not exceed a few degrees, then this is not a problem. This can be checked by a diagnostician. But a “worked out” tensioner, which can no longer tension, can lead to the chain starting to “dangle” (usually a loud noise appears). “Stalingrad”, of course, will not happen, but violations in the operation of the timing belt and progressive wear of the entire drive cannot be avoided here.
It is necessary to urgently change it if there is abnormal noise (worn sprockets and chain links).
A break in even a worn chain is an extremely unlikely event (unless a camshaft jams, for example, it rusts after swimming in salt water).
DON'T JUST TELL WHAT YOU KNOW, BUT ALWAYS KNOW WHAT YOU'RE SAYING! THERE WILL ALWAYS BE SOMEONE WHO IS SMARTER THAN YOU!
More about the chain.
The advertising phrase “the chain is designed to operate for the entire service life of the vehicle” should not be taken literally. Many took it literally, and on its basis they began to develop a legend about the chain’s service life of several hundred thousand kilometers. There's no harm in dreaming...
The chain rarely breaks and does not require such frequent scheduled replacements. There is a layout advantage for DOHC - four valves per cylinder are driven through two shafts with a phase change mechanism; the fuel injection pump and pumps are driven by a relatively “thin” chain instead of a “wide” belt.
Since the chain has a tendency to stretch during operation (due to wear and play in the link connections), it is necessary to either introduce a procedure for regularly tightening the chain into the regulations, or (which all manufacturers do) install a permanent hydraulic tensioner. It operates from the general engine lubrication system, so its durability depends on the quality of the oil. Hello to those who like to comply with the “new regulations” for changing diesel oils after 10 thousand kilometers.
Toyota has placed the chain tensioner on the new generation of chain engines not inside the engine, but outside, to simplify its replacement.
During operation, the chain “saws through” the tensioners and dampers, its rollers and shaft sprockets gradually wear out, and wear products end up in the engine oil.
Everything needs to be changed: the hydraulic tensioner (sometimes it dies by 150 thousand km - among thrifty fans of “regulations”), a stretched chain, a tensioner shoe and a damper, and inevitably worn-out sprockets (an old sprocket can very quickly ruin a new chain).
DON'T JUST TELL WHAT YOU KNOW, BUT ALWAYS KNOW WHAT YOU'RE SAYING! THERE WILL ALWAYS BE SOMEONE WHO IS SMARTER THAN YOU!
Informative and timely response! I change the oil every 5.5 km every 6 t.km. There is no noise. How can we check the condition of the shoe tensioners specifically on our engine?
I control dreams! (I have two Toyotas!))
The mileage is 142,000 km, except for the preventive flushing of the intake systems, nothing worries me, but I heard that at some point the timing chain needs to be changed... Who has already done this procedure and is it necessary at all?
If you look at the photo from the topic about major repairs, then the condition of the timing belt is quite good.
and the most IMPORTANT thing is…………….the client owns the TLK200 in petrol and diesel versions.
in comparison (according to the client), 4.7 gasoline does not run and consumes gasoline, 20 liters. and up the “mountain”…………………
and the diesel, 12 liters ——— in the combined cycle,….and two turbines whistle as they should.
It’s just not clear what the mileage is (it can’t be 32,000, again judging by his photo).
START,………many days have passed between February and May.
I semi-capitalized the 1zhr engine on my Prado 120. The mileage was 240,000. There were no signs of wear on the timing mechanisms. They left everything original (chains, tensioners). I later drove another 25 thousand on it and sold it without any problems.
What does this noise (worn or stretched chain) sound like?
Iron like a Lion in Zion
On runs up to 200 thousand km with a normal schedule for changing the oil and oil filter (400 operating hours under normal operating conditions, under severe operating conditions, including very poor diesel fuel - you need to consult the dealer’s technologist regarding the replacement schedule and treat the engine with extreme care) I wouldn't bother with this issue.
Causes and consequences of a broken Prado timing belt
As was said, a broken timing belt on a Prado does happen, and quite often. The main factors causing this emergency situation are the following:
According to experienced service station workers, the destruction of the Prado gas distribution mechanism drive is the most common due to its natural aging. Often Russian motorists drive beyond the recommended replacement period of up to 50 thousand km. As long as the belt doesn’t burst simply due to old age. In this case, it needs to be replaced, and the fault of the Prado driver himself is solely due to negligence.
The second most common cause of drive failure in the Prado is a problem in the operation of the rollers and/or tensioners, as well as on very old engines, jamming of the water pump, which, as was written earlier, can also be involved in the rotational phase of the timing belt. When carrying out routine maintenance, it is recommended to check the condition of these mechanisms and the degree of tension of the belt itself, and if necessary, replace it.
If, during a technical inspection, the presence of aggressive technical fluid or automobile oil was discovered on the surface of the Prado belt, then it should be replaced as soon as possible.
And finally, by installing products from little-known manufacturers in your car, you increase the risk that the belt will not last the stated 60,000 km. And given the dire consequences of a breakdown for Prado diesel engines, we do not recommend saving on this relatively inexpensive consumable, and in case of replacement, buy high-quality products.
The picture of a Prado timing belt break looks like this. The rotation of the camshaft stops, the valves stop, and this may be in their open position. Since there are no recesses for valves on the surface of the pistons of the Prado 150 diesel 3.0 engine, they will most likely collide with open valves. As a result, at best, you will simply get a stopped Prado engine, at worst, bent valves, their guides, and even deformation of the piston mirror. All this will require expensive repairs and replacement.
Further it could be even worse; along the chain, there is likely to be damage to the camshaft cams and, in especially sad cases, damage to the Prado cylinder head or the connecting rod group mechanism. Therefore, weigh the cost of a high-quality belt with its replacement and the cost of probable repairs if it breaks.
Land Cruiser Prado 120 chain tags
There are two heads in a car engine: right and left (determining the side in the direction of travel). Each includes intake and exhaust camshafts. On the exhaust, the mark is a dent in the gear that shows where the mounting chain link is attached. Clutches are installed on the intake camshafts. On both sides they are identical and also equipped with marks:
When replacing the timing chain for Prado 120 4 l, put on according to the marks so that the teeth between the installation links are located next to the ebbs on the camshaft itself.
The Prado 120 4 liter timing mark on the crankshaft looks like a small depression and is aligned parallel to the cast rib of the engine block. The key on the shaft sprocket should also be located opposite the block ebb.
The chain itself has three installation links: two orange and one yellow. The first two are for the camshafts (left and right), and the last one is for the crankshaft.
When making a replacement, it is important to match the marks on the motor shafts and links correctly to avoid damage.
You need to check and adjust the position of the shafts:
Replacing the timing chain on a Toyota Prado 120 with a 4-liter engine should also be accompanied by placing marks on the shafts.
What is the timing belt replacement interval for Prado 120
Recommendations for replacing the part are specified in the vehicle manufacturer's operating instructions. But in reality, the timing differs due to the conditions in which the machine is used. The company generates its data based on field tests, but the real operating conditions of the car are very different from them.
According to the general regulations, replacing the timing chain with a 1GR-FE engine on a Toyota Prado 120 is carried out once every 150-200 thousand kilometers. However, if the car is driven off-road or used in changing climatic conditions, then this procedure is recommended to be carried out more often - at 100 thousand kilometers.
When the driver notices problems with the machine, an emergency replacement is required.
The fact is that while the engine is running, the chain bends and heats up. This causes sagging. The result is a decrease in strength. The link connections wear out. For this reason, they jump from one gear tooth to another. In this case, it is necessary to quickly replace the part to prevent serious damage.
Generator operating principle
It doesn’t matter which car you take, all of them, including the Toyota Prado, have technical content. This includes a generator
It is very important what condition this part of the car is in, because the operation and movement of the car depends on it. Therefore, every driver should know how to remove the Prado 120 generator.
Consider the functions of a generator in a car:
- Charges the battery.
- Provides power to the vehicle.
This part wears out quite often, which is why it must be replaced. It's just a matter of time.
Before you get a generator, you should protect yourself:
- The engine must be turned off.
- We put on a mask and gloves to protect our hands and face.
- To avoid getting an electric shock, disconnect the wire from the battery.
- We put the car on stands.
Now you need to put together the necessary tools and materials. You will need a set of ratchet wrenches, including long wrenches. A substance such as WD-40 will also come in handy.
Instructions for replacing timing belt
The process of replacing the timing chain on a Prado 120 with a diesel engine is labor-intensive and consists of a number of steps. They must be performed consistently and clearly.
The car is prepared for replacement, the battery and protection are disconnected, oil and coolant are drained.
Afterwards, access to the engine is provided so that the timing belt is visible.
The next step is to align the crankshaft pulley according to the dead spots. We must not forget about the belts, viscous coupling, and fan that need to be removed. You will have to remove the cooling radiator, air filters, and intake manifold. Next, you should disconnect the sensors, ignition and injectors from the wiring harnesses to de-energize. They are removed along with the valve covers.
Then you need to remove:
Unscrew the fastening bolts from the pan and the front cover, after which it is removed to the side.
Then the marks are installed, the main chain, tensioner and damper are removed, as well as the chain from the camshafts. Remaining sealant, O-rings and gaskets must be removed.
Only after these stages the new spare part is installed according to the marks.
Then all the parts are assembled in reverse order.
Toyota Land Cruiser Prado 120. Replacing the timing chain kit.
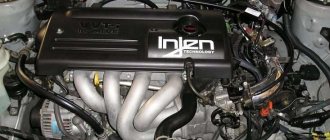
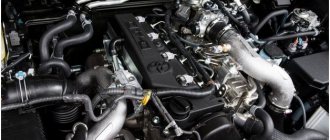
Car: Toyota Land Cruiser Prado 120 2005. ICE - 1GR FE, 249 hp. With.
The car came with a task - extraneous sounds appeared in the timing belt area, the check light came on.
Verdict - replace the timing chain kit.
The work is complex, voluminous and expensive, but interesting.
One of our specializations is repair and maintenance (MOT) of jeeps of various brands.
We know and can do a lot about SUVs.
We post some of our work here to show what we can do.
We put the car in the repair area. We allocate 1-2 days for such work.
| Engine – 1GR FE – 249 hp. With. — V6 VVT-i. |
| Remove the top plastic cover and the engine valve covers. |
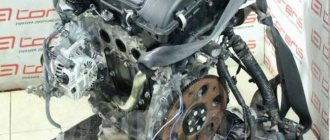
| We remove everything that blocks access to the timing chain. |
| The foreman receives a work order and spare parts. In this case, all spare parts are original. |
| We remove, clean, and wash the front cover of the internal combustion engine. |
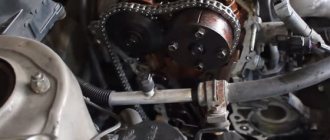
| We reached the chain. |
| Cooling system pipes. Dirt and deposits are visible on the walls. Change antifreeze and flush the cooling system on time. |
| In the center, an oil supply pipe for lubrication of the crankshaft gear is visible. |
| Camshaft gear with VVT-i clutch |
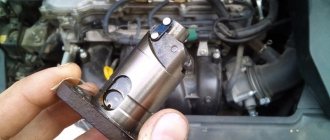
| And this is the main timing chain tensioner. It can be seen that the tensioner has already come out completely. This means that it cannot maintain the chain at the correct tension. In this situation, it is necessary to change the timing chain kit. |
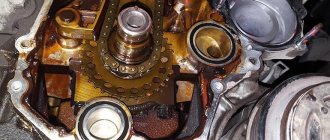
| We dismantle the previously installed chain kit. |
| One of the old timing chain tensioners for the camshaft. There should be a plastic cover on top, but the chain has erased it. |
| Another old timing chain tensioner for the camshaft. And another plastic cover worn away by the chain. |
| Main chain stabilizer and also plastic bent by the chain. |
| Old timing chain kit. We took it off and put it in a pile - we’ll show it to the owner of the car. |
| While working, the master carefully places all the parts to be removed on an auxiliary table. |
| We are starting to install a new timing chain kit. This is a new, original camshaft gear with VVTi clutch. |
| New timing chain tensioner for camshaft. The tensioner is cocked, the safety pin is on. |
| And here the VVT-i gear and tensioner are already installed. The tensioner guard is removed at the very end of the assembly. |
| Completely installed chain set. We check the chain marks and correct assembly. |
| We put all the covers back. |
| Fill with oil and antifreeze - start and warm up the internal combustion engine to operating temperature. We check it for leaks and extraneous noise. We make sure that everything is fine, everything works properly. We prepare documents and notify the Client. We did it in one working day! |
As a result: - service time - one working day.
— after replacing the timing belt kit, the extraneous noise went away, the internal combustion engine ran smoothly, the check went out. — The client is satisfied and very happy. That's all for today. Contact us - 240 42 11 .
Good luck to all!
AU team.
When is tensioner replacement required?
The timing chain tensioner is an auxiliary component of the gas distribution mechanism. It provides the required degree of tension along the entire length and does not depend on external factors: temperature, load on the car and wear.
The chain drive is reliable and resistant to extreme driving conditions. The only thing the part is susceptible to is wear due to expansion under the influence of high temperature. Over time, it stretches out and is no longer able to function normally. Uncharacteristic noise and vibration appear, links jump off the sprockets, which leads to the destruction of individual engine mechanisms. The tensioner prevents such problems from occurring. Its functions:
This detail eliminates the need to manually calibrate chain tension. In addition, the tensioner is a unit that removes additional load from other parts, thus reducing wear. If this part malfunctions, serious problems are likely to arise that will require lengthy repairs and financial investments.
A broken tensioner can be seen even by a non-car mechanic. When the limit position of the rod on it is reached, this means that the spare part is not able to work correctly.
The 1GR tensioner on the Prado 120 needs to be replaced along with the chain itself.