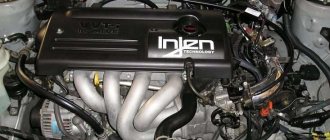
1KR engines were created by the Japanese plant Daihatsu Motor Corporation. These are neat-looking, low-power motors, but essentially durable. The 1KRFE engine series was introduced by Toyota in 2004. And the first vehicle to test this engine was a new car called Daihatsu Sirion. Manufactured specifically for the European market.
Let's look at the technical specifications of the 1KRFE engine.
Technical specifications 1KRFE
The 1KRFE was created as an engine for small-displacement urban vehicles. The engine is compact and playful for a mini-car. Has the following advantages:
- high traction at medium and low speeds;
- light weight;
- fuel efficiency;
- low level of emissions of harmful gases. Engines of the 1KRFE series comply with the Euro 4 environmental class.
Attention! The motor is produced not only in Japan. Factories for the production of 1KRFE were built in Poland.
1KRFE is a three-cylinder direct engine. The cylinder volume is 996 cubic centimeters. More detailed information can be seen in the table below.
| ICE parameter 1KRFE | Meaning |
| Total weight | 69 kg |
| Power | 71 horses |
| Compression ratio | 10,5:1 |
| Cylinder diameter | 71 mm |
| Piston stroke | 84 mm |
| Number of valves per cylinder | 2 |
| Torque | 91 Nm |
| Fuel supply system | EFI – distributed electronic injection |
| Lubrication system | Combined |
| Gasoline consumption in the city per 100 km Gasoline consumption on the highway per 100 km | 5.5 l4.1 l |
| Fuel octane number | 95 |
| Life resource | 250 thousand km |
Attention! The motor received the “Engine of the Year” award from 2007 to 2009 in the competition for the best small engines.
The timing belt is created according to the DOHC scheme. All 12 valves are equipped with VVT-i. The intake manifold is made of plastic. This technique made it possible to lower the temperature and increase the filling of the cylinders with the combustible mixture.
Engine Modifications
Especially for the Asian automobile markets, Toyota developed two simplified modifications on the 1KR-FE engine platform: 1KR-DE and 1KR-DE2.
Production of the 1KR-DE internal combustion engine began in 2012 in Indonesia. This power unit was intended to equip the urban compact Toyota Aqva and Daihatsu Ayla, produced by the Astra Daihatsu joint venture and supplied to the local market as part of the Low Cost Green Car program. The 1KR-DE engine is distinguished from its “parent” by the absence of the VVT-i system, as a result of which its characteristics have become “more modest”: maximum power is 48 kW (65 hp) at 6000 rpm, torque is 85 Nm at 3600 rpm . The diameter and stroke of the pistons remained the same (71 mm by 84 mm), but the volume of the combustion chamber increased slightly - to 998 cc. cm.
Heat-resistant rubber-plastic was chosen as the material for the manufacture of the 1KR-DE cylinder head instead of aluminum, which made it possible to reduce the total weight of the engine by almost 10 kg. For the same purpose, an exhaust manifold and a catalytic converter with an oxygen sensor were integrated into a single structure with the cylinder head. In 2014, in Malaysia, a joint venture with Daihatsu began production of the Perodua Axia hatchback, which began to be equipped with a more powerful version of the 1KR-DE engine - 1KR-DE2. The increase in power was achieved by slightly increasing the compression ratio of the working mixture - to 11:1. The 1KR-DE2 produces a maximum of 49 kW (66 hp) at 6000 rpm and 90 Nm at 3600 rpm. The remaining characteristics are completely similar to those of the 1KR-DE engine. The engine meets EURO 4 environmental requirements, and to achieve a higher standard it clearly lacks the VVT-i system.
It should be noted that the 1KR-DE2 internal combustion engine produced in Malaysia is used on another Toyota model. This is a Toyota Wigo, which a subsidiary of a Japanese corporation assembles and supplies to the Philippine automobile market.
The Chinese, based on the 1KR-FE engine, developed and created their own similar three-cylinder internal combustion engine with the index BYD371QA.
List of car models in which it was installed
This engine can be seen not only on Toyota vehicles. The French also used it to operate cars produced by the Peugeot-Citroen plant.
Here is a list of cars on which the 1KRFE engine can be found:
- Toyota Aygo AB10, Toyota Yaris, Belta XP90, iQGJ10. This engine is still installed on some Toyota cars;
- Daihatsu Sirion M300, Sirion M700, CuoreL275.
Let's move on to French cars:
- Peugeot 107, Peugeot 108 to this day;
- Citroen C1.
The engine has performed well with both automatic and manual transmissions.
Applicability
Below is a complete list of cars from different manufacturers on which the 1KR-FE internal combustion engine has been installed and is still installed:
- Toyota Passo (05.2004-present);
- Toyota Aygo (02.2005-present);
- Toyota Vitz (01.2005-present);
- Toyota Yaris (08.2005-present);
- Toyota Belta (11.2005-06.2012);
- Toyota iQ (11.2008-present);
- Daihatsu Sirion;
- Daihatsu Boon;
- Daihatsu Cuore;
- Subaru Justy;
- Citroen C1;
- Peugeot 107.
1KRFE Service Regulations
Maintenance of the 1KRFE is an important element in its care. Routine preventative maintenance is carried out once a year at service centers. Here the chassis and electronic parts of the engine are completely rechecked. If any are worn out or their performance is questionable, then such components are replaced.
Regular oil changes in the 1KRFE engine are also important. The lubricant not only protects engine parts from wearing out, but also prevents the temperature of the unit from increasing during operation.
It is recommended to fill only high-quality motor oils. This
- 0W30;
- 5W30.
If the requirements for lubricant quality regulations are not met, this leads to clogging of the system valves. Frequent use of bad oil affects the entire engine. It will fail before the scheduled time of 200 thousand kilometers.
Replacing antifreeze is as important as changing the oil in a 1KRFE engine. Without it, the system will overheat. High temperatures will increase the timing of valve failure, deform the cylinder head, and dry out the seals so that they begin to leak lubricant. Increased oil consumption will be caused to the engine if the antifreeze is not changed in time and the engine overheats.
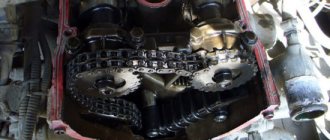
The weak link in the entire 1KRFE engine is the timing chain. It is single-row. The lifespan of the chain is 100 thousand kilometers. But experienced mechanics recommend looking under the hood every 50,000 kilometers. Since light cracks or chips in the chain can lead to failure. A belt failure will bend the engine valves.
Often, experienced mechanics in service centers on older 1KRFE engines have to deal with clogged VVT-I valves and clogged throttle valves. Their timely cleaning will give the engine an extra 100,000 kilometers and will not cost the car owner up to 50,000 rubles for major repairs.
Timing chain replacement kit MASUMA MGR-1001 for the 1KR-FE engine , which was installed on TOYOTA (AYGO, PASSO, VITZ, YARIS, YARIS).
Equipment:
- Timing chain (Number of links – 124; markings – 1, 7, 33)
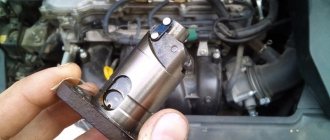
- Timing chain tensioner
- Timing chain tensioner bar
- Timing chain tensioner
- Crankshaft gear
- Camshaft gear
Masuma Company
produces a complete
kit for replacing the timing chain
, which allows for comprehensive maintenance of the gas distribution mechanism.
Masuma timing chains
are made from high-quality alloys that are wear-resistant and durable.
The chain rollers undergo a nitrocarburizing process
, due to which they have a hardened surface layer.
- Tensile strength (mechanical stress): 13KN (~1325 kg)
- Outer plate (material - 40Mn, hardness - 47-51HRC)
- Inner plate (material - 50CrV, hardness - 48-52HRC)
- Pin (material - 38CrMoAl, hardness - 88-92HR15N)
- Roller (material - 20CrNiMo, hardness - 88-92HE15N, nitrocarburization - 0.15-0.25 mm)
Masuma timing chain tensioner shoes
effectively reduce the amplitude of timing chain vibrations. Covered with ultra-durable polymer material for long service life.
Timing chain guides Masuma
dampen residual vibration after the tensioner, preventing the chain from jumping off the sprockets on the camshaft and crankshaft. Reduce noise levels. A comprehensive replacement of all parts of the assembly guarantees proper operation of the timing belt.
Laboratory tests have shown
— minor shifts in the valve timing angle began after 19,102 hours of operation under variable loads (bench tests were carried out on engines - 1ZZ-FE, SR20). The “run-in stand” showed a slight shift in the phase angle, gas distribution began after 357,000 km. Tests in real conditions ~ 241,000 - 287,000 km. Summing up the test results, the service life of the Masuma timing chain kit is at least 200,000 km.
The warranty on the timing chain kit is 24 months or 80 thousand km. mileage
only if timing chain kits are installed at vehicle service stations or Authorized Service Centers. When installing timing chain kits yourself, there is a limited warranty of 14 days from the date of purchase.
Masuma
is a global brand of spare parts, components and consumables for cars.
The main specialization of the brand: resource parts for post-warranty service of Japanese cars. The company's strategy is to offer consumers the best balance of reliability and price of spare parts. All products are manufactured to order, technology and under the control of the parent company Masuma Auto Spare Parts Co., LTD (Tokyo, Japan)
in dozens of modern factories located in East Asia.
Review of faults and methods for repairing them
The weak point of the engine is the timing chain. If the car owner is going to change it, then it is better to change it with all the sprockets. Because they also get very tired. It is best to check the chain size every 80 thousand kilometers. A stretch of 2 mm from the standard size should serve as a signal to replace the timing belt.
Belt tension on 1KRFE
The timing chain is tensioned as follows (follow the symbols in the figure):
- Unscrew the bolt under the letter “A” a little.
- Then loosen nut "B".
- Now you need to tighten the bolt marked “B” until the gap disappears.
- As you turn the “C” bolt, you need to adjust the chain tension.
- Now you need to tighten bolt “B”.
For bolt “A” the tightening force should be 54 Nm, and for bolt “B” - 34 Nm. Carry out the operation with a torque wrench.
It happens that it is not necessary to tension the belt, but to replace it. The process is shown in the next block.
Replacing timing chain 1KRFE
The timing chain is replaced every 100,000 km. Briefly about removing the old and installing a new chain.
- First of all, you will need to drain the oil and antifreeze. Remove the air filter and the engine itself. Remove the coolant pump.
- Remove the ignition coils and cylinder head cover.
- Remove the oil filter and pan.
- Fix the piston of the first cylinder at TDC on the compression stroke.
- Rotate the crankshaft until the marks 0 align with the mark on the timing cover.
- Secure the pulley and the crankshaft itself.
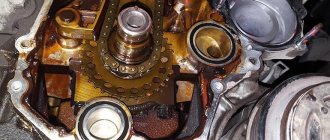
- Remove the timing chain cover.
- Remove the old one and install the new one, having first pressed in the new crankshaft oil seal and lubricated it with oil.
- Align the orange links of the timing chain with the marks on the sprockets. Then the yellow links with a mark on the crankshaft sprocket.
- Install the chain tensioner.
- Install the timing chain cover.
- Install the crankshaft pulley.
- Next, tighten the oil pan with bolts.
- Install the engine.
This is how the timing chain is removed and installed on the 1KRFE engine.
Toyota Vitz 2000 Toyota Vitz SCP10 Replacing the drive belt and spark plugs
In two circles, the marks on the shafts with the marks on the chain will diverge by one link. Forgetting that the marks are not on the block, as usual, but on the chain! Degrease the surface cleaned of sealant with acetone.
We insert the pins into the cover and very carefully wind it up and put the Front cover in place. Well, then everything is in reverse order. After assembly, we smoke for 24 hours and only then start the engine and the sealant dries.
It took 3 hours to disassemble. For troubleshooting and assembly 5. Engine wear has not been detected, everything is in excellent condition. After assembly, all parameters are within acceptable limits.
Of course, it was necessary to change the damper too. Dark gray Camry Grace g 4WD. Use a screwdriver to tear it off the sealant. And we see this: It should look exactly the same after replacing all the spare parts: We remember how everything should be.
We remove the tensioner and immediately the intake shaft rotates a few degrees. And then I ran into problems. They appeared, but not immediately. I installed the chain and aligned the yellow chain links with the marks on the sprockets. I released the rod and got this: Tightened it all down, sealed the washed cap and installed it. And then I saw a star for the position of the shaft cranks in the box with bolts.
I figured the pulley was not hitting zero, but when I tried to return the intake shaft to its initial position, I turned it with an adjustable wrench, already with the chain, and released the tensioner. This whole thing has gone wrong.
I unscrewed and removed the cover, of course, all this while wiping off the sealant both from the cover and from the block. I tried to fix this whole thing. I spent the whole night thinking about how to do this. We combine the yellow marks on the star of the crankshaft, Then we pull the oil pump onto the star, as if the star turns the oil supply pump. We tighten it so that there is not the slightest sag.
Then we pull it onto the graduation star.
Get More Stories Like This
The yellow marks converge, but it is very difficult. There is no need to install a sedative.
We install the lower guide, the tensioner guide, and the tensioner itself onto the pin. We pull the chain onto the intake sprocket, turning the camshaft with a wrench so that the mark on the sprocket faces up, plus the yellow mark on the chain is in place, plus there should be no slack between the sprockets.
Tags: Aveo, company, recall, Chevrolet
- Related Posts
- Replacing the fuel filter for BMW X5, E53, diesel hp. look at the video & | diabloarea.ru
- New Actyon: Replacing the fuel filter cartridge
- Buy a belt for Toyota Mark II! Spare parts: contract, new and used.
« Previous entry
Selecting a new part
To choose the right new timing belt, the car owner needs to follow the recommendations:
- Purchase consumables only from the following manufacturers: Gates;
- Kit;
- Sat;
- Tayota;
- Basz.
- Belt length;
- 2AZFXE - has different series (1,2,3, etc.). Depending on the series, it may fit all Passo models;
Replacing the timing belt on a Toyota Passo with your own hands
Before you start changing consumables, the car owner will need to prepare the necessary tools:
- Set of spanners;
- Ratchet wrench with a set of replaceable heads.
Step-by-step instructions for changing the timing belt:
- The first step is to loosen the generator mount. To do this, we do the following: First of all, remove the right front wheel.
- Then remove the plastic fender liner. It’s worth considering here: it consists of two parts, so first unscrew the top part and then the side.
- Next, take a ratchet and a 14mm socket, and then loosen the generator mount
It is worth considering that the belt must be installed strictly as in the photo below, otherwise when the engine starts, the tension roller pin may break and the generator pulley guide may break.