24.03.2020
| (Votes: 2, Rating: 5) |
Issues discussed in the material:
- What you need to know about replacing the chain tensioner in a Toyota
- How to replace the chain tensioner in Toyota
- How to understand that it is not the chain tensioner in a Toyota that needs to be replaced, but the chain itself
- How to replace the tensioner and chain in a Toyota Corolla
- Replacing the chain tensioner in Toyota through the eyes and hands of car enthusiasts
Replacing the chain tensioner in a Toyota, at first glance, is not the most difficult procedure that even a novice car enthusiast can handle. However, the apparent simplicity can result in more serious engine repairs if something goes wrong.
To replace the chain tensioner in a Toyota, as well as the chain itself, it is better to contact an authorized service center. If you want to know how such repairs are carried out in order to supervise the master or expand your own horizons, read our material.
What you need to know about replacing the chain tensioner in a Toyota
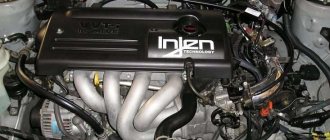
Toyota cars equipped with a 1ZZ engine are preferred by many motorists around the world to other brands. This is explained by the fact that such an engine is equipped with a timing chain (gas distribution mechanism), and not a belt. That is why the car is considered more reliable.
It is worth noting that replacing the Toyota Corolla chain tensioner is done much less frequently when compared with the exact same engine with a timing belt. In addition, a car with a power of 140 hp. With. consumes less fuel compared to cars equipped with 7A, 4S engines with a timing belt. And another advantage of the engine with a small displacement of only 1.8 liters is that it is more powerful than belt-driven engines.
The timing belt is necessary for the operation of not only the engine, but also other vehicle systems. This mechanism supplies fuel to the cylinders and then removes combustion products.
The timing belt is driven by a chain or belt that is connected by 2 gears. A chain or belt drive plays the role of a transmission mechanism during engine operation. If the gas distribution mechanism fails, the internal combustion engine will also not be able to function.
Many motorists are interested in when to replace the chain tensioner in a Toyota. If extraneous sounds appear under the hood while driving, then replacement cannot be avoided. Moreover, this must be done in advance, as soon as the first signs of a malfunction arise. Don't delay replacing and wait until the chain breaks.
Spare parts
To replace an element, you will need a repair kit, which will include all the necessary spare parts and consumables. There is a large selection of manufacturers on the market whose kits are suitable for the 1ZZ motor. The generator drive belt (accessories) may not be included.
Repair kit contents:
- the timing chain itself;
- automatic hydraulic tensioner;
- sedative;
- tensioner shoe;
- camshaft gear (exhaust valves);
- variable valve timing (VVT) gear;
- crankshaft gear;
- crankshaft oil seal.
How to replace the chain tensioner in Toyota
When there are oil leaks and the chain starts to ring, it means replacing the tensioner in Toyota is mandatory.
What tools and consumables will be needed for replacement:
- tensioner No. 13540-0D010 for Toyota;
- RTV silicone based sealant;
- wrenches or sockets with a ratchet and an extension for 10 and 22.
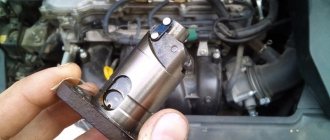
The procedure for replacing the chain tensioner in a Toyota is as follows: retract the rod on the new part. It must be locked in a compressed position; to do this, use a hook. On the 1.8 liter Toyota 1ZZ-FE engine, the mechanism is located on the passenger side at the rear of the cylinder block.
When unscrewing the second fastening bolt, you must be careful - the tensioner in the Toyota is spring-loaded and can jump out. Use a flathead screwdriver to lightly pry the mechanism, this will make it easier to remove.
Oil or silicone-based sealant should be applied to the rubber sealing ring in Toyota. It is important that the lubricant does not come into direct contact with the tensioner itself. Apply sealant in small quantities. Otherwise, the compound will squeeze out when you start tightening the bolts.
When replacing the chain tensioner in a Toyota, make sure that it is installed correctly. How to do it? The hook should be positioned at the top, then the fastening bolts should be tightened to the required force, approximately 20 Nm.
We recommend
“Toyota transmission oil for responsible car owners of all brands” More details
Next, take a 22mm key or socket and turn the generator pulley. This way you can turn the motor counterclockwise. This is necessary to release the locking hook and bring the rod into working condition. If you do everything correctly, you will hear a click.
Assembly
We install the VVT sprocket and exhaust camshaft in place. When tightening the bolts, be sure to hold the camshafts with a wrench.
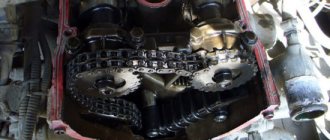
Replace the crankshaft sprocket and chain guide. On the new chain we find two marks located approximately six links from each other. These are the camshaft marks. We install a new chain, while aligning the camshaft marks and the crankshaft mark.
The chain run from the exhaust camshaft sprocket, through the VVT sprocket and to the crankshaft sprocket must be tensioned. In this case, the marks on the camshaft sprockets must coincide. We install the tensioner shoe. On the block at the top there is a special groove for it, which allows it to “fall out”.
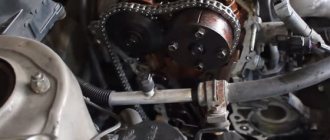
The assembled structure looks like this.
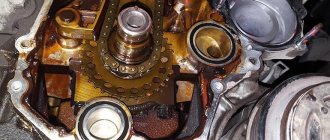
We put the timing cover in place, having previously lubricated the contacting surfaces with sealants. We install a new tensioner. The pin is facing up. Tighten the two nuts.
To bring the tensioner into working condition, you need to: carefully press the tensioner shoe up with a wide screwdriver until it stops, so as not to damage it, and release it. If the tensioner is discharged, then with further pressure the free play will be very small. To be sure, you can bend a small wire hook and carefully move the pin; if it moves, then everything is in order. Well, or use a flexible camera.
Then we fill the timing chain and sprockets with new engine oil. We turn the crankshaft two turns and check the marks on the crankshaft pulley and between the camshaft sprockets. The marks on the chain will go away, we don’t pay attention to them, this is due to the fact that the number of teeth on the crankshaft sprocket is several times less than the number of timing chain links. If all the marks are in place, we proceed to final assembly. We put all the parts in place in the reverse order of removal.
We start the car. We forget about this procedure for another 160,000 km.
How to understand that it is not the chain tensioner in a Toyota that needs to be replaced, but the chain itself
If a Toyota engine is equipped with a timing chain, it means that it transmits rotational force from the crankshaft to the camshaft located in the cylinder head (overhead valve type engines).
All chains in Toyota are divided into two types: gear and roller, and the latter are practically not used. On most machines with a gas distribution mechanism, gear systems are installed if a chain drive is used.
Toothed units ensure smooth operation, have increased reliability, and make virtually no noise during operation. In operation, gear systems are similar to belt drives. It is impossible to accurately answer the question of which is better. If you start discussing this topic, you will get a full-fledged article.
Hydraulic tensioners, the working fluid of which is engine oil, tension the chain in Toyota. Oil flows through the engine lubrication system. The number of tensioners depends on the number of camshafts. There may be one, two or three.
The timing chain system includes the chain itself, the tensioner, and the lubrication system. Over time, due to wear of parts, the mechanism begins to work worse: the tensioner or the chain itself in the Toyota needs to be replaced.
How to understand that the timing belt has become unusable? To do this, listen to how the motor works. We heard metallic sounds and a crackling noise at high speeds, which means that the gas distribution system has failed.
Press the accelerator pedal sharply, you will immediately understand that the circuit is faulty. In this case, the ignition will not work properly, and when the speed increases, you can see black exhaust gases coming out of the exhaust pipe. This indicates that the fuel mixture is over-rich.
To identify wear on the chain drive, you need to inspect the motor. We remove the valve cover, even a beginner can handle this, the main thing is to take a suitable key. After 10 bolts are unscrewed, remove the cover. Now you can easily reach the chain. Carry out a visual inspection of it. If it is in working condition, it will not sag at the top.
You should also inspect the tensioner in the Toyota. It should be in such a position that the chain is well tensioned. Have you noticed that it is sagging? This means it needs to be replaced. Many motorists who do not have the opportunity to replace the chain do the following. They install bolts on the tensioner or even install a second tensioner. This manipulation is considered a last resort and can only be performed in emergency cases. After all, the effect will be temporary, and it will be more difficult to repair the mechanism later.
How long a chain will last depends on the material from which it is made. It must be high quality. You should also pay attention to the degree of effectiveness of the heat treatment of the material.
Timing sprockets must also meet the above requirements, because they participate in the operation of the mechanism. The lubrication system must not be allowed to malfunction, as it affects the functioning of the unit. Only high-quality lubricant should be poured into the engine and changed on time.
We recommend
“Changing the oil in a 6-speed automatic transmission: main stages” More details
If the chain drive is made of durable material and the required tension is set during maintenance, and the oil is changed regularly, the mechanism will properly serve as long as the engine.
On the contrary, a stretched chain will quickly fail. To avoid the need to replace it, you should buy a high-quality part, set the tension correctly, and use a suitable lubricant.
Replaced the timing chain and... the car came to life
I am the owner of a regular family car Toyota Corolla Fielder (2001 onwards)
. More than two years have passed since the purchase of the car. Before it fell into my hands, an adult woman rode on it (carrying seedlings to the dacha).
After the first technical inspection, which was carried out immediately after purchasing the car, the mechanic advised to replace the timing chain in the near future.
From his words it became clear that due to the stretched chain:
- the engine is noisy;
- the valve timing is off;
- fuel consumption increases;
- engine power and throttle response are lost.
But, as the mechanic said: “Japanese cars are very reliable, you’ll definitely be driving for another six months.”
.
At the end of the second year of operation, I covered 45,000 km. mileage According to drivers, this is not a long mileage for a big city. But with each trip, the feeling became more and more that the car could not move.
You will think several times before overtaking or getting ahead: the dynamics have completely disappeared; weak traction; the car drove like a sleepy fly... In addition, when the engine was running, a sound similar to the operation of a diesel engine became more and more apparent.
I found out the reason for this behavior of the car when I stopped at a service station. The specialist performed diagnostics and issued a verdict: the timing chain needs to be replaced.
I decided that after the New Year holidays I would definitely start repairing the engine. While long trips are not foreseen, this means you can travel like a “vegetable truck”.
For repairs it was supposed to buy spare parts. The list was provided to me by a mechanic.
Usually, to get original spare parts for a car, I used the exist service. There was enough time to choose and buy, so I spent it choosing a convenient store: not far from home; reasonable prices; Possibility of payment by VISA card.
In the end, I settled on the SLONRU online store.
List of spare parts:
- 13506-21020 TOYOTA COROLLA timing chain, 1 pc., 2208 RUR;
- 13540-21020 Timing chain tensioner TOYOTA 1NZ-FE, 1 pc., 668 RUR;
- 13559-21010 Chain tensioner shoe TOYOTA 1NZ-FE, 1 pc., 572 RUR;
- 13561-21010 Timing chain stabilizer TOYOTA 1NZ-FE, 1 piece, 818 RUR;
- 1121321011SN Valve cover gasket (Sanwa), 1 pc., 268 rub.
I gave the prices at which I got the spare parts, but the store didn’t charge anything for delivery. The only “non-original” spare part is the valve cover gasket. I couldn’t find the original one, and the price was disappointing.
The mechanic said that the non-original gasket does not matter much, because... When mating, sealant will be used. I was satisfied with this answer and on the day when I picked up the spare parts from the store, I took the car for repairs (Shop "Shosse M52"). Engine repair took almost two full days and emptied my wallet by 4,500 rubles.
Additionally I had to buy:
- Front crankshaft oil seal
- Two o-rings (for oil pump)
And what was the result of the repair? I didn’t write this note right away (when I picked up the car), I decided to check the sensations over a few days.
Silence in the cabin
.
This is the first thing immediately about, the engine was running quietly.
Before leaving the service station, I warmed up the engine. At the same time, I pressed the accelerator pedal several times, watching how quickly and smoothly the tachometer needle reacted. Things got interesting next...
Playfully
! Driving onto a multi-lane busy highway, I felt a traction that I hadn’t felt even since I bought the car.
The car quickly and easily picked up the desired speed, merging with the flow. Without hiding the delight and pleasure of driving, I tried to perform several maneuvers of advancing and changing lanes. At traffic lights I tried to be the first in the lane to get a feel for the start...
If it weren't for the studded Bridgestone Ice Cruiser 5000, it would probably have struck sparks from the asphalt.
It seems to me that the car was born again. A real delight!
Thanks to the mechanics, thanks to the Toyota engineers.
How to replace the tensioner and chain in a Toyota Corolla
To replace the chain tensioner in a Toyota Corolla, you will need the following consumables:
- timing chain;
- tensioner;
- shoe;
- drive belt.
If you are not confident in your abilities, you should not do the replacement yourself. At first glance, the work seems easy. However, if you make a mistake, it will not be easy to correct the situation: the motor will fail. Be prepared for the fact that you will spend a lot of time and effort replacing the tensioner in a Toyota. You should be extremely careful while working.
To replace the tensioner in a Toyota, the chain will have to be removed. You need to proceed as follows:
- We remove the protective cover of the motor, as well as the ignition coil of the spark plugs.
- Remove the valve cover. There is a reusable gasket under it; it must be left and installed back upon completion of the work.
- The machine must be fixed; for this we use a jack or a lift. We dismantle the front right wheel, as well as the protection (fender liner), it is located in the wheel arch.
- You now have access to the pulley on the crankshaft. We jack up the engine and remove the support to reach the chain.
- After the tension is loosened, remove the chain.
- To remove the chain, we pull out the lower sprocket; it easily moves along the crankshaft to a distance of 1–1.2 cm. Then we remove the chain.
- We stop the crankshaft pulley by wedging the flywheel. When the bolt on the pulley is unscrewed, remove it from the key.
- We dismantle the generator and power steering pump. Then unscrew the side cover.
- After the coolant has been drained, remove the tensioner and shoe.
- Using compressed air, we remove dirt and install a new tensioner and chain in the Toyota.
How to install a tensioner in a Toyota:
- We place marks on the camshaft pulleys, as well as on the crankshaft. This must be done for the motor to work properly.
- We begin to install the chain, first from above, then from below.
- Set the desired tension. We insert the tensioner using the hook, install it, and tighten the mounting bolts. Then you can remove the hook. If everything is done correctly, the rod will be in the desired position and the chain tension will be normal.
- Then install the side cover and screw it on.
- We perform assembly in reverse order.
The resource of the Toyota gas distribution chain is quite large. However, you should regularly check its serviceability. If this part wears out, the timing belt will not be able to function properly, and the engine shoe will fail, just like the damper. In order not to spend a large sum on restoring the mechanism, it is necessary to periodically check the tension. Of course, the chain breaks infrequently, but such a breakdown cannot be excluded with 100% probability.
Valve Timing Setting Procedures
- Make sure the marks on the crankshaft pulley are aligned with the TDC marks on the timing chain cover (1)
- Make sure that the timing marks of the camshaft sprockets are aligned (2) and (3) or (4): If not, rotate the crankshaft one revolution.
- Check the alignment of the painted or marked chain link with the crankshaft sprocket timing mark (5).
- Remove the chain tensioner, tensioner shoe and chain guide.
- Check the chain for wear:
- Stretch the chain.
- Replace the chain if the link length exceeds 115.4 mm (6).
- Check the sprockets for wear:
- Place the timing chain onto the crankshaft sprocket.
- Replace the sprocket if the diameter “X” at the chain rollers is less than 51.6 mm (7)
- Place the timing chain onto the camshaft sprocket.
- Replace the sprocket if the diameter “X” at the chain rollers is less than 97.3 mm (7).
- Check the chain guides for wear: 1.0 mm maximum.
- Make sure the crankshaft sprocket keyway is in the 12 o'clock position (8).
- Install the timing chain by aligning the colored or marked links (2), (3) or (4) and (5).
- Cock the chain tensioner:
- Press the ratchet (9) to release the tensioner rod (10).
- Push the rod into the tensioner body and lock it with the lock (11).
- Install the tensioner.
- Turn the crankshaft slightly counterclockwise.
- Remove the tensioner clamp (11).
Replacing the chain tensioner in Toyota through the eyes and hands of car enthusiasts
- Replacing the tensioner is not a panacea “I wondered how the chain should behave after replacing the tensioner? The other day I made a replacement on my Toyota, and strange sounds appeared when I pressed the accelerator pedal. Then the noise disappeared, but I'm wondering if everything is okay? A friend says there will be problems with the timing belt. After all, if the chain is stretched, the new tensioner will quickly fail.”
- Changing the tensioner yourself is scary
“I picked up a tensioner for Toyota today.” But I'm afraid to replace it myself. I've read reviews from car owners who change them themselves. Often, after such intervention, even more problems appear. I studied the instructions on how to make the replacement, everything is shown there, how to and how not to change, but I didn’t see the difference.” - There's nothing scary
Replacing the tensioner in a Toyota with your own hands is easy; even a beginner can do it. Personally, I installed the tensioner on the hook and applied sealant to the gasket. I installed the part, tightened the bolts, took a 19mm socket and a ratchet. Then he rotated the crankshaft in the opposite direction to rotation. I heard a click - it was the tensioner that jumped out. Then he scrolled again, but this time in the direction of rotation. Everything is perfectly audible and understandable.”We recommend
“Replacing an automatic transmission in a Toyota Corolla: at a service center or on your own” Read more
- I replaced it, but nothing is clear
“I encountered the following problem when replacing the tensioner in a Toyota: I turn the crankshaft clockwise, but I don’t know how many turns I need to make. I clicked twice in 1 revolution; when I started the engine, there were 2-3 more clicks. That is, when the crankshaft rotates clockwise, it tensions the chain when starting the engine?When I started the car another time, nothing clicked. I turned the crankshaft - nothing. There are no noises, everything seems to be fine.”
Procedure for replacing a chain on a 1ZZ engine
The 1ZZ engine has become increasingly common lately. Many cars with just such a power plant are imported into the country every day. However, not everyone knows how to repair or maintain this unit. The question of the process of replacing the timing chain is relevant.
The procedure for replacing a chain on a 1ZZ engine is quite simple. To do this, you need to purchase a new timing kit, cylinder head gasket and sealant. You must first drain the coolant from the entire system and disconnect the minus terminal of the battery.
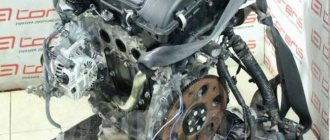
The timing belt replacement procedure begins with removing the plastic and ignition modules. Then it is necessary to dismantle the cylinder head cover with gasket. Next the generator is removed. After this, you need to jack up the engine a little to remove the support. It is also necessary to remove the VVT valve.
Next, you should set the position to TDC and remove the front wheel on the right side. The most important thing during disassembly is that the marks of the HF pulley coincide with the zero mark of the timing chain cover. In turn, the marks of the PB asterisks must be installed opposite each other. If this is not the case, then the HF should be turned once.
The chain link should be marked opposite TDC on the RV sprocket; for the VVT sprocket, the chain is marked along the existing long mark. After setting the marks, the belt of additional components and the tension roller are removed.
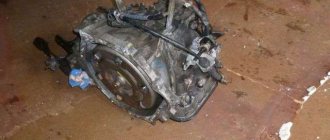
The spar will interfere with removing the tension roller, so it will be necessary to jack up the engine. One jack is placed under the front of the engine, and the second under the gearbox support. You need to remove both the tensioner and its holding pin. Then the engine mount bracket and pump are removed. When removing the pump, you should mark 2 places where the short bolts are screwed in. Next, you should tighten the HF and remove the pulley from it.
Next, the HF position sensor and the power steering pump are dismantled. Then remove the chain tensioner, which is installed in the upper left part. After dismantling the chain tensioner, the timing cover, the rotor of the HF position sensor and the chain guides are removed. Opposite the mark on the HF sprocket you need to put a mark on the chain.
Next, the old chain is removed and compared with the new one from the kit. The manufacturer indicates the marks on the new chain in advance. After this, you need to dismantle the KV, RV and VVT sprockets. The 5-point bolts must not be touched when dismantling the sprockets. When installing the chain, you must strictly observe the position of the marks.
Apply sealant to the front cover according to the picture.
The remaining assembly work is carried out strictly in the reverse order.
Source