When to change the timing chain?
A timing chain is much better than a belt and lasts much longer, but sometimes you have to change it too. This is due to normal wear and tear as the chain can stretch.
When it comes to Toyota Corolla, replacing the timing chain is resorted to when the element can no longer be tightened. If the chain is stretched, it can no longer be restored by building up links. If the part is stretched, the vehicle's gas distribution will be disrupted and the engine will not operate normally. In addition, a stretched chain will lead to rapid wear of the engine shoe, and can also damage the damper, which is quite expensive to change every month.
You will know that the timing chain has stretched when the engine becomes noisy. It needs to be changed urgently, because if it breaks, the car will suffer serious damage.
Replacing the Toyota Corolla timing belt (Toyota Corolla)
The timing chain must be replaced once every 200,000 km, and the timing belt must be replaced once every 150,000 km, according to Toyota Motor Corp. regulations.
1 standard/hour - 1000 rub. Prices from 01/01/2020
| Types of jobs | Working hour | Cost, rub. | Description | ||
| Toyota Corolla timing chain replacement | from 5 | from 5 000 | The cost of work includes replacement of: timing chain, tensioner roller, drive belt, camshaft gears, hydraulic tensioner, damper chain, valve cover gaskets | ||
| Toyota Corolla timing belt replacement (1CDFTV) | 4.5 | 4 500 | The cost of work includes - replacement of: timing belt tensioner roller drive belt tensioner | ||
| Additional work and spare parts when replacing the timing belt are carried out upon inspection | |||||
| Replacing the pump | 1.5 | 1 500 | |||
| Drive belt tensioner roller | 1.5 | 1 500 | |||
| Replacing the crankshaft oil seal | 0.5 | 500 | |||
| Replacing the camshaft oil seal | 0.5 | 500 | |||
The cost of replacing the Toyota Corolla timing belt may vary depending on engine size, transmission and configuration.
Post-warranty car service.
Services
Contacts
- Address Moscow, Proektiruemy pr. No. 134, bld. 1 Tel.: +7 (495) 133-9-007 WhatsApp: +7 926 136-9-007 email [email protected]
All information on the site is advisory (informative) in nature and is not a guide to action. And under no circumstances is it a public offer as defined by the provisions of Article 437 of the Civil Code of the Russian Federation. All information on the site is current as of the date of publication. Reproduction, copying, transmission of the content of this website without the prior written consent of the copyright holder is prohibited and punishable by law.
How to replace the timing chain on a Toyota Corolla?
Toyota Corolla is not the most fastidious car, but the timing belt may require repairs. This procedure can be done in your garage. It is not necessary to disassemble the front part of the engine to replace the timing chain.
Method No. 1
If you don't want to take risks and waste a lot of time doing pointless work, use the following method: remove the front cover and crankshaft pulley. This will allow you to get to the desired element without riveting its links. The Corolla can suffer serious damage if the chain opens on its own due to careless operation, and the method of accessing it through the crankshaft will protect you from this risk.
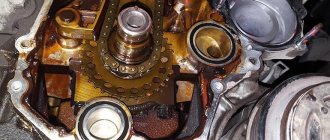
GR mechanism - schematically
To replace, you will need to carefully open the links of the stretched chain, then the broken part is connected to the new one and pulled forward so that the new part takes the place of the old one, holding all the sprockets. The part is pulled out to the place where the disconnected link is located, then you need to rivet the links of the new chain. This method has one drawback, but it is quite significant. By using this method of repairing the timing belt of a Toyota Corolla, you will significantly reduce the life of the new timing chain. Another problem could be the lack of a good connection. Such a replacement should be done only as a last resort, if you have no other choice.
Method No. 2
There is another, much more reliable method of replacing this element, but it requires more time and skill than the previous one.
To do this, you will first have to remove the battery terminals, always disconnecting the positive one, remove the air filter so that it does not interfere, and the valve covers for the same reason. Then you need to align the engine according to the marks made by the manufacturer. The mark on the camshaft sprocket should coincide with the mark located in the center of its housing. The bottom mark should match the mark on the crankshaft pulley. The marks should align on the engine cover, which is located in front.
The ratchet holding the crankshaft pulley is moved to the side, then the engine is cranked with a special flat-based wrench. With the engine in the desired position, remove the wires from the ignition coil and turn on the starter. The ratchet will come off either the first time or after several attempts.
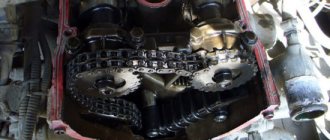
Gas distribution mechanism
After this, you need to remove the crankshaft pulley and unscrew the front engine cover. Loosen the tensioner bolts and remove it. You will need to check the shoe and remove the auxiliary shaft sprocket. Only after this will it be possible to remove the part itself. This method will take a lot of time, but it is the safest for the engine and you will not damage the new chain.
Before assembly, check that the sprockets are not damaged. This is quite simple to do: put a chain on them. If there is no play, then the sprockets are working. Most often you have to change them too. After installing the chain, you need to assemble everything in the reverse order. Do not immediately tighten the sprocket bolts. First you need to make sure that the marks on the engine and the cover match the ones we used to set everything at the beginning. If yes, then feel free to tighten it, if not, bring the marks into line.
Repairing a timing belt on a Toyota Corolla is not a simple task, and if you are not confident in your abilities, it is better to contact specialists.
Read further: Replacing the timing belt on a Toyota Corolla
Replacing the timing belt in Toyota Corolla
The timing belt is one of the most important engine components. The service life of the power unit depends on the timeliness of its replacement. If you have special skills and tools, and, most importantly, if you strictly follow the sequence, replacing the Toyota Corolla timing belt is a simple operation. You can do it yourself in a garage.
What to consider when replacing the timing belt
The 4A FE engine, on the basis of which the 3ZZ-FE was built with the Toyota VVT-i brand system, is equipped with a belt drive. The frequency of replacing the Toyota Corolla timing belt is 100 thousand kilometers.
There are some factors to consider. According to them, an adjustment is made to reduce the service life of the belt. The production of cars on which the 4A FE was installed ceased in 1998. Therefore, most engines have a fairly high mileage. And timing belts manufactured under license are always used less than the original ones.
Replacing the Toyota Corolla timing belt, if necessary, can be combined with such related work as:
- replacing the front crankshaft oil seal;
- replacing spark plug well seals;
- replacing the coolant pump.
In later generations, replacing the timing chain on a Toyota Corolla is always done at higher mileage. The need for this procedure is determined by characteristic features. For example, by the noise of the chain that occurs while the motor is running. Sometimes they resort to defect detection of the main parts - chains, stars.
Work order
Before replacing the timing belt on a Toyota Corolla, purchase the necessary spare parts. Give preference to original parts recommended by the manufacturer. Replacement will require a new timing belt and tensioner pulley.
How to tension a timing chain
To pre-tension the chain, it is necessary to turn the power unit shaft by the pulley counterclockwise, ensuring the disconnection of the regulator plunger and the latch.
When the movable rod is released, a metallic click will be heard.
Some owners hold the shoe in place with a wire hook and remove the retaining hook with a long screwdriver, then turn the shaft clockwise until the plunger reaches the required length.
The process of removing and installing the timing chain
In order to replace the chain on a Toyota Corolla, you need to purchase the following components:
- the timing chain itself;
- hydraulic chain tensioner;
- shoe;
- drive belt.
Do not rush to contact specialists at a service station to replace the chain. You will simply pay money for work that you can do yourself. Although this is a labor-intensive process that requires a lot of attention, it is still within the power of a car enthusiast.
Timing Chain Removal Guide
- Remove the engine protective cover and spark plug ignition coil.
Remove the valve cover. Here I would like to note that the gasket, which is located under the valve cover, is reusable and should not be thrown away, as it can be used again.
Having secured the car in a stationary state using a jack or other lifting mechanisms, we remove the front right wheel and the protection (fender liner), which is located in the wheel arch. After this, we gain access to the pulley on the crankshaft. Having gained access to the pulley, jack up the engine and remove the support to gain access to the belt.
Release the belt tension and carefully remove it. (The belt in a Toyota Corolla performs many functions. It transmits torque to the generator, power steering, and air conditioning. After removing the belt, we lock the crankshaft pulley by jamming the flywheel. We unscrew the bolt on the crankshaft pulley and remove it from the key. Having completed these operations, we remove the generator and power steering pump to gain access to the side cover and unscrew it.
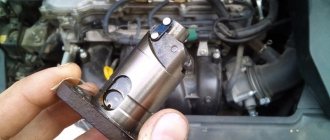
Drain the antifreeze, remove the hydraulic tensioner and shoe.
Timing diagram
In order to remove the chain, we need to pull out the lower sprocket, it moves without problems along the crankshaft at a distance of 10-12 mm, then we remove the chain itself. After removing the chain, you need to thoroughly clean everything from contamination using compressed air and begin installing a new one chains.
Timing Chain Installation Guide
- At the beginning of assembly, we place marks on the camshaft pulleys and the crankshaft. This is very important for the normal operation of the car.
- Now let's start installing the chain. We install the chain first from above and then from below.
Before replacing the chain on a Toyota Corolla is completed, you should tension it; to do this, cock the chain tensioner using a hook and put it in place, tightening the mounting bolts. Only after this we remove the hook. Thanks to this procedure, the rod takes its place and the chain is tensioned.
After installing the chain, install the side cover and tighten it.
All subsequent assembly is carried out exactly the opposite.
Signs of worn parts
There are several symptoms that determine whether the chain needs to be replaced:
- It rattles when the engine is running.
- It scrapes against the sides of the lid.
- It looks like it's sagging a lot.
The chain is much more reliable than the timing belt and lasts many times longer, but every coin has another side: changing it is much more difficult and expensive. For those who want to replace it themselves, detailed instructions are provided below.
This is interesting: Replacing the battery in a Toyota Camry v50 key - let's look at it in detail