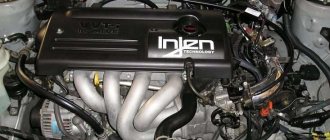
To drive camshafts in Toyota digging engines, a chain with automatic tension adjustment is used. On Toyota Corolla cars, the timing chain is replaced when signs of elongation appear that are not compensated by stops. The owner can carry out the repairs himself in a garage or contact a service center.
The timing chain is replaced when errors appear in the memory of the control unit.
Signs of a worn timing chain
The main symptoms of timing belt stretching are:
- the appearance of a uniform rustling sound coming from under the drive cover (regardless of the engine temperature);
- detonation and increased fuel consumption (provided that gasoline with the correct octane number is used);
- the appearance of errors in the memory of the control unit, indicating a violation of the valve timing;
- sagging of the upper branch of the chain (discovered when removing the front cover);
- metallic knocking of the chain on the surface of the covers, which disappears as the power plant warms up.
How to determine if a chain drive is faulty
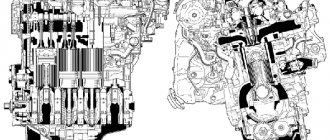
Unlike the timing belt drive, which is located outside the engine, the chain with gears is located inside the power unit and is completely hidden from view. On the one hand, this is a plus: the mechanism makes less noise and is generously lubricated with engine oil, which increases its service life. On the other hand, without removing the valve cover it is impossible to visually assess the technical condition of the unit.
The first sign of a chain drive problem is a rumbling sound coming from under the cover when the power unit is operating. The rumble of a weakened chain cannot be confused with anything; it is heard from the side where the gas distribution mechanism is located.
Loosening with a gap of up to 1 cm allows the chain to jump when starting the engine
Having heard such a sound, the car owner should check the condition of the drive so as not to encounter big troubles associated with engine repair. There are 2 ways: immediately go for diagnostics to the nearest car service center, or remove the valve cover yourself and make sure that the section of the chain near the camshaft gear is loose. Worsening tension is caused by the following reasons:
If an old-style mechanical tensioning device is installed in the car engine, then when the described symptoms appear, the first action is to tighten the chain with its help. To do this, simply loosen the outer nut holding the plunger spring and manually turn the crankshaft 1-2 turns. After which the nut is tightened again.
Old VAZ 2101–07 engines have a mechanical tensioner with a nut
Modern automatic hydraulic tensioners are not designed for manual adjustment and must be replaced if they break. You can verify that the element has failed only by removing it or disassembling the entire timing belt assembly. The same applies to the damper - on most cars, its wear can only be assessed when the mechanism is disassembled.
Ignoring the rumbling noise made by the chain will sooner or later lead to motor failure. The severity of the consequences depends only on your luck.
Replacement frequency
The manufacturer does not indicate the service life of the drive, recommending maintenance if extraneous sounds appear during engine operation.
According to reviews from car owners, parts wear out after a mileage of 100 to 500 thousand km, regardless of the displacement of the power plant and the type of transmission.
The resource depends on operating conditions, the type of engine oil, climatic conditions and the quality of components.
The frequency of replacement depends on operating conditions.
Technical characteristics 4ZZ-FE - main data
The motor was produced as a budget alternative to larger units. The creators planned lower fuel consumption and improved performance for city travel. But not everything turned out as smoothly as we wanted. It’s better not to go on the highway with this unit at all, and even in the city, starting from traffic lights turns out to be very sluggish.
The main characteristics of the engine are as follows:
| Working volume | 1.4 l |
| Engine power | 97 hp at 6000 rpm |
| Torque | 130 N*m at 4400 rpm |
| Cylinder block | aluminum |
| Block head | aluminum |
| Number of cylinders | 4 |
| Number of valves | 16 |
| Cylinder diameter | 79 mm |
| Piston stroke | 71.3 mm |
| Fuel supply type | injector, MPI |
| Fuel type | gasoline 95, 98 |
| Fuel consumption: | |
| — urban cycle | 8.6 l / 100 km |
| - suburban cycle | 5.7 l / 100 km |
| Timing system drive | chain |
Even though the torque is available quite early, this does not give the motor any advantages in operation. 97 horses would be enough in this configuration for the Yaris, but not for heavier cars.
By the way, this unit was installed on Toyota Corolla 2000-2007, Toyota Auris 2006-2008. On the Corolla, the unit included three versions: E110, E120, E150. It is difficult to explain why Toyota never made a sensible replacement for this power plant earlier.
Required replacement parts
To change the gas distribution mechanism drive, you need:
- camshaft and oil pump chains;
- hydraulic tension module for driving camshafts;
- a set of dampers and tensioners;
- O-rings for the cover and camshaft adjusters;
- timing and pump drive gears;
- sealant for sealing the joint between the cover and the crankcase;
- engine oil and filter.
Additional components may be required to complete the work; the list depends on the condition of the engine. For example, some owners install a new crankshaft front seal, change the spark plug well O-rings, or replace the coolant pump gasket.
To change the drive, camshaft chains are needed.
Step by step guide
For servicing, the car must be driven into a garage box equipped with an inspection hole, or placed on a mechanical lift. To carry out the work, you will need a set of wrenches and sockets, a torque wrench, a jack and safety stops (for repairs above the inspection hole). It is necessary to prepare a clean rag and brush to remove dirt from the engine covers and crankcase.
You will also need a stationery or construction knife to remove a layer of old sealant.
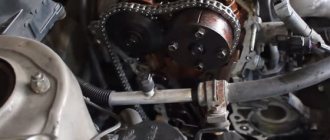
Removing the timing chain
General algorithm of actions:
The process of removing the timing chain.Place the car on a jack or lift, and then remove the front right wheel. If the car is installed on the floor, a support must be installed under the threshold to prevent the body from sliding off the jack.
- Open the hood and disconnect the battery from the on-board network.
- Unscrew the screws and remove the standard or additional engine sump protection.
- Unscrew the oil drain plug and place a container under the hole to collect waste.
- Turn off the tap and drain the coolant from the radiator and jacket (antifreeze can be reused as long as the characteristics are maintained).
- Sequentially unfasten the wire connectors connected to the ignition coils, variable valve timing system valves and crankshaft position and pressure sensors in the lubrication system.
- Remove the coils from the wells and unscrew the spark plugs, and then unscrew the bolts securing the valve cover to the head.
- Place a support under the engine pan (for example, a jack or stand) with a wooden block to prevent damage to the part.
- Remove the cooling system expansion tank and unscrew the bolts securing the power unit support to the body.
- Rotate the power unit shaft manually by the pulley until top dead center is reached in cylinder 1 (check marks are provided on the pulley and cover).
- Unscrew the pulley nut through the wheel well (using a pneumatic or electric tool, for example), and then manually remove the pulley from the shaft nose.
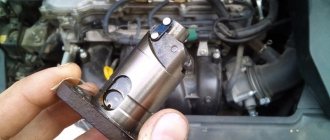
- Unscrew the 2 nuts securing the hydraulic tensioner, and then remove the bolts on the oil filter housing.
- Remove the generator with the tension mechanism, which will allow you to remove the coolant circulation hoses from the thermostat housing.
- Unscrew the bolts securing the centrifugal antifreeze pump, and then unscrew the 19 bolts located around the perimeter of the engine front shield. Remove dirt with brushes or dry rags.
- Remove the shoe and chain guide bolts, and then turn the intake camshaft counterclockwise using a spanner to remove chain tension between the gears.
- Remove the chain and then return the camshaft to its original position.
- Remove the upper part of the damper.
- Screw in the pulley mounting bolt and rotate the shaft 90° clockwise, aligning the hole in the oil pump drive gear with the slot made on the pump body.
- Unscrew the bolt from the shaft toe, insert a 3 mm diameter steel wire fixing pin into the hole, and then remove the spring and tensioner of the pump chain drive.
- Pull the timing and oil pump drive gears off the crankshaft nose.
- Remove the gear from the lubrication pump drive shaft along with the chain.
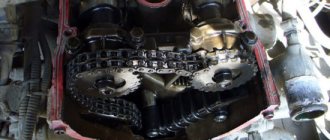
Timing chain installation
For assembly you need:
Installing a new timing chain.Align the shaft to the top dead center position in cylinder 1 (the keyway is directed vertically upward), and then align the oil pump axis with the cutout opposite the boss in the block.
- Put on the chain with new gears (it is acceptable to reuse the gear on the pump) and align the centers of the yellow enamel links with the dot marks on the gears.
- Secure the tensioner housing with a bolt (torque 10 N*m), and then rotate the crankshaft 90° and insert the locking wire pin.
- Tighten the nut on the pump (torque 28 N*m) and return the crankshaft to the top dead center position in cylinder 1.
- Place the gear on the shaft toe and secure the side stabilizer with 2 bolts (torque 21 N*m).
- Mount the upper part of the chain stabilizer between the camshafts (torque 10 N*m), after which it is necessary to lay the chain. Align the center of the orange link with the point on the exhaust valve shaft and pass the chain through the guides without sliding the chain onto the crankshaft gear. Rotate the intake valve drive shaft counterclockwise and place the chain on the gear, aligning the orange link with the dot mark.
- Rotate the intake valve shaft clockwise, ensuring the tension of the upper branch of the chain.
- Place the bottom of the chain onto the crankshaft gear, aligning the center of the orange link with the dot mark on the surface of the gear.
- Carry out an additional visual check of the correct installation using the marks, and then proceed to install the tensioner.
Installing the chain tensioner assembly
Algorithm of actions:
- Insert the tensioner shoe and then install new O-rings on the cylinder block and metal end cap.
- Clean the mating surfaces from traces of sealant and wipe with solvent. If necessary, install a new front shaft seal (for example, if engine oil is worn or leaking).
- Apply a layer of sealant to the end of the block (the amount of material depends on the differences in surface height).
- Replace the cover and tighten the bolts in accordance with the diagram given in the vehicle documentation (to ensure uniform contact). The tightening torque ranges from 10 to 43 N*m.
- Mount the coolant pump with a new gasket and put a pulley on the toe of the engine shaft, and then tighten the bolt to a torque of 190 N*m.
- Install the tension mechanism in its original place, first installing a new gasket. To reduce the risk of oil leakage, the fasteners must be tightened with a force of 10 N*m.
Before installing a new tensioner, it must be filled with oil.
Army and weapons
Exactly a year ago, on the November holidays, I set out to change the timing chain. Subsequently, I wrote a report in my BZ about replacing the chain. A lot of time has passed since that moment, the post was sometimes read, less often commented on, but literally a couple of months ago, dozens of people a day began to visit it. To date, the report has already received more than 4,000 views. Why did it happen? Probably, the age and mileage of our cars is approaching the scheduled replacement of the chain. Apparently everything is supported by experience before the upcoming repair