Replacing the Toyota Corolla timing belt, how to change the chain in the engine?
Repairing and replacing a Toyota Corolla timing belt or replacing a chain in a Toyota Corolla engine is a rather labor-intensive process and requires the skills of a real car mechanic. The only consolation is that the timing chain on the Toyota Corolla requires virtually no maintenance.
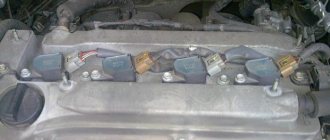
But if the mileage on the car is quite high, and the noise under the hood increases, then this operation cannot be avoided.
But if you still decide to carry out the repair yourself, then carefully read the following instructions. Without this, it will not be possible to replace the chain, since the operation is quite complex, painstaking and very long.
The ideal option is to carry out such a replacement on a removed motor.
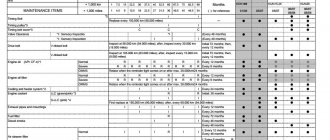
The timing chain components are shown in the schematic diagram just below.
To get to the Toyota Corolla timing belt, you will need to perform the following operations:
1. Remove the right engine mount cushion 2. Remove the ignition coils 3. Remove the cylinder head cover 4. Remove the poly V-belt tensioner assembly
5. Remove the right engine mount bracket
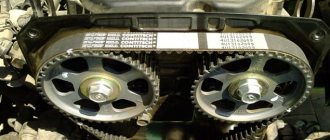
An important point is to install the piston of the first cylinder at TDC of the compression stroke, for which you need to perform the following operations - Rotate the crankshaft pulley and align the mark on it with the synchronizing mark “0” on the timing chain drive cover. Make sure that the marks (dots) on the camshaft drive gears are located opposite each other, as shown in the following diagram.
Otherwise, rotate the crankshaft 1 revolution (360°) and align the marks as indicated above.
Next, we remove the crankshaft pulley, for which official dealers use a special tool SST 09960-10010 (09962-01000, 09963-01000).
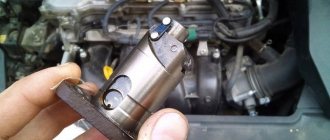
Another important point is removing the chain tensioner, for which you need to unscrew two nuts, see the photo below.
NOTE Do not rotate the crankshaft if the chain is not tensioned by the tensioner.
Removing the Toyota Corolla timing chain drive cover. Remove 10 bolts and 2 nuts. Using a TORX E8 socket wrench, remove the stud. Separate the timing cover by inserting a screwdriver between the cover, the cylinder head and the cylinder block, looking at the location of the bolts on the cover.
The timing chain drive cover seal must be changed when replacing the chain. Next, remove the chain tensioner shoe by unscrewing just one bolt.
To remove the Toyota Corolla timing chain, use 2 screwdrivers to remove the chain along with the drive gear, as shown in the figure below.
Be sure to place a rag under the screwdriver to avoid damaging the engine. If it is necessary to turn the camshafts with the chain removed from the gears, the crankshaft should be turned no more than 1/4 turn to avoid contact of the valves with the pistons.
Installing a new timing chain.
Set the piston of the first cylinder to TDC on the compression stroke. To do this, align the marks on the timing gears. Turn the camshafts by the hexagonal part so that the 2 marks (dots) on the drive gears are located opposite each other.
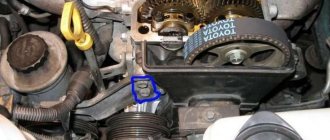
Turn the crankshaft by the crankshaft pulley bolt until the timing gear key aligns with the dot mark on the oil pump, as in the following diagram.
Install the chain tensioner shoe and secure it with the bolt. Tightening torque: 18.5 Nm. Install the crankshaft angle sensor sprocket with the “F” mark toward the front of the vehicle.
Installing the Toyota Corolla timing chain drive cover is a very important operation that requires care and precision. Remove any remaining old sealant from the mating surface of the cylinder block and drive cover.
Apply the sealant in a continuous bead (diameter 3.5–4.5 mm) as shown in the following illustration. Scheme for laying sealant on the timing cover side.
Secure the timing chain cover with 10 bolts and 2 nuts. Tightening torque: 13 Nm for bolt A and nut A. 18.5 Nm for bolt B. Using a TORX E8 socket wrench, tighten the stud. Tightening torque: 9.5 Nm.
Installing the chain tensioner assembly.
Make sure there is no dirt on the O-ring, then install the hook as shown in the figure below. Apply a thin layer of engine oil to the O-ring. Secure the chain tensioner with 2 nuts. Tightening torque: 9.0 Nm. If the hook comes loose when installing the chain tensioner and releases the plunger, re-lock the plunger with the hook.
Next, install the crankshaft pulley and tighten it to 138 Nm. The position of the crankshaft when removing the plunger should be as shown below.
Turn the crankshaft counterclockwise, then remove the hook from the locking pin and release the plunger.
Checking the operation of the plunger will ensure that the chain tensioner is working properly. Turn the crankshaft clockwise and make sure that the plunger presses the chain tensioner shoe. If the plunger does not extend, use a screwdriver to push the shoe toward the tensioner until the hook disengages from the locking pin so that the plunger can extend.
Apply a thin layer of engine oil to the crankshaft position sensor O-ring. Secure the crankshaft position sensor with 2 bolts. The tightening torque of these bolts is 9.0 Nm. Install the coolant pump assembly. Install the right engine mount bracket with a tightening torque of 47 Nm. Install the serpentine belt tensioner assembly.
Secure the cylinder head cover and 3 mounting brackets with 9 bolts, 2 sealing washers and 2 nuts. Bolt tightening torque: 11 Nm for bolt A and nut A, 9.0 Nm for bolt B.
The long-term and reliable operation of the Corolla engine depends on the correct assembly of the timing belt, so install and assemble the chain carefully. Don’t forget to apply sealant to all the places where you removed it during disassembly, in order to avoid oil leaks in the future.
Source: https://ruauto99.ru/2017/05/zamena-grm-toyota-corolla-kak-pomenyat-cep-v-dvigatele/
Step by step guide
For servicing, the car must be driven into a garage box equipped with an inspection hole, or placed on a mechanical lift. To carry out the work, you will need a set of wrenches and sockets, a torque wrench, a jack and safety stops (for repairs above the inspection hole). It is necessary to prepare a clean rag and brush to remove dirt from the engine covers and crankcase.
Removing the timing chain
General algorithm of actions:
Timing chain installation
For assembly you need:
Installing the chain tensioner assembly
Toyota Corolla timing chain replacement
The timing chain of a Toyota Corolla is replaced when it can no longer be tightened. The service life of the chain is much longer than the timing belt, so not every car owner has to deal with replacing it.
Consequences of low timing chain tension
Despite the fact that the Toyota Corolla timing chain lasts quite a long time, it is necessary to monitor its condition. Wear of the chain leads to disruption of the timing belt, wear of the engine shoe, and breakdown of the damper. To avoid costly repairs, chain tension should be checked regularly. A broken circuit is extremely rare, but it cannot be completely ruled out.
Signs of worn parts
There are several symptoms that determine whether the chain needs to be replaced:
It is recommended not to skimp on this spare part and choose only the original one, because it affects the integrity of the engine and is changed once every 200 thousand kilometers. It’s better to spend five years’ money once and be sure that the engine valves will be in order.
The chain is much more reliable than the timing belt and lasts many times longer, but every coin has another side: changing it is much more difficult and expensive. For those who want to replace it themselves, detailed instructions are provided below.
Replaced the timing chain and... the car came to life
I am the owner of a regular family car Toyota Corolla Fielder (2001 onwards)
. More than two years have passed since the purchase of the car. Before it fell into my hands, an adult woman rode on it (carrying seedlings to the dacha).
After the first technical inspection, which was carried out immediately after purchasing the car, the mechanic advised to replace the timing chain in the near future.
From his words it became clear that due to the stretched chain:
- the engine is noisy;
- the valve timing is off;
- fuel consumption increases;
- engine power and throttle response are lost.
But, as the mechanic said: “Japanese cars are very reliable, you’ll definitely be driving for another six months.”
.
At the end of the second year of operation, I covered 45,000 km. mileage According to drivers, this is not a long mileage for a big city. But with each trip, the feeling became more and more that the car could not move.
You will think several times before overtaking or getting ahead: the dynamics have completely disappeared; weak traction; the car drove like a sleepy fly... In addition, when the engine was running, a sound similar to the operation of a diesel engine became more and more apparent.
I found out the reason for this behavior of the car when I stopped at a service station. The specialist performed diagnostics and issued a verdict: the timing chain needs to be replaced.
I decided that after the New Year holidays I would definitely start repairing the engine. While long trips are not foreseen, this means you can travel like a “vegetable truck”.
For repairs it was supposed to buy spare parts. The list was provided to me by a mechanic.
Usually, to get original spare parts for a car, I used the exist service. There was enough time to choose and buy, so I spent it choosing a convenient store: not far from home; reasonable prices; Possibility of payment by VISA card.
In the end, I settled on the SLONRU online store.
List of spare parts:
- 13506-21020 TOYOTA COROLLA timing chain, 1 pc., 2208 RUR;
- 13540-21020 Timing chain tensioner TOYOTA 1NZ-FE, 1 pc., 668 RUR;
- 13559-21010 Chain tensioner shoe TOYOTA 1NZ-FE, 1 pc., 572 RUR;
- 13561-21010 Timing chain stabilizer TOYOTA 1NZ-FE, 1 piece, 818 RUR;
- 1121321011SN Valve cover gasket (Sanwa), 1 pc., 268 rub.
I gave the prices at which I got the spare parts, but the store didn’t charge anything for delivery. The only “non-original” spare part is the valve cover gasket. I couldn’t find the original one, and the price was disappointing.
The mechanic said that the non-original gasket does not matter much, because... When mating, sealant will be used. I was satisfied with this answer and on the day when I picked up the spare parts from the store, I took the car for repairs (Shop "Shosse M52"). Engine repair took almost two full days and emptied my wallet by 4,500 rubles.
Additionally I had to buy:
- Front crankshaft oil seal
- Two o-rings (for oil pump)
And what was the result of the repair? I didn’t write this note right away (when I picked up the car), I decided to check the sensations over a few days.
Silence in the cabin
.
This is the first thing immediately about, the engine was running quietly.
Before leaving the service station, I warmed up the engine. At the same time, I pressed the accelerator pedal several times, watching how quickly and smoothly the tachometer needle reacted. Things got interesting next...
Playfully
! Driving onto a multi-lane busy highway, I felt a traction that I hadn’t felt even since I bought the car.
The car quickly and easily picked up the desired speed, merging with the flow. Without hiding the delight and pleasure of driving, I tried to perform several maneuvers of advancing and changing lanes. At traffic lights I tried to be the first in the lane to get a feel for the start...
If it weren't for the studded Bridgestone Ice Cruiser 5000, it would probably have struck sparks from the asphalt.
It seems to me that the car was born again. A real delight!
Thanks to the mechanics, thanks to the Toyota engineers.
Source: https://liris-notes.blogspot.com/2012/03/blog-post.html
Toyota Corolla timing chain replacement
Cars with the 1ZZ engine configuration are increasingly conquering the global car market. This is because these engines are equipped with a timing chain (timing chain) instead of a traditional belt and have a number of advantages.
Firstly, replacing a chain on a Toyota Corolla is not done as often as replacing the timing belt of an engine with the same displacement. Secondly, with a power of 140 horsepower, fuel consumption is much less than that of engines 7A, 4S (engines with a timing belt). Thirdly, despite the small engine displacement (1.8 liters), it has more power than engines with a timing belt.
The gas distribution mechanism is of great importance in the operation of both the engine and the entire machine as a whole. With its help, fuel is supplied to the engine cylinders and combustion products are removed.
The movement of this mechanism is carried out using a chain or belt connecting two gears. Thus, the chain or belt plays the role of a transmission mechanism when the engine is running, and a rupture of this mechanism will inevitably lead to the cessation of engine operation.
Toyota Corolla car owners often ask themselves the question: “how often should the car’s timing chain be changed?” You can easily answer this question like this.
If you hear noise from the front of the engine when driving, you should know that the timing chain needs to be replaced. Of course, it shouldn’t tear, but you are guaranteed discomfort while driving.
The process of removing and installing the timing chain
In order to replace the chain on a Toyota Corolla, you need to purchase the following components:
- the timing chain itself;
- hydraulic chain tensioner;
- shoe;
- drive belt.
Do not rush to contact specialists at a service station to replace the chain. You will simply pay money for work that you can do yourself. Although this is a labor-intensive process that requires a lot of attention, it is still within the power of a car enthusiast.
You can replace the timing chain of a Toyota Corolla yourself without the help of service station specialists. But you need to understand that if you are not confident in your abilities, then it is better to seek help from specialists.
Required replacement parts
To change the gas distribution mechanism drive, you need:
Additional components may be required to complete the work; the list depends on the condition of the engine. For example, some owners install a new crankshaft front seal, change the spark plug well O-rings, or replace the coolant pump gasket.
How to replace the timing chain on a Toyota Corolla
Home… Repair and maintenance
When to change the timing chain?
A timing chain is much better than a belt and lasts much longer, but sometimes you have to change it too. This is due to normal wear and tear as the chain can stretch.
When it comes to Toyota Corolla, replacing the timing chain is resorted to when the element can no longer be tightened. If the chain is stretched, it can no longer be restored by building up links.
If the part is stretched, the vehicle's gas distribution will be disrupted and the engine will not operate normally.
In addition, a stretched chain will lead to rapid wear of the engine shoe, and can also damage the damper, which is quite expensive to change every month.
How to replace the timing chain on a Toyota Corolla?
Toyota Corolla is not the most fastidious car, but the timing belt may require repairs. This procedure can be done in your garage. It is not necessary to disassemble the front part of the engine to replace the timing chain.
Method No. 1
If you don't want to take risks and waste a lot of time doing pointless work, use the following method: remove the front cover and crankshaft pulley.
This will allow you to get to the desired element without riveting its links.
The Corolla can suffer serious damage if the chain opens on its own due to careless operation, and the method of accessing it through the crankshaft will protect you from this risk.
GR mechanism - schematically
To replace, you will need to carefully open the links of the stretched chain, then the broken part is connected to the new one and pulled forward so that the new part takes the place of the old one, holding all the sprockets.
The part is pulled out to the place where the disconnected link is located, then you need to rivet the links of the new chain. This method has one drawback, but it is quite significant. By using this method of repairing the timing belt of a Toyota Corolla, you will significantly reduce the life of the new timing chain.
Another problem could be the lack of a good connection. Such a replacement should be done only as a last resort, if you have no other choice.
Additional recommendations
After completing the installation and setting the marks, it is recommended to turn the crankshaft by hand 2 turns to check the relative position of the drive elements. If adjusted correctly, the mark should not move relative to the notches on the crankcase and head. When installing the camshaft covers, new gaskets should be installed; existing seals should not be reused due to the risk of loss of tightness and lubricant leakage. After starting the engine, there may be clicks from the tensioner, into which engine oil begins to flow.
Source