3377 Apr 20
Owners of Toyota Corolla with E120 and E150 bodies sometimes encounter a situation where the water cooling pump fails. After starting the internal combustion engine (ICE), smoke appears from under the hood. Upon inspection, it becomes clear that the cause of the breakdown is in the pump, and the generator belt may also break.
We will step by step study the process of replacing the pump on a 2008 Toyota Corolla. Reinstalling the water pump on a Toyota Corolla with an E120 body will not be a very difficult task. Even a novice car owner who has never encountered this can cope with such installation and installation.
Initially, it is necessary to establish the cause of the breakdown.
Toyota Corolla 150 pump replacement
Let's look at the entire process of removing a water pump from a 2008 Toyota Corolla with a chain drive engine. Toyota Corolla 2008 pump replacement
is a fairly easy job that can be performed even by an inexperienced car owner who has no idea about it. If you have determined what exactly is the source of your problems, that is, it is the pump, then the next step is the decision to replace it.
DIY fuel filter replacement for Corolla 150
Even though Japanese cars are famous for their technical reliability, even the legendary Toyota Corolla 150 requires replacement of the fuel filter, since its service life depends on the quality of the fuel supplied to the engine. The structure is installed in the gas tank and is a standard unit installed in passenger cars.
The fuel filter is quite simple in design and includes the following elements:
- Coarse filter – protects the engine from excessive humidity and large foreign impurities in the fuel;
- Fine filter element – prevents elements invisible to the human eye from entering the engine;
- Gasoline pump;
- Fuel level sensor;
- Fuel line.
Any owner is able to independently replace the gas filter, or replace the entire fuel module at once.
Purpose of the pump and prerequisites for its repair
The Toyota Corolla is equipped with a water pump, which is necessary to remove heat from the car's power unit. In most cases, the pump pumps liquid throughout the vehicle system in order to provide general circulation to cool all transport components.
You need to replace the pump if the moment the engine warms up is accompanied by a characteristic unpleasant sound. In the worst case scenario, you may find a leak from the pump. Returning to the sound, or rather to the squeak, it is worth noting that it occurs at the moment when the above-mentioned plaque forms.
The Toyota Corolla is a fairly simple car to assemble, so in order to fix the breakdown, you just need to purchase a new pump. Replacement can be done independently if you follow the instructions below.
How to check the condition of a car pump?
You can easily check the condition of the pump. To do this, you just need to turn on the engine and at the same time the liquid in the tank should begin to bubble and “boil”. If you have not noticed this, then this is evidence that the car has a breakdown. This way you can find out the problem without contacting a service center, where services are not cheap.
The main defect of a water pump is the leakage of coolant from the pump and wear of the pump bearing. This is easy to determine - if you hear increased noise during its operation, then there is a problem.
Next we can start replacing the plastic trim, this process is also simple. Then you will see the engine mounts. Next you just have to unscrew the two bolts. And the third bolt is located in the depths; you don’t need to unscrew it completely, it’s better to just loosen it.
Then you can already see the water pump of the Toyota Corolla car. Perform the following steps in order: unscrew the 3 fastening bolts, remove the cover and pull out the pump. On the new pump, you first need to insert the pipes and screw them back in the same way. And then everything goes in reverse order.
First we install the pump, then the inverter and finally screw it in. And now your vehicle is ready.
Cooling system Toyota Corolla, Replacement of coolant, pump, thermostat, radiator
The engine cooling system is liquid, closed type, with forced circulation of liquid. The system consists of a cooling jacket, radiator with electric fan, expansion tank, water pump, thermostat and hoses. The circulation of liquid in the system is created by a water pump. From the pump, liquid is supplied to the engine cooling jacket, washes the cylinders and combustion chambers and then, depending on the position of the thermostat valve, returns to the pump through the bypass channel (at low temperatures) or through the radiator (at high temperatures). The engine cooling system also includes a cabin heater radiator and heating channels for the throttle body of the power system. Radiator
with horizontal fluid flow, tubular-ribbon aluminum core and plastic tanks.
The radiator tanks contain inlet and outlet hose pipes to the engine water jacket. A tap is installed in the left tank to drain coolant from the system. The expansion tank
serves to compensate for the changing volume of coolant depending on its temperature.
It is made of translucent plastic. The filler neck of the tank is closed with a plastic plug with two valves: inlet and outlet. The exhaust valve opens at a pressure of 78.5-122.7 kPa (0.80-1.25 kgf/cm2), ensuring an increase in the boiling point of the coolant and preventing intense vaporization. When a liquid cools, its volume decreases and a vacuum is created in the system. The inlet valve in the plug opens at a vacuum of about 7 kPa (0.07 kgf/cmg). The serviceability of the plug valves is very important for the normal operation of the cooling system. However, when problems arise (for example, boiling coolant), car enthusiasts pay attention only to the operation of the thermostat and forget to check the valves. Leaking of the exhaust valve leads to a decrease in the boiling point of the coolant, and its jamming in the closed state leads to an emergency increase in pressure in the system, which can cause damage to the radiator and hoses. water pump
(Pump) provides forced circulation of liquid in the cooling system.
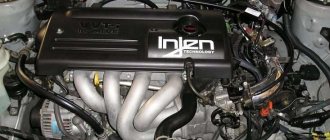
It is located on the front surface of the cylinder block and is driven from the crankshaft pulley by a poly-V belt, common with the generator and air conditioning compressor. The pump has sealed bearings that do not require replenishment of lubricant. The pump cannot be repaired, therefore, if it fails (liquid leakage or bearing damage), it is replaced as an assembly. A thermostat
with a solid heat-sensitive filler maintains normal operating coolant temperature and reduces engine warm-up time.
The thermostat is installed in a housing mounted on the cylinder head. At a coolant temperature of up to 77 °C, the thermostat is completely closed and the liquid circulates through a small circuit, bypassing the radiator, which speeds up engine warming up. At temperatures above 80 °C, the thermostat begins to open and at 95 °C it opens completely, allowing fluid to circulate through the radiator. The electric fan
of the cooling system (with a plastic multi-blade impeller) serves for additional cooling of the radiator and is turned on and off by a signal from the electronic unit of the cooling system.
Moreover, depending on the intensity of the thermal regime and the operating algorithm of the air conditioner, the electric fan can rotate at low and high speeds. The electric fan assembly with casing is mounted on the radiator of the cooling system. The system is filled with liquid (antifreeze) Toyota Super Long Life Coolant
(red), which does not freeze at ambient temperatures down to -40 °C.
It is not recommended to fill the cooling system with water, since antifreeze contains anti-corrosion and anti-foaming additives, as well as additives that prevent scale deposits. Coolant is toxic! Avoid inhalation of its vapors and contact with skin. Correct any leaks in the cooling system in a timely manner to prevent coolant vapors from entering the vehicle interior during operation. Your health is more valuable than a new cooling system pipe or a tube of sealant! CHECKING COOLING SYSTEM HOSES AND CONNECTIONS 1. Open the hood and inspect the engine compartment.
When inspecting the engine, pay attention to the presence of coolant in the expansion tank, the integrity of the rubber hoses, the radiator.. 2 ... and the thermostat housing. If coolant leaks from under the thermostat housing, tighten its mounting bolts. If tightening the bolts failed to eliminate the leakage, then it must be removed, the mating surfaces cleaned and installed with Loctite 518 sealant or its equivalents. 3. Inspect the hose connections on the bracket for mounting the cooling system pipes... 4. ...as well as with the heater radiator pipes. If you detect a leak in any of the hoses at the place where they are connected to the pipe, drain the coolant. Squeeze with pliers and slide the fastening clamp along the axis of the hose. Remove the hose from the pipe. As a rule, the cause of a leak is corrosion of the sealing surface of the pipes. Clean the damaged surface and install the hose on the sealant. After the sealant has dried, add coolant.
Replacing Toyota Corolla coolant, Replacing antifreeze
According to the manufacturer's recommendation, the coolant should be replaced for the first time after 160 thousand kilometers, and then replaced every 80 thousand kilometers. Fill the cooling system with Toyota Super Long Life Coolant
or an equivalent.
You will need: coolant, cleaning cloth, a container with a capacity of at least 10 liters
for draining the coolant, pliers.
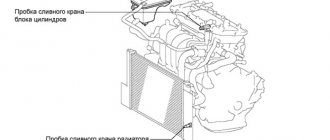
Replace coolant only when the engine is cold. Coolant is toxic, so be careful when handling it. When starting the engine, the expansion tank cap must be closed. Screw the reservoir cap tightly. The cooling system is under pressure when the engine is running, so coolant may leak from under a loosely tightened plug. 1. Place the car on a level surface 2. Remove the lower engine mudguards 3. Turn counterclockwise. 4. ...and remove the expansion tank cap. 5. Place a container under the drain valve of the radiator of the cooling system, located in the lower radiator tank, unscrew the drain valve plug two or three turns and drain the liquid.
6. Place a container under the cooling system drain valve located on the left side of the cylinder block, unscrew the drain valve plug two or three turns and drain the liquid. 7. Hand tighten the plugs of both drain valves. 8. Flush the cooling system by filling it with water through the filler neck of the tank. 9. Start the engine and let it run until the electric fan turns on. 10. Stop the engine and drain the water. 11. Flush the cooling system until clean water begins to drain. 12. Fill the engine cooling system by pouring coolant into the reservoir to the level of the steam pipe. 13. Start the engine and warm it up to operating temperature (before the fan turns on). As air leaves the system, add coolant to the reservoir. The fan will turn off 3-5 times until the air is completely released. 14. Add coolant to the expansion tank to the “FULL” mark. After this, stop the engine and let it cool. 15. Check the coolant level and, if necessary, add it to the expansion tank to the “FULL” mark. When the engine is running, monitor the coolant temperature according to the gauge. If the arrow reaches the red zone and the radiator fan does not turn on, turn on the heater and check what kind of air passes through it. If the heater supplies heated air, the fan is most likely faulty, and if it supplies cold air, it means that an air lock has formed in the engine cooling system. To remove it, turn off the engine and let it cool. To better fill the system without air locks, periodically squeeze the radiator hoses by hand. After a few days of using the car after replacing the coolant, check its level. Replenish the level if necessary. If after a very short time the color of the fresh liquid turns brown, it means that you have filled it with a fake, to which you have added corrosion inhibitors. REMOVAL AND INSTALLATION OF THE EXPANSION TANK You will need: a 10mm socket, extension, pliers, a container for draining the coolant from the expansion tank. 1. Squeeze the clamp securing the steam exhaust hose with pliers and slide it along the hose. 2. Remove the steam removal hose from the expansion tank pipe. 3. Squeeze the clamp securing the liquid hose with pliers and move it.
4. Place a container to drain the coolant and remove the hose from the expansion tank pipe. Take measures to reduce the flow of coolant from the hose, for example, by plugging it with a wooden plug.
5. Remove the bolt securing the expansion tank to the body pillar. 6. Remove the bolt securing the expansion tank to the bracket. 7. Remove the reservoir.
8. Install the expansion tank in the reverse order of removal. 9. Fill with coolant to the “FULL” mark.
Toyota Corolla radiator replacement
You will need: a “7” wrench, a “10” socket head, and pliers. 1. Drain the coolant 2. Remove the front bumper 3. Loosen the clamp securing the radiator supply hose by squeezing its bent ears with pliers, slide the clamp along the hose... 4 ...and remove the hose from the radiator pipe. 5. Similarly, disconnect the radiator outlet hose... 6. ... and the remaining hoses of the cooling system from the radiator. 7. Remove the four bolts and upper radiator bracket. 8. Unscrew the three bolts and remove the hood lock. 9. Unscrew the two bolts and disconnect the two fasteners securing the upper part of the radiator to the body. 10. Disconnect the wiring harness connector from the cooling fan ECU. 11. Remove the radiator assembly with fan shroud from the engine compartment. 12. Remove two bolts and disconnect the fan casing from the radiator. 13. Rinse the outside of the radiator with a stream of water and dry. If cracks appear on the plastic radiator tanks, replace the radiator. 14. Check the tightness of the radiator by plugging one radiator pipe, supplying air under a pressure of 0.1 MPa (1 kgf/cm2) to the second, and lowering it into a container of water for at least 30 s. A leak in the radiator can be determined by escaping air bubbles. If the radiator does not fit completely into the container, check it sequentially from all sides. 15. Install the parts in the reverse order of removal. 16. Fill with coolant To prevent further leakage of coolant, before installing the hoses, lubricate the radiator pipes with a thin layer of silicone sealant.
Toyota Corolla pump replacement
You will need: 10" and 12" socket heads, a flat-blade screwdriver.
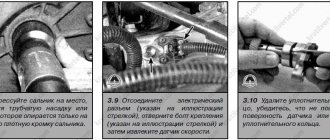
1. Drain the coolant 2. Remove the accessory drive belt 3. Remove the generator 4. Remove the five bolts securing the water pump to the timing chain cover. 5. Remove the water pump 6. Use a screwdriver to pry... 7. ...and remove the rubber gasket of the water pump from the timing cover. 8. Align protrusion A with slot B on the timing chain cover and install a new gasket. 9. Tighten the water pump mounting bolts in the sequence shown in the photo to a torque of 21 N m (2.1 kgf-m). 10. Install the parts in the reverse order of removal. 11. Fill with coolant
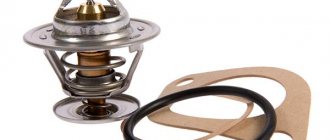
Replacing the Toyota Corolla thermostat
The need to remove the thermostat may arise to replace it if the engine temperature is unstable: overheating or insufficient heating. To check the thermostat on a car, start the cold engine and touch the lower (outlet) radiator hose with your hand - it should be cold. Once the coolant temperature reaches 90-95 °C, the hose should begin to heat up quickly, indicating that fluid has begun to circulate through the large cooling system circuit. If this does not happen, remove the thermostat and replace it. You will need a key "10". 1. Drain the coolant 2. Loosen the clamp securing the radiator outlet hose and, squeezing its bent ears with pliers, slide the clamp along the hose. 3. Remove the hose from the thermostat fitting. 4. Unscrew the three nuts securing the thermostat cover. 5. Remove the pipe.. 6. ...and the thermostat installed under it. 7. Remove the O-ring from the thermostat and inspect it. Replace a heavily compressed, hardened or torn ring. 8. Install the O-ring on the new thermostat. 9. Install the parts in the reverse order of removal. 10. Fill with coolant and remove any air pockets from the cooling system
Step-by-step instructions for replacing the pump
Before proceeding with the replacement, first unscrew the alternator. And even earlier, mark the tensioner with a marked mark. It is important that the marker is waterproof and does not rub off the first time it gets wet. This will make your work easier when you install a new pump. You also need to remove the battery terminals.
- After completing these steps, carefully remove the generator without damaging it. You can do this in two ways:
1. Unscrew the generator completely and put it aside for a while.
2. Partially unscrew the generator so that its main part remains attached only to the lower bolt.
Toyota Corolla, with its own characteristics, recommends the first method. It is the most reliable and practical. In addition, having the alternator completely removed will provide you with much more space to ensure that the pump replacement can be carried out as safely as possible.
Please note that after the generator is removed, you will have the opportunity to check the belts and their condition. Replace the belts if they become cracked.
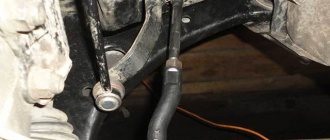
Next, you will need to drain the antifreeze or antifreeze from the cooling system. This procedure is carried out by turning a small tap, which will start the fusion mechanism. Toyota Corolla has a yellow faucet, which allows you to find it quickly enough. Use a pre-prepared hose and an empty container with a volume of at least 6 liters. Replacing the pump is quite simple if you follow the exact instructions.
Once the pump is free of liquid, it’s time to start unscrewing the pump. A total of 6 bolts need to be tightened. Keep in mind that when unscrewing, it will most likely start leaking. Therefore, use another empty container and place it under the pump. Antifreeze can even leak through the bearings, so plan for this in advance.
Having rid the car of the old pump, proceed to install the new pump. But first, you need to install an elastic band that seals the leak.
If you compare two pumps externally, the first one will be visually very different from the old one.
Most often, Toyota Corolla produces a high-quality pump, but it is not designed for long-term use. Replacing the pump can provide the car with a guarantee that replacement of this spare part will not be required for several years.
- Screw the new pump as tightly and securely as possible. Toyota Corolla cannot function using water, so after installing the pump, pour new antifreeze or antifreeze inside, depending on which product suits your car best.
- The last step is to return the generator to its place. You took care of this in advance and marked with a marker the places where it should be installed. And then we return and install the tensioner.
Water pump?
Antifreeze leaked in the area of the pump. Can I buy a new one or replace the gaskets? It didn’t seem to make any noise or whistle. The only thing I changed was the MSK recently, I took off the belt. But it didn’t seem to be too tight.
There are 17 replies to this topic
What does it mean in the pump area?
The only thing I recently changed was Moscow time
This means that I will disassemble it today and see if the oil seals are leaking.
Did you change the oil scrapers, did you EAT OIL? The problem has gone away, or not?
I don’t know yet - I changed it last week. And then the pump started leaking. I'll unsubscribe.
Today I removed the pump and discovered that the top mounting bolt of the pump was missing. Apparently I removed the belt while replacing the MSK, and then installed it, tightened it, it was slightly skewed and leaked. I didn’t notice any play or any other deterioration on the pump itself. Probably it’s on the sealant and I'll put it in.
I didn’t bother with sealant gaskets and replaced the entire pump. Now I don’t expect it to leak/not leak with tension