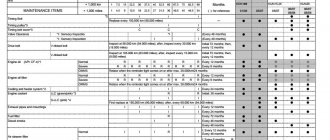
Technical regulations recommend replacing the timing belt after 100 thousand kilometers. However, this figure is adjusted by the operating characteristics of your car. City traffic jams and harsh weather conditions shorten the service life of the part. Its replacement is carried out regularly at a car service center or independently by an experienced car owner.
How to determine the need for replacement?
- Knock when starting the engine;
- Unstable, intermittent engine operation;
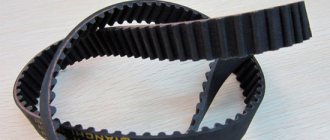
- Visible damage upon visual inspection - cracks, mechanical damage, peeling, traces of oil. (Remove the casing cover and inspect the belt);
- Manufacturer's recommendations;
- Pay attention if you see traces of oil under the hood and black smoke from the exhaust pipe.
A belt rupture can lead to dire consequences - a major engine overhaul and the need to troubleshoot the vehicle's gas distribution system. If this part is faulty, the car will not move. Evacuation by rope is also difficult because the brakes practically do not work.
You can replace the part yourself or entrust it to a technical service. The second option is less economical and the qualifications of car service specialists raise questions. You must choose either an authorized service or a specialist whose qualifications you have no doubt about. The main reason for contacting the service for this service is the inaccessibility of the unit, therefore the cost of this service is significant.
If you decide to make the replacement yourself, you will need
- Not just car maintenance skills, but also the willingness to disassemble part of the engine yourself;
- Tools (set of wrenches, screwdrivers, jack);
- Actually, the timing belt and tensioner pulley;
- At least 4-5 hours of free time.
We can argue a lot about the use of original parts, but one thing is clear - the quality of the parts directly affects their service life, the quality of the engine and your safety. It is recommended to use the original KOYO belt and pulley. They have good reviews among professionals and car owners.
Accessories and tools
Before you begin, you need to purchase components. The numbers of original parts from the catalog with prices are given below:
- Timing belt – 06A 109 119 C. Price – 800-1000 rubles.
- Tension roller - 06A 109 479 F. Price - 1400-2000 rubles.
- Cooling system pump - 06B 121 011 QX. Price – 1700-2000 rubles.
The list includes a water pump for the reason that it can be changed while replacing the belt if suddenly there are questions about its operation (smudges are found or extraneous sounds are heard).
After purchasing the components, you need to prepare the tool. You will need a lot of different devices, we will not give a complete list. We only note that in addition to the standard set of keys (socket, hexagon, torx), you will need a special key to turn the timing belt tension roller. It is not difficult to purchase it in a store or make it yourself. Alternatively, you can use a circlip puller with a side grip that fits the format.
Preparatory stage
- Set the car to the parking brake.
- Disconnect the negative terminal of the battery (on forums you can find recommendations that this step is not necessary, but safety issues are important).
- Place the machine on reliable stands (if possible, use a pit or overpass).
- Remove the right front wheel.
- Remove engine protection.
- Remove the expansion and washer barrel.
To carry out work to support the engine - use a jack on which to install a long board.
A step that requires serious labor is removing the crankshaft pulley bolt. It is recommended to use a special tool; there are standard holes for this. It is possible to perform this task with ordinary plumbing tools. Insert the punch into the recess with the blunt end. We use a 17 socket wrench, a pair of extension adapters and a handle with a length of 50 centimeters. We place the pry bar between the head, drift and suspension arm. We decide on a support for applying force - you cannot use a drive! The line of the key should continue the line of the crankshaft. Turn the key handle counterclockwise. It is important when installing the handle and, immediately before applying force, to check it: it should be as close to the pulley as possible.
It is necessary to create a line key - crankshaft. The key handle moves from right to left. We control the placement of tools. Significant force is required. You can make this task a little easier by purchasing a special puller at a car store. Desperate car enthusiasts solve the problem using a starter. This operation is carried out in pairs. One presses the head of the key, the second turns the ignition key and then back. And so on until we get the desired result. Disconnect the spark plugs first. To perform this operation alone, you need to calculate it so that when you turn the key, the lever immediately rests. The action usually needs to be repeated 2-3 times.
Video review on replacing the timing belt on the 5A-FE engine
I have selected several videos on the topic for you so that you can visually understand what’s what.
Similar materials
It happens that some part of the electrical system stops working and you start going through the whole crowd of fuses. To make troubleshooting easier, I will try to describe them.
The main locations of the fuse and relay blocks are indicated by numbers in the figure from the manual. Fuses and relays located in the passenger compartment Main unit.
I think someone will find the report on cleaning the throttle useful. I decided to clean it because at warm-up speeds the car behaved strangely: the speeds fluctuated and after some time the car.
0 comments on “Replacing the timing belt on a 5A-FE engine in a Toyota Corolla”
How to check the timing belt yourself on a Toyota 5a engine I'm due)
If the belt is original, it will go 150,000 km without problems; if it’s Chinese, then 50,000 km.
On your own it’s just a tension. On the bend of the mobius. If it bends more than 90 degrees, it is weakened.
The car has covered 100,000 km. - change it! (if the belt is original).
I don’t know how it is on Toyota, but I think it won’t be possible to check without removing it. On Ladas they take them off and look from the inside at the break, and since it costs a penny, they change it, and the old one is thrown into the trunk as a spare.
How to change the timing belt on a Toyota Corolla, 93 Guards I want to change the timing belt myself, I heard about the marks. If you have any information on this car, please post a link. Thanks in advance) I’m going to go on vacation to the south, I’m afraid that you never know what will happen on the road
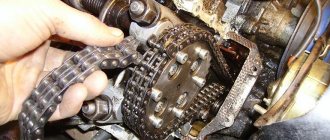
When you remove the old one, mark the gears with something as they were.
We will talk about cars with a 2E engine. Diagram of the gas distribution mechanism. Attention! 1. Before starting work, remove the battery terminal. 2. Do not turn the crankshaft and/or camshaft with the timing belt removed 3. Unscrew the spark plugs - it will be more convenient 4. Do not start the engine with the tension roller bolt loosened 5. Do not use the starter to unscrew the pulley bolt 6. Do not stretch, bend or twist the timing belt 7. Do not hit the pulley with a hammer/metal objects. Step-by-step replacement algorithm. 1. Remove the battery terminal. 2. Remove the high-voltage wires and turn out the spark plugs. 3. Remove the plastic cover on the right side, opposite the crankshaft pulley. 4. Loosen the alternator belt and remove it. Insert a strong metal pin of suitable diameter, such as the shank of a drill, into one of the holes in the pulley. Place a standard 12 or 14 socket wrench on this pin. Place a suitable piece of water pipe on the back of this wrench and press it into the ground. Try to unscrew the pulley bolt - the engine will start to rise, but the weight of the car should be enough to unscrew the bolt. Do not insert the pin into the pulley hole deeper than 10 mm - you can damage the timing belt cover, which is located under the pulley.
Equipment dismantling
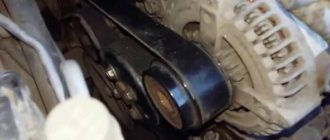
It is necessary to loosen the tension, axial, and lock bolts. Remove the alternator belt. If this is not done, difficulties will arise when removing the lower timing belt guards. To remove the power steering drive belt, loosen the bolt on the guide and move the power steering towards the engine. Remove the air conditioner belt.
Loosen the bolts securing the engine mount to the body. Remove the bolts and remove the valve cover and protective covers. They must be handled carefully, because they protect the belt from contamination and accordingly extend the life of the part. If the covers are damaged during dismantling, replace them.
An important point is to observe the marks on the parts. To align the marks of the crankshaft and camshaft, return the crankshaft pulley to its place. We turn the crankshaft clockwise and align the marks. It’s better to unscrew the spark plugs first, just to avoid getting dirty. Pay special attention to this operation if you are not just changing the timing belt, but if it is torn. In this case, damage may occur that cannot be repaired by alignment.
In working condition, the mark on the crankshaft pulley should coincide with the “O” mark on the lower timing cover, and the mark on the camshaft bearing was visible in the hole of the camshaft pulley (you can check it in the vehicle’s technical manual). After aligning the marks, the shafts must not be allowed to rotate. Moving counterclockwise, loosen the tensioner pulley bolt. Carefully and carefully release the timing belt from the gear splines. To remove the part, drag it under the engine. To raise the engine, you need to remove several bolts securing the support.
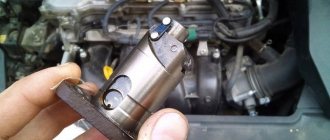
Inspect the part; if damage is detected on only one side, it is recommended to check the condition of the guides and pulleys. It is recommended to replace the crankshaft oil seal. The gear is taken out freely, we clean and degrease the landing site. We treat the oil seal with sealant and install it.
Let's move on to the video. After unscrewing the bolt, remove the roller, remove the spring from it and put it in a new roller. We are returning the video.
Replacing the timing belt on a 5A-FE engine in a Toyota Corolla
Show me how you drive and I'll tell you who you are
Self-replacement of the timing belt on engines 5A, 4A, 7A. First of all, you need to remove the right front wheel, securely place the car on stands (doing everything on a jack is very dangerous), remove the crankcase protection and the engine boot on the right side. It's a good idea to spray the center bolt of the lower pulley with WD-40.
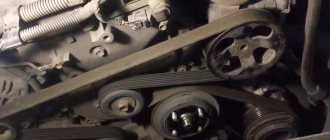
In this case, a Gates belt and a roller from some obscure German packaging company were installed, and inside there was a quite decent Japanese Koyo roller. If you are planning to change the pump while the belts are in place, remove the 4 bolts securing the pulley (socket wrench size 10). Unscrew and move the washer reservoir to the side (1 bolt per 10). Unscrew the spark plugs (magnetic head 16) and turn off the power supply to the distributor - two-pin connector. Loosen the drive belts of the mounted generator, power steering, air conditioner and remove them.
If it is not possible to unscrew the lower pulley bolt with a pneumatic gun, put a socket with a long wrench on it, rest the wrench against the suspension arm and briefly turn on the starter to break it off the impact. If you are lucky, the pulley will come off without effort; if not, use a puller; if you don’t have a puller, gently use a piece of wood or a copper drift from the back side to knock the pulley off the crankshaft.
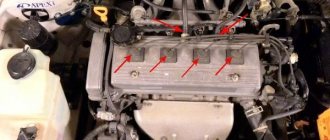
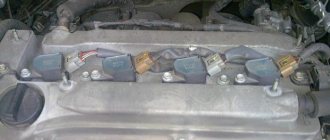
Remove the cylinder head cover (4 nuts by 10, plastic wiring casing, 2 bolts by 10) Throw the wiring harness over the cover. Remove the cylinder head cover, in front of you is the intestines of the engine block head, in this case the 5AFE engine, the oil is strictly synthetic, the mileage is 230 thousand. The head is clean and orderly. Set the TDC of the 1st cylinder - the reference points on the knee of the key are clearly up, on the camshaft pulley the drilling with the letter K (5A) or A (4A) is also clearly up.
Unscrew the tension roller bolt and move the roller to the side, loosen the belt tension and tighten the bolt again. After this, remove the old timing belt, then completely unscrew the timing pulley bolt and remove the pulley. Remove the tension spring from it, move it to the new roller and install it in place.
When installing the crankshaft pulley, pay attention to the condition of the pulley seating surface and the crankshaft journal. If there is corrosion, remove the rust with fine sandpaper and coat the contacting surfaces with graphite grease or lithol. The pulley mounting bolt must be cleaned and when installing, coat the threads with a special thread sealant; it protects the bolt from spontaneous unscrewing.
If you pull the bolt by hand, tighten it as much as possible. When installing the cylinder head cover, remove the remnants of the old silicone sealant from the corners of the cover and place a new one there. If the gasket is hard like plastic, it is better to change it; if there is no new one, coat the old one with sealant.
Installation of new equipment
Raise the engine and pull through the new belt, secure the support with bolts. To install it, move the roller as far as possible to the side and install the belt. First from the right, and then from the side of the roller. Please note that the gears should not rotate. With the timing belt removed, the crankshaft and camshafts must not be turned. There is no need to specially tighten the belt with a roller; this occurs due to the action of the spring. It is tensioned between the shafts on the right side and the roller on the left side. We secure the protective covers of the part from bottom to top.
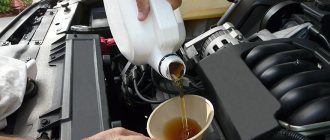
Replacing the timing belt and oil in the automatic transmission on 5A-FE
This article will discuss how to replace the timing belt and fluid in a 1.5 L 5A-FE Toyota engine. You will need approximately 6 hours.
The first thing you will need to do is remove the right wheel, then remove the mudguard. That's it, we can proceed to the most complex procedure, our task is to unscrew the crankshaft pulley bolt. Once you get to the pulley, you will notice that it has holes for a special tool. We will use a simple drift from a regular Soviet set of keys.
You will need a good 17mm head, the handle of which is no shorter than 0.5 meters, and you will also need a mount. This pry bar needs to be placed between the drift, the suspension arm and the head, place it so that it does not fly out, find a good support point, remember that you cannot rest the pry bar against the drive . Now the key handle is unscrewed; you need to turn it counterclockwise. You will need a lot of strength to be able to unscrew this bolt. Once the bolt is removed, the hardest work is over. The alternator belts can be removed.
To do this, you will need to loosen the "axle" bolt, the locking bolt, the tension bolt and the adjusting bolt.
That’s it, when nothing is in the way, you can remove the timing belt; to do this, remove the valve cover, as well as the dirt-proof covers of the timing belt. The tensioner pulley bolt needs to be loosened; it unscrews counterclockwise.
Shutdown
We return all removed equipment to its place in the reverse order. We pay special attention to the crankshaft bolt. If necessary, clean from corrosion and treat with a special thread sealant. We twist it thoroughly. You can ask the nearest service center to use pneumatic tools. When installing the cylinder head cover, replace the old sealant (remove its traces) with a new compound; if it is old and very hard, it is better to replace it. Just check the tension of the generator belt - it should not turn more than 90 degrees.
And since half of the engine has already been disassembled, use this - clean the now accessible parts from dirt and soot. Inspect the currently available components and parts, check for serviceability, and determine the need for repairs.
After the work has been done, mark your odometer readings so as not to miss the next replacement date for such an important part of your car. Start the car. After these manipulations, the engine should run smoothly, without surges or vibrations.
A little history of the famous Toyota Carina
A sports sedan introduced at the end of the 20th century, the Toyota Carina was produced by the Japanese company until 2001. The latest, seventh, generation of the model is made in five modifications and is equipped with 2-liter gasoline and diesel engines with a capacity of 135 hp. with a five-speed manual gearbox with front-wheel drive or all-wheel drive. The first generations of cars were made in hatchback, coupe, and station wagon bodies, while the newest generation was a sedan. The signature and efficient look of the Toyota Carina goes well with innovative technical equipment and an optimal range of options.
Why should transport problems be corrected in our car service center?
First of all, we employ real experts in their field. Our employees have the proper skills and never stop learning new things. Also, we have modernized equipment. Thirdly, we are glad to see you every day, our dear customers and clients!
We are one hundred percent confident in the quality of our work, and we provide a 1-year warranty on repairs and spare parts! Come to us and make sure that our service does not make unjustified promises.