1. Check the drive belts for wear and damage. If a defect is found, replace the belt.
Note: peeling of rubber from the cord on the inner (from the side of the ridges) and outer surfaces of the belt, exposure or damage to the cord, separation of the ridge from the rubber base, cracks, peeling or wear on the side surfaces of the belt and on the side surfaces of the belt ridges are not allowed. Replace the belt if necessary.
2. (1ZZ-FE, 1AZ-FSE) Check the tension of the attachment drive belt.
By pressing on the belt, make sure that the tensioner works (the roller moves) and provides the necessary belt tension. In order to replace (remove) the belt, slowly move the tensioner (pushing the hydraulic tensioner rod) as shown in the figure.
3. (1NZ-FE) Check the tension of the accessory drive belts. Apply a force of 98 N (10 kg) at the points indicated in the corresponding illustrations and measure the deflection of the belts. Nominal deflection: alternator drive belt:
new. 7.0-8.5 mm used. 11.0-13.0 mm power steering pump drive belt: new. 8.0-10.0 mm used. 11.0 -13.0 mm
1 - power steering pump, 2 - generator, 3 - coolant pump, 4 - crankshaft, 5 * air conditioning compressor.
— The term “used belt” refers to a belt that has been in use for more than 5 minutes.
— After installing the belt, check that it is seated correctly on the pulleys. Check with your hand at the bottom of the pulleys to see if there is a loose groove on the pulley. — After installing the belt, start the engine and let it run for 5 minutes, and then check the belt tension again.
4. (1NZ-FE) Adjusting the tension of the generator drive belt.
a) Loosen the YAM and VI mounting bolts indicated in the figure.
b) Adjust the tension of the drive belt and tighten the fastening bolts B" and A
5. (1NZ-FE) Adjusting the tension of the power steering pump drive belt (if necessary).
a) Loosen the fastening bolts “A” and “B” indicated in the figure
b) Adjust the tension of the drive belt and tighten the fastening bolts “B” and “A”.
The time has come to replace the belt and, as expected, the roller along with it. Initially, I wanted to replace it myself, but out of curiosity I went to a service station and found out about the cost of this procedure: With spare parts, the amount of work was 5,000, without spare parts, 2,000.
I ordered spare parts from the plentycar website. I ordered them on Monday and on Thursday of the same week I received an SMS about their arrival at the warehouse in my city. I ordered not the original, but replacements that were recommended to me by the owner of the office (he installs the same replacements on his car, only a Chrysler car) and I am very pleased with them. Poly V-belt CONTITECH (Germany) (catalog number 6PK1733, price 710 rub.)
and tensioner pulley OPTIMAL (Germany) (catalog number 0-N1462S, price 850 rubles).
Before replacing, I read how others changed them themselves and these two entries helped me: This and This
To replace it, I needed the following set of keys:
To unscrew the roller you will need an asterisk key, something like a hexagon.
It has a title, “Something Else” but I don’t remember 
You will also need a small flathead screwdriver to remove the plug on the roller.
And of course rags
Let's get started: Open the hood, remove the terminals from the battery, remove this plastic engine protection
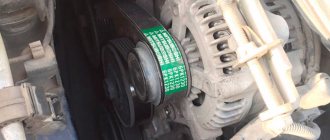
And here before us is the treasured belt, rollers and tensioner
Next, take a 17mm head, or 2 ring wrenches (by the way, you can also unscrew it with a wrench) and loosen the tensioner
Here's my old belt
True, I tried to bend it and was surprised, not even a single hint of cracks... The original belt has served faithfully since the moment I bought the car.
Then we shoot the video. To do this, take a small flat screwdriver and remove the plastic plug.
After removing it, we will see the same bolt that holds the roller to the tensioner. Unfortunately, I forgot to take a photo of it from the front... There is only this photo
Now we need those same star keys
To remove the bolt, you will need the larger one, and then you can take a smaller one and unscrew it without straining.
The video was also original, from the factory.
The photo shows that the original video has edges, but the new one does not.
But in principle this does not play any role. The belt will not come off anywhere due to the fact that there are streams on the other rollers.
Naturally, I took the VDshka and coated all the screwed-in and unscrewed parts: bolts, nuts, washers.
This VDshka is radically different from ours; it does its job 200 times better and faster. (Not advertising)
Well, now we do everything in reverse order: Take a new video
We screw it into place. It doesn’t matter which side you put the video on, at least that’s how it was for me. BUT! IMPORTANT! The washer is placed on the inside of the roller, that is, towards the engine! In any case, after screwing the roller, make sure that it does not stand in a wedge, but moves freely!
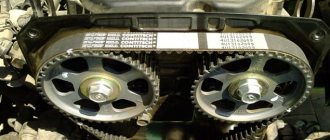
Now we take a new belt
We place it on the rollers exactly according to the diagram, but without pulling it onto the tensioner roller (it will become clear why later). It is advisable (not necessary) before removing the belt, just in case, to sketch how everything is installed.
Schemes may differ depending on the vehicle configuration
We take a ratchet and a 19mm socket and pull the same bolt over ourselves (although it is not a bolt, but something like a notch on the tensioner, they are solid), put the belt on the tensioner roller and release. We check how the belt is seated, whether it fits into the grooves everywhere. We check if everything is screwed in place and if everything is in place. Now we connect the battery terminals and start the car. Voila, you're done. Let the car spin for another five minutes, and then you can turn it off.
Personally, my car began to work differently, much better and almost silently. In short, “purred”
I would also like to say that if you plan to replace the tensioner itself, then you will have to unscrew one (left) mounting and lift the engine. When unscrewing, the bolt securing the tensioner to the engine rests against the car body and cannot be completely pulled out.
This is the story of replacing drive parts in my broom. Thank you for reading, everyone!
Comments • 10
I don't understand shit
Quit smoking tramp, you're suffocating, like it