Replacing shock absorbers on the front suspension of Toyota Corolla
Over time, in any car you have to deal with such a problem as replacing struts. Although the quality of foreign cars is much higher than what we are used to being satisfied with in our Russian cars, they also sometimes need to be repaired.
Recommendations for replacing the front struts on a Toyota car of any model (Toyota):
- make sure the Toyota car is set to the handbrake
- be careful and careful when removing the spring
- After replacement, thoroughly tighten all bolts and nuts
- Also, after replacement, you need to bleed the brakes
The safety of people depends on all these procedures.
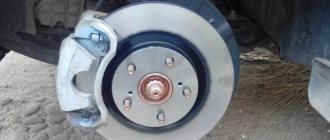
We inspect these rack elements to determine their condition.
You can visually see the condition of the support bearing boot in contrast to a new one.
Distinctive condition of the foam boot of the support bearing cup.
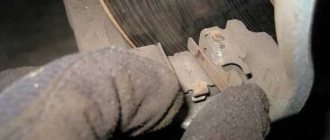
We inspect the condition of the support bearing for any play or tears.
We check the condition of the support bearing for defects.
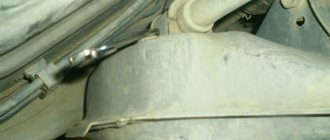
We inspect the condition of the strut boot.
We check the boot for tears and cracks.
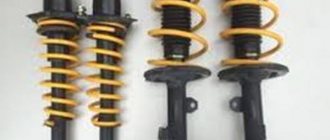
The difference in the springs has become quite obvious. Its last coil is not completely finished and there are definitely different distances between the coils. This feature thereby adds additional reinforcement to the structure when compression is performed during operation.
The obvious difference between the old spring and the new one.
Components of the rack
The suspension strut includes several elements:
- Spring. Untimely replacement leads to subsidence, which means a decrease in load capacity and ground clearance. In rare cases, the spring coils break off and further operation of such a vehicle is impossible. The average replacement interval is about 150 thousand kilometers.
- Shock absorber. There are oil and gas-oil types. Designed to stabilize roll and prevent swaying, as well as absorb impacts from uneven surfaces. The average replacement interval for shock absorbers is 60 thousand kilometers.
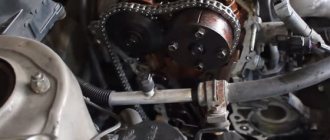
- Upper support. Fastening element. Absorbs shocks from the shock absorber without transferring them to the body. The front supports are equipped with a bearing.
- Shock absorber rod boot. Protects against dirt or dust. A torn boot reduces the life of the shock absorber.
The stage of assembling a new rack.
We wash the bearing of the upper support of the strut with WD-40 liquid, as it easily removes the remnants of the previous lubricant. Then we blow it with compressed air, apply fresh lubricant (special lubricant for the support bearing 08887-01206).
Of course, you need to wash the ball bearings of the upper strut support and lubricate them with fresh grease.
We prepare the new rack for assembly by manually pumping it. Why do this? The new rack was in an ineffective state and the liquid inside was not subject to circulation. This contributed to its drainage in one specific place. By manually pumping, this liquid begins to be distributed throughout the entire internal system of the rack, thereby bringing it into ready working condition. If this type of procedure is ignored, then the fact of internal damage and destruction cannot be excluded, since the liquid is not evenly distributed inside the rack. This is a fact that prematurely contributes to the failure of the new rack without definitely passing through assigned resource.
Stabilizer link assembly.
Location of bushings and washers on the upper part of the link.
Sequence of installation of new link washers on the upper part of the link.
Location of bushings and washers in the lower part of the link.
Correct placement of bushings and washers on the bottom of the link.
You can clearly see from this diagram how the link washers and bushings are located.
How to correctly position the bushings and washers on the assembled stabilizer link.
Now, having decided on the correct assembly of the link bushings and washers, we assemble the assembly from new parts. We proceed to tightening the link nuts, observing a force of 18 Hm.
New installed stabilizer link.
When such labor-intensive work has been done to overhaul the front suspension. We remove the car from the stands, install it on the wheels and continue to operate it.
Let's start disassembling the stabilizer link assembly.
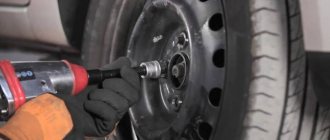
We install the wheels to create a load on the suspension arms, driving onto the placed bricks.
We unscrew the nuts from the studs that are attached to the stabilizer. Using a 12mm and 10mm wrench. Then remove the link, disassembling it into its component elements.
We lay out the component elements of the link. How the washers and bushings are positioned correctly.
Purpose of racks
Stabilizer links are rigid arms attached to the body and suspension parts. They compensate for the resulting lateral forces that act on the chassis while in motion. Typically, replacement of stabilizer links on Toyota is required due to wear or broken rods. Some people decide to make the replacement themselves in a garage, but this requires experience and special tools, as well as quite a lot of free time and effort.
The process of pumping the rack is very simple:
1. Place the stand in such a way that the rod is always at the top. We press the rod until the end of the stroke. Approximately five times. With each such manipulation, the rod should come out independently to the end.
2.Then we continue the procedure further, turn the rack over with the rod position at the bottom, press it in until the end. The approximate amount is five times, each time holding it with your hand, allowing the rack to rise independently. After this procedure, we put the rack in the appropriate position without resorting to laying it on its side. It is more correctly recommended to hold or move the pumped rack strictly in a vertical position until its final installation.
Rack diagnostics
The most accurate way to diagnose the performance of a rack is a special test stand. Such equipment is expensive and not every service station has it.
You can check the racks yourself by following a few simple steps:
- carry out a visual inspection for mechanical damage to elements and the presence of oil leaks;
- evaluate the speed of stabilization of the car when it swings in a vertical plane - serviceable struts do not allow the car to oscillate up and down;
- make several turns while driving, a strong roll indicates problems with the elements of the struts;
- turn the steering wheel in place, a characteristic crunch in the front of the car may indicate failure of the upper shock absorber mounts.
If malfunctions are detected, it is recommended to eliminate them as quickly as possible. Moving with racks that do not perform their functions is fraught with consequences:
- decreased vehicle controllability at medium and high speeds;
- loss of directional stability in all travel modes;
- reduced load capacity and ground clearance;
- increased load on other elements of the chassis;
- lack of comfort when driving over uneven surfaces;
- increase in braking distance.
The load on the front axle is much greater than on the rear. This is especially noticeable in the Camry with a 3.5 liter engine. For this reason, the front struts will require more frequent replacement.
Let's proceed directly to the assembly of the new rack.
We hold the stand vertically to install the spring on it. The lower coil of the spring is aligned with the groove on the lower support cup, fixing it.
Correct position of the spring on the lower support cup.
Having come to the moment when the spring begins to compress, this fact should be taken into account. Until what moment should it be compressed? It should be compressed, of course, so that the spring is lower in height than this groove of the rod (as shown in the photo below).
Use ties to compress the spring below this groove.
An example of installing spring ties on a stand for assembly.
The example shows the correct engagement of the strut spring ties.
We put the spring on, compressing it to the required compression, put the boot on top. Then we put the bump stop on the rod, install the upper spring cup so that the grooves coincide with the grooves on the support cup. Then we install a new support bearing boot along with the support itself. We begin to tighten the rod nut. We align the marks on the vibration isolator and the marks on the upper support cup of the spring. By installing the marks in this way, lining them up in one line, approximately running along the entire rack directly to the lower mount, where it is attached to the steering knuckle.
We assemble the rack correctly by aligning the corresponding marks.
Do-it-yourself repair of Toyota struts (Toyota Corolla) - video
The front and rear shock absorbers of Toyota Corolla with bodies 120 and 150 are very vulnerable and sensitive parts. Despite the fact that the Japanese manufacturer is sensitive to the development of Russian versions of its cars, it is still not possible to avoid the negative impact of domestic roads. The parts used in the shock absorption system are of fairly high quality, but sooner or later they have to be changed to avoid much more serious problems.
Payment via Yandex Cashier
After selecting payment via Yandex, the Yandex Cashier payment system will launch, where you need to select a convenient payment method (bank card, QIWI, Yandex Money account, etc.)
After specifying payment details and confirming payment, payment for the goods will occur.
If you have a bank card in a currency other than the ruble, then the money will be debited from the card at the rate of the Central Bank of Russia at the time of the purchase.
This payment method is optimal for residents of Russia, Kazakhstan and Belarus.
Official website of the Yandex Kassa payment system https://kassa.yandex.ru
Front shock absorbers for Toyota Corolla E120
The front shock absorbers supplied for the ninth generation Corolla are divided into right-hand and left-hand. The original catalog number will differ depending on the body type and country of assembly of the car, but if necessary they can be interchanged. The technical characteristics of the front shock absorbers for the Toyota Corolla E120 are shown in the table: Original numbers and sizes of the front shock absorbers of the Toyota Corolla E120
| Original numbers and sizes of front shock absorbers Toyota Corolla E120 | |||||||
| vendor code | Assembly | Rod diameter, mm | Case diameter, mm | Length in compressed state, mm | Rod stroke, mm | price, rub. | |
| Left | Right | ||||||
| 4852080003 | 4851080103 | Europe+ UK (sedan, station wagon) | 22 | 51 | 336 | 184 | 6973 |
| 4851009711 | 4852009611 | 6713 | |||||
| 4852009890 | 4851009A60 | UK (hatchback) | 22 | 51 | 330 | 145 | 6271 |
Payment via Portmone
After selecting payment through Portmone, the payment system will launch, where you need to select the payment method: bank card or Portmone account.
The price in the Portmone payment system is converted into dollars at the exchange rate of the Central Bank of the country where you are located.
If you have a bank card in a currency other than the dollar, then the money will be debited from the card at the rate of the Central Bank of your country at the time of the purchase.
After specifying payment details and confirming payment, payment for the goods will occur.
Official website of the Portmone payment system https://www.portmone.com
Replacement process 120-150 body
Before you begin, you need to prepare the following parts and tools:
- Four new racks, it is better to purchase original ones;
- Set of open-end wrenches;
- Large and small wrench with a set of heads;
- Ties or spring puller;
- Jack;
- A lubricating fluid, such as WD 40, is needed so that the bolts can be easily unscrewed.
In order to replace them, you need to completely remove the entire shock absorber assembly, having previously treated it with lubricating fluid, after which you can proceed to dismantling:
Front
- The hood opens and the main bolt that secures the strut is located, then it is unscrewed;
- Use a 6mm hexagon and a 17mm wrench to unscrew and remove the rod;
- The brake hose fastening bar is removed, and if it is available, the ABS sensor is dismantled with a 14 key;
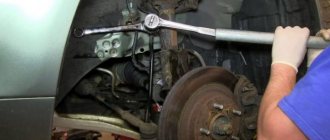
- Using a 19 wrench, unscrew the main bolts that secure the part;
- Carefully remove the strut from under the drive, brake hose and ABS,
- The spring is tightened with a puller or ties and the nut is unscrewed;
- The required part is removed from the spring.
At this point, dismantling can be considered complete. The worn part is replaced with a new one, the nut is placed on the rod, the pullers or ties are fixed and removed, and then everything is installed in the reverse order of removal.
Important: Among the huge assortment, it is recommended to choose original ones as they are of higher quality and more reliable. If you choose a cheap analogue, you will have to change them more often.
Rear
The rear elements are much easier to dismantle; this is done as follows:
- Use a hexagon and a 6mm wrench to unscrew the nut at the strut rod;
- The car is jacked up, the wheel is removed, a 19 mm wrench is taken and the lower nut is unscrewed from the rack;
- The part is removed;
- The spring tightens;
- The required part is removed;
- New Toyota Corolla struts are being installed;
- Everything is put together in reverse order.
Payment via PayPal
After selecting payment via PayPal, the PayPal payment system will launch, where you need to select the payment method: bank card or PayPal account.
If you already have a PayPal account, then you need to log into it and make a payment.
If you do not have a PayPal account and you want to pay using a bank card via PayPal, you need to click on the “Create an Account” button - shown with an arrow in the picture.
PayPal will then prompt you to select your country and provide your credit card information.
After specifying the information required to make the payment, you must click on the “Pay Now” button.
Official website of the PayPal payment system https://www.paypal.com
Analogs of front shock absorbers for Toyota Corolla E120
When choosing to replace the original struts on a Toyota Corolla E120, you can find various options. As a rule, manufacturers offer two strut options for the front axle (depending on the country of manufacture), and the rear axle has the same shock absorbers. The most popular companies are shown in the table below. Kayaba supplies for sale struts of different series for both the front and rear axles (Excel G - standard, to replace the standard ones, Ultra SR - more rigid, for aggressive driving).
| Manufacturer | vendor code | Front left | Front right | price, rub. |
| KYB | WB | 334818 (Excel-G) 324701 (Ultra-SR) | 334817 (Excel-G) 324700 (Ultra-SR) | 3418/3386 4893/5255 |
| KYB | Japan (not for bad roads) | 333359 (Excel-G) | 333358 (Excel-G) | 5196/4990 |
| SACHS | WB Japan | 311914 312228 | 311913 312227 | 3477/3521 3037/12078 |
| Monroe* | WB Japan | E7010 | E7008 | 5919/3494 |
Payment via WebMoney
After selecting payment via WebMoney, the payment system will launch, where you need to select the payment method: bank card or WebMoney wallet.
If you already have a WebMoney wallet, then you need to log into it and make a payment.
If you do not have a WebMoney wallet and you want to pay in another way, you need to select any of the methods that WebMoney offers and make the payment
After specifying payment details and confirming payment, payment for the goods will occur.
Official website of the WebMoney payment system https://www.webmoney.ru/
Analogues of the rear struts of the Toyota Corolla E120
Rear shock absorbers for the Toyota Corolla E120 have a wide range of choices; you can find various alternatives to the original shock absorbers, both by manufacturer and price category, but like the front struts, Kayaba remains the sales leader, due to its reliability and affordability.
| Manufacturer | A country | vendor code | price, rub. |
| KYB | WB | 341816 (Excel-G) | 2819 |
| KYB | Japan (not for bad roads) | 351701 (Ultra-SR) | 7827 |
| SACHS | — | 311915 | 3323 |
| Monroe | — | E1312 | 2944 |
Shock absorber Toyota 4853080309
Shock absorber KYB 341816
Downloading a book
After successfully completing the payment (by any method) and returning to the KrutilVertel store from the payment system website, you will be taken to the successful payment page:
On this page you need to indicate your e-mail, where access to download the book will be sent.
The book you purchased will be in your personal account, from where you can always download it.
Please note that after making the payment, you need to return back from the payment system website to the KrutilVertel website.
Rules to remember
Let's start with the first rule - these spare parts must be replaced in pairs. That is, if the right front strut fails, then you need to replace not only it, but also the left one, even if it is in good condition. This is because the car must have equal rigidity on both sides.
The same applies to the rear struts - we change both, otherwise the car will not hold the road well, even after going through the wheel alignment procedure. And also replacing both parts will make your life easier, since the part that is not replaced will still fail and you will have to repeat all the procedures again.
The second rule applies to people who like to experiment. Let’s say right away that replacing the struts with new ones using different manufacturers or using struts of different stiffness (one in front, another in the back) is categorically not recommended. Your Toyota Corolla Fielder will be unstable and it will be a huge inconvenience for you to drive.
Problems when paying with bank cards
Sometimes difficulties may arise when paying with Visa/MasterCard bank cards. The most common of them:
- There is a restriction on the card for paying for online purchases
- A plastic card is not intended for making payments online.
- The plastic card is not activated for making payments online.
- There are not enough funds on the plastic card.
In order to solve these problems, you need to call or write to the technical support of the bank where you are served. Bank specialists will help you resolve them and make payments.
That's basically it. The entire process of paying for a book in PDF format on car repair on our website takes 1-2 minutes.
Rear shock absorbers for Toyota Corolla E120
Unlike the front ones, the rear pillars are not divided into left-hand and right-hand. The original article number of the spare part differs depending on the body type and type of assembly of the car. Data on sizes and catalog numbers are given in the table.
| Original numbers and dimensions of rear shock absorbers Toyota Corolla E120 | ||||||
| vendor code | Assembly | Rod diameter, mm | Case diameter, mm | Length in compressed state, mm | Rod stroke, mm | price, rub. |
| 4853080309 | Europe | 22 | 51 | 379 | 193 | 6383 |
| 4853009F20 | UK (sedan, station wagon) | 6983 | ||||
| 4853009910 | UK (hatchback) | 4683 | ||||
Analogs of rear struts for Toyota Corolla E150
When replacing original struts on a Toyota Corolla E150, three main manufacturers are in greatest demand: Kayaba, Sachs, Monroe. Manufacturer numbers are given in the table.
| Manufacturer | vendor code | price, rub. |
| KYB | 344811 | 2550 |
| SACHS | 314890 | 2505 |
| Monroe | G1095 | 2170 |
Shock absorber KYB 344811
Shock absorber SACHS 314890
Which struts to choose for a Toyota Corolla?
When choosing struts for a Corolla, you need to take into account the country of manufacture of the car, and also pay attention to the series of shock absorbers (like Kayaba). The most often preferred from companies: Sachs, Kayaba, Monroe. Among the reviews from car owners, Kayaba racks are the most popular. When selecting shock absorbers, it should be taken into account that Corollas supplied to Russia are equipped with gas-oil struts designated for bad roads. The struts that are purchased in Europe are much softer and, accordingly, it is much easier to break through them, their breakdown force is less than that of native PPDs, and motorists do not recommend installing oil struts due to the short travel of the suspension, as a result of which the car sways strongly on them. In addition, the springs are installed on the car not for oil shock absorbers, so you will have to change the springs along with the shock absorbers, and this is an additional expense. It is also not recommended to install gas ones, firstly they are more expensive and secondly they have a high internal gas pressure of about 60 atm. (for gas-oil ones approximately from 5 to 20 atm). Gas ones are less common, mainly oil and gas-oil ones with the so-called gas pressure are used, they have two working elements, oil and gas, gas under pressure is needed to counteract the foaming of the oil during operation.
Front shock absorbers for Toyota Corolla E150
Front shock absorbers for Toyota Corolla E150 (tenth generation, 2006-2013) are divided into left-hand and right-hand according to the installation method. To find the required number, use the table below.
Replacing struts for Toyota Corolla 2007 – 2010
No matter how much you drive, and no matter how you drive, one day you will realize that your car does not behave the way you would like it to (of course, if you are a sober driver). On the highway you can feel uneven response of the suspension, swaying of the car, knocking, “yaw”. These are the first signs that diagnostics are needed, and subsequent repairs to the vehicle's chassis, which include replacing shock absorbers and struts.In this article we will find out how to replace the struts of Toyota Corolla 2007 - 2010
d. Repairs should begin with the acquisition of the necessary parts. In our case, these are racks. There are many types of racks, but we should highlight the most reliable and high-quality ones that will last for many years. Some prefer inexpensive racks, while others, on the contrary, expect longer use. So, there is no need to save on this. It is known that the miser pays twice.
High-quality struts for Toyota Corolla 2007 – 2010
It is recommended to replace all racks at once. Only after this will you experience the beauty of traveling in a stable, not loose car. We buy Tokico stands, why Tokico, you ask? Yes, because there are a lot of positive reviews about these racks. Of course, you can buy a “koni – sport” if you want your car to be very rigid. And so, the most acceptable option is still “Tokiсo”, moderately soft, and at the same time does not allow the car to get out of control.
How to change struts
on a Toyota Corolla 2007 - 2010
The car should be placed on a lift or in a viewing hole. If you have neither one nor the other, you can do it on level ground. But it will be a little more difficult. I want to say right away that replacing the struts of a Toyota Corolla 2007 - 2010 is not much different from the same repair on older generation models. Secure the car so that it does not roll. Open the hood and use a spanner or socket to loosen the central nut on the old strut. If this is not done, then it will be problematic to do this with the rack removed. Next, remove the wheel and put it to the side. Unscrew the bolts securing the brake hoses and ABC from the rack. Then, using a spanner wrench or a 19mm socket, unscrew the two mounting bolts of the strut to the axle. You can jack up the lower arm, and when you feel that the bolts move easily in the holes, remove them. We return to the engine compartment. Unscrew the three nuts securing the upper cup to the car body. We dismantle the rack. Be sure to secure the pin, otherwise the drive may pop out of the gearbox.
Now you need to remove the spring if you don't have a new one. But it is advisable to have it, since the springs have different wear, and this may affect the further operation of the machine. To remove the spring, use “ties”. We securely clamp the lower part of the rack in a vice and install the ties on opposite sides of the spring. Then, using a 14-mm open-end wrench, we compress it evenly, not forgetting to check its condition from time to time. As soon as the spring begins to rotate easily in the seat, stop tightening. Next, unscrew the central nut and remove the spring, boot, and bump stop.
Carefully clamp the new rack in a vice, install the bump stop, boot, and washer. Then we also carefully place the spring in the lower cup, not forgetting about the gasket, and scroll it all the way in a certain place, there is a step there. We put the top cup in place and tighten the central nut. We will tighten it all the way on the car. Next, we relax the ties and remove them. The entire rack is ready to be installed on the car. Installation proceeds in reverse order. Don't forget to tighten the center nut of the strut.
And so, we made sure that replacing struts for Toyota Corolla 2007 - 2010
g is not such a difficult task that can be realistically completed by a person with at least a little knowledge of automotive technology.
Sergey Demin specially for the Avtoliteratura website