Payment for goods and downloading of the book in electronic form (PDF format) is made on the website.
To do this, you need to find the book you are interested in and click on the “Buy” button. The price of the book is indicated on the button.
For convenience, the price on the website for residents of Russia, Belarus and Kazakhstan is presented in rubles.
For residents of Ukraine in hryvnias, and for all other countries - dollars.
After clicking on the “BUY” button, a payment window will open where you can select a payment system with which you can pay for the selected book using any bank card (Visa, MasterCard, MIR, etc.)
When you click on the “Pay by bank card” button, the Portmone payment system will open, which is the easiest way to make a payment.
In addition, the website offers four payment systems for payment:
- Yandex (payment from any bank cards, Yandex Money account, QIWI Wallet, terminals, etc.);
- Portmone (payment from any bank cards, Portmone account);
- PayPal (payment from any bank cards, PayPal account);
- WebMoney (payment from any bank cards, payment from WebMoney wallets).
Payment via Yandex Cashier
After selecting payment via Yandex, the Yandex Cashier payment system will launch, where you need to select a convenient payment method (bank card, QIWI, Yandex Money account, etc.)
After specifying payment details and confirming payment, payment for the goods will occur.
If you have a bank card in a currency other than the ruble, then the money will be debited from the card at the rate of the Central Bank of Russia at the time of the purchase.
This payment method is optimal for residents of Russia, Kazakhstan and Belarus.
Official website of the Yandex Kassa payment system https://kassa.yandex.ru
Payment via Portmone
After selecting payment through Portmone, the payment system will launch, where you need to select the payment method: bank card or Portmone account.
The price in the Portmone payment system is converted into dollars at the exchange rate of the Central Bank of the country where you are located.
If you have a bank card in a currency other than the dollar, then the money will be debited from the card at the rate of the Central Bank of your country at the time of the purchase.
After specifying payment details and confirming payment, payment for the goods will occur.
Official website of the Portmone payment system https://www.portmone.com
Connecting buttons
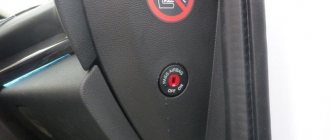
Unfortunately, there are no buttons for the speed limiter in version 84250–12020. There is one option, but it is quite expensive, and not everyone is willing to spend that much.
You can do it differently. Disassemble a fragment of buttons with a picture of a phone. On the diagram you need to find a button with the inscription ASLD, from the original location of the button two cables run along the board to the opening, then the original wiring - they are all there. Next, you need to cut the tracks going to this button and connect them with wires to suitable contacts. It is necessary to check all wires with a tester and do not damage them with screws during assembly.
How to remove the airbag - there was already a description, screw the buttons, neatly lay out the cables and connect the connector to the screw cable.
The most important step is to trim the ears of the airbag, but this is best left to a professional. You also need to remove the stiffener, because if you leave it, it will interfere with the signal (as you know, in this case the signal button does not work).
Finally, connect the pad so as not to pinch the wire. Tighten the screws, attach the plugs and connect the battery.
As for the buttons on the steering wheel of Toyota Corolla 2008, Toyota Corolla 2011, Toyota Corolla 2012 and 2005 in the E151, 120 and 150 body, their steering wheel buttons are practically the same.
Payment via PayPal
After selecting payment via PayPal, the PayPal payment system will launch, where you need to select the payment method: bank card or PayPal account.
If you already have a PayPal account, then you need to log into it and make a payment.
If you do not have a PayPal account and you want to pay using a bank card via PayPal, you need to click on the “Create an Account” button - shown with an arrow in the picture.
PayPal will then prompt you to select your country and provide your credit card information.
After specifying the information required to make the payment, you must click on the “Pay Now” button.
Official website of the PayPal payment system https://www.paypal.com
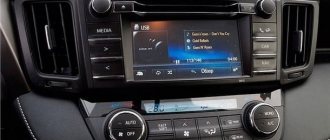
Toyota Corolla E12
Type 2
Details about specific buttons, controls, and functions are described in alphabetical order in the following list.
1 2 3 4 5 6 (preset buttons)
These buttons are used to preset and tune radio stations.
To preset a radio station to a specific button: Tune the receiver to the desired radio station. (See the description of the SEEK/TRACK or TUNE button.) Press and hold the button until a beep sounds—this will indicate that the radio station is set to that button. The preset button number appears on the display.
To call a preset radio station: Press the button of the desired radio station. The preset button number and radio station frequency appear on the display.
This radio can memorize one AM and three FM radio stations under each button. (When you press the AM-FM button, the display will show AM, FM1, FM2 or FM3n.)
CD eject button
This button is used to eject one or all CDs.
To eject the current CD, press and release the button.
To eject a specific CD, press the “DISC V” button or the “DISC L” button until the number of the disc you want to eject appears on the display. Press and release the eject button.
To eject all CDs at once, press and hold the eject button until the beep sounds. The CD that was last played before the eject button was pressed will be ejected first. If the ejected disc is not removed for a long time, the eject function is cancelled.
AF (alternative frequencies)
This button is used to search for RDS (Radio Information System) radio stations throughout the entire band.
Each time you press the AF button, the AF mode changes in the following order:
AF on: “AF” appears on the display. In this mode, the radio switches to a radio station with good reception within the same PI (Program Identification) code.
REG on: “AF REG” appears on the display. In this mode, the radio switches to a radio station with good reception within the same local PI (Program Identification) code.
To turn off the AF function, press the button again.
A M-FM
Press the AM-FM button to switch between AM and FM bands. The display will show “AM”, “FM1”, “FM2” or “FM3”.
AST (auto save)
This button is used to automatically preset frequencies of up to 6 radio stations for each band (FM3 and AM).
If you use the "AST" button in FM mode (FM1, FM2, FM3), automatic storage is performed in FM3 mode. For example, even if you autosave in FM1 mode, the mode changes to FM3.
Press the “AST” button until a beep sounds. If the radio cannot find any radio station, it will receive the frequency to which it was tuned before turning on “AST”.
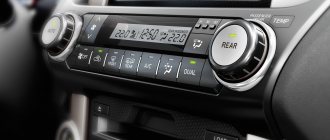
AUDIO CONTROL / ENTER (Tone and balance adjustment function)
Each time you press the AUDIO CONTROL/ENTER button, the mode changes. Rotate the button to adjust tone and balance.
BAS: Adjusts the bass frequency. Display ranges from - 5 to 5.
TRE : Treble adjustment. Display ranges from - 5 to 5.
FAD: Adjusts the balance between the front and rear speakers. Display ranging from F7 to R7.
BAL: Adjusts the balance between the right and left speakers. Showing ranging from L7 floR7.
DISC (compact disc)
Press the "DISC" button to play the CD.
When the audio system is in CD mode, the display shows the track number or
The number of the track and disc currently playing.
Fault messages
If there is a problem with the player, the system will display one of the following six error messages.
"WAIT": The CD player may be too hot. Let the player cool down.
"ERR1": The disc may be dirty, damaged, or inserted incorrectly (upside down). Clean the disc and reinsert it.
"NO DISC": The individual unit's CD changer is empty. Insert the disc.
"ERR 3": Problem within the system. Remove the disc. Insert the disc again.
';ERR 4″: Overload. Have it inspected by any authorized Toyota dealer or repairer or other suitably qualified and equipped professional.
"CD OPEN": The CD changer cover of the individual unit is open. Close the CD changer cover.
If the problem persists, take your vehicle to any authorized Toyota dealer or repairer or other properly qualified and equipped professional.
DISC V A
Use these buttons to select the disc you want to listen to.
Press the “DISC V” or “DISC up” button until the disc number you want to listen to appears on the display.
DISP
This button is used to change the display for CDs that contain text data.
To change the display, quickly press and release the DISP button while a CD is playing. The display changes in order from playing time to disc title, to track title, then back to playing time.
If the button is pressed while playing a CD that does not contain text data, “NO TITLE” appears on the display.
If the full disc or track name does not appear on the display, press and hold the button until a beep appears. The remainder of the title appears on the display.
LOAD
This button is used to load CDs into the CD player. This CD player can hold up to six discs.
To load only one CD, quickly press and release the button. When the lights on either side of the slot turn green, insert the CD. Once the CD is loaded, the slot shutter will close.
If no CD is inserted, the shutter will close after 15 seconds.
To load multiple CDs, press and hold the button (until a beep sounds when the audio system is on). When the lights on either side of the slot turn green, insert the first CD. Once the CD is loaded, the slot shutter will close. After a few seconds, the shutter will automatically open again and the indicators will turn green so that the next disc can be inserted. The same process can be applied to boot the remaining drives.
If a CD is not inserted, the shutter will close after 15 seconds.
PTY (program type)
If you press the mouth button while receiving an RDS radio station, the current program type appears on the display.
Each time you press the PTY button, the program type changes in the following order:
about NEWS (news)
about SPORTS (sports)
about TALK (conversation)
about POP (pop music)
about CLASSICS (classics)
If no PTY code of an RDS radio station is received, “NO PTY” appears on the display.
When the L or V side of the SEEK^RACK button is pressed while the program type is displayed on the display, the radio will search for a station that broadcasts the PTY code. If the radio cannot find any radio station, “NOTHING” will appear on the display.
If the system is left untouched for 6 seconds while a program type is displayed, or if another operation is performed, the program type indication will disappear from the display and the radio will receive the program type last displayed.
ALARM: If an emergency message is received while receiving an FM radio station or SLT mode, you will hear a beep and “ALARM” will appear on the display.
RAND (random play)
There are two shuffle functions—you can listen to tracks on one CD in random order, or you can listen to tracks on all CDs in the store in random order.
To play tracks on the same disc in random order: Quickly press and release the RAND button. “RAND” will appear on the display and the player will play in random order the tracks on the disc you are listening to. To turn off the random play function, press this button again.
To play all tracks in a store in random order: Press and hold the RAND button until a beep sounds. “D-RAND” will appear on the display and the player will play all tracks on all discs in the magazine in random order. To turn off the random play function, press this button again.
PWR-VOL (power and volume)
Press the "PWR-VOL" button to turn the audio system on or off. Rotate the "PWR-VOL" button to adjust the sound volume.
RPT (replay)
There are two repeat play functions—you can repeat play a track on a disc or the entire CD.
Repeating a track: Quickly press and release the RPT button while a track is playing. “RPT” will appear on the display. When a track ends, it will play again automatically. To turn off the repeat function, press this button again.
To play a disc repeatedly: Press and hold the RPT button until a beep sounds. “D-RPT” will appear on the display. The player will repeat all tracks on the disc you are listening to. When the disc runs out, the player will automatically return to the first track on the disc and play again. To turn off the repeat playback function, press this button again.
SCAN
There are two scanning functions—you can scan tracks on a specific disc or scan the first tracks of all discs in the store.
Scanning tracks on a disc: Quickly press and release the SCAN button. “SCAN” will appear on the display and the player will scan all the tracks on the disc you are listening to. To stop scanning, click this button again. If the player has scanned all the tracks on the disc, it will stop scanning.
Scanning the first tracks of all discs in the store;
Press and hold the SCAN button until a beep sounds. “D-SCAN” will appear on the display and the player will scan the first track of the next disc. To stop scanning, click this button again. If the player has scanned all discs, it will stop scanning.
SEEK/TRACK
Radio
In seek mode, the radio finds and receives the next radio station up or down the band.
To find the next station, quickly press and release the L or V side of the SEEK/TRACK button. Do this again to find the radio station after this one.
CD player
Using this button, you can either skip up/down to another track, or fast forward/backward the track you are listening to.
Skip tracks up/down: Quickly press and release the L or V side of the SEEK/TRACK button. The track number appears on the display.
Fast forward/rewind tracks:
Press and hold the L or V side of the SEEWTRACK button until a beep sounds. As long as you hold the button, the player will fast forward/reverse the track. When you release the button, the player will resume playback.
ST (stereo reception) indication
Your radio automatically switches to stereo reception when it receives a stereo broadcast. “ST” appears on the display. If the signal becomes weak, the radio receiver lowers the channel diversity value to prevent! formation of noise due to a weak signal. If the signal becomes extremely weak, the radio switches from stereo to mono reception.
TA (traffic messages)
This button is used to receive TA radio stations across the entire frequency range.
EON (Additional Enhanced Network) System—If the RDS (with EON data) radio station you are listening to does not broadcast a traffic information program in TA (traffic announcements) mode, the radio switches to the traffic information program automatically using the EON AF list. After the traffic information ends, the radio automatically returns to the original program. A beep tells you when this function starts and stops working.
For FM reception:
Press the “TA” button to switch the radio mode to TP (road program). “TP” will appear on the display.
In TP mode, the radio will begin searching for a TP radio station. If the radio finds a TP radio station, the program name will appear on the display. When receiving a TA radio station, the radio will automatically switch to the traffic information program. At the end of the program, the original operating mode is restored. If the AF mode is also turned on, the radio will search for a TP radio station using the AF list.
Press the "TA" button again to switch the radio mode to TA. “TA” will appear on the display and the radio will lower the volume of the FM radio station.
In TA mode, the radio will begin searching for the TP radio station. It will sound only when the TR radio station is received. When a TP radio station is received, the program service name appears on the display. If the AF mode is also turned on. The radio will search for a TP radio station using the AF list.
While searching for a TP radio station, “TP SEEK” appears on the display. If the radio cannot find any TP radio station, “NOTHING” appears on the display for 2 seconds and starts searching for a TP radio station again.
If a TP signal is not received within 20 seconds of turning on the TP mode, the radio will automatically search for another TP radio station.
When listening to a CD:
Press the “TA” button to switch the radio mode to TA. “TA” will appear on the display.
When the traffic information program starts, the “CD” mode is interrupted and the traffic information program is automatically received. At the end of the program, the original operating mode is restored.
Volume memory function “TA” - The volume when receiving traffic information is remembered.
The sound volume memory range is limited: if the volume of the previous reception is greater than the maximum volume for the memory, it will decrease to the maximum volume of the memory, and if less, it will increase to the minimum volume.
You can adjust the volume independently of the stored “TA” volume when receiving a “TA” radio station. (For reference, see "PWR-VOL".)
To return to normal mode from the TA mode, press the “TA” button again.
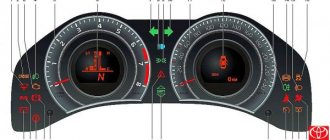
TRIP/NAVI
Each time you press the TRIP/NAVI button, the display shows in order the average fuel consumption, the current fuel consumption and the average vehicle speed. (For details, see the Multi-Information Display chapter in Section 1-9.)
TUNE
Turn the TUNE button clockwise to step up the range. Turn the button counterclockwise to step down the range.
Payment via WebMoney
After selecting payment via WebMoney, the payment system will launch, where you need to select the payment method: bank card or WebMoney wallet.
If you already have a WebMoney wallet, then you need to log into it and make a payment.
If you do not have a WebMoney wallet and you want to pay in another way, you need to select any of the methods that WebMoney offers and make the payment
After specifying payment details and confirming payment, payment for the goods will occur.
Official website of the WebMoney payment system https://www.webmoney.ru/
Downloading a book
After successfully completing the payment (by any method) and returning to the KrutilVertel store from the payment system website, you will be taken to the successful payment page:
On this page you need to indicate your e-mail, where access to download the book will be sent.
If you are already registered on our website, then simply follow the link to your personal account.
The book you purchased will be in your personal account, from where you can always download it.
Please note that after making the payment, you need to return back from the payment system website to the KrutilVertel website.
If for some reason you did not return back to the site and closed the payment system tab with a message about the successful completion of the payment, please let us know - we will send you a letter indicating access to download the book.
Problems when paying with bank cards
Sometimes difficulties may arise when paying with Visa/MasterCard bank cards. The most common of them:
- There is a restriction on the card for paying for online purchases
- A plastic card is not intended for making payments online.
- The plastic card is not activated for making payments online.
- There are not enough funds on the plastic card.
In order to solve these problems, you need to call or write to the technical support of the bank where you are served. Bank specialists will help you resolve them and make payments.
That's basically it. The entire process of paying for a book in PDF format on car repair on our website takes 1-2 minutes.
If you still have any questions, you can ask them using the feedback form, or write us an email at [email protected]
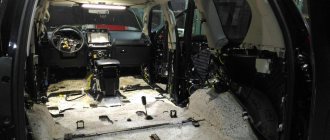
Instructions
- The first thing to do is to align the steering wheel and wheels straight.
- Disconnect the battery, wait a little (about 2-3 minutes), then remove the plugs from the steering wheel (lower part), then you need to unscrew one screw on both sides, a screwdriver with an asterisk bit will help.
- Disconnect the airbag and disconnect the wires.
- It is necessary to make marks on the steering wheel and shaft to secure them after removal. Unscrew the nut with a wrench.
- Remove the steering wheel, as well as the lower fragment of the casing, disconnect the old wires and disconnect the screw cable (there are 3 of them), then connect a new cable and connect the wires.
- Now you need to put the casing in place, you also need to break the safety stop (it prevents the cable from rotating). It is important not to move it before installing the steering wheel; the opening should be at the top.
- Connect the steering wheel, aligning the previously made marks.
- Connect the cruise control cable and secure the joystick with 2 clips.
- Connect the airbag and horn key.
- Twist the pillow, install a new plug with a connector for the lever on the right, and the old one on the left.
- Connect the battery.
That's it, the cruise control switch is connected.