Payment for goods and downloading of the book in electronic form (PDF format) is made on the website.
To do this, you need to find the book you are interested in and click on the “Buy” button. The price of the book is indicated on the button.
For convenience, the price on the website for residents of Russia, Belarus and Kazakhstan is presented in rubles.
For residents of Ukraine in hryvnias, and for all other countries - dollars.
After clicking on the “BUY” button, a payment window will open where you can select a payment system with which you can pay for the selected book using any bank card (Visa, MasterCard, MIR, etc.)
When you click on the “Pay by bank card” button, the Portmone payment system will open, which is the easiest way to make a payment.
In addition, the website offers four payment systems for payment:
- Yandex (payment from any bank cards, Yandex Money account, QIWI Wallet, terminals, etc.);
- Portmone (payment from any bank cards, Portmone account);
- PayPal (payment from any bank cards, PayPal account);
- WebMoney (payment from any bank cards, payment from WebMoney wallets).
Payment via Yandex Cashier
After selecting payment via Yandex, the Yandex Cashier payment system will launch, where you need to select a convenient payment method (bank card, QIWI, Yandex Money account, etc.)
After specifying payment details and confirming payment, payment for the goods will occur.
If you have a bank card in a currency other than the ruble, then the money will be debited from the card at the rate of the Central Bank of Russia at the time of the purchase.
This payment method is optimal for residents of Russia, Kazakhstan and Belarus.
Official website of the Yandex Kassa payment system https://kassa.yandex.ru
Payment via Portmone
After selecting payment through Portmone, the payment system will launch, where you need to select the payment method: bank card or Portmone account.
The price in the Portmone payment system is converted into dollars at the exchange rate of the Central Bank of the country where you are located.
If you have a bank card in a currency other than the dollar, then the money will be debited from the card at the rate of the Central Bank of your country at the time of the purchase.
After specifying payment details and confirming payment, payment for the goods will occur.
Official website of the Portmone payment system https://www.portmone.com
Replacement
To carry out all the necessary work you need to prepare the following tools:
- Standard set with keys;
- Wheel wrench with jack;
- Thrust shoe;
- Special lubricant such as WD-40 and wire.
Front e 150
When all the necessary tools are ready, you can proceed to work:
- To secure the car under the wheels, we install shoes;
- We pump out the fluid from the main brake cylinder;
- We unscrew the wheel, before removing it, slightly loosen the bolts that secure it, this can be done with a wheel wrench, after which we jack up the vehicle and remove the wheel;
- We unscrew the lower bolt of the caliper, lift it and, for convenience, fix it with wire;
- We remove the pads;
- We unscrew the top bolt that holds the caliper and disconnect it from the bracket; if it is difficult to unscrew it, you can use special lubricant WD-40;
- We turn the steering wheel in the direction from which the work is being done, then you need to unscrew a couple of bolts and caliper brackets, after which it needs to be removed;
- There are holes on the disk into which you need to screw the bolts 8 in all the way, after which you need to tap the disk with a hammer (this is done because they stick together, which creates difficulties during removal), after which it can be dismantled;
- We remove the disk.
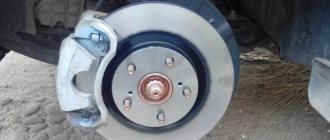
Next, a new brake disc is installed; before installing it, the installation site can be cleaned of dirt with a special metal brush.
It is important to know that when replacing a disc, it is advisable to immediately replace the brake pads, since they wear out unevenly, and if they are not replaced, the discs will also wear out unevenly.
Rear 2008
The rear brake discs on the Toyota Corolla are changed in the same way as the front ones, but there is a slight difference:
- You need to release the handbrake;
- Before dismantling, you need to bring the handbrake pads together with a screwdriver;
- When the discs are changed, the pads must first be spread apart so that they do not rotate, and then brought together so that they rotate freely.
Payment via PayPal
After selecting payment via PayPal, the PayPal payment system will launch, where you need to select the payment method: bank card or PayPal account.
If you already have a PayPal account, then you need to log into it and make a payment.
If you do not have a PayPal account and you want to pay using a bank card via PayPal, you need to click on the “Create an Account” button - shown with an arrow in the picture.
PayPal will then prompt you to select your country and provide your credit card information.
After specifying the information required to make the payment, you must click on the “Pay Now” button.
Official website of the PayPal payment system https://www.paypal.com
Payment via WebMoney
After selecting payment via WebMoney, the payment system will launch, where you need to select the payment method: bank card or WebMoney wallet.
If you already have a WebMoney wallet, then you need to log into it and make a payment.
If you do not have a WebMoney wallet and you want to pay in another way, you need to select any of the methods that WebMoney offers and make the payment
After specifying payment details and confirming payment, payment for the goods will occur.
Official website of the WebMoney payment system https://www.webmoney.ru/
Downloading a book
After successfully completing the payment (by any method) and returning to the KrutilVertel store from the payment system website, you will be taken to the successful payment page:
On this page you need to indicate your e-mail, where access to download the book will be sent.
If you are already registered on our website, then simply follow the link to your personal account.
The book you purchased will be in your personal account, from where you can always download it.
Please note that after making the payment, you need to return back from the payment system website to the KrutilVertel website.
If for some reason you did not return back to the site and closed the payment system tab with a message about the successful completion of the payment, please let us know - we will send you a letter indicating access to download the book.
Corolla servicing
Like any other system installed on another car, it needs timely maintenance. This issue includes replacing the pads, checking the brake disc for damage, as well as measuring its thickness, and finally, replacing the brake fluid, which must meet the DOT3 and DOT4 standards.
Servicing a Toyota Corolla is a real pleasure. The simplicity of the car’s design allows everything to be done quickly and without any problems with the complexity of the system. As a rule, almost every skilled driver can independently replace the pads, drain and refill brake fluid, and bleed it correctly.
Problems when paying with bank cards
Sometimes difficulties may arise when paying with Visa/MasterCard bank cards. The most common of them:
- There is a restriction on the card for paying for online purchases
- A plastic card is not intended for making payments online.
- The plastic card is not activated for making payments online.
- There are not enough funds on the plastic card.
In order to solve these problems, you need to call or write to the technical support of the bank where you are served. Bank specialists will help you resolve them and make payments.
That's basically it. The entire process of paying for a book in PDF format on car repair on our website takes 1-2 minutes.
If you still have any questions, you can ask them using the feedback form, or write us an email at [email protected]
Brake system Toyota Corolla
- Repair manuals
- Repair manual for Toyota Corolla 1992-1998.
- Brake system
9.0 Braking system The models described in this manual are equipped with a hydraulic dual-circuit braking system with separation between the front and rear wheels.
Disc brakes are installed on the front wheels, and drum or disc brakes on the rear wheels, depending on the model. Both front and rear brakes are... 9.1 Technical data Type of brake fluid (see subsection 2.1) Brake pedal height: – models with right-hand drive 148.5 – 158.4 mm – models with left-hand drive 138.7 – 148, 6 mm Brake pedal free play 1.0 – 6.1 mm Brake pedal travel minimum 70.1 m…
9.2 Anti-lock brake system (ABS) Location of anti-lock brake system (ABS) elements 1. ABS activation indicator light 2. ABS system drive 3. Control relay 4. Electronic control unit 5. Sensor rotor 6. Front wheel speed sensor 7. Speed sensor rotation of the rear...
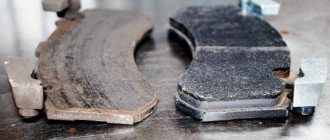
9.3 Front brake pads Warning Brake pads must be replaced on both wheels at once - never replace brake pads on just one wheel. Dust resulting from brake pad wear contains asbestos, which is hazardous to health. Do not blow it out with compressed air or inhale it...
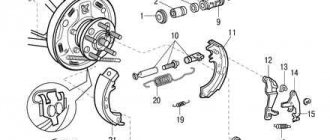
9.4 Front brake caliper Caliper elements model PE54 1. Dust cover 2. Pad holder 3. Anti-noise pad 4. Internal brake pad (with wear indicator) 5. Pad mounting plates 6. External brake pad 7. Anti-noise pad 8. Anti-noise spring…
9.5 Rear disc brake pads Warning Brake pads must be replaced on both wheels at once - never replace brake pads on just one wheel. Dust resulting from brake pad wear contains asbestos, which is hazardous to health. Do not blow it out with compressed air or in...
9.6 Rear disc brake caliper Elements of the rear disc brake caliper 1. Bolt 2. Bushing 3. Pad holder 4. Brake disc 5. Bolt cover 6. Bushing 7. Handbrake extension 8. Adjusting bolt 9. Adjustment bolt travel stop 10. Spring stop 11. Spring fastening 12. ...
9.7 Brake disc Inspection PERFORMANCE ORDER 1. Unscrew the wheel nuts, lift the car and install it on supports. Remove the wheel and tighten the two nuts to secure the disc. 2. Remove the brake caliper, following the instructions given in (see subsection 9.4) (front disc...
9.8 Rear drum brake pads Rear drum brake components 1. Air release valve 2. Piston 3. Boot 4. Cap 5. Spring 6. Washer 7. Brake shoe lever 8. Hand brake lever 9. C-shaped washer 10. Rear brake block 11. Tension spring 12. Adjustment mechanism...
9.9 Working cylinder Warning If it is necessary to overhaul the working cylinder (usually due to a brake fluid leak), first find out the price of spare parts or the cost of an already restored or new cylinder. Before you start rebuilding, purchase a repair kit. Always repair both working c...
9.10 Master cylinder of the brake system Mounting elements for the master cylinder of the brake system Brake system without ABS: 1. Tee 2. Master cylinder 3. Gasket 4. Vacuum booster Brake system with ABS: 1. Branch 2. Master cylinder 3. Gasket 4. Vacuum booster ...
9.11 Brake Hoses and Pipes Inspection Approximately every six months, with the vehicle raised and supported, the rubber hoses connecting the steel brake pipes to the front and rear brakes should be inspected for cracks, signs of wear, brake fluid leaks, swelling or other damage. Rezinov...
9.12 Hydraulic brake system Warning Safety glasses must be worn when bleeding the brake system. If brake fluid gets into your eyes, rinse them immediately with water and consult a doctor. Bleeding Bleeding the brake system must be carried out in order to remove from it all the air that could…
9.13 Vacuum booster Elements of the vacuum booster 1. Vacuum hose 2. Gasket 3. Pin 4. Pin 5. Return spring 6. Vacuum booster Checking operation PERFORMANCE ORDER 1. Depress the brake pedal several times with the engine off and check that it every…
9.14 Handbrake Adjustment When properly adjusted, the handbrake lever should lift 4–7 clicks when pulled with medium force. If it goes up by fewer clicks, there is a chance that the car is not releasing the handbrake completely and the brake pads are constantly touching...
9.15 Handbrake cables Replacement PERFORMANCE ORDER Cables between the equalizer and brakes 1. Unscrew the nuts securing the rear wheels, lift the rear of the car and install it on supports. Block the front wheels. Remove the rear wheel. 2. Check that the car is not standing on the handbrake...
9.16 Brake pedal Brake pedal height Brake pedal height is the distance between the pedal and the floor when the brake pedal is released. 1. Pushrod 2. Brake light switch 3. Brake pedal height Brake pedal free play Brake pedal free play is the distance between the…
9.17 Brake light switch The brake light switch is mounted on a bracket on top of the brake pedal. The switch turns on the brake lights at the rear of the vehicle when you press the brake pedal. Check PERFORMANCE ORDER 1. To check the brake light switch, check whether the brake light lights come on...
9.18 Vehicle Load Sensing Pressure Limiting Valve Warning Due to the need to use special equipment to accurately check and adjust the brake fluid pressure after installing (or connecting) the valve, it is recommended that this work be carried out by specialists. Description of operations for removing and installing the actuator valve...
↓ Comments ↓
1. Introduction
1.0 Introduction 1.2 Model codes 1.3 Control panel 1.4. Instrument cluster 1.5. Controls and instrumentation 1.6. Starting the engine and driving the car 1.7 Technical data 1.8 Adjustment data, filling containers and liquids 1.9. Possible faults
2. Maintenance
2.0 Maintenance 2.1 Technical data 2.2 Location of components and parts 2.3 Checking fluid levels 2.4 Checking the condition of tires and tire pressure 2.5. Maintenance every 5000 km or 3 months 2.6. Maintenance every 12,000 km or 6 months 2.7. Maintenance every 24,000 km or 12 months 2.8. Maintenance every 50,000 km or 2 years 2.9 Maintenance every 100,000 km or 4 years
3. Engines
3.0 Engines 3.1. Technical data 3.2. Diesel engine 3.3. Engine electrical equipment
4. Cooling and heating systems
4.0 Cooling and heating systems 4.1 Technical data 4.2 Antifreeze 4.3 Thermostat 4.4 Fan and fan relay 4.5 Radiator and expansion tank 4.6 Coolant pump 4.7 Coolant temperature sensor 4.8 Fan unit 4.9 Heater radiator 4.10. Heater and air conditioning control panel 4.11 Air conditioner dehumidifier 4.12 Compressor 4.13 Condenser 4.14 Evaporator and expansion valve
5. Fuel and exhaust systems
5.0 Fuel and exhaust systems 5.1 Technical data 5.2 Procedure for decompressing the fuel system 5.3 Fuel pump and fuel pressure 5.4 Removing and installing the fuel pump 5.5 Fuel level sensor 5.6 Fuel lines and joints 5.7 Fuel tank 5.8 Cleaning and repairing the fuel tank 5.9 Air filter 5.10 Throttle cable dampers 5.11 Electronic fuel injection system (EFI system) 5.12 Checking and replacing EFI system units 5.13 Exhaust system maintenance
6. Toxicity reduction system
6.0 Toxicity reduction system 6.1 Technical data 6.2 Electronic control system 6.3 Electronic control unit 6.4. On-board diagnostic system 6.5. Sensors of the automatic engine control system 6.6 Gasoline vapor recovery system 6.7 Recirculation system (EGR system) 6.8 Forced crankcase ventilation system (PCV system) 6.9 Catalytic converter
7. Gearboxes
7.0 Gearboxes 7.1. Technical data 7.2. Automatic transmission
8. Clutch and axle shafts
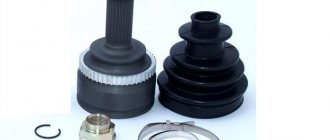
8.0 Clutch and axle shafts 8.1 Technical data 8.2. Clutch 8.3. Half shaft
9. Brake system
9.0 Brake system 9.1 Technical data 9.2 Anti-lock brake system (ABS) 9.3 Front brake pads 9.4 Front brake caliper 9.5 Rear disc brake pads 9.6 Rear disc brake caliper 9.7 Brake disc 9.8 Rear drum brake pads 9.9 Slave cylinder 9.1 0 Brake master cylinder 9.11 Brake hoses and pipes 9.12 Hydraulic brake system 9.13 Vacuum booster 9.14 Handbrake 9.15 Handbrake cables 9.16 Brake pedal 9.17 Brake light switch 9.18 Vehicle load-sensing pressure limiting valve
10. Suspension and steering
10.0 Suspension and steering 10.1 Technical data 10.2 Suspension strut (front) 10.3 Suspension strut 10.4 Anti-roll bar (front) and bushings 10.5 Control arm 10.6 Ball joints 10.7 Steering knuckle and hub 10.8 Hub and wheel bearing (front) 10 .9 Anti-roll bar stability (rear suspension) and bushings 10.10 Suspension strut (rear) 10.11 Longitudinal link 10.12 Transverse suspension links 10.13 Hub and bearing (rear wheel) 10.14 Rear wheel hub bracket 10.15 Steering 10.16 Steering wheel 10.17 Tie rod ends 10.1 8 Steering gear 10.19 Power steering pump steering 10.20 Power steering system 10.21 Wheels and tires 10.22 Wheel alignment
11. Body
11.0 Body 11.1 Maintenance and Repair 11.2 Vinyl Trim 11.3 Upholstery and Carpets 11.4 Minor Body Damage Repair 11.5 Major Body Damage Repair 11.6 Hinges and Locks 11.7 Windshield and Fixed Windows 11.8 Hood 11.9 Trunk Lid 11.10 Rear Door (Stagon Models) ") 11.11 Rear door support pillar 11.12 Door decorative panel 11.13 Door 11.14 Door latch, lock cylinder and handles 11.15 Door window glass 11.16 Bumpers 11.17 Outside mirror 11.18 Seats 11.19 Instrument cluster frame 11.20 Glove compartment 11.21 Central decor ive panel 11.22 Steering column cover 11.23 Lower steering column trim panel 11.24 Console 11.25 Instrument panel 11.26 Radiator grille 11.27 Hood ventilation grille 11.28 Seat belts
12. Electrical equipment
12.0 Electrical equipment 12.1 Fuses 12.2 Fuseable jumpers 12.3 Circuit breakers 12.4 Relays 12.5 Turn signal/hazard light switches 12.6 Combination switch 12.7 Steering column switches 12.8 Ignition switch and lock drum 12.9 Rear window defroster switch 12. 10 Heated rear window 12.11 Radio and speakers 12.12 Antenna 12.13 Headlight bulbs 12.14 Headlights 12.15 Replacing bulbs 12.16 Daytime running lights system 12.17 Windshield wiper motor 12.18 Instrument panel 12.19 Horn 12.20 Cruise control system 12.21 Central locking system 12.22 Window lift system 12.23 Rear view mirrors with electric drive 12.24 Airbag 12.25. Electrical circuits