Payment for goods and downloading of the book in electronic form (PDF format) is made on the website.
To do this, you need to find the book you are interested in and click on the “Buy” button. The price of the book is indicated on the button.
For convenience, the price on the website for residents of Russia, Belarus and Kazakhstan is presented in rubles.
For residents of Ukraine in hryvnias, and for all other countries - dollars.
After clicking on the “BUY” button, a payment window will open where you can select a payment system with which you can pay for the selected book using any bank card (Visa, MasterCard, MIR, etc.)
When you click on the “Pay by bank card” button, the Portmone payment system will open, which is the easiest way to make a payment.
In addition, the website offers four payment systems for payment:
- Yandex (payment from any bank cards, Yandex Money account, QIWI Wallet, terminals, etc.);
- Portmone (payment from any bank cards, Portmone account);
- PayPal (payment from any bank cards, PayPal account);
- WebMoney (payment from any bank cards, payment from WebMoney wallets).
Payment via Yandex Cashier
After selecting payment via Yandex, the Yandex Cashier payment system will launch, where you need to select a convenient payment method (bank card, QIWI, Yandex Money account, etc.)
After specifying payment details and confirming payment, payment for the goods will occur.
If you have a bank card in a currency other than the ruble, then the money will be debited from the card at the rate of the Central Bank of Russia at the time of the purchase.
This payment method is optimal for residents of Russia, Kazakhstan and Belarus.
Official website of the Yandex Kassa payment system https://kassa.yandex.ru
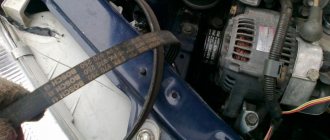
How to replace the drive belt yourself
To install a new belt, you will need a set of wrenches, as well as a wrench and a set of turning attachments.
The whole procedure will take less than an hour and proceeds as follows:
- First you need to remove the protection to gain access to the rotary bolt that regulates the belt tension;
- Next you need to press out the bolt. You should not try to unscrew the part with keys or treat it with special liquids - dismantling will require a wrench or a rough lever;
- After releasing the bolt, the tension of the drive belt decreases, making the product easily accessible;
- The new belt is put on the pulley in the same way as the old one, and the fixing bolt is clamped with a lever.
Note! When installing the drive belt, it is important to pay attention to the location of the hooking elements - if installed incorrectly, the belt may come off or break when the gas pedal is pressed sharply.
If the belt tension is insufficient, the roller rollers will need to be replaced. It is recommended to change the drive belt on the Corolla E150 every 60,000 km, and roller rollers must be replaced every 100-110,000 km.
Payment via Portmone
After selecting payment through Portmone, the payment system will launch, where you need to select the payment method: bank card or Portmone account.
The price in the Portmone payment system is converted into dollars at the exchange rate of the Central Bank of the country where you are located.
If you have a bank card in a currency other than the dollar, then the money will be debited from the card at the rate of the Central Bank of your country at the time of the purchase.
After specifying payment details and confirming payment, payment for the goods will occur.
Official website of the Portmone payment system https://www.portmone.com
Review of analogues and original components
When selecting a belt for the E150 generator, it is recommended to pay attention to the original products from the company - src=»https://g-light-auto.ru/wp-content/uploads/posts/generator-privodnoi-remen-toiota-korolla-150- zamena/generator-privodnoi-remen-toiota-korolla-150-zamena_0.jpg" class="aligncenter" width="644″ height="402″[/img]
Dealer belts have a quality guarantee and are characterized by a long service life, which prevents the possibility of the product breaking when used at high speeds or in case of engine overheating.
| Manufacturer | vendor code | Compatibility by car year | Approximate cost, rub. |
| OEM | 16620-22032 | 2006-2014 | 1650 |
| OEM | 09916-02664 | 2006-2014 | 1660 |
| Novline | 1357022010 | 2008-2015 | 1560 |
| API | 25658528 | 2006-2017 | 1590 |
| TYG | 13506-0D020 | 2006-2018 | 1700 |
| TYG | 13540-0D010 | 2006-2018 | 1690 |
It is necessary to select belts by checking the vehicle VIN code and the spare part number for compatibility. If a non-standard model is installed on a car, it is advisable to choose a new belt of a similar form factor and degree of rupture.
Note! The front surface of the new belt must have a quality guarantee stamp and the name of the manufacturer.
Payment via PayPal
After selecting payment via PayPal, the PayPal payment system will launch, where you need to select the payment method: bank card or PayPal account.
If you already have a PayPal account, then you need to log into it and make a payment.
If you do not have a PayPal account and you want to pay using a bank card via PayPal, you need to click on the “Create an Account” button - shown with an arrow in the picture.
PayPal will then prompt you to select your country and provide your credit card information.
After specifying the information required to make the payment, you must click on the “Pay Now” button.
Official website of the PayPal payment system https://www.paypal.com
Toyota Corolla Alternator Belt Replacement
Read and see how to change the belt
generator for Toyota Corolla
A motorist should never forget that a car is, first of all, a technique, and it has the ability to break down, and usually always suddenly. Although can a breakdown be expected? When planning a long-term or short-term trip, you must always be prepared for any surprises.
This could be a tire puncture, a brake water leak, or a broken alternator belt , so that these little things do not spoil the driving memory.
Drivers often observe this situation, specifically a whistle from under the hood. The story of the owner of a Lada Priora hatchback, replacing the alternator belt on a Priora with power steering. The sound is especially amplified by the load on the machine's electrical system. For example, if the radio is on, or the hazard signal is on, or the high beam headlights are on.
All this indicates wear or low tension on the alternator belt .
When the alternator belt needs replacing:
- if unusual sounds are heard from under the hood, the belt
needs to be tightened or replaced; - There is also a scheduled replacement of the alternator belt on the Toyota Corolla.
- It is carried out after the car has driven for about sixty or eighty kilometers;
- A broken alternator belt definitely requires replacement.
Making sure that the belt
requires replacement, you need to decide how to actually change it. The Toyota Corolla alternator belt may fail due to wear. Replacing it requires a few simple steps. The easiest way is to go to a service station and a specialist will make a replacement.
Or you can try to do it yourself.
Replacing the Corolla E120 drive belt
Replacement
drive
belt
on
Toyota
3ZZ-FE (1ZZ, 4ZZ) engines.
Replacing the drive belt on a Corolla
My daughter and I stopped in the garage for ten minutes to change the belt
. Actually, the alternator belt on a Priora car with power steering is replacing the alternator belt. She filmed this process on her phone
The first time you need to take this seriously and understand how to change the alternator belt on a Toyota Corolla
.
Procedure for replacing the belt:
1) the first and most important thing is to buy a new belt
.
2) then lay out the tools so that everything is at hand;
3) second, turn off the engine and remove the ignition key. How to remove and replace the heater radiator, generator belt roller, Toyota Avensis. Next, you need to open the hood and disconnect the negative cable from the battery;
- 4) the alternator belt is located to the left of the engine, so you need to visually inspect it again and make sure that it needs to be replaced;
- 5) the main nuance of the entire procedure is to sketch or photograph the attachment points and location of the generator belt
before removing it. This will eliminate the possibility of errors when installing a new belt; - 6) then we proceed directly to the replacement.
To remove the old belt
you need to release the tension.
This is done by removing the tensioner bolt. Replacing the tension roller and belt of the 4zz-fe generator. This bolt does not need to be unscrewed at all; the belt
will loosen immediately after turning the bolt;
- 7) visually compare the old and new belts, they must be identical;
 if the belts are the same, we begin the installation process, the belt must be put on the pulleys;
- 9) using the tensioner bolt, we adjust the belt tension on the Toyota Corolla;
10) after all this, connect the battery and check that the installation is correct. To do this, we put a load on the car’s electronics. Replacing the alternator belt on a Priora with power steering. If the whistle is heard again, you need to increase the belt tension. Proceed carefully and with extreme caution so as not to break the belt .
After this, the process of installing the alternator belt
completed. If you act carefully and carefully, with a little effort, then this repair is quite possible to do yourself. The car is in good working order again and can be driven.
Source: https://sis26.ru/zamena-remnja-generatora-tojota-korolla/
Payment via WebMoney
After selecting payment via WebMoney, the payment system will launch, where you need to select the payment method: bank card or WebMoney wallet.
If you already have a WebMoney wallet, then you need to log into it and make a payment.
If you do not have a WebMoney wallet and you want to pay in another way, you need to select any of the methods that WebMoney offers and make the payment
After specifying payment details and confirming payment, payment for the goods will occur.
Official website of the WebMoney payment system https://www.webmoney.ru/
Everything you need to know
The generator operates immediately after the car engine starts and continues until the ignition is turned off.
The generator performs a lot of functions:
- Recharges the battery;
- Provides engine ignition;
- Supplies voltage to additional electrical consumers in the car.
The principle of operation of the generator on the Toyota Corolla E150 is electromagnetic induction, as a result of which a magnetic flux passes through the copper winding of an electric coil and generates voltage. The output voltage synthesis is directly proportional to the rotation speed of the equipment.
Despite the average engine power, the generator on the E150 is installed with a reserve, making it possible to connect additional consumers with increased load: when installing additional acoustics, multimedia or a new air conditioner, replacing the generator is not required.
| Manufacturer | vendor code | Equipment power, ss | Compatibility by year of manufacture | Approximate cost, rub. |
| Dingo | 157QMJ | 125-135 | 2006-2009 | 17900 |
| Unipoint | ALTT150 | 125-140 | 2007-2010 | 18300 |
| DINGO | 152QMI | 125-140 | 2006-2018 | 18000 |
| DINGO | 157QMJ | 150-180 | 2006-2018 | 19900 |
| 4T | 147FMH | 150-180 | 2006-2017 | 21000 |
| 4T | 152FMI | 150-180 | 2006-2017 | 20700 |
Note! You must select a new generator for the E150 strictly according to the vehicle’s VIN number or by ordering components on the manufacturer’s official website using original part numbers. These methods will protect you from purchasing an incompatible device model - an incorrectly selected generator can cause failure of all electrical equipment of the vehicle.
Downloading a book
After successfully completing the payment (by any method) and returning to the KrutilVertel store from the payment system website, you will be taken to the successful payment page:
On this page you need to indicate your e-mail, where access to download the book will be sent.
If you are already registered on our website, then simply follow the link to your personal account.
The book you purchased will be in your personal account, from where you can always download it.
Please note that after making the payment, you need to return back from the payment system website to the KrutilVertel website.
If for some reason you did not return back to the site and closed the payment system tab with a message about the successful completion of the payment, please let us know - we will send you a letter indicating access to download the book.
What causes a belt to break?
This happens due to the fact that the part of it that rotates in the direction of the driving pulley is stretched much stronger than when rotating in the dependent direction. As mentioned earlier, there is excessive load on the belt, which is the result of a break. In this case, the replacement of this part cannot be delayed even for a short period of time.
Advantages and disadvantages of the Toyota Corolla alternator belt:
- + withstands fairly high mechanical stress;
- + operates without unnecessary noise;
- + ensures uniform jerking;
- — short service life;
- — accelerated wear and the inability to drive a vehicle in case of insufficient belt tension;
- - gradual disruption of the functionality of the car due to constant additional load on the shafts and bearings due to excessive stress.
Problems when paying with bank cards
Sometimes difficulties may arise when paying with Visa/MasterCard bank cards. The most common of them:
- There is a restriction on the card for paying for online purchases
- A plastic card is not intended for making payments online.
- The plastic card is not activated for making payments online.
- There are not enough funds on the plastic card.
In order to solve these problems, you need to call or write to the technical support of the bank where you are served. Bank specialists will help you resolve them and make payments.
That's basically it. The entire process of paying for a book in PDF format on car repair on our website takes 1-2 minutes.
If you still have any questions, you can ask them using the feedback form, or write us an email at [email protected]
Toyota Corolla E150 generator replacement and repair
The process of replacing a generator with your own hands is quite extensive, but will not cause difficulties. To repair equipment, you will need a slotted screwdriver, a set of wrenches, pliers and electrical tape.
The procedure for replacing or restoring the functionality of the generator will take approximately 2-2.5 hours and can be performed with one pair of hands. To repair a generator on a Toyota Corolla E150 you must:
- Place the hood on the stop and turn off the power supply to the car by disconnecting the negative terminal from the battery;
- Next, you need to jack up the front of the car and remove the right front wheel, as well as remove the mudguards;
- Then we remove the decorative engine casing and its lining, after which access to the generator opens;
- Near the device, disconnect the electrical connector and remove the cover. To do this, you need to loosen the wiring harness with pliers, and after disconnecting the latch, disconnect the power wire;
- Now we loosen the drive belt to the required level and remove the product from the pulley;
- Next, all that remains is to unscrew the fixing screws on the mounting brackets and the equipment can be removed.
The dismantling procedure ends here: if it is not repairable, the generator must be replaced with a new model and the equipment must be installed according to this algorithm in reverse order.
Required Tools
To repair and replace the generator on a Corolla 120, you should prepare the tools that are listed in the table below
Table - List of tools for repairing and replacing the generator
| Name | Note |
| Key | "at 10", "at 12", "at 22" |
| Head | "on 10" |
| Screwdriver | Cross |
| Screw bearing puller | Required in case of bearing failure |
| Hammer | To press in a new bearing |
| Calipers | To measure brush sizes |
| Multimeter | For checking the chain. You can also use an ohmmeter. |
| Megger | To monitor the insulation condition |
Replacement process
Tools
So that the procedure does not take much time, you need to prepare everything in advance:
Jack for work
Step by step instructions
- First, disconnect the battery and set your Toyota Corolla to the parking brake. Support the wheels to keep the machine securely in place.
- Using a jack, lift the front of the car and place bricks under it, and then unscrew the bolts securing the right front wheel. The front wheel along with the bumper body kit can be removed.
- Next, unscrew the spark plugs, and then remove all drive belts.
- In the photo, the arrow marks the intermediate roller of the air conditioner drive belt; it needs to be removed.
- If your Toyota Corolla is equipped with a cruise control actuator, then you need to unscrew it and move it to the side. After this, remove the cylinder head cover.
- You need to place a stand under the engine, but it should not rest against the engine fluid drain plug.
- Now you need to set the piston of the first cylinder to the top dead center of the compression stroke. After this, you will need to pry and pull out the inspection hatch cover; to do this, secure the flywheel in advance with a screwdriver so that it does not rotate. If someone helps you, then ask a friend to unscrew the crank pulley screw, since it will not be very convenient to do this yourself. The crank pulley disc itself should be removed without problems.
- Remove the toothed belt covers. The timing belt flange must be removed, but before doing this, remember its location. In particular, the rolled part of the element must face outwards.
- You will then need to use a wrench to loosen the idler pulley adjustment pin. The roller itself will need to be pressed inward so that it does not interfere, and the screw will need to be tightened again. The timing belt can be removed from the driven gear. In the photo, two arrows mark the motor mounting nuts; they need to be unscrewed. It is also necessary to unscrew the upper screw, marked with an arrow, and lower the motor, then pull up the lower part of the support and stretch the strap between its upper and lower sections.
- Remove the belt from the drive gear and pull it out of the engine compartment. If the condition of the drive gear is not particularly inspiring, it must be replaced.
- You will then need to mark the position of the element's top dead center on the gear and oil pump so that the new element will be installed correctly. All further installation and marking procedures must be carried out in reverse order. If you did everything correctly, then you will not have any problems with this.
Due to lack of experience, it is better to entrust such a procedure to specialists. As you can see, this process is not easy, it will take time and certain knowledge to complete. If you do not understand something after reading the instructions, then it is better to entrust your car to professionals. And do not buy low-quality belts from dubious auto stores. It is better to install official products from the manufacturer on your car. By buying a low-quality product, you are dooming yourself and your car to possible problems in the future, think about this before purchasing.
Principle of operation
The operation of the Toyota Corolla E150 generator, like other units of this brand, begins immediately after starting the engine, and during operation it constantly recharges the engine battery, preventing it from being completely discharged. Its action is based on the well-known principle of electromagnetic induction, according to which a magnetic flux passing through the winding of a copper coil provokes the formation of a voltage at its terminals, the magnitude of which is directly proportional to the speed of rotation.
The generator unit of the Corolla 120, as well as models with a different body (for example, Fielder 14, Corolla 121 models) is located in the front of the engine and is activated by the crankshaft. The closed-type bearings on which the shaft is mounted are designed for the entire period of operation of the vehicle, without additional lubrication.
With a high mileage of the Toyota Corolla E150, as well as older versions of the car, it is recommended to check and, if necessary, repair or replace the unit. The following may indicate that the generator has a malfunction:
- Battery discharge light that does not go out after starting the engine. This indicates that the belt has become loose (it needs to be tightened) or the reason is in the unit itself (worn brushes need to be replaced, there is a break in the winding, the diode kit needs to be changed).
- Power is not supplied to the battery, the cause may be an oxidized terminal, a loose belt, or a non-working battery.
- The battery is being recharged - the cause could be any of the faulty elements of the mechanism.
- The appearance of a characteristic whistle in the area where the generator is located most often occurs due to a high degree of belt tension and a high load on the bearing.
Any repairs or replacements must be carried out only after the vehicle has been completely de-energized and all terminals from the battery have been disconnected.
Basic generator malfunctions
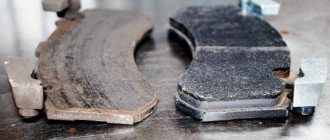
If the belt is tight, but the generator does not recharge the battery, you can decide that it is the one that is faulty.
The reason may be a burnt-out diode bridge or a faulty voltage regulator. In such cases, these nodes are changed. The graphite brushes of the generator wear out even more often, and you can also replace them yourself.
Burnt and new diode bridge
But a burnt-out excitation winding is a nuisance that can only be eliminated by replacing the generator, and this is not a cheap pleasure. True, it happens quite rarely. You should also check that the generator wire is securely fastened to ground, and also look into the fuse box.
How to repair an old generator on E150
To repair old electrical equipment, you will need the same set of tools, as well as a hammer and an electrical tester. Repair work on components begins with a complete inspection - first you need to check the integrity of the windings: the presence of a break indicates a failure of the rotor. The tester should show a resistance of 2.45 ohms, the infinity icon on the display is a sign of a break.
You should also check the diode rectifier unit - by connecting the tester in parallel, you need to check the ability to transmit current separately in each direction. If the circuit operates in both directions, the diode unit must be replaced.
Next, you need to replace the generator brushes - the protrusion of the components in a free state should not exceed 5 mm. The procedure for replacing components on a generator involves removing the top retaining screws and removing the insulation, after which you can disconnect the internal wiring and remove the equipment components.
The collection of components is carried out using the reverse algorithm - if there is no experience in repairs, it is recommended to sketch or photograph the generator circuit at the time of disassembly. Repairing a generator on an E150 with your own hands will allow you to save a lot on maintenance at a service station and gain experience - cases of electrical equipment failure on the road are rare.