Toyota Corolla ignition switch and steering column lock
CARS WITH PETROL ENGINE Start – turn on the starter.
When released, the key returns to the On position. The procedure for starting the engine is described in subsection 1.6. On – switches on the electrical equipment of the engine and all consumers. Suitable for driving conditions.
ACC – switching on additional consumers (for example, a receiver), the engine electrical equipment is turned off.
LOCK – engine electrical equipment is turned off, the steering wheel is locked. The key can only be reached in this position. The key is turned from the ACC position to the LOCK position by pressing it.
VEHICLES EQUIPPED WITH IMMOBILIZER
After removing the key from the ignition switch, the immobilizer system (engine start code recognition) is automatically put into readiness (see subsection 1.5.2).
When starting the engine, the key may become stuck in the LOCK position. To release the key, first make sure the key is fully seated in the lock, then rock the steering wheel while carefully turning the key in the lock.
It is forbidden to remove the key from the ignition while driving, as the steering wheel will lock and the car will become uncontrollable.
VEHICLES WITH DIESEL ENGINE Start – turning on the starter. When released, the key returns to the On position. The procedure for starting the engine is described in subsection 1.6.
On – switches on the electrical equipment of the engine and all consumers. The spark plugs are heating up. The On position corresponds to the riding position.
ACC – switching on additional consumers (for example, a receiver), the engine electrical equipment is turned off.
LOCK – engine electrical equipment is turned off, the steering wheel is locked. The key can only be removed from the lock in this position. The key is turned from the ACC position to the LOCK position by pressing it.
When starting the engine, the key may become stuck in the LOCK position. To release the key, first make sure the key is fully seated in the lock, then rock the steering wheel while carefully turning the key in the lock.
Video about “Ignition switch and steering column lock” for Toyota Corolla
The ignition key won’t turn, how to drive without a key, how to remove the ignition switch on a Toyota Carina
The steering wheel blocked the ignition switch. How to start the car?
Source
Engine 4A-FE: characteristics, service life, oil, problems
| Type | in-line |
| Number of cylinders | 4 |
| Number of valves | 16 |
| Exact volume | 1587 cm³ |
| Cylinder diameter | 81 mm |
| Piston stroke | 77 mm |
| Supply system | injector |
| Power | 100 – 115 hp |
| Torque | 135 – 150 Nm |
| Compression ratio | 9.5 |
| Fuel type | AI-92 |
| Environmental standards | EURO 2 |
Information about the material Author: Vladimir Bekrenev Views: 264827
Toyota Corolla ignition switch pinout Car alarm connection points for Toyota Corolla
It is necessary to ensure that the system responds to the condition of the rings. You should connect the wires of the alarm itself to the contacts of the switching socket, the Toyota Corolla connection points of which come out with green and brown wires, a map of their connections in the instructions for the car alarm.
Now let's connect the trunk ring.
In order for it to react, it is necessary to connect the Toyota Corolla wire coming from the security system unit to the white wire of the driver's threshold. Ignition system We connect the security system to the ignition switch. We find the ignition - it is a white wire.
It must be broken and connected to the first end, coming from the ignition switch, with a thin yellow car alarm wire, and to the second remaining part of the wire we connect the thick brown wire of the purchased security system.
In order to connect the interlock circuit, you need to use the relay that comes with the security system.
Electrical diagram of a TOYOTA COROLLA car. Toyota Corolla 120 ignition switch pinout
We connect its first wire to the wire of the main module of the system being installed, and the second to the positive ignition wire. It can be found using a control light: To install autostart, you need to bypass the immobilizer installed in the car.
To do this, take the battery out of the chip key and place it in the autostart module that comes with the car alarm. We take the red wire coming from it and connect it to the negative output from the starter.
This will create a simulated button press for remote start. Next, to implement the connection point for the Toyota Corolla engine, we will connect the yellow wire of the car alarm to the generator with the pink wire coming from.
5 Reply from MaxiM85 04/05/2013 21:55:52 (8 years 6 months ago) 9 reply from noooobik 05042013 220347
| Huge gas consumption on 1G-FE. The Corolla has a wide range of engines with a wide variety of technical data from barely running to the amazing 240-horsepower examples of the 4A-GE TRD line with a displacement of 1. With the launch of the XV20, which featured improved aerodynamics, fuel costs ranged from 10.5 to 14.0 liters for power plants with 4 and 6 cylinders, respectively. |
- Toyota Carina E (04.1996 - 11.1997) restyling, hatchback, 6th generation, T190;
- Toyota Carina E (04.1996 - 11.1997) restyling, station wagon, 6th generation, T190;
- Toyota Carina E (04.1996 - 01.1998) restyling, sedan, 6th generation, T190;
- Toyota Carina E (12.1992 - 01.1996) station wagon, 6th generation, T190;
- Toyota Carina E (04.1992 - 03.1996) hatchback, 6th generation, T190;
- Toyota Carina E (04.1992 - 03.1996) sedan, 6th generation, T190.
Toyota Corolla alarm connection points
Final steps To install the antenna module, you need to connect the Toyota Corolla connection point to the connector coming from it to the main module of the security complex; the connection port is indicated in the instructions.
The same is done with the shock sensor. It is very important to place this device on a horizontal plane!
Because in other planes it will come off over time. To connect the siren, we draw a wire coming from the connector of the car alarm itself and connect it to the scarlet wire of the siren.
The second remaining black connection point is the Toyota Corolla with the car body. Sometimes it happens that something breaks; for repairs, images of the electrical equipment of the machines are needed, because without them it is practically impossible to figure out what to repair and how to repair it.
Electrical circuits for Toyota Corolla are distinguished by their complexity. Let's look at almost all the diagrams for a given car - from the power window diagram to the radio and stereo systems.
Machines are constantly being improved. Therefore, simplified diagrams will be shown, so to speak, general ones, which are the Toyota Corolla connection points for most years of production of the Toyota Corolla. So, further schematic pictures of electrical equipment will be presented. They are completely translated into Russian. So, let's begin.
Schematic illustration of the ignition for a Toyota Corolla. Next, you can imagine the engine management system of the Toyota Corolla. Now we can look at the structure of the Toyota Corolla head optics. Illumination of dashboard elements, as well as rear dimensions. Consists of two pictures below.
Car alarm connection points for Toyota Corolla
Simplified, templated view of collars. Next you can consider: Head optics adjustment system.
If there are rear fog lights. Schematic representation of the front fog lamp system, as well as heated mirrors. Next, you can consider the Toyota Corolla connection points for the rear-view mirror drive and the top hatch; if your configuration has any, then you will probably need them someday.
Connecting the camera according to the pinout
Knowing the pinout of the car radio, you can easily connect the rear view camera with your own hands. Using the example of the popular Toyota Ca-Fi device, we will learn how to do this. The process itself is divided into two parts: the actual installation of the device with the connection and the connection of the rear view camera.
Note. Installing and connecting the monitor is no different from installing the factory head unit. You just need to swap the connectors and that's it.
But connecting the camera can be difficult for some. Here's what you need to know:
- The rear view camera for Toyota Prado is powered by 5V;
- To connect it, you will need a connector from the factory monitor, which remains free after installing the new radio;
- This same connector is 14-pin. But we only need two video signal wires and a reverse signal;
- In addition, you will need to convert the voltage from 12V to 5V.
Note. To convert voltage means to carry out the process using a special converter, which is sold in any store.
The camera connection diagram has its own pinout. This is what she looks like.
Pinout of toyota car radio connectors
The circuit is positioned as if you were looking at it from the side of the wires. The photo in the upper left corner is placed for clarity. So, in order to connect the camera to the Toyota car radio, you must first connect together the reverse signal and the Reverse wire on Ca-Fi. In addition, it will be necessary to install a converter and make a tulip for transmitting video data.
Note. This does not mean that you will have to literally do everything from scratch. You just need to buy Scotchlocks in the same store where you purchased the converter (they will help connect the wires to each other).
The photo below shows how to splice wires using tape.
Scotchlock and wires
Next we do the following:
- We start the car;
- We turn on reverse gear;
- Let's check how everything works (the monitor of the installed radio should show the image from the camera).
Thus, knowing the pinout of Toyota car radios, you can connect using any of the selected schemes. During the work process, it is extremely useful to watch a video review. Step-by-step instructions from other sources will also help. The price of installing a car radio yourself is noticeably different from the cost of specialist services, which is several times higher.
We considered Ipsum and Picnic cars with gasoline and diesel engines manufactured in 1996, 1997, 1998, 1999, 2000, 2001.
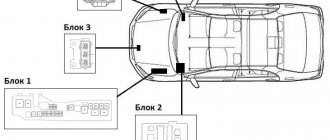
Location of control units under the hood of a Toyota Picnic.
Location of control units under the hood of a Toyota Ipsum car.
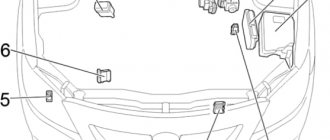
Engine compartment fuse boxes A and B.
- Airbag, ABS system
- Alarm
- Rear air conditioner
- Egnition lock
- Ignition switch, fuel heater
- Radio tape recorder
- Driver's windows
- Generator
- Interior lighting, local lighting, luggage compartment lighting, clock
- Headlights (left)
- Headlights (right)
- Fuel injection system
- Sound signal
- Sound signal, emergency alarm
ACC SOCKET, PWR OUTLET
- Socket (trunk)
The same block in expanded form.
The relay block in the engine compartment is number 5 in the image.
The fuse block in the image is number 3.
Relay block No. 7 is number 2 in the image.
Relay block on the partition of the engine compartment in the image (Picnic figure 21), (Ipsum figure 16)
Location of control units in the Toyota Ipsum interior.
Location of control units in the Toyota Picnic interior.
Ignition switch Toyota Corolla (Toyota Corolla) price, photo
When starting a car, the first thing we pay attention to when inserting the key into it is the ignition switch, and the Toyota Corolla is no exception. The lock not only serves to ensure the safety of the vehicle from attacks by intruders, but is also responsible for the reliable operation of the entire vehicle.
Ignition is a very important system of a car, without which its operation would be impossible. Therefore, its proper operation must be monitored and periodic maintenance or repair of elements of this system must be carried out.
Toyota Corolla cars have several types of ignition systems, for example, with an internal electronic unit or an external one. Their main difference is that the first has an electronic unit, in other words, a switch, built into the distributor housing. The coil in both of these systems is mounted inside the distributor.
The vehicle ignition system usually consists of the following parts:
- ignition lock and key;
- accumulator battery;
- the electronic unit;
- induction sensor;
- coil;
- high and low voltage wiring;
- distributor;
- spark plug.
Modern Toyota Corolla cars have injection power units, and the entire ignition system is controlled by an electronic processor (ECM unit). It performs all automatic adjustments such as ignition timing and some others. At the same time, it takes readings from various sensors that read engine operating parameters, for example, its speed, coolant temperature, and air flow.
3ZZ FE tuning options. 2 answer from maxim85 05042013 214153
| Toyota Corolla Spacio 4A-FE. Not food for the horse. Forum Change the spark plugs in a timely manner, otherwise a whole heap of engine defects will form, in order to fix which it will be necessary to update the well seals; Versions of these cars are still successfully sold on the secondary market and are in demand among car owners due to their successful exterior, high-quality interior, strong suspension and durable engine. |
- Gen 1 – produced in the period 1987 – 1993, had a power of 100 – 102 hp. p., had electronic injection;
- Gen 2 - introduced in 1993 - 1998, had a power of 100 - 110 hp. s, the injection pattern, SHPG, intake manifold has changed, the cylinder head has been modernized for new camshafts, valve cover fins have been added;
- Gen 3 – years of production 1997 – 2001, power increased to 115 hp. With. Due to changes in the geometry of the intake and exhaust manifold, the internal combustion engine was used only for domestic market cars.
Similar on the topic: Reduce gasoline consumption of Toyota Corolla Verso • Consequently, organizations that rent ships can also receive a Certificate, which is confirmed by a letter from the Russian Ministry of Finance.
How is the castle built?
the Corolla and Avensis models it is almost identical, so the repair scheme can be considered using their example. Without a properly working ignition switch, you will not be able to operate the car, so it is very important to monitor its condition and promptly correct any problems that may be associated with it.
Cars may have several types of ignition systems; for example, the location of the electronic unit may be different. It can be external or internal. If the switch is built into the distributor body, then the coil will be inside it. This somewhat simplifies the handling of the lock, because you do not have to look for its individual components. The ignition system most often includes the same elements. Their presence is inherent in such inexpensive and relatively simple models as Vista , and higher class cars, for example, Prado. Structure composition:
- The ignition switch itself and the set of keys supplied with it.
- Battery.
- The electronic unit.
- Coil.
- Sensors
- Wires, including high-voltage ones.
- Candles.
- Distributor.
If we consider modern cars, for example, Toyota Corolla or Camry with injection engines, another element will be included in the system - this is the ECM unit, with the help of which the car receives automatic adjustments and separate security systems operate. Sensors are also connected to the processor, which monitor the operation of the engine and many other systems, reporting errors when they fail.
Engine Toyota 1ZR-FE/FAE 1.6 l. 124 hp
Clarification of oxidized diesel fuel and removal of hydrogen sulfide aromatics.
During the winter season, car owners have to warm up their engines more often. Or why so much gasoline is wasted. At first I didn’t like it, but my husband bought it. The ratio of the scale of the controls and the actual thing being controlled is impressive. The official manual for the naturally aspirated in-line engine 5A FE contains a description of the design:
- the block is cast iron, the cylinders are bored into the body without liners, which dramatically increases maintainability and reduces cost;
- double-shaft cylinder head with DOHC 16V gas distribution;
- At first, the ignition system consisted of a common coil, a distributor, and a bundle of high-voltage wires; later a second coil was added according to the DIS-2 scheme;
- there are no hydraulic compensators or VVTi clutch, so the requirements for oil quality are quite low;
- boosting is most often done by analogy with AvtoVAZ engines by boring the cylinders;
- major repairs are easily carried out in garages on their own;
- The design feature is a belt drive of one camshaft, the second is rotated by a gear wheel from it.
Cylinder head 5A-FE
The design is very simple, reliable, maintainable, and has a high resource life.
Removing the ignition coil on Toyota Corolla cars
The ignition coil on Toyota Corolla cars cannot be repaired, so if it fails, it must be replaced with a new one. On Toyota Corolla car models produced at different times, the coils can be installed in different places.
To replace the coil of cars produced recently, you must:
- remove the engine decorative grille;
- disconnect the coil connector and unscrew its fastening;
- remove the coil and replace it with a new one.
What are Toyota motor oils? 3 reply from stanum 05042013 214302
The manufacturing company is Exxon Mobil, which bottles under a contract with the Toyota automobile corporation; this brand of motor oil is known under the Castle brand. The manufacturer recommends filling the Toyota Corolla automatic transmission with original transmission oil ATF Type T-IV for early models or ATF WS for later ones, red.
| City | 9.5 liters |
| Route | 5.6 liters |
| Mixed | 7.1 liters |
Repair and service
Before buying a new part and replacing the old one with it, you should make sure that this is really the problem. In any case, the ignition switch will have to be removed, so it is recommended to follow these rules:
- The engine may not start for various reasons: for example, if the battery is discharged, but the headlights still turn on. In any case, it is not recommended to leave the key turned in the lock. Operating the device for more than 10 minutes may damage the ignition coil.
- If you plan to connect a tachometer, then this should be done strictly according to the instructions or at a car service center.
- The coil leads should not touch the car body, this can lead to dangerous consequences, such as electric shock. In addition, such treatment can lead to damage to the ECU and coil.
- Do not disconnect the battery while the engine is running.
- The electronic unit must always be connected to vehicle ground.
- When working on the ignition system, care must be taken. With the engine turned off, you need to remove the positive terminal from the battery; only after this can you disassemble the steering column and remove the lock itself. The most dangerous elements are considered to be high-voltage wires and coils.
Restyling generation 10 (E140, E150, 2010-2013) 3 response from stanum 05042013 214302
The American version with a hybrid installation and a continuously variable transmission met the standard of 5.7 liters per 100 km. Under the hood there was a 154-horsepower internal combustion engine with a volume of 2500 cm3 and a traction electric motor. The strangest thing is that the stove blew warm only while driving, not while standing, if anyone has encountered this and knows the answer, write in the comments what was the matter. The interior is very cool, everything is nice, ergonomic, only the turn signal lever has happened to turn off the low beam or high beam, if on off decree
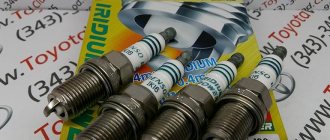
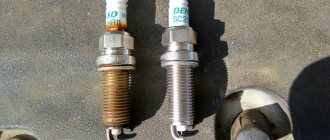
Replacing spark plugs in Toyota Corolla cars
Manufacturers of Toyota Corolla recommend using NGK BKR5EY-11 spark plugs for their engines. But according to numerous reviews, Denso candles and many others are also suitable.
Replacement of spark plugs should be carried out in a timely manner: after 20 thousand kilometers for regular ones, and 80 thousand for platinum ones. To replace spark plugs you will need the following tools:
- spark plug wrench 16 mm;
- 10 mm head;
- ratchet.
Important! All work on replacing spark plugs is carried out only on a cold engine.
Modification 1.3 MT+AT – 4 response from Sambo 05042013 215226
A Toyota Corolla equipped with this type of engine has good dynamic characteristics combined with optimal fuel consumption, which, according to the owners of this modification, almost completely coincides with the official fuel consumption of the car as declared by the manufacturer. heh I redid everything, kmslorodnik new, redid everything last year, the total consumption dropped from 18 to 15, this was in the winter with warm-ups in the summer, 7.5, the highway did not parse normal consumption.
| Name | Index |
| Manufacturer | Kamigo Plant Shimoyama Plant Deeside Engine Plant North Plant Tianjin FAW Toyota Engine's Plant No. 1 |
| Model | 5A FE |
| Volume | 1.5 liter (1498 cm3) |
| Number of cylinders | 4 |
| Number of valves | 16 |
| Fuel | Petrol |
| Injection system | Carburetor/Injector |
| Power | 85-120 hp |
| Fuel consumption | 5.0 l/100 km |
| Cylinder diameter | 78.7 mm |
| Recommended oils | 5W-30 10W-30 15W-40 20W-50 |
| Engine life | 300,000 km |
| Motor applicability | Toyota Corolla Toyota Corona Toyota Carina Toyota Corolla Ceres Toyota G Touring Toyota Sprinter Toyota Sprinter Marino Toyota Tercel Toyota Vios FAW Xiali Weizhi |
Common faults
The most common problem is that the lock is jammed. This can happen to any make and model of car, regardless of age or lock type. If this happens, there is a risk of coil failure; in addition, the spark plug contacts may be damaged - they will burn out. If such a problem occurs, the lock will need to be removed.
For most cars, the lock is located on the right side. It is attached to the steering column with bolts, the number of which may vary depending on the year of manufacture of the car and its model.
For example, Toyota Carina has many more connections than Prado. But this is not so important, because you only need one tool - a TORX hexagon. If the lock jams, it is quite simple to understand: the key does not always turn in it and often does not do so right away. The second common problem is wear of the contact group, in which case it must be replaced after removing the lock.
In order to dismantle the lock and disassemble it, you will need to perform the following steps:
- Disconnect the battery terminals.
- Insert the key into the lock, but do not turn it.
- Remove the steering column cover.
- Carefully unscrew the lock. It is better not to tear off the bolts, but to purchase a special tool, otherwise putting this or a new lock in place will be a big problem.
- After disconnecting the electrics, the lock is removed, but the key must remain inside.
- Once you have the ignition switch in your hands, you can remove the contact group from it. If this is the problem, then you can install a new one and put the lock back, performing all the above steps in reverse order.
- If other repairs are required, the lock cylinder must be removed, the key must still remain inside.
- After this, the secretions are visually inspected: they can be considered serviceable only if they do not protrude from the larva. If they stick out, the protrusions can be ground off with a file.
- After this, all elements of the lock are cleaned of dirt, lubricated and installed in place. In some cases, the lock is replaced with a new one.
Refractory fuse diagram
The operating instructions provide detailed fuse location diagrams to make it easier to replace them yourself. If you do not know the reason why certain devices do not work, start looking for a blown fuse. We will show how to do this using the example of a radio, which often becomes a victim of incorrect use of capabilities. First you need to figure out where the Toyota Corolla radio fuse is located. Please note that the diagrams for the 2008 Corolla, Corolla 150, TOYOTA CORONA PREMIO, Echo and later Avensis, Rav 4 and Land Cruiser 100 models may be different.
Layout diagram
Fuse layout
What does the block to the left of the driver look like?
Block on the left side of the driver
Instructions
Description of the Corolla fuse diagram (from the documentation)
The fuse box is located in the passenger compartment on the passenger side in the glove compartment. Very often it fails not because of a malfunction of the car, but because of an attempt to use the cigarette lighter for other purposes. Mainly as a power source. If the radio is playing at this moment, the auto fuse may burn out.
In some circuits (see above) you can find an additional fusible circuit breaker for the audio system; sometimes other elements of the electrical network fail, affecting the performance. So it’s better to get the final version of your block from the documentation for your model. The layout of the Corolla 2008, as well as the Corolla 150, Crown Premium, and Echo may differ. Especially in the latest models Avensis, Rav 4 and Land Cruiser 100.
For example, you can compare it with the Corona Premium scheme, issued before 2001. The required machine is located in the engine compartment at number 9, and the number of circuit elements is significantly less than in modern cars. The same story awaits you in the diagram of the Toyota Echo model.
Block locations
As an example, we also give where the automatic radios are located in popular Toyota models:
- Toyota Avensis radio fuse - access from the passenger compartment, circuit breaker No. 36 on the CIG diagram.
- Toyota Rav 4 radio fuse - in Rav 4 the cigarette lighter circuit breaker is shared with others, given that many use this section of the network to connect to the battery. You will need machine number 25.
- The Toyota Land Cruiser 100 radio fuse is located on the driver's side. You will need item 31.
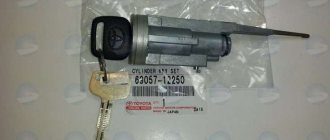
Removing the ignition switch from a Corolla
To replace this element on a Corolla, use a chisel, 2 screwdrivers and a hammer. Sequence of work:
- For safety, it is necessary to disconnect the terminal with the “-” sign from the battery.
- The steering column is covered at the top and bottom with two casings secured with screws that need to be unscrewed. For convenience, you can also remove the steering column pad, which is attached in the same way.
- After removing the covers, you need to disconnect all the wire plugs.
- The lock itself is fixed to a metal bracket with 4 bolts. For anti-theft purposes, these bolts are tightened at the factory, and the heads are specially broken off, but they can be unscrewed using a chisel and a hammer. It is necessary to rest the tool against the side so that when you knock on it, the bolt turns counterclockwise.
Toyota Sprinter Carib
The industry produces a large group of pumps with a voltage of 12-24 V, as well as 220 V with a capacity of 10-60 liters per minute, which can quickly pump out small and medium volumes of flammable liquids.
2 Reply from MaxiM85 04/05/2013 21:41:53 (8 years 6 months ago)
Re: 4s engine excessive consumption of gasoline, who knows.
Does the check give any error?
reupholstery services t. 89o5o8o4672 whatsapp Instagram: @rulbrn22 VK - https://vk.com/rulbrn22
Common problems
Complaints about the condition of the ignition switch can most often be heard from drivers of cars older than five years. With constant use, parts wear out and sometimes need to be replaced. For example, to turn a key in a lock, you have to make an effort, as if it were stuck there. Over time, the lock begins to seriously bite, and this causes inconvenience.
You can try to lubricate such a lock; It is important to use liquid lubricant; thick lubricant can cause significant damage. However, liquid lubricant can corrode the contacts and cause other harm due to the fact that a lot of dirt accumulates inside the mechanism. That is why it is recommended to disassemble it. If you do not take care of this problem, over time the lock will not be able to be restored; the key will also wear out or begin to fall out when moving.
Photo report: trunk release cable repair
Oldtech
King breeder
It would be more correct, of course, to call the theme collective farm
Repairing the trunk release cable)) This kind of trouble happened today
Moreover, I installed this cable myself five years ago, to replace the old one that broke in the same place. Apparently this is due to the bend due to which the cable gradually breaks... I was suffocated by the toad to buy a new cable again, disassemble the interior in order to stretch it, so this idea was born in my head: carefully removed the crimping on the other end of the cable
Replacing the larva
Replacing a Corolla AE 100 ignition switch with a new original one is an expensive undertaking. The cost of such work to order: $100. Buying this spare part at a disassembly site is not the best option, because it is unknown how long it will last, even though it costs 2,500 rubles. It may happen that the device breaks down again in a month.
The most reasonable option in the event of a breakdown is a new cylinder or repair of the old one, because this is the part that most often breaks.
In order to pull out the cylinder, you need to turn the key to the ACC position (120 degrees), and then press the stopper with a screwdriver as in the photo.
Using another screwdriver, remove the cover shown by the second red arrow.
Technical specifications 5A FE 1.5 l105 l. With.
Before purchasing a Land Cruiser, test drive it for a few days to calculate approximate fuel consumption, then decide how cost-effective it is to own the vehicle. However, in this document it is not always possible to find the necessary information for certain types of special equipment, especially since its manufacturers produce dozens of new models every year.
Causes
Although the inside of the ignition switch is made of durable material, it is subject to natural friction and wear. If the car is modern, it understands the key codes, and these elements are made of brass - a rather fragile material. The key begins to gradually wear down and requires updating, just like the lock cylinder.
Over time, this will lead to the fact that the code frames will not go to the required depth, the shape of the key will be completely changed, and the lock itself will be destroyed. To prevent this from happening, you just need to replace the larva in time.
Why you shouldn't lubricate a jamming lock
There are 2 types of breakdowns of this unit: electrical and mechanical, which will be discussed in the article. For any type of breakdown, this part must be removed from the car to repair it.
Under no circumstances should the wedging lock be lubricated! The fact is that as the lock parts wear out, they produce metal shavings, which become full of them inside. In addition to this, small particles of dirt and dust are brought into the hole. Now imagine what will happen when all this dirt mixes with lubricant and clogs all the grooves. The key will simply stop turning.
Toyota ignition switch repair
Like many other car components, ignition switches are also designed for a specific operating cycle. Or in other words - for a certain number of openings and closings. Having exhausted its resource, the lock stops working.
In this article we will look at why Toyota ignition switches break and how professional repairs should be carried out.
Complaints and signs
After five or more years of operation, the key in the Toyota ignition switch begins to work incorrectly and turns every once in a while. In most cases, we are talking about the Camry and Corolla ignition switch.
Until this moment, he most likely worked with great effort, as if he was grinding in a lock. Although, since turning the key in the lock is most often loaded with a spring, the owner does not notice the difficulty of turning it. After the lock began to bite, God forbid you try to lubricate it with something. If you add thick lubricant, it will finish off the lock and completely stop the code elements.
If you add liquid lubricant, it will most likely corrode all the waste and coke in the lock, which now keep the worn elements in their usual range of operation. And Dirt in the ignition switch after several years of operation is just lumps, believe me.
So, for a heavily jammed lock, there are two possible ways for the situation to develop. In the vast majority of cases, the key stops turning completely in the lock. No amount of dancing or tambourines can revive him.
In some situations, particularly greedy, persistent car owners abuse the key in the lock for years, deliberately not paying attention to jamming and biting. After a few more years of operation, the key begins to fall out and be removed from the ignition switch, including when the car is running. Fatal wear and tear has occurred, both the key and the lock as a whole.
Causes
The Toyota ignition key is made of a hard, wear-resistant alloy. The code elements of the security mechanism, which set the key code, are made of soft brass.
After several years of operation, the key “eats” the working edges of the frames, along which it rubs when positioned in the well. Code elements are deformed, that is, they change in shape and size. The key also gets some wear and tear.
And after some time, it turns out that when setting the key, the heavily worn code frames do not go into the cylinder body to the required depth. By interfering with rotation and rubbing against the wall of the case, they create parasitic pressure and further destroy the shape of the key and lock.
Adequate repair
In order to repair a lock due to severe wear of the code elements, as you probably already guessed, the code elements need to be replaced. Replaces code elements in a workshop on a completely removed lock.
Please note that our company’s specialists do not provide advice on the restoration and revitalization of self-disassembled locks at any cost, under any conditions.
We emphasize that, depending on the degree of wear, often, after replacing the code elements, the key must be restored. A heavily worn key after repairing the lock will again “kill” the code frames in a short time.
Do-it-yourself pseudo-repair
On the vastness of the Internet, you can find options for independently solving such situations. So that you don’t have to run around and search, I’ll list them here.
It is possible to repair the ignition switch cheaply - to do this, you need to throw out those code elements that strongly protrude from the body of the larva. And those that do not look out much can be sharpened with a needle file or file.
The procedure is reminiscent of removing a finger after it is broken. But, nevertheless, for those who are careless with things, for those who save every ruble on a car worth several thousand rubles, this option exists.
True, the secrecy of the lock is reduced significantly, and it is possible that the lock will eventually be turned with a screwdriver - this has happened. You also need to understand that the unfinished code elements will wear out again after a while and will again require either “refinishing” or removal from the lock.
How to order repairs from us
Those who treat such expensive things as a car responsibly. For those who understand that each specialist should be engaged in his specialty and business, and not meddle with timid attempts and collective farm methods in an unfamiliar area. We invite you to come to us for ignition switch repairs on all Toyota vehicles.
The lock repair is carried out in the workshop on a removed sample. You must bring with you, including all the keys you have. Repair time is several hours. Price – 2500 rubles.
We also work with other regions: we accept and send locks by courier services. Cash and non-cash forms of payment are possible.
Source
TOYOTA FUSE BLOCK
It is easy to find a Toyota Fuse Box and any other spare parts for a given vehicle. The catalog contains complete information on the applicability of spare parts, with the exception of many types of car equipment. In most cases, it is enough to contact our experts for assistance in the selection and advice on the applicability of the part and the choice of the required price segment and quality. The online store presents spare parts from both branded manufacturers that supply their products to assembly lines, as well as lesser-known manufacturers, but with a really low price.
Among the spare parts presented in our online store there are parts for all the main components of the car that can be used for:
- scheduled maintenance
- body restoration repairs,
- engine overhaul,
- replacement of chassis parts,
- salon care.
Let's look at a simple example of how to save money on purchasing parts using our online store. As you know, all original spare parts packaged in boxes of Toyota, Mercedes and other brands are not manufactured by them themselves, but are purchased from the production lines of branded manufacturers such as Mann, Bosch and others. In other words, if you don’t want to overpay 3 or 4 times the price for beautiful boxes, then this is a serious reason to contact us. We investigated the purchase of parts for maintenance using the example of a Toyota Camry and in fact it turned out that Original spare parts cost 16,000 rubles, and the same analogues that are included in Toyota packaging, if taken with the manufacturer’s factory packaging, cost 4,500 rubles. Agree, the difference is colossal, so why give money?
Our goal is to provide a high level of consultation and excellent service for payment, delivery and dispatch of shopping orders. Our specialists use the most advanced technologies for selecting spare parts and guarantee the applicability of parts to cars, with the obligatory use of the vehicle’s VIN code, select parts from original catalogs and offer the best brands, reasonable prices and prompt delivery.
Many are accustomed to searching for products all over the Internet and looking for the lowest price for the same Toyota Fuse Box, but why do this and trust unverified companies or simply private individuals because of a slight difference in price. There are more than 500 suppliers represented on our website and each of them sees the prices of competitors and, of course, they have a desire to sell more and reduce their price accordingly.