Toyota cars equipped with electronic control units (ECUs) of the engine, automatic transmission, ABS, etc., have the ability to perform self-diagnosis. The operating principle of this system is as follows:
- If a deviation from the normal operating mode occurs, the sensor recording it is turned off.
- A bypass program is activated in the ECU, allowing the vehicle to continue operating. When this program is turned on, the alarm light on the display lights up or the system operation lamp in which a breakdown is detected blinks.
- When the malfunction is eliminated (spontaneously or as a result of repair), the bypass program is disabled and the system continues to operate as normal.
- Information about a malfunction that occurs is stored in the form of a special code, which can later be read.
On modern Toyota Corolla cars, the ECU is able to distinguish faults according to the degree of importance for operation, and information about “light” deviations is not recorded. For example, if dirt gets on one of the ABS sensors while driving, and after washing it off, the sensor returns to normal operation, this deviation will not be recorded.
The diagnostic system is very convenient when repairing a car, thanks to it you can quickly identify the cause of problems.
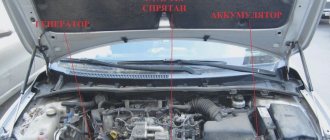
Connectors for diagnostics of Toyota Corolla cars
For self-diagnosis of Toyota Corolla cars, special diagnostic connectors (DLS - DataLinkConnector) are provided, the type and location of which depend on the model and year of manufacture of the vehicle.
DLS 1 is a rectangular plastic box located under the hood of the car on the left. This connector has a corresponding designation on the housing - “DIAGNOSTIC”. Self-diagnosis is carried out using the “CHECK” light located on the instrument panel, the corresponding control lights for vehicle systems or other signaling devices.
The DLS 2 diagnostic connector is located in the passenger compartment: under the front panel on the driver's side. It has a different configuration from DLS 1, as it involves connecting special diagnostic equipment. This connector is convenient because it allows self-diagnosis of a running vehicle.
DLS 3 is also located in the cabin under the dashboard. This type of diagnostic connector is mainly found in cars with a robotic transmission.
How to check engine errors and erase the error in the ECU memory
To carry out engine diagnostics and read error codes, as well as to reset them, many drivers prefer to go to a service station where there is a scanner. Service station specialists, at the owner’s request, can issue a printout that will display the error codes recorded in the control unit’s memory. Note that this procedure is optimal in the case when the check is constantly on. If the error is “floating” (the check periodically lights up and goes out), then a visit to the service may not yield anything.
In such a situation, you can buy a scanner for personal use, but its cost and the need to study the features of the software make this method impractical, especially when it comes to diagnosing only one car. Let us add that the scanner is used in parallel with a laptop or personal computer, which creates additional inconvenience.
All kinds of third-party BCs (on-board computers) also rightly belong to similar ones in terms of ease of use, cost and feasibility of purchase. The solution is capable of reading and deciphering error codes and displaying additional information about the parameters and operating modes of the internal combustion engine. At the same time, the BCs require proper connection and separate installation in the cabin.
Among the main advantages of such adapters is that the device is a small, compact “box” that is inserted into the diagnostic socket of your car. This means that the need to connect, lay wires, place the device itself in the cabin, use a PC and perform other additional actions is completely absent.
The adapter in the connector remains almost invisible and connects to a tablet or smartphone “over the air” thanks to bluetooth/wi-fi technology. This is especially convenient when the engine error lights up periodically. In other words, you can drive with the adapter in the connector as long as you like, and at the moment the check light comes on, immediately read the fault code. You only need to secure your smartphone or tablet to a stand or holder to be able to monitor the readings on the screen while driving.
As for the software, it may be supplied with the adapter. The necessary programs are also available in the Play Market for Android and similar solutions for devices on other operating systems. The software must be installed on a smartphone/tablet. Note that among the various available solutions, the Torque program is very popular (a free version of this application is available in the Market for Android). The program allows you to flexibly customize the interface, has the ability to not only read, but also decipher errors, and has the ability to reset engine errors.
Using the solution looks like this:
- The adapter is inserted into the vehicle's diagnostic connector;
- A smartphone/tablet with installed software is installed in the holder;
- Next, the car starts;
- Bluetooth is turned on on your smartphone or tablet;
- A program (for example, Torque) is launched on the phone/tablet;
Now you need to wait for the adapter and device to synchronize with the program, after which the parameters of the operating power unit are displayed. To determine why the check is on, you need to go to the appropriate subsection on your mobile device. Error codes will be displayed there, and it is also possible to provide options for decoding them. At the same time, it is possible to collect individual errors or all of them at once, as a result of which the check engine light goes out.
Methods for reading information during car self-diagnosis
There are two main ways to read error codes: using improvised means or using special equipment for car diagnostics.
- In the first case, self-diagnosis is performed by shorting the corresponding terminals of the DLC connectors with a wire or using a regular straightened paper clip. To do this, find the connector marked DIAGNOSTIC and open its cover. On the back of the cover there is a pin marking diagram. Using a wire, we close the terminals “E1” and “TE1” on DLC 1, or the terminals “TC” and “CG” on DLC 3. After this, turn on the car’s ignition and observe the blinking of the corresponding lights on the instrument panel.
- For diagnostics, special diagnostic devices can also be used: scanners or testers. Some service stations have special diagnostic computers. These devices are expensive, but in addition to full diagnostics, they allow programming of various systems and reading signals coming from various nodes in real time.
Built-in ECU reset tools
A complete reset of errors is carried out through the diagnostic block - this is the law. Secondary on-board comments, read frivolous ones, can be deleted from memory using standard means. This is the dashboard and on-board computer control keys.
- Press and hold the daily mileage button.
- Turn on the ignition, the daily mileage button is still clamped. The instrument panel will enter self-test mode when all needles move from the minimum to the maximum value. The button can be released.
- Press the daily mileage button again and again. Numbers and dashes will appear on the monochrome display. Each cell is responsible for a specific set of errors. If there is a dash in the cell, then there are no comments from the on-board system. If it is a number, then you should look for its decoding in a specialized manual for diagnosticians.
- You can reset errors in the same mode by holding down the odometer button for 2-3 seconds.
ECU records in old foreign cars with monochrome displays are reset in a similar way. As for new cars with display instrument panels and multimedia-intelligent control systems, here frivolous comments can be eliminated through the intelligent system menu. Serious errors can only be removed with the help of diagnostic equipment, through the block; removing the battery terminal is pointless.
Types of two-digit codes
For self-diagnosis of cars, two types of two-digit codes are most often used: the first is type 09; the second is type 10.
You can determine what type your car supports and whether there are any recorded errors in its operation as follows:
Frequent and continuous flashing of the warning light, when the flash and pause last for 0.5 seconds each, indicates that the vehicle is using type code 09. If when using this code the light flashes more than 11 times, then no fault records were detected.
When using codes of the second type, the light blinks at intervals of varying durations. The absence of faults during self-diagnosis is indicated by continuous flashing at intervals of 4.5 seconds. An example of reading codes of this type: flash - pause - flash - long pause - flash - this is code 21.
We carry out computer diagnostics
Diagnostics of Land Cruiser Prado 120 using a Lexus dealer scanner
To test the components and assemblies of the Toyota Land Cruiser Prado 120 for possible errors, scanning devices are used. Accurate results are provided by specialized dealer scanners. In addition to them, there are universal devices. The simpler the scanner, the more likely it is that it will not recognize Prado 120 specific errors. However, most faults will be deciphered.
Faults are read using the same algorithm:
Connect the scanner to the Prado 120 diagnostic connector.
Rewrite the issued Prado 120 error codes. Some programs decipher them independently. If there is no such function, then information can be found on the Internet.
If the Prado 120 is diagnosed professionally at a car service center, then the next step is dynamic scanning. This check allows you to obtain information about the ignition timing, temperature conditions, instantaneous fuel consumption and other data on engine operation. Dynamic diagnostics are performed with the engine running.
Now you can analyze the errors and take measures to eliminate them.
Two-digit system codes
Powertrain fault codes
Decoding engine fault codes for type 09:
11 — lack of power supply to the valve control unit; 12 and 13 - no engine speed signal is received; 14 - no feedback is received from the negative contact of the ignition coil or, if there are two of them, then from coil No. 1; 15 - no feedback from the negative contact of ignition coil No. 2; 16 - no signal is received from the automatic transmission ECU; 17 and 18 - unacceptable value of camshaft position No. 1 and No. 2; 21 — incorrect signal from the oxygen level sensor; 22 - unacceptable temperature value of the power unit; 23 and 24 - incorrect indicator of intake air temperature; 25 — lean air-fuel mixture; 26 - too rich air-fuel mixture; 27, 28 and 29 - incorrect signal from the additional oxygen sensor; 31 — unacceptable value of air flow or pressure of the intake manifold; 32 — incorrect response of the air flow sensor; 34 — boost malfunction; 35 — unacceptable value of intake manifold pressure (vacuum sensor); 38 - incorrect signal from the fluid sensor in the automatic transmission; 41 — incorrect response of the throttle position sensor; 42 - unacceptable value of the speed that the car develops; 43 - lack of starter signal on the engine ECU; 46 - malfunction of solenoid valve No. 4 or its circuit; 47 - breakdown of the additional sensor that fixes the position of the throttle or its circuit; 48 — malfunction of the additional fuel supply system; 51 - there is no idle signal from the sensor displaying the throttle position; 52 and 55 - incorrect feedback from the knock sensor; 53 - failure of the knock sensor control circuits; 61 - malfunction of the speed sensor and its circuit; 62-65 - malfunction of solenoid valves No. 1-4 or the corresponding circuit; 67 - malfunction of the O/D switching sensors or its circuit; 71 — breakdown of the exhaust gas recirculation system; 72 - malfunction of the fuel cut-off solenoid; 77 - malfunction of the pressure control solenoid or its circuit (in automatic transmission); 78 - there is no signal from the fuel pump or a malfunction of its circuits; 81—85 — malfunction of circuits in various parts of the robot box; 86 - breakdown of sensors that record engine speed; 88 - malfunction of the electrical circuit between the power plant control units and the automatic transmission; 89 — malfunction of the electrical circuit between the power plant control units and the robot box; 99 - no faults. Decoding engine fault codes for type 10: 1 - normal operation; 2 — unacceptable air flow value; 3 — incorrect switch signal; 4 - unacceptable antifreeze temperature value; 5 — incorrect oxygen sensor signal; 6 — unacceptable engine speed; 7 — incorrect response of the throttle position sensor; 8 — invalid air temperature sensor signal; 9 — incorrect signal from the sensor recording the vehicle speed; 10 — there is no signal to turn on the starter; 11 - breakdown of the air conditioner or position N in the automatic transmission.
Error codes for ABS and TRC systems (code 10)
11 — presence of an open circuit in the solenoid relay; 12 - solenoid relay circuit closed; 13 — presence of an open circuit in the pump motor control relay; 14 — circuit closure of the pump motor control relay; 15—18 — presence of disturbances in the operation of the TRC solenoid control; 21—24 — violation of the wheel solenoid circuit; 25—27 — violation of the TRC solenoid circuit in different parts of the circuit; 31—34 — incorrect signal from wheel speed sensors; 35 and 36 - open circuit of wheel speed sensors; 37 - malfunction of the rotors installed on the sensors displaying the speed of the rear wheels; 41 — too high or low supply voltage; 43 - deviation in the operation of the deceleration sensor; 44 - malfunction of the deceleration or neutral sensor circuits; 45-49; 58 and 61 - breaks and malfunctions of TRS circuits and parts; 51—53 — malfunction of the pump electric motor or its control; 55 - low brake fluid level or malfunction of its sensor; 56 and 57 - unacceptable oil pressure value; 62 — incorrect operation of the engine speed sensors; 71—74 — reduced voltage of wheel speed sensors; 75—78 — unstable signal from wheel speed sensors; 79 - deviation in the operation of the deceleration sensor or its circuit.
Error c1751 and how to fix it
Error c1751 Toyota Prado refers to the air suspension system. In a specific case - to the relay of the device responsible for closing and opening the electrical circuit.
The relay serves as an intermediary, transmitting a signal to the electronic control unit to fill the air cylinders with air. If its operation is disrupted, there is no positive signal and the ride height control stops.
In Prado 120, error number 1751 stands for damage to the compressor relay winding. However, malfunctions occur in electrical areas, in connectors, and in the ECU.
The main parameter of relay operation is resistance. If during measurement the value does not correspond to factory conditions, it is concluded that the reason is in the unit. Replacement is done with your own hands or by service station specialists.
If the ECU malfunctions, it is repaired; if the wires and connectors are damaged, it is cleaned, replaced or repaired.
Prado
In cars, malfunctions and malfunctions of mechanisms are recorded by the control unit. A special car scanner will help identify Prado 120 errors. You just need to know how the codes displayed on the device screen are deciphered. But modern devices do this automatically.
The Prado 120 diagnostic connector is located under the steering column.
OBD standard codes
Some Toyota Corolla cars support the OBD standard, which provides for error indication using 5-digit codes: one alphabetic character and four numeric ones.
The first character of this code is called the Alpha pointer and indicates the system in which the fault occurred:
- P - engine or transmission;
- B - car body;
- C - suspension;
- U is a network system.
The following numbers indicate the exact location and classification of the problem.
To diagnose problems in cars that support this protocol, it is recommended to use special scanners, testers, or connect to a PC using special programs.
What's the result?
Ease of use and accessibility allow adapters for the diagnostic connector to significantly simplify the procedure for checking a car, reading and decoding ECU errors. It is also worth noting that the error can be quickly reset without having to disconnect the battery terminals, erase a critical error, etc.
Finally, we would like to add that among the commercially available adapters, there are devices that may not read errors recorded in the ABS unit and Airbag airbag modules. In other words, information on these items may not be available. For this reason, before purchasing an adapter, it is necessary to separately clarify the possibility of reading errors from the memory of the above and other ECM modules by one or another device.
How to reset error data after diagnostics?
After carrying out diagnostics and reading the necessary information about vehicle breakdowns, it is recommended to erase the error data for correct operation of the system. To do this, some models provide a method for removing fuses (for different models this may be “HAZ-HORN”, “STOP” or “EFI”). The 30-second method of disconnecting the negative terminal of the battery is suitable for all cars. This method is not recommended for cars that have systems for adjusting to driving style.
Selecting a scanner
There are many scanners for sale that differ in functionality and price. An inexperienced driver may have dazzle in the eyes from such a choice. Therefore, let’s simplify the task and focus on three popular devices for diagnosing the Prado 120.
Car scanner Delphi DS150E
Country: USA. Place of production: China.
Good price-function ratio. The scanner software contains a database of hundreds of cars, both trucks and cars of all popular models. The connection plug here is standard OBD-ƖƖ. A good device for personal use.
ODB-II connector for Delphi DS150E scanner
Here we can say that the functionality is slightly limited, but this disadvantage is not compensated by the low price.
Autoscanner Launch CReader V+
Price about 3500 rubles
LCD display of the Launch CReader V+ scanner
Price. The device is equipped with a liquid crystal display, which makes it autonomous. Diagnostics do not require connection to a laptop or smartphone. Diagnostic data can be displayed in two formats to choose from - text or graph. Reads Prado 120 error codes at a good level.
Diagnostic data can be displayed in two formats - text or graph.
May not detect some protocols. Powered by a built-in battery, which discharges quickly in the cold.
Car scanner Delphi TCS CDP+USB+BlueTooth
Delphi TCS CDP+USB+BlueTooth
Country USA, made China
Price 11 thousand rubles.
Diagnostic interface: Autocom
The scanner is capable of working with different diagnostic interfaces: Autocom, Wow or Delphi in Windows 10. The software contains information about 4000 car models. In addition to reading errors, the device can calibrate sensors, program injectors and key fobs. There is also an on-board recorder function without using a computer, which allows you to identify many faults in electronic systems.
Diagnostic Interface: Wow
It is possible to reset the service interval and control all vehicle systems. At a relatively low price, the functionality is close to professional.
Diagnostic interface: Delphi
If the scanner is needed only to simply identify Prado 120 errors, then this is not the optimal choice.
Toyota Corolla ICE error codes
Quite often, sensors report engine malfunctions, which can occur either as a result of natural wear and tear on internal parts or due to improper operation of the machine. Most often, owners of this model encounter the following error codes during diagnostics:
- P0011 – incorrect camshaft position, i.e., desynchronization of the shafts, which causes the valve timing in the CVVT system to change and the element gear to light up.
Such a problem can occur due to incorrect position of the contacts in the gas distribution system valve, contamination of the piston channel by the oil flow, or breakdown of the phase regulator. The CVVT system itself can also be damaged, but this is less common.
If the P0011 fault message starts to light up, you must first check the serviceability of the sensor, inspect it for absence of oxidation and correct connection.
Then you need to look at the condition of the phase sensor: it may be contaminated with a layer of carbon deposits due to the use of low-quality oil. Then you should check the VVT valve for operability and, if it breaks, install a new part, and also see if there is any mechanical damage to the camshaft gear, which could not fit correctly.
- 2196. Toyota Corolla, in which computer diagnostics has detected such an error code, may receive an excessively rich mixture (1 sensor in 1 row should be checked). When code 2196 appears, you should check the condition of the EFI relay, air intake system, injectors, check the pressure level in the fuel system, and also see if there is an open circuit or short circuit in the electrical circuit of the sensor itself.
- P2118. This error means that the engine throttle actuator is not functioning properly because the current values are outside the normal range. If the check engine light comes on and the diagnostic code shows this code, you should check the ETCS power supply circuit for an open, any fuses that may be blown, and the ECM system. The problem may also occur due to the car battery being discharged.
- P2103. The code indicates that there is too much current in the throttle actuator circuit, which is necessary to move the throttle valve. The test reveals that its value exceeds 10 A for 0.1 s or 7 A for 0.6 s.
To fix the problem with the P2103 signal, it may be necessary to check the circuit for a short circuit; in some cases, it is necessary to change the damper itself or the housing assembly.
- P0606. If such an error starts to appear, this indicates a malfunction in the engine control unit. The cause of the problem is the ingress of moisture, which causes corrosion of the duralumin body, or clogging of the drainage hose leading from the car stove. You can remove traces of corrosion using alcohol or alcohol-containing products manually; after drying, the light should go out.
What does error c1728 mean on Prado and how to get rid of it
A fault code containing the Latin letter “c” in combination indicates problems with the SUV’s chassis. The appearance of error c1728 in Prado 120 indicates a breakdown of the rear shock absorber located at the left wheel.
The shock absorber is part of the suspension equipment. It protects the car from mechanical vibrations that occur while driving. When passing over uneven surfaces, the shock absorber softens body vibrations or completely absorbs them.
Since the SUV is exposed to extreme conditions, the equipment works under increased load, thus being subject to operational wear. Foreign elements cause damage to units, which leads to failure and malfunction.
Shock absorber breakage is determined physically. The car is rocked on its own, while counting the number of vibrations before it stops. When the shock absorbers are working, the swaying stops quickly. Otherwise, the car is sent to a service station lift, where professionals are involved in eliminating code c1728 in Toyota Prado.
Error c1735 in Toyota Prado concerns the compressor equipment complex. A compressor or supercharger is designed to suck in more air and increase the power of the main power unit - the motor.
The mechanisms of the SUV are connected to each other by electrical circuits. A break or short circuit leads to loss of communication between the elements. The integrity of the wires is compromised as a result of rotting due to the ingress of dirt, sand and dust.
The fault code indicates a loss of electrical voltage in the exhaust valve circuit located on the compressor. Sometimes the problem lies in the valve.
The owner of an SUV is quite capable of fixing the breakdown. If the wires are short-circuited, they are replaced, and if they are broken, the integrity is restored. Repair shop specialists will carefully examine the condition of the units and issue a verdict, on the basis of which they will repair the machine.
Toyota Corolla gearbox errors
Toyota Corollas of 2006, 2007 and later years of production are characterized by problems with the gearbox, especially often they happen with modifications equipped with a CVT robot. At the same time, the gearbox malfunction check lights up on the dashboard, and computer diagnostics can identify the following problems:
- Error P0909, indicating a malfunction of the rocker mechanism. In a manual transmission, gear selection is performed by means of an electric drive (actuator), which consists of a pair of electric motors, travel sensors and a gear that drives the engagement shaft of the desired gear in motion. The appearance of error code P0909 means that the travel sensor, the actuator itself or the hinge/fork, which are responsible for the switching process, are faulty.
- P0810. The error indicates incorrect behavior of the electric motor: the instruments register a clutch current of more than 22 A for 2 s, the clutch position deviates from the norm by 0.3 mm or more, and the movement of the mechanism is too slow. With code P0810, a control error may occur as a result of a damaged actuator, a faulty TCM, or a faulty travel sensor.
If a problem occurs when installing a new drive in the assembly, the mechanism clamp must be adjusted before doing this, otherwise P0810 (control error) cannot be cleared.
- When replacing the sensor, it is necessary to configure the electronics for the transmission system. If the above actions do not help and the lamp does not go out, you should replace the TCM system so that error P0810 can no longer occur.
- P0920. This code indicates a malfunction in the electrical circuit of the shift drive, which ensures the operation of forward gears. In this case, the voltage supplied to the gearbox actuator is too low or absent; When checking, you should find out the condition of the electric motor, TCM, and check the electrics for a short circuit.
- P0751. This command reports that the solenoid valve is stuck when the transmission is in the off state. To fix the error, you must do the following:
- Check the oil level in the gearbox.
- Accelerate the vehicle to a speed of 72 km/h to check the throttle opening degree.
- Check that the gear ratio and valve e/m correspond to the required values.
Diagnostics and elimination of tripping on Toyota Land Cruiser Prado
Let's look at the common Prado 120 error codes that diagnostics detect.
B1153
Error B1153 Prado 120 means: malfunction of the seat position sensor. This often means that the driver's seat sensor wire is damaged. To fix the problem, you need to remove the seat; on the bottom right side of it is the part we need. We find and eliminate the break.
We remove the seat; on the bottom right side of it is the part we need. We eliminate the break.
P0051
Error P0051: Oxygen Sensor Malfunction
P0051 error Prado 120 means a malfunction of the oxygen sensor. It is treated by replacing the damaged device. It can be removed using a wrench. The removed “oxygen tube” must be ringed. If it is working properly, then the problem is a clogged catalyst, the passage of gases through which deteriorates and affects the sensor readings.
S1223 and S1246
Errors C1223 and C1246 Land Cruiser Prado 120
Errors C1223 and C1246 Prado 120 are related to ABS. C 1223 reports a general system malfunction, and c1246 indicates that the problem is with the pressure sensor in the master cylinder.
When driving, this is manifested by the ABS fault indicator constantly glowing on the dashboard and the cruise control not working.
When scanning the system, we display the signals of the brake light sensor and pressure sensor on the display in graphical form. When you press the brake pedal, the graph shows an increase in pressure in the circuit, but the stop signals are not activated. The ABS unit does not receive a signal from the brake pedal.
We check the fuse box - the fault is most likely there. We replace the burnt element.
Fuse box Land Cruiser Prado 120
But if the cause of the fuse blown is not eliminated, the problem will reappear. Operating experience of the Prado 120 suggests that the reason is a damaged towbar socket.
Damaged towbar socket
Other errors detected during diagnostics
When checking the condition of Toyota Corolla systems, other problems may be identified regarding the condition of the power steering, electrical systems, airbags, climate control and other structural elements. Most often, owners encounter the following cases:
- Error P0351 or P0353. These malfunctions are due to the fact that during engine operation the IGF signal is not received by the ECM system. The problem with code P0353 should be looked for in the ignition system. First, it is checked for short circuits, then coils 1–4 are inspected and, if the diagnostics do not reveal problems in these elements, and error P0351 or P0353 does not disappear, the ECM is replaced.
- Code P0136 indicates that the oxygen sensor is faulty: the signal does not exceed 0.55 V when the car is moving at a speed of more than 40 km/h, the engine is warming up to a temperature above 40 degrees Celsius and at a speed level of more than 1400. The problem is why code P0136 may appear , consists of a break in the electrical circuit or a malfunction of the sensor itself.
- Error P0500, indicating damage to the vehicle speed sensor. The instrument fault signal P0500 may come on in the cruise control state and the current signal is interrupted for 0.14 s longer. When P0500 appears, it is necessary to check the electrical system for a short circuit. If the problem is not a failure, and error P0500 has not disappeared, it is worth scanning the instrument panel, the speed sensor itself, the ECU of the anti-skid mechanism and the body. P0500 is an error that is reset after replacing the sensor or electrical components.
- P0133. The code indicates low performance of the oxygen sensor circuit in row 1. The cause of the problem may be a short circuit, a problem with the air intake system, incorrect pressure levels, or a faulty or clogged injector. In addition, the malfunction may be that the sensor itself has burned out.
- Code P2196 indicates a continuous supply of an excessively rich mixture. You should check the oxygen sensor, EFI relay, sensor heater and circuits, and if the problem is not caused by failure of these devices, the cause is the condition of the ECM.
In addition, when diagnosing a Toyota Corolla, you may encounter code P0115: it indicates a malfunction of the cooling fluid temperature sensor (error 22). Also, some owners are faced with the ECU data bus being disconnected: this problem is designated as error 94, and its cause is a malfunction in the CAN system. For the Corolla E120 model, it is not uncommon to receive an error about a malfunction of the protection system: you should check the airbags and make sure that the connectors under the seats are not disconnected.
The car's steering wheel, power steering, Airbag system, or battery may be faulty. A red signal on the dashboard indicates a problem with the corresponding system, and the car may turn on the check and stall: this is especially true if there are problems with electrical systems in cold weather. In this case, it is worth checking the battery charge and sequentially diagnosing various parts of the wiring: the error can most often pop up due to a short circuit.
Diagnosis of Prado: features and frequency
Prado maintenance is carried out once a year or every 10 thousand km. It includes the replacement of fuels and lubricants, testing and diagnostics of the main systems and equipment of the vehicle.
Every 40 thousand kilometers, an in-depth inspection of vehicle components is carried out and replacement is carried out in accordance with the maintenance regulations.
Signals displayed on the central instrument panel mean that problems have arisen that require the owner’s attention:
- First of all, it is recommended to inspect the external condition of the SUV.
- If no signs of malfunction are found, then computer diagnostics are performed. The scanner is connected to the on-board computer, and error codes representing a combination of Latin letters and numbers are displayed on the device screen. Each combination describes a breakdown in the vehicle system.
- The problem is being fixed.
Inspection and the occurrence of errors cannot be treated negligently.
Timely elimination of problems will protect health and save the owner’s nerves and money.
The occurrence of a fault code is associated with a malfunction of the electronic components of the suspension. This unit regulates the interaction of vehicle elements with the road surface by measuring the height of the vehicle.
To calculate the parameter, sensors are installed that transmit a signal to the electronic control unit. Error c1713 in Toyota Prado appears when one of the elements or connecting parts, harnesses and connectors malfunctions.
The voltage value in the wire connecting the sensor and the main unit will allow us to draw a conclusion about existing malfunctions. The number of volts in the circuit is within the factory parameters. Deviation from the specified values indicates a critical condition of the rear height sensors.
If the suspension sensors malfunction, they are replaced with new ones. In the connecting parts, damage to the integrity of wires and connectors is eliminated. When completely worn out, the materials are replaced.
Actions to take when an error occurs
What to do if the check engine light or another system light comes on? If errors occur in the climate control, airbag, battery, actuator or internal combustion engine, a reset should be performed after diagnostics: for this you can use a scanner or perform electrical manipulations.
Resetting the error for a Corolla 150, Toyota Corolla E120 or another modification of any year of manufacture is carried out according to one algorithm: you can turn on the ignition, press the brake pedal several times, and then repeat the procedure with the ignition off.
When diagnosing an E150 or Corolla E120 model for errors with a scanner, a reset can be performed quickly with just a few button presses.
If you decide to remove the terminal
When disconnecting the battery terminal, you must follow the following basic rules:
- Do not remove the terminal if the key is in the ignition switch. On some cars, when the battery is disconnected and the key is in the ignition, the airbags or other additional features are deactivated. equipment. The reverse connection is usually made at the service.
- Remove the negative terminal first. In fact, it makes no difference to the technician which terminal is removed first. This is rather a preventive measure, the explanation for which is to avoid shorting the positive terminal to the negative (“body ground”).
After connecting the battery back, do not be alarmed by the highlighting of new symbols that were not previously displayed when the engine was running. Following the reboot, the system performs adaptation, and the icon only confirms this. In addition, after a few minutes it will go out.
For example, on a VW Polo, after rebooting the “brains” with a disconnected terminal, the electric power steering icon lights up. This is a signal to turn the steering wheel to the left all the way, and then all the way in the opposite direction.
Rebooting the "brains" of the Audi 80
I would like to immediately note that this method is suitable for any “Mono-Jetronic” / “Mono-Motronic” manufactured by Bosch , regardless of what car it is installed on - VW, Audi, Renault or Fiat and others.
- Start and warm up the engine until the cooling fan turns on twice or until the oil temperature reaches +80 C.
- Stop the engine and turn off the ignition.
- Disconnect the connector from the Mono-Jetronic/Motronic control unit. Wait at least 10 minutes. This is necessary so that the contents of the control unit’s RAM are guaranteed to be erased (lost).
- Connect the connector back to the control unit.
*Note. Theoretically, it is possible to replace steps 3 and 4 by disconnecting the negative terminal of the battery for the same time, and in most cases this simplification is acceptable. However, in some cases, due to the implementation features of the vehicle's electrical circuit, this solution does not work.
We dump our brains on Mitsubishi Karizma
According to the display, if there is no standard radio with a “Disp” button (it remains in a text file on the computer, I can’t check it now, but I think I tried it before, everything worked on the first Kara with a non-original radio).
Press and hold the left button, turn on the ignition (do not start the engine), while holding the left button pressed - the SET button - you can switch the computer readings
To see the consumption when the engine is on and the “power reserve” display is set, press M (with the left button pressed). The display proceeds to set the consumption readings: liters per kilometer or kilometers per liter, and at the same time displays the current consumption. Pressing Set returns everything to its place. Tested on cars with and without standard radio. The readings are reset with the same long press of the left button.
To switch modes, you need to simultaneously press the left and set. Doesn't have to be long. This all works when you turn on the ignition with set pressed. If you just turn on the ignition, the mode cannot be changed.
Hold the “A” button longer, the one closest to the steering wheel. And the reading that was selected will be reset to zero.
How to enter the display service mode
We press and hold the nameless button, turn on ACC, hold the button all the time, press H twice, then SET and enter the service, switching SET.
The reset is done this way: on the BC display, press and hold for 6 seconds (or until reset) the leftmost button.
We train our brains on Mitsubishi Karisma after resetting
- Warm up the engine to operating temperature, turn it off, remove the battery terminal for 10-20 seconds, and put it on.
- With consumers turned off, turn on the ignition for 10 s, turn off for 20 s, start the engine and let it idle for 10 minutes (all consumers should be turned off!).
- Turn off for 20 seconds, start again, turning on all possible loads (headlights, air conditioning, radio, heated seats, windows, interior lights, etc.), let it run for 10 minutes.
- Turn off the ignition for 10-20 s.
For everyone whose idle speed floats after they removed the terminals from the battery for some reason or reset their brains. After this, you need to train the computer XX again and this is described in detail in the instructions. For those who don’t have them, I’ll explain. Under the hood is a fuse and relay box. — Open the lid, find the air conditioning relay and its 25A fuse, after warming up the internal combustion engine to operating temperature, take out the whole thing. — Start the car and let it idle for 10 minutes, it may float a little but be patient. — After 10 minutes, turn off the car, put the relay and fuse in place, close the lid and hood, start it and enjoy smooth speed. PS This procedure perfectly regulates the idle speed, but only if the engine is OK.