The robot initialization procedure on a Toyota Corolla 2008 model year is carried out after transmission repairs associated with the installation of a new control unit or clutch. To set up, you can use a computer or make adjustments by performing a sequence of actions with the selector and brake pedal. If the adjustment is incorrect, the wear of structural elements accelerates or the gearbox stops switching gears.
The robot is initialized after the transmission has been repaired.
What does P0900 mean?
When the PCM (automatic transmission control module) detects an open clutch actuator control circuit, it sets the P0900 error code. The PCM continuously monitors the actuator output voltage as it engages and disengages the vehicle's clutch. To change gears, the PCM must send a command to engage the clutch. After this, the drives in the transmission turn off the current gear and turn on the next one (higher or lower).
Some models use a solenoid device in the drives to operate the clutch using brake fluid. Other models use pneumatic or hydraulic actuators, electronic sensors, or a combination of both, controlled by microprocessors. In any case, if this error code appears, it means that the circuit is open and the PCM cannot engage the gear.
What causes the P0900 code?
There are a number of reasons why P0900 may occur:
- Corrosion of electrical connectors
- Damage to electrical circuits inside drive solenoids or servomotors
- Malfunction of motion or movement sensors in the clutch
- Wiring damage
- Ground Loss
This could also be due to a faulty PCM. However, this is extremely rare and if the PCM mistakenly reports the wrong code, the symptoms listed below will not correspond to this error.
What are the symptoms of a P0900 code?
The main symptom of this error is that the car simply will not engage the gear. However, this problem may also affect other components. In addition to the check engine light coming on, the following symptoms may also be present:
- Engine stops after control system failure
- The engine does not turn over (this is actually a PCM safety precaution).
- The transmission goes into automatic emergency mode
- The transmission is stuck in one gear, but does not go into automatic transmission protection mode
Setting up a Toyota Corolla 2007–2008 robot - step-by-step instructions
If the car owner does not have a diagnostic scanner, then the settings can be made by manipulating the brake pedal and the robot selector handle. To complete the work you will need a piece of copper wire or a steel clip. The procedure allows you to reset the controller (ECU) settings or initialize the clutch or transmission of the car.
Self-adaptation of the robot
Brief instructions on how to independently adapt the robot to a Toyota Corolla with an E150 body:
- Place the car on a level surface or in a garage box and place the transmission lever in the neutral position.
- With the ignition off, insert a wire or wire jumper into the diagnostic block, closing contacts CG and TC.
- Wait 10 seconds and then turn on the ignition circuits.
- Within 3 seconds, press the brake 7 times and wait for the double beep.
- Press the brake pedal and adapt the desired system using the gearbox selector. For example, to program the clutch, you need to move the lever from neutral through the positions E/M/+/M/-/M/+/M/-/E, and then return to the neutral position.
- After entering the setup mode, you should release the clutch and immediately press it again; if the manipulations are performed correctly, a triple signal will be given by the buzzer (the number of sounds depends on the selected initialization algorithm).
- After the end of signaling, you need to press the brake pedal 3 times within 2 seconds; if the procedure is performed correctly, the buzzer will beep 2 times (regardless of the selected initialization algorithm).
- Turn off the ignition and wait at least 10 seconds, and then remove the jumper from the diagnostic block.
- Start the engine and check the operation of the transmission; the inclusion of an emergency indicator in the form of a gear indicates the presence of malfunctions or incorrect adjustment.
Robot adaptation allows you to reset the car controller settings.
If during the setup process there are no sound signals or they sound at an increased interval, then the programming procedure should be interrupted.
To return to the initial stage, turn off the ignition circuit for 15-20 seconds. The number of initialization attempts is not limited and does not have a negative impact on the electromechanical clutch or gear shift actuators.
Setting up the transmission system
General initialization of the transmission is carried out according to a similar procedure, but it is required to move the selector according to the E/M/-/M/-/M/+/M/+/E scheme. If the algorithm is executed correctly, 4 buzzer signals are given (with an interval of 0.5 seconds). After completing the setup, you need to remove the paperclip and check the operation of the box while running.
Winter driving program
The robotic transmission does not support a special winter operating mode. Operating a car at negative air temperatures is no different from driving a car with a manual transmission. To warm up the crankcase and the electromechanical drive, let the engine idle for 3-5 minutes. At air temperatures below -25°C, there have been cases of spontaneous transition to neutral due to the solidification of the lubricant in the actuator cavity.
The Toyota robot does not support winter operation.
How does a mechanic diagnose a P0900 trouble code?
A qualified technician will begin a diagnosis using an OBD-II scanner to see what codes have been stored on the vehicle. After that, it will move on to solving problems that may have occurred before the P0900 code appeared. And finally it will do:
- Checking the voltage at the PCM terminals
- Checking the condition of the PCM terminals
- Checking the clutch drive chain
- Checking the clutch wires and connector
- Checking the clutch drive unit
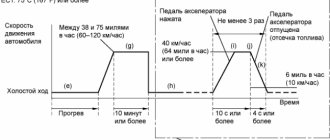
TEST SEQUENCE
NOTE: If you are replacing the selector and shift position sensors, you must perform [Initialization and Setup] and [Timing Position Calibration] after installing the sensors (Click here). If the sensors are installed without performing [Initialization and Setup] and [Timing Position Calibration], the vehicle's drivability may deteriorate and parts of the system may be damaged.
Connect the handheld diagnostic tool to the DLC3.
Turn the ignition switch (IG) and the handheld scan tool ON.
Select the following menu items: Powertrain / Multi-Mode M/T / Data List / T/M Reverse Switch Signal and Gear Position (Current).
| [Abbreviation] options | Measured variable: display | Normal condition | Diagnostic Notes |
| Reverse Switch Signal T/M [T/MR SW Sig] | Transmission reverse switch signal: Open or Gnd | Gnd: reverse gear engaged Open: any other state | In case of malfunctions, the indicator is constantly on or off, regardless of the current gear |
| Gear position (current) | Current gear position: min: 0, max: 7 | Actual gear position is displayed | 0 = Neutral 1-6 = 1st to 6th 7 = Reverse |
OK: When you operate the gear shift lever, the instrument display shows values corresponding to the normal conditions in the table above.
Result:
| Result | Next step |
| NG | A |
| OK | B |
Disconnect the reverse light switch connector.
Turn on the ignition (IG).
Measure the voltage according to the values given in the table.
Rated voltage:
| Contacts for connecting a diagnostic tool | Switch position | Specified conditions |
| B5-2 - mass | Ignition on (IG) | 11-14 V |
Connect the reverse light switch connector.
Remove the reverse light switch assembly.
Check the resistance when the switch is pressed and released.
Nominal resistance:
| Contacts for connecting a diagnostic tool | Switch position | Specified conditions |
| 1-2 | Pressed out | 10 kOhm or more |
| 1-2 | Pressed | Less than 1 ohm |
Reinstall the reverse light switch assembly.
Disconnect the reverse light switch assembly connector.
Disconnect the TCM connector.
Remove the reverse lamp assemblies.
Measure the resistance according to the values given in the table below.
Nominal resistance:
| Contacts for connecting a diagnostic tool | Mode | Specified conditions |
| A34-9 (RSW) - B5-1 | Always | Less than 1 ohm |
| A34-9 (RSW) - weight | ↑ | 10 kOhm or more |
Turn on the ignition (IG).
Connect the reverse light switch assembly connector.
Connect the TCM connector.
Remove the shift mechanism travel sensor.
Prepare 3 dry batteries (1.5 V) and 2 terminals for connecting batteries and sensor.
Connect the batteries in series.
Connect the positive lead of the battery to pin 3 of the sensor, and the negative lead to pin 2.
Check the voltage between pins 1 and 2.
Nominal voltage (at a total dry cell voltage of 4.5 V):
| Sensor angle | Output voltage at pins (1-2) |
| 55° | Approximately 4.05 V |
| 0° | Approximately 2.25 V |
| -55° | Approximately 0.45 V |
Reference voltage (with a total dry cell voltage of 5.0 +- 0.3 V):
| Sensor angle | Output voltage at pins (1-2) |
| 55° | Approximately 4.5 V |
| 0° | Approximately 2.5 V |
| -55° | Approximately 0.5 V |
Connect the positive lead of the battery to pin 6 of the sensor, and the negative lead to pin 5.
Check the voltage between pins 4 and 5.
Nominal voltage (at a total dry cell voltage of 4.5 V):
| Sensor angle | Output voltage at pins (4-5) |
| 55° | Approximately 4.05 V |
| 0° | Approximately 2.25 V |
| -55° | Approximately 0.45 V |
Reference voltage (with a total dry cell voltage of 5.0 +- 0.3 V):
| Sensor angle | Output voltage at pins (4-5) |
| 55° | Approximately 4.5 V |
| 0° | Approximately 2.5 V |
| -55° | Approximately 0.5 V |
- Do not supply more than 6 V.
- Do not use the sensor if it has been dropped.
Reinstall the shift stroke sensor (Click here).
Perform [Initialization and Setup] (Click here) and [Timing Position Calibration] (Click here).
Disconnect the shift stroke sensor connector.
Disconnect the TCM connector.
Measure the resistance according to the values given in the table below.
Nominal resistance:
| Contacts for connecting a diagnostic tool | Mode | Specified conditions |
| A34-30 (VCS2) - A32-6 | Always | Less than 1 ohm |
| A34-29 (VSS2) - A32-4 | ↑ | Less than 1 ohm |
| A34-28 (E2S2) - A32-5 | ↑ | Less than 1 ohm |
| A34-19 (VCS1) - A32-3 | ↑ | Less than 1 ohm |
| A34-18 (VSS1) - A32-1 | ↑ | Less than 1 ohm |
| A34-17 (E2S1) - A32-2 | ↑ | Less than 1 ohm |
| A34-30 (VCS2) - weight | ↑ | 10 kOhm or more |
| A34-29 (VSS2) - weight | ↑ | 10 kOhm or more |
| A34-28 (E2S2) - weight | ↑ | 10 kOhm or more |
| A34-19 (VCS1) - weight | ↑ | 10 kOhm or more |
| A34-18 (VSS1) - weight | ↑ | 10 kOhm or more |
| A34-17 (E2S1) - weight | ↑ | 10 kOhm or more |
Connect the shift stroke sensor connector.
Connect the TCM connector.
Remove the selector travel sensor.
Prepare 3 dry batteries (1.5 V) and 2 terminals for connecting batteries and sensor.
Connect the batteries in series.
Connect the positive lead of the batteries to pin 4 of the sensor, and the negative lead to pin 5.
Check the voltage between pins 6 and 5.
Nominal voltage (at a total dry cell voltage of 4.5 V):
| Sensor angle | Output voltage at pins (6-5) |
| 55° | Approximately 4.05 V |
| 0° | Approximately 2.25 V |
| -55° | Approximately 0.45 V |
Reference voltage (with a total dry cell voltage of 5.0 +- 0.3 V):
| Sensor angle | Output voltage at pins (6-5) |
| 55° | Approximately 4.5 V |
| 0° | Approximately 2.5 V |
| -55° | Approximately 0.5 V |
Connect the positive lead of the batteries to pin 1 of the sensor, and the negative lead to pin 2.
Check the voltage between pins 3 and 2.
Nominal voltage (at a total dry cell voltage of 4.5 V):
| Sensor angle | Output voltage at pins (3-2) |
| 55° | Approximately 4.05 V |
| 0° | Approximately 2.25 V |
| -55° | Approximately 0.45 V |
Reference voltage (with a total dry cell voltage of 5.0 +- 0.3 V):
| Sensor angle | Output voltage at pins (3-2) |
| 55° | Approximately 4.5 V |
| 0° | Approximately 2.5 V |
| -55° | Approximately 0.5 V |
- Do not supply more than 6 V.
- Do not use the sensor if it has been dropped.
Reinstall the selector travel sensor (Click here).
Perform [Initialization and Setup] (Click here) and [Timing Position Calibration] (Click here).
Disconnect the selector stroke sensor connector.
Disconnect the TCM connector.
Measure the resistance according to the values given in the table below.
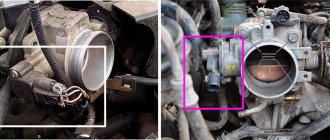
I decided to check the condition of the clutch actuator, wear of the clutch disc and MMT in general.
Lower original bushing before pressing:
I stopped by Toyota officials to find out the number of clutch connections. I went into the repair area and they did it in front of me, but the technician seemed to not quite understand... In the end, he checked everything and initialized it, but he couldn’t say what exactly... To the question “Which ini did you do?” I only received “I was initializing MMT...” And to the question “How many successful, unsuccessful and attempted attempts were there?” Answered: “16 is indicated here!” What exactly 16 he could not explain.
They kicked RoboCop out for me and I went. There is a smooth start forward and backward, and there is also start-up assistance.
I went to the guys at a regular service center (where I usually go) and asked to change the clutch actuator bushings, and in general I wanted to see the condition of the bronze bushing of damn good quality, which I installed at 92,000 km. There was some debris from the motor brushes, but the motor itself was in excellent condition. The bushing was also in excellent condition. The bushings were replaced, I installed bushings made of sheet metal with Teflon coating, which I keep in stock))
After assembly, nothing changed... everything was as good as it was)) I just don’t want to bring the robot to a bad state and decided that it would be better to change the bushings periodically.
I went to the village and then... Fucking gear... I think I’m done...
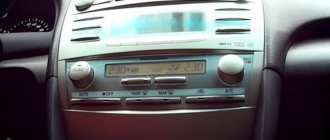
I first figured out the error using a paper clip and self-diagnosis - the answer was 67 (based on the blinking of the gear) - I googled it - the problem is in the reverse gear chain. I returned home and connected the Toyota cord - the same error P0812 (Malfunction in the reverse gear input signal circuit) And indeed, the gear lights up only if you turn on the reverse gear and the reverse light did not light up, and accordingly the parking sensors do not work, since it It is also powered by turning on the reverse gear. With the help of TechDoc, I found out that the problem is in the reverse light sensor.
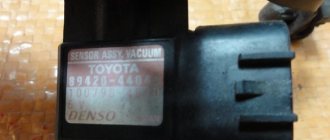
Toyota 84210-52050 - reverse sensor, screwed into the gearbox from above, with the help of a long wrench you can get it out without disassembling anything, but while I was looking for it, I removed the air filter housing.
Existist gave analogues of the Toyota 84210-52050 sensor (1067₽) from 509₽: Toyota 84210-12040 Fae 40846 Eps 1.860.111 Stellox 06-12526-SX Facet 7.6111 ZZVF GRA0402 Vernet RS5554 Deppul DE40214 Y KW 560.111
I googled a little and ordered a similar sensor Toyota 84210-04010 but for 500₽ from the Emirates)) I like it better)) Maybe someone will also find the number useful.
__________________ UPD: A couple of weeks later the sensor arrived from the Emirates and on the same day the old one started working))) So for now I’m driving with the old one - everything works))
Owners of a Toyota Corolla often encounter various malfunctions of the engine, gearbox, clutch or other systems, the appearance of which is accompanied by a corresponding signal on the dashboard. Computer diagnostics helps determine the cause and type of problem, and depending on what fault code the device shows, internal systems are checked and the vehicle is repaired.
Common errors when diagnosing code P0900
Most mechanics make mistakes related to the above steps during diagnosis. For example, they might fix a PCM terminal voltage problem and think they've done everything they need to do when they should have also paid some attention to the clutch actuator.
Another mistake is not using an OBD-II scanner. This occurs when an experienced mechanic hears a car owner describe a particular problem and assumes he knows what to do, although this is not always the case. If a P0900 code is detected by a scanner, it could tackle the problem by starting with what needs to be done first, instead of doing everything from start to finish.
How to distinguish between a gearbox and a robot
You can distinguish a classic automatic transmission from a robotic one by the following characteristics:
- by the absence of an actuator module under the hood connected to the clutch fork, and additional positions for manual switching M- and M+ on the selector pad;
- based on the results of computer diagnostics, which will indicate the modification of the transmission;
- by deciphering the vehicle’s equipment by VIN number;
- by the appearance of the selector, which provides additional modes and a Shift Lock button to release the transmission lock when the engine is off;
- according to the year of manufacture of the car, after restyling in 2010, the manufacturer refused to install the robot.
You can distinguish a manual transmission from a robotic one by the presence of an additional clutch pedal and a gear shift lever with a pictogram on the head. Manual and automatic transmissions were offered with a 1.6-liter 124-horsepower 1ZR-FE engine and a 1.8-liter unit. The manual transmission was the base for 1.4 liter engines (cars produced until the end of 2008) and 1.3 liter, and was also used on the initial versions of sedans with a power plant based on the 1ZR-FE model.
You can distinguish the gearbox by the appearance of the selector.
How serious is the P0900 code?
This error is quite serious because the vehicle will not function properly until the underlying problem is resolved. This can also lead to problems on the road, for example, the vehicle may stop in an inappropriate place and its owner will be stranded, requiring the assistance of a tow truck. For this reason, even if you think the problem can be resolved quickly, it is best to have a professional inspect your vehicle as soon as possible.
Conclusion
Computer diagnostics of a Toyota Corolla E150, 120 or other modification for most modern cars is performed through the OBD II connector, and during the test the device can show a code with the index P, which indicates the presence of problems. When such errors appear, it makes sense to check the engine of a Toyota Corolla released in 2008 or later, and conduct a detailed check of the condition of the gearbox, clutch, electrical system or other system, depending on the specific code. The error is reset after the problem is detected and corrected; cleaning is done by issuing a command from the scanner or resetting the terminal: in the first case, the result will appear instantly.
Hello! Once a week a gear pops out, I turn it off, wait a couple of seconds and I’m good to go. The clutch does not slip, the first digit of the actuator motor is 4, I don’t know what year. Where do you recommend starting to look for the problem and how? Thank you in advance!
solne4nyj_zajka
New Member
likeman
New Member
Andrey 2312
New Member
ValeriY-S
New Member
Participant
Inf1n1ty
New Member
Tell me, please, I’m already exhausted with the robot. The car is 2006, I have had it in my hands since the spring of 2013 (almost 4 years). Mileage 155 thousand.
Somewhere in the summer of 2015 the car stopped working and the clutch was replaced. 2 months ago the car suddenly stopped on the Moscow Ring Road, the transmission switched to N. I stopped, turned off the engine, started up after 10 minutes and drove off. Diagnostics showed error p0810. I went to the officials, they said that it would cost from 47 to 190 thousand rubles.
I found a specialized service on the Internet and went to them, they removed the box. The disc was worn out and was clearly worn out. Replaced the clutch with a new one. The flywheel was also not in the best shape, they suggested either grinding it down or installing a new one, they installed a new one. They opened the actuator motor, there was some kind of black powder inside and it was not because of the brush, the master said. Replaced the motor with a new one. All this cost me 44 thousand.
And recently the car stopped again on the Moscow Ring Road, again with a gear and a flashing neutral. I went to the same service center because... We have a 1 year warranty on labor and spare parts. They immediately started loading me up, saying that I didn’t show up for initialization (they didn’t warn me about any initialization, and the car only drove 2500 km after the repair). As a result, I drove the car into the box, they read the error with a scanner and there were 2 errors: P0810 and P0812.
I was told that the transmission selector error is P0812, and P0810 is its consequence. Replacement costs 37,000 rubles. This is a completely different unit and is not included in the warranty. I scoured the Internet about the P0812 error, it is very rare and I have a feeling that the main error is P0810 and the car service did not complete something or something else needs to be changed.
Please tell me who has encountered such a situation. Thank you.
Oldtech
King breeder
Anton0707
Participant
Tell me, please, I’m already exhausted with the robot. The car is 2006, I have had it in my hands since the spring of 2013 (almost 4 years). Mileage 155 thousand.
Somewhere in the summer of 2015 the car stopped working and the clutch was replaced. 2 months ago the car suddenly stopped on the Moscow Ring Road, the transmission switched to N. I stopped, turned off the engine, started up after 10 minutes and drove off. Diagnostics showed error p0810. I went to the officials, they said that it would cost from 47 to 190 thousand rubles.
I found a specialized service on the Internet and went to them, they removed the box. The disc was worn out and was clearly worn out. Replaced the clutch with a new one. The flywheel was also not in the best shape, they suggested either grinding it down or installing a new one, they installed a new one. They opened the actuator motor, there was some kind of black powder inside and it was not because of the brush, the master said. Replaced the motor with a new one. All this cost me 44 thousand.
And recently the car stopped again on the Moscow Ring Road, again with a gear and a flashing neutral. I went to the same service center because... We have a 1 year warranty on labor and spare parts. They immediately started loading me up, saying that I didn’t show up for initialization (they didn’t warn me about any initialization, and the car only drove 2500 km after the repair). As a result, I drove the car into the box, they read the error with a scanner and there were 2 errors: P0810 and P0812.
I was told that the transmission selector error is P0812, and P0810 is its consequence. Replacement costs 37,000 rubles. This is a completely different unit and is not included in the warranty. I scoured the Internet about the P0812 error, it is very rare and I have a feeling that the main error is P0810 and the car service did not complete something or something else needs to be changed.
Please tell me who has encountered such a situation. Thank you.
These mistakes are far from rare, of course you were loaded with such amounts. With such a mileage, it’s clear that the clutch release actuator needs to be changed. Replacing the motor did not give anything due to the fact that the clutch release actuator bushings were not replaced. Because of them, this error comes out, since they are already worn out.
I can assume that the actuator worm shaft is also worn out.
Regarding the clutch, according to your story, you were initially bullied, with replacing the clutch, the signs for replacing the clutch are the same as for mechanics, THE SMELL OF BURNING IN THE PASSENGER, AT HIGH RPM DOES NOT SHIFT GEAR, SLIPPING OF THE CLUTCH.
and the fact that you stopped on the Moscow Ring Road was initially a problem with the actuator, not the clutch.
All errors TOYOTA 4RUNNER, ALLEX, ALLION, ALPHARD, ALTEZZA, ARISTO, AURION, AURIS, AVALON, AVENSIS, AYGO, BB, BELTA, BLADE, BREVIS, CALDINA, CAMI, CAMRY, CELICA, CELSIOR, CENTURY, COROLLA, ECHO, ESTIMA , FJ CRUISER, FORTUNER, FUNCARGO, GT86, HARRIER, HIACE, HIGHLANDER, HILUX, INNOVA, IPSUM, iQ, ISIS, IST, KLUGER HYBRID, KLUGER V, LAND CRUISER, LAND CRUISER PRADO, MARK, MARK X, MATRIX, MR 2 , NADIA, NOAH, OPA, PASSO, PLATZ, PREMIO, PREVIA, PRIUS, PROBOX, PROGRES, RACTIS, RAUM, RAV4, RUSH, SAI, SEQUOIA, SIENNA, SIENTA, SOLARA, TACOMA, TUNDRA, URBAN CRUISER, VANGUARD, VELLFIRE, VENZA, VERSO, VITZ, VOLTZ, VOXY, WILL CYPHA, WILL VS, WINDOM, WISH, YARIS.