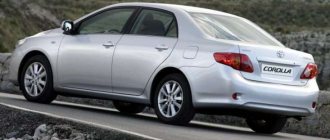
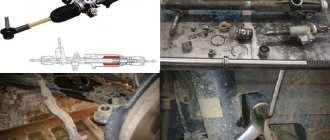
In the suspension of a Toyota Corolla car, there are main key elements that play a huge role while driving, such as the CV joint.
Thanks to this part, torque is transmitted to the wheels at different angles. It is a hinge that needs to be changed periodically, since over time it fails, as a result of which it is necessary to make major repairs or change it completely. Used only for front wheel drive vehicles. The hinges wear out quickly due to careless use of the car, as well as under the influence of the environment.
How much will it cost to repair CV joints on a Corolla E150: be on the lookout!
Replacing CV joints on a Corolla E150 is a rather expensive procedure, requiring the purchase of new components and a lot of consumables - in addition to the parts, you will need to buy boots, silent blocks, fixing clamps, technical oil and lubricant for grenades.
| Manufacturer | vendor code | Installation side | Compatibility by car year | Approximate cost, rub. |
| FEBEST | 0110-054 | External | 2006-2009 | 2200 |
| NIPPARTS | J2822032 | External | 2006-2009 | 2250 |
| OEM | 4346009R30 | External | 2006-2009 | 2100 |
| OEM | 4355042010 | External | 2006-2009 | 2140 |
| FEBEST | 0110055A48 | Internal | 2006-2009 | 2200 |
| FEBEST | 0110ZZE120A48 | Internal | 2006-2009 | 2480 |
| OEM | 4551012391 | Internal | 2006-2009 | 2100 |
When choosing a set of CV joints for a Toyota Corolla E150, it is recommended to check the part numbers for compatibility with the vehicle’s VIN number, using the search program on the manufacturer’s official website. Installing incompatible parts can reduce the strength of the chassis and can provoke an emergency on the road.
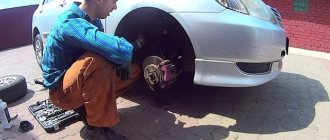
The replacement will take place with complete removal of the hub. Spray the nuts of the steering tip, ball, caliper, and hub with WD40. The amount of WD depends on the contamination and “sticking” of the nuts.
1. remove the wheel :o)
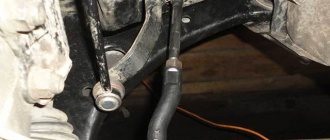
2. remove the steering tip from the hub: - take out the pin securing the steering tip, - unscrew the nut, BUT NOT TO THE END, leave a couple of turns so that the nut does not fall off, - pry it off with a ball puller. without a puller - apply SIDE blows with a hammer to the place where the hinge is attached to the tip, - then unscrew the nut completely and carefully move the steering wheel to the side.
3. remove the brake caliper: - unscrew the bar holding the brake hose, - unscrew the caliper and remove it from the brake disc, - (!) do not disconnect the caliper from the brake hose but tie it with a wire or nylon tie to the strut spring, - do not forget to also remove ABS sensor.
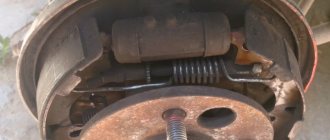
4. remove the brake disc, and this is what we see:
5. Unscrew the hub nut. It can be with a pin or with a pressed body for locking. For greater convenience and simplicity, a long pipe to increase the shoulder will be very helpful when unscrewing the nut, because she gets very attached.
5. unscrew the 3 lower bolts securing the ball to the lever, DO NOT unscrew the ball from the hub.
6. unscrew 2 bolts from the steering knuckle
7. remove the hub: - turn the steering knuckle to the side, - lower the lever down and pull the hub towards you and up.
8. on the removed hub: - unscrew the lock nut, as on the steering end, - use a puller to pull out the ball, - change the ball and simultaneously lubricate the wheel bearing.
9. move on to the grenade:
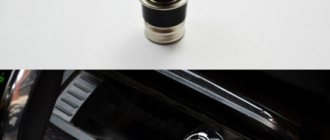
10. remove the clamps from the boot and...
This is where I fell for numerous reports that say that you can KILL an external grenade without removing the drive - DON'T BELIEVE THIS - this can only be done with a f... but broken grenade.
There are several ways to remove an external grenade:
1) pull out the drive from the internal grenade, having previously removed the clamps from the internal boot - this can be done easily, having a hole or raising the car higher on a jack (!) DO NOT FORGET about the safety measures when working under the car ;o). We clamp the drive in a vice and: - knock down the outer grenade - break the bearing race and disassemble the grenade - cut with a grinder and disassemble, be careful not to damage the drive
2) if you have an angle grinder, you don’t have to remove the drive
I broke the clip because... I couldn’t initially shoot down the grenade (after spending an hour and a half on it) and I don’t have an angle grinder. As a result, the retaining ring was knocked off the inside of the drive and the next day it flew out of the tripod when turning (but that's another story)
11. under the boot we see:
12. after breaking the clip, you can see this ill-fated locking ring, which prevents the grenade from flying off the drive
13. The old grenade has been removed. HOORAY!
14. We put on the new ring from the grenade kit.
15. put on a new grenade: - fill the grenade with lubricant; - screw the hub nut so that it is flush with the grenade rod, this is done to increase the area and so as not to damage the thread; — place the grenade in the grooves and sharply hit the nut with a wooden mallet (or a sledgehammer through a wooden block) and put the grenade on the drive. There should be a click that the retaining ring has straightened behind the “star”, but you may not hear it :o) - fill in more grease, rotating the grenade distribute the grease over the bearing.
16. assemble in reverse order.
CV joint seals on Toyota Corolla E150: what and when to change?
Installing new seals on the hinges is an integral part of servicing the vehicle chassis - neglecting replacement reduces the service life of CV joints. To replace, in addition to new seals and lubricant, you will need socket heads “30” and “13”, as well as a slotted screwdriver and a hammer. To replace consumables on CV joints you must:
- Place the vehicle on a lift or jack up the front of the vehicle;
- Drain the oil from the junction box;
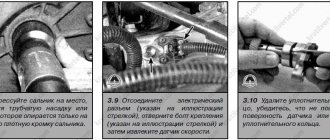
- Next, you will need to remove the right drive and, using the tip of a screwdriver, remove the oil seals from the housing of the crankcase and the box;
- Then we lubricate the new part with oil and install the appropriate clamp for fixation, after which we install the oil seal in place;
- Now install the drive and fill in the transmission oil.
In order not to damage the new oil seal, it is also recommended to install the part using the tip of a slotted screwdriver, having previously wrapped the slot with masking tape or electrical tape.
A little more about CV joints
The hinge provides torque transmission at different angles. Its main purpose is to transmit torque to the wheels. In the automotive industry it is used only for front-wheel drive cars, which is exactly what our Corollas are. The hinges wear out quite quickly, especially under the influence of the environment and careless operation of the car. It is very important that the rubber tightly covers the hinges themselves, and also keeps all the lubricant inside, which is intended to increase the service life of the part.
Most often, replacement is necessary precisely because the rubber band breaks. When this happens, all the lubricant is quickly used up and dirt gets inside, which quickly wears out the CV joints. At such moments, the part requires complete replacement. However, if you notice that the rubber band has burst or just torn, you should buy a repair kit and change the rubber band, having first washed, polished and lubricated the part itself.
Toyota Corolla E150 CV joint problems: common problems
Despite their long service life, CV joints often fail due to dirt and small abrasive parts getting inside the structure. The emergency condition of the vehicle's chassis can be diagnosed by the behavior of the vehicle - urgent replacement of components is necessary in the event of:
- Excessive vibration loading of the machine - there may be severe wear on the outer CV joint of the drive wheel or the possibility of mechanical grinding of the rollers of the internal joint. The situation can be corrected by replacing the inner joint or CV joint assembly;
- Uncontrollability of the car - when the car rolls or drives to the side, severe wear of the outer CV joint or inner race is likely;
- Jerking during acceleration or acceleration indicates an uneven load on the parts, which provokes backlash in the grenades. If this situation occurs, it is recommended to replace the CV joints as quickly as possible;
- Extraneous noise when starting the car - the situation is a sign of loose CV joints, which requires replacing components and restoring wheel alignment;
- The presence of smudges or oil leaks - the presence of traces of process fluids indicates wear of the rubber boots or weak fixation of the fastening clamps;
- Knocks when the car enters turns - severe wear or deformation of the outer CV joint; urgent replacement of the part is necessary.
It is important to know! Replacing CV joints on a Toyota Corolla E150 is recommended every 80,000 km. When operating a vehicle on roads with insufficient surface quality or when transporting heavy luggage, replacement of a structural unit may be necessary earlier.
You should not save and delay the time of repair work - neglecting to replace CV joints is fraught with expensive repairs, as well as a decrease in the safety of vehicle operation.
You can check the CV joints for integrity during a sharp start from a standstill - in the event of a sharp crunch under the hood, it is recommended to recheck the parts and, if necessary, replace them with new components. When replacing CV joints, it is also recommended to change the entire structural unit, which will increase the strength properties of the joint and stabilize the behavior of the car on the road.
The main symptoms of a malfunction on a 120-150 body
Signs indicating that there are problems with this nodal system are as follows:
- Vibration occurs while driving. This may indicate that the outer joint of the wheel drive or its rollers are very worn;
- He begins to drive the car;
- Oil streaks have appeared on the CV joint; as a rule, the cause is poorly tightened clamps or damage to the boot;
- An extraneous knock or noise is heard in the area of the front wheel while driving;
- There is a knocking sound when turning.
The main causes of these problems are damage or wear of the race or rollers of the inner CV joint. It is especially important that the hinges keep the lubricating fluid inside them and are tightly covered with rubber bands, since their rupture is most often the reason why this part is replaced. If this problem occurs, you need to buy a special repair kit and replace the torn rubber band.