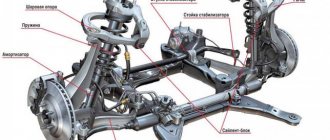
The appearance of extraneous sounds from the suspension when driving over bumps very often indicates problems with the stabilizer bar bushings or struts.
The first signs of wear and tear cannot be ignored, as the stability of the vehicle will deteriorate. Bushings and struts are not repairable and must be replaced if worn or damaged.
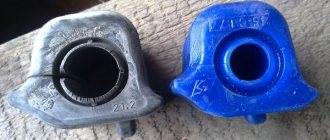
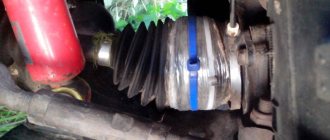
Bushings
Replacing bushings and stabilizer struts in Toyota Corolla
The chassis of the latest generations of Toyota Corolla is highly reliable. But sometimes, nevertheless, drivers wonder how to change stabilizer bushings on a Toyota Corolla. It is quite possible to carry out these works independently if you have an inspection pit (lift) and a set of necessary tools. It is important to follow the disassembly order, which we will discuss below. When assembling components, the tightening torques of bolts and nuts must correspond to those recommended by the manufacturer.
Where is the replacement of Corolla car bushings carried out?
- Service station masters.
- On one's own.
Preparatory work for replacing failed Toyota Corolla bushings at a service station includes:
- Corolla car wash.
- Installing the Toyota car on a lift.
Then the front wheels, fender liners, and protective plastic elements are removed. The fastening is removed from the stabilizer elements. The same operation is carried out with the stabilizer bracket. Then the old parts that have become unusable are replaced with new ones. The assembly process proceeds in reverse order. The procedure seems to be simple, although it requires the owner of a Toyota Corolla to have certain tool skills.
REMINDER! When carrying out work, such as in the case of replacing bushings at a service station, as well as when performing work independently, it is necessary to comply with safety regulations. At least no one has canceled them yet.
What tools are needed?
If the suspension begins to make noise when you increase speed or hit an obstacle, you can talk about a malfunction of its elements. In such cases, replacement of the stabilizer bushings is most often required. To do this you need to prepare the tools:
- head collar,
- ratchet,
- a metal brush, which is needed to clean the seat and stabilizer from rust,
- a brush for applying penetrating lubricant,
- stationery knife for cutting the sleeve.
Replacing elements
You can replace worn parts yourself. At the very beginning of the repair, it is necessary to raise the car's axle. To do this, you need to tighten the handbrake and install reliable wheel chocks. The easiest way to lift the axle is with a jack, although you can also use a lift. This will position the entire suspension in balance. This procedure is required to prevent the stabilizer from pulling the entire suspension down. Otherwise, it will be impossible to install new racks. It is also important to clean the repair area, and this should be done even if there is no dirt as such.
The rear stabilizer struts are usually replaced first for convenience. First you need to grab the end of the axle shaft. To do this, you need to insert a hex key of the appropriate size. Then you need to unscrew the nut that secures the stand itself.
Purchased parts can be removed quite easily, but the factory original (if it has not been changed before) is secured quite tightly, so you need to strain a little to remove it.
The vacated space should be thoroughly cleaned. Now you can insert the new stand. However, you cannot immediately tighten the nut completely, since after returning the car to its original position from the jack, it is necessary for the part to take the correct position. This is done only at the very end of the procedure.
The front strut is a little more difficult to change. It all starts in the same way as in the case of the rear one: the axle shaft is secured, the nut is unscrewed. Next, remove the thrust washer (usually called the cup) and loosen the stem nut.
There are two bolts on the caliper mount: the top one needs to be disconnected and the bottom one needs to be loosened a little. After this, it is recommended to move the caliper a little.
Only after these procedures can you remove the bolts, having first loosened them. If the original is being replaced, it is better to release the brake hoses before disconnecting the strut. In other cases, you can do this after dismantling. Now you can insert the part and assemble it in reverse order.
Top 2. Monroe
Rating (2021): 4.68
The most reliable spare parts According to tests conducted by authoritative publications Motor Trend, Quattroruote and Auto Review, stabilizer struts from Monroe have the longest service life, exceeding 160 kilometers.
- Characteristics
Average price: 1,700 rub.
- Country: USA
- Year of foundation of the company: 1916
- Official website: monroe.com
The company was born even before the automobile became widespread. From the very beginning, she was involved in the development of suspension parts, trying to improve and strengthen this module. The company has repeatedly become the founder of new ideas and technologies, and even today its products are often called the best and awarded winning places in a variety of categories. In addition, Monroe is the official supplier of a number of American concerns, and European companies, for example, Mercedes, recommend brand parts as an alternative to the original. In general, these stands could be called the best in all respects, if not for the price.
Advantages and disadvantages
- Constant introduction of new technologies
- Long and Rich History
- Cooperation with leading concerns
- High prices
- Low popularity in the CIS countries and Russia
See also:
- 20 best shock absorbers for cars
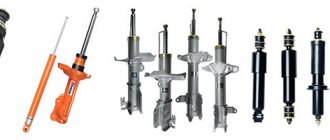
Reasons for shock absorber failure
Shock absorber struts are part of the suspension system. A common reason why they fail is not careful use, for example, driving fast through potholes.
Even though the driver will try to drive carefully, the shock absorbers will still wear out their service life; the majority of the roads on which travel takes place leave much to be desired. Gradually they begin to knock, leak and as a result become unusable, this leads to the fact that the car begins to handle poorly and easily skids. Therefore, if the racks become unusable, they need to be replaced as soon as possible.
Important: before making a replacement you need to remember some rules:
- If one is replaced, the second one is also replaced, even if it is in good condition. This applies to both front and rear pillars; if this is not done, the car will become poorly controlled on the road;
- You need to use elements of the same rigidity.
Corolla 120 body. The bones began to tap a little. The original on the existential costs 1,500 apiece - 3,000 rubles for both. Is it worth buying the original or is it better to save money?
If you recommend substitutes, what company do you recommend?
Replacement of front shock absorbers, replacement of links (stabilizer struts) for Toyota Corolla E120
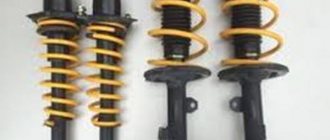
Following the replacement of the rear shock absorbers, the front shock absorbers were also replaced. We purchased: a gas shock-absorbing strut, “Excel-G” Kayaba 339011/339012 worth 2,750 rubles each, while the cost of the original shock-absorbing struts was more than 7 thousand rubles. Original racks are also installed by KYB. I bought the racks in a store, from official KYB distributors, so it turned out a little cheaper, they sell for 3150 on exist.
KYB racks with article number 339011 / 339012 are produced only at the plant in Japan.
These racks are positioned as for right-hand drive cars, but they are no different from those used for left-hand drive cars, so you can safely buy them; they fit perfectly.
I bought Linky from Sidem:
front stabilizer bar Sidem 45564 , I bought it for 550 rubles each.
Country of origin: Belgium. According to reviews, they write that Sidem is a good company, it has been on the auto parts market for more than 80 years and is “the oldest brand of chassis parts,” let’s see how they behave during use on the car. I also purchased for replacement: Shock absorber boots kit Boge 89-162-0 for 971 rubles, now they are more expensive, the kit also includes bump stops. Made in Italy.
Boots and bumpers Boge
I also bought a Febest TSD-002 strut support bearing protective ring for replacement - 268 rubles for two rings.
Febest TSD-002
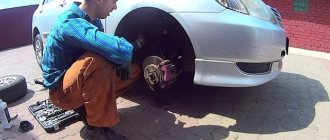
Dismantle and remove the front shock absorbers
Let me remind you that shock absorbers can only be replaced in pairs; replacement is carried out simultaneously on both sides; replacement by lifting each side of the car in turn is not allowed. Before installing, everything must be cleaned of dirt and treated with liquid key (WD40).
At the top, the shock absorber strut is secured to the car body with three nuts. Before lifting the car, it is necessary to loosen the nut securing the shock absorber rod by first removing the plug; I did not do this first and had to jack up the wheel to loosen the nut. Without loosening the rod nut under load, it will simply turn and you will not be able to unscrew it.
Top rack mount
Next, you need to unscrew the stabilizer strut mount (links), the brake hose mount to the strut and the ABS sensor wires, and the two bolts securing the strut to the steering knuckle.
Removing the front strut
Next, having finally unscrewed the upper fastening nuts, carefully remove the shock absorber strut from under the car.
Left and right dismantled front struts. The right strut was replaced before me, for a reason unknown to me, the original was also installed, it was changed at an official dealer, and it was assembled incorrectly, even the shock absorber bump stop 48331-02050 was placed upside down. Shock absorber sellers provide a 6-month warranty for self-installation and 2 years for installation at a service station. But self-installation will be much better than at a service station and the rack will last longer. 80% of failures and breakdowns of car parts are due to their incorrect installation, and then people think that it was a fake, although these are the tricks of illiterate technicians at service stations.
Description of replacing stabilizer bushings on a Toyota Corolla 120
Replacing the Toyota Corolla 120 stabilizer bushings is carried out according to the instructions given below.
- Raise the front of the car. This can be done using a pair of jacks or a lift. If you use jacks, you must secure the car with the hand brake.
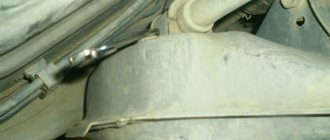
- Remove the protection that covers the chassis elements.
- Clean the bushings from contamination. Treat the bracket fastenings with penetrating lubricant.
Stabilizer struts on the Toyota Corolla 120 version (like the 150) are a standard consumable item, since on unusually rugged domestic roads it is difficult to keep the shock absorption system in good condition. Despite the fact that the original is quite strong and reliable, operating conditions still take their toll, so a replacement has to be made. Unfortunately, few motorists know how to do this, although on the road in the absence of nearby service stations this skill will be extremely useful.
Checking and purchasing parts
You can find out whether the stabilizer struts need to be replaced by the sound - if tapping sounds are heard in the area of one or another wheel (they can have different volumes). The sounds will be especially pronounced when driving over potholes and other “relief” roads. In addition, characteristic knocking sounds can be detected when turning, and they will be best heard from the direction in which the car is heading.
It is worth paying attention to the choice of elements. It is best to take the original, since these types of parts most successfully fit the configuration of the Toyota Corolla shock absorption system. However, the same components cannot be purchased for 120 and 150 bodies. The fact is that each new version of the car has unique parameters. This also applies to racks that differ in angle of inclination and length.
For example, on Corollas produced in 2008 and 2011, despite their chronological proximity, the dimensions of the parts are different, so it is advisable to purchase original parts for the existing car model.