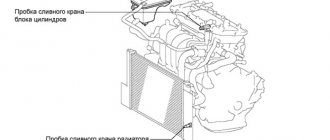
Advantages and disadvantages of the original and used
If the owner has a sufficient amount, it is better to purchase new original consumables with a quality guarantee from the manufacturer. However, the high cost of body parts is not always within the capabilities of the car owner, as a result of which they give preference to parts from disassembly.
The advantages of purchasing new consumables are obvious: quality guarantee, originality, 100% compatibility with the model. Spare parts from disassembly have a low cost, which is an advantage.
You can purchase new and used components at car markets, auto stores, on the Internet, or through intermediaries. Recently, the possibility of ordering with subsequent installation at service centers has become popular. Advantages of this method:
- efficiency of delivery;
- professional installation;
- quality assurance;
- post-warranty service;
- possibility of installing additional equipment;
- carrying out comprehensive preventive maintenance and technical inspection.
Replacing front and rear doors on a Toyota Corolla 150
Removing the front door trim of Toyota Corolla
The process of replacing plastic trim is intuitive and simple, and can be done by a car owner without experience in repairs. There is no need for special equipment or tools. All you need is a Phillips head screwdriver. Professional craftsmen recommend purchasing repair sets of plastic spatulas for picking clips and latches on which most of the casing is attached.
- We place the car on a level surface and provide unobstructed access around the entire perimeter of the car;
- open the front door, unscrew one screw behind the door handle, the second under the armrest. All other elements are attached to plastic clips;
- unfasten the polymer casing, disconnect the electrical scion, remove the block with wires. The front door trim has been removed.
We carry out preventative maintenance, replace components, and install elements in the reverse order. The rear door trim is replaced by analogy, the processes are similar. To avoid damage to the plastic, we recommend wearing latex gloves.
When installing the new trim, pay attention to the bottom of the door. Despite the coating with anti-corrosion mastic, the bottom is the weak link in the body structure. If the anticorrosion has dried out, hardened, or become unusable, remove it and apply a new layer. This can be done using a brush or a stationary spray bottle. Be sure to clean the drain grooves and holes on the bottom of the door. Insufficient ventilation contributes to corrosion of body parts and damage to the paintwork.
Toyota Corolla front door
- disconnect the battery terminals to avoid short circuit;
- dismantle the plastic casing. The algorithm of actions is described above;
- remove the protective polyethylene placed on the sealant. As well as electrical wiring, contact boards, metal glass guides;
- dismantle the plastic trims on the threshold;
- This is not enough to remove the door. We unscrew the trim at the place where the windshield wipers are attached: two bolts and three plastic clips;
- dismantle the wheel, remove the fender liner. In a Toyota Corolla 150, another plastic protection is installed under the fender liner; it also needs to be removed. In the cavity of the wheel arch, unscrew one bolt - the retainer;
- We proceed to dismantling the left / right part of the front bumper. This is necessary to remove the wing. The process is not complicated, just three bolts;
- After removing the wing and disconnecting the bumper, unscrew the door from the standard hinges. Otherwise, the design will not allow it.
Carefully unscrew three bolts on each hinge and remove. We carry out preventive maintenance and begin preparations for the installation of a new body element.
Be sure to cover the perimeter of the door with masking tape to avoid damaging the paintwork. We start the block with electrical wires, fix the upper and lower loops, but do not clamp them. We set the gaps to the “level”, after which we finally tighten the bolts. We fix the guides, insert the double-glazed window, connect the blocks with wires. Finally, screw the door handle into place.
Toyota Corolla BEAUTY › Logbook › First experience of covering door cards
I welcome everyone who may be interested in this process.
Over the weekend I devoted myself entirely to the car. I decided to start with the door cards. I unscrewed 2 bolts (the first behind the door handle and the second in the niche of the pocket under the plug)
Photo from the instructions for the car on how to remove the door trim Then I went home and again began dismantling while Vasily (the parrot) was singing
I cut off the fastening clips and cut out an approximate piece from eco-leather with a margin of 2-3 cm. 88glue, I still couldn’t find it... Something was selling out quickly (the seller said that there was some kind of excitement about it...) I tried it in a moment (it also says 88 there) nothing... it gets absorbed somehow holds...nothing at all! I decided to glue it with proven glue (liquid nails)
Do not apply too much glue, it is almost not absorbed! Coat the surface with bends completely. If there is a lot of glue it will come out through the perforation! It will be ugly and then you will have to clean the surface... very inconvenient...
So that’s how it happened. Then I sealed the fastening points with a glue gun.
First, a little inside, then everything with a little mound
Assembled When I inserted and soldered, I pulled it up by the edges of the skin so that there were no folds. In general, it turned out well! I liked it and there is nothing complicated! This is what it looks like in the car There is a small little joint, but we can fix it) it came off a little bit... And lastly, I sewed the cover for the gear knob myself✌ Now I’m learning how to tighten the knob cap and steering wheel Thank you all and good luck! I hope my advice will help someone ☝
Toyota Corolla rear door
We open the door and dismantle the plastic casing according to the algorithm described above. Remove the decorative trim from the threshold and disconnect the electrical wiring. We unscrew each of the hinges one by one and remove the body element.
We carry out preventive maintenance, install the new door in its original place, having previously covered the perimeter with masking tape to avoid accidental damage to the paintwork. We assemble the structure in reverse order. The gaps will be uniform provided there is no deformation of metal surfaces, impacts, accidents, or collisions.
Where to start work?
It is not necessary to remove the door itself if you are interested in the trim. First, you will need to remove its card: if a power window is installed on it (usually the front right door or the front left door of a Toyota), you must first pry off the plastic panel on which the control unit buttons are located. Carefully unscrew the bolts of the device, remove all wires leading to the buttons.
Before removing the door trim on a Toyota Corolla, it is recommended to watch a video of similar work: this will help you better navigate the process and understand how to act correctly. Pay attention to the door handle: it is attached to the plastic with a bolt that needs to be unscrewed.
When all the fasteners are unscrewed, you can remove the plastic trim from the door handle protrusions. To do this, you need to pry them off with a narrow object. A utility knife or flat head screwdriver may be useful, but be careful as the soft plastic may be scratched or otherwise damaged. Under the covers there will be several more bolts that secure the handles.
After all the fasteners are unscrewed, you need to pry off the plastic, you need to start doing this from the bottom of the door. The casing is held on by latches; you can simply pry them off, separating it from the body, and pull it several times.
Tip: To remove the plastic around the door handle, you need to pry it slightly, then slide it forward. Until this fastening is removed, the casing will not be removed.
After removing the casing, carefully disconnect the wires. If the rear right or left door has insulation and it interferes with work, it must be carefully torn off.
Removal and adjustment
On a Toyota Corolla 2008, removing the doors, as on a car in the 120 and 150 body of any other year, will not cause any difficulties. Removing them is simple: after disassembling the casing, you need to disconnect the wiring. Then you will need to unscrew the bolts that attach the door hinges to the body. If the bolts do not come off, you can use WD-40 or try to heat them; as a last resort, the bolt can be drilled out and replaced with a new one. If you know how to use welding, you can weld a small piece of metal on top of the bolt, and on it a nut of 12 or more, try to unscrew such a bolt using a wrench.
The product is installed in the reverse order. Door adjustment on a Toyota Corolla is required after each removal, as well as during operation if you notice that they begin to close poorly.
You can check whether the adjustment has been carried out correctly as follows: open the door and lift it so that the body remains stationary. If it rises more than 1.6 cm, the hinges need to be replaced.
Please note that if you removed, for example, the rear right door, after installing it back the gaps should be the same everywhere, the structure should not warp.
The surface should not protrude beyond the level of other body parts.
Adjustment occurs using bolts connecting the hinges. After loosening them, place the door in the desired position, then tighten the bolts sufficiently tightly.
Adjusting and replacing the door, removing the trim to carry out work inside the structure will not cause you any difficulties. If you understand how to change products, then you can do it yourself.
General information
Which sound insulation to choose for a car
Improving the sound insulation of this car is usually associated with the following parts:
- Floor;
- Doors (in terms of increasing the acoustic component, an obligatory part of the “Shumka”)
- The luggage compartment (“the noise” of this part of the car is also very important, since the buffer is often installed here, and the rear acoustics will sound differently);
- Hood;
- The roof.
Toyota gender
The floor is considered the most labor-intensive part of the car in terms of carrying out noise. It is especially difficult to dismantle it. Using this information, you can greatly facilitate this type of work:
- First remove the seats (you will need to remove the airbags in advance);
- Then various fasteners, mats, etc.;
- Then begin soundproofing.
Note. You should know that Toyota's noise depends on the presence of thermal insulation. So, if it is not installed in the car, then a vibration isolator is used. And vice versa, if carried out, the vibration isolator may not be used.
In the process of carrying out the “Shumka” on Toyota, Splen is always used, although if you have money, you can afford Babiton for the entire area.
Toyota Corolla Auris manual
You will need: flat-blade and Phillips-blade screwdrivers, 10mm wrench.
1. Use a screwdriver to pry...
2. ...and open the cap of the screw securing the armrest pad.
3. Remove the screw securing the armrest pad.
4. Move the inner door handle, pry it with a screwdriver and, overcoming the resistance of the latches...
5. ...remove the inner door handle trim.
6. Remove the screw securing the inner door handle.
7. Using a screwdriver, press out the socket of the window lifter handle...
8. ...and remove the spring clamp of the window lifter handle.
9. Remove the window lifter handle.
10. Use a screwdriver to pry up the edge of the cladding and, overcoming the resistance of the clamps...
11. ...move the trim away from the door panel so as to gain access to the drive mechanism of the inner door handle.
NOTE. This is where the mounting pins for the rear door trim are located.
12. From the inside of the trim, disconnect the handle drive cable sheath clamp from the upper bracket of the inside handle of the rear door...
13. ...and disconnect the spherical end of the drive cable for the inner handle of the rear door from the upper arm.
14. Similarly disconnect
15. ...and disconnect the spherical end of the rear door lock drive cable from the lower lever.
16. Remove the rear door trim.
Assembly, Disassembly, Rear side door
9. Unscrew the three nuts, disconnect the connector and remove the side mirror.
10. Cover the area with protective tape.
shown in the figure, and using a special tool, remove the molding
a) Connect the control panel
window lifters and release the glass until the bolts appear in those
nological hole, as shown in the figure. b) Unscrew the two bolts and remove
18. Remove the outer opening handle
a) Using the TOPH key, unscrew the screw and remove the lock cylinder. b) Disconnect the handle by pulling it to the rear.
c) Using the TOPH key, unscrew the screw and remove the external opening handle
12. Remove the door glass seal. 13. (Models with electric drive stack
lifters)
Disconnect the connector
Unscrew the six bolts and remove the window regulator mechanism.
unscrew the three screws and remove the electrical
window lifters)
Turn away five
bolts and remove the glass mechanism
16. Unscrew the screw and remove the guide
a) (Models with electric door lock)
Disconnect the connector, b) Disconnect the inner rod from the outer door handle. c) Remove two bolts. d) Using the TOYCH key, unscrew the three screws
and remove the door lock.
2. Adjustment of the door in the transverse and vertical directions. Loosen the door bolts
hinges to the door and adjust the polo
The front door 1 is assembled in the reverse order of disassembly, taking into account the following;
a) When installing the mechanism, glass
lift and door lock, apply grease to the moving parts of the mechanism. b) Install the service hole cover using adhesive tape as shown in the figure.
3. Adjusting the door lock bracket.
a) Make sure that the hinges and rods of the lock
the doors are adjusted correctly.
b) Slightly loosen the screws securing the bracket and, gently tapping with a plastic hammer, adjust
window lifters)
When installing the power window control knob, raise the window completely.
doors, install the washer and handle
window regulator with a locking ring, as shown in the figure.
1. Use a screwdriver to disconnect
pistons, clamps and remove the under cover. Note:
Check and, if necessary, adjust the gaps between the rear side doors and the car body, as shown in the figure “Adjusting the gaps between the rear side doors
doors and car body."
1, Door adjustment in longitudinal and
Using a special tool, loosen
those bolts securing the door hinges to the body and adjust the position
Source
How to Remove Door Trim on Toyota Corolla 150
Body parts are often damaged, especially doors and wings. But knowing how, for example, the rear right door is disassembled may be required not only when replacing it, but also when performing other work: replacing electrical wiring, repairing windows, installing speakers for an audio system.
The rear left door on a Toyota Corolla 150 can be removed easily enough to expose the bolts that hold it in place, but this procedure is not required very often. A more popular question among owners is how to disassemble the doors on a Toyota Corolla 150.
This is a necessary skill if you decide to install additional soundproofing on your car, you will need to replace or repair glass, interfere with electrical wiring, or install speakers to listen to music.
Removing the tailgate trim is not the most difficult process, so it can be done entirely according to the garage's criteria. You will need to equip yourself with 10-key, Phillips and flat-head screwdrivers. You will need to pay attention to electrical outlets when working. They will need to be disabled, and then be sure to put them back in place.
Advice. To protect yourself from short circuits during operation, remove the positive terminal from the battery.
The door trim is secured with plastic clips. They are easy to destroy, so they need to be removed using special plastic equipment. This way the fabric remains intact and you won't break the clips yourself. If you don't have a tool, a large flat-head screwdriver will do, but it needs to be wrapped in cloth first to avoid the risk of it tearing off.
There is no need to remove the door itself if you are interested in trim. First you will need to remove its card: if it has a power window (usually the front right door or front left door of a Toyota), you will first need to break the plastic panel where the control unit buttons are located. Carefully unscrew the bolts of the device, remove all wires that lead to the buttons.
How to dismantle the casing?
The rear left door of the Toyota Corolla 150 can be removed quite simply, just open the bolts that hold it in place, but this procedure is not required too often. A more popular question among owners is how to disassemble a door on a Toyota Corolla 150.
This is a useful skill if you decide to install additional sound insulation on your car, you need to replace or repair power windows, tamper with the wiring or install speakers for listening to music.
Removing the rear door trim is not the most difficult process, so it is quite possible to perform it in a garage. To carry out the work, you will need to equip yourself with a 10-mm wrench, Phillips and flat-head screwdrivers. When working, you will need to pay attention to the electrical connectors. They will need to be disconnected, then remember to put them back in place.
Tip: to protect yourself from short circuits when carrying out work, remove the positive terminal from the battery.
The trim is attached to the door using plastic clips. They are easy to damage, so they need to be removed with a special plastic tool. Then the material will remain intact, and you will not break the clips themselves. If you don’t have a tool, a large flat-head screwdriver will do, but you need to wrap it in fabric first to eliminate the risk of tearing the casing with its tip.
How to Remove a Door Trim on a Toyota Corolla 100
Door to Toyota Corolla
Body parts are often damaged, especially doors and wings. However, knowing how, for example, the rear right door is disassembled, it may be necessary not so much to replace it as to perform other work: replacing electrical wiring, repairing windows, installing speakers for an audio system.
How to remove the casing?
Rear left door of Toyota Corolla 150 is easy to remove
, simply open the bolts that hold it in place, but this procedure is not very common. A more popular question among owners is how to disassemble the doors on a Toyota Corolla 150.
This is a necessary skill if you decide to install additional sound insulation on your car, you will need to change what it is called, repair windows, interfere with electrical wiring or install speakers to listen to music.
Removing the rear door
- not the most difficult process, so this can be done in a garage. You will need to equip yourself with 10-key, Phillips and flat-head screwdrivers. You will need to pay attention to electrical outlets when working. They will need to be disabled, then be sure to place them in the zone.
Advice. To protect yourself from short circuits during operation, remove the positive terminal from the battery.
The door trim is secured with plastic clips. They are easy to destroy, so they need to be removed using special plastic equipment. This way the fabric remains intact and you won't break the clips yourself. If you don't have the tool, a large flat head screwdriver will do, unfortunately you will need to wrap it in cloth beforehand to avoid the risk of tearing it.
How do I get started?
There is no need to remove the door itself if you are interested in trim. First of all, you will need to remove
its card: if there is an electric window installed on its surface (usually the right front door or front left door of Toyota), you first need to tear off the plastic panel, the controls are occupied. Carefully unscrew the bolts of the device, remove the remaining wires that lead to our customer's buttons.
Tools needed to remove the door card
To remove the door trim on a Corolla or Auris you will need:
- two screwdrivers, one flat and the other Phillips;
- and the key to “10”.
Also, do not forget that since you will need to disconnect several electrical connectors, in order not to short anything, God forbid, you should disconnect the battery terminal.
In order to pull off the door card and not damage the surface of the door or the clips on which the trim is fixed, it is advisable to use a special plastic device or use a wide flat screwdriver wrapped in fabric.
The entire subsequent procedure for removing the Toyota Corolla 150 front door card can be clearly seen in these illustrations:
Auto giants are increasingly having to enter into negotiations with labor collectives over concessions in personnel costs, which usually make up the bulk of a manufacturer’s costs.
See all photo news >>
The next victim of falling demand on world markets is the BMW concern, which is looking for ways to optimize its budget. The other day, the company's management announced that it had reached an agreement with trade unions to reduce costs, which allows them to avoid radical measures against labor collectives.
The agreement includes cuts to bonuses based on company profits, as well as changes to Christmas pay and other bonuses for some workers. The measures will be introduced from 2021. It is reported that compared to last year, bonus payments will be almost 20 percent lower.
BMW aims to save more than 12 billion euros by 2022, which explains the decision to enter into negotiations with union representatives and leading suppliers.
The result was a solution based on solidarity, said company CEO Oliver Zipse. This will avoid the drastic measures that other automakers are currently taking to cut their costs, he added. By this he means mass layoffs, the closure of individual sites or the cessation of active work in some regions. Such actions have already been observed in the last year by such companies as Ford, Daimler, Audi and other large companies.
Let us remind you that leading representatives of the German auto industry have to intensify efforts to reduce costs in order to find funds for investments that are necessary for the deployment of large-scale production of electric vehicles and the development of new technologies. Only this can make it possible to maintain competitiveness in the long term, company management admits.
And the European automotive industry is increasingly being pushed to switch to environmentally friendly transport by rules for reducing emissions in the EU, which will only become stricter. And they will be almost impossible to achieve without a significant increase in the production and sales of electric vehicles, which until now have had limited demand from consumers. Trade wars and declining demand in key markets such as China have made the transition to new technologies even more challenging.
See all photo news >>