There are quite a few articles on installation in the vast expanses of the drive, but as a “non-electrician mechanic,” some points were incomprehensible to me, and I couldn’t find specifics that would be accessible in the style of “don’t put your fingers in the socket, don’t shit under desks” on the drive. I had to dig through a bunch of information and spend a lot of time. Therefore, this article will be useful, first of all, to those who have little experience installing such gadgets. I will try to describe in detail the main points of installation. PS There will be a lot of letters and photos. So, let's go! First of all, I needed: — a key for 10; - flatbeds; - corrugation; - flat screwdriver; - double sided tape; - hacksaw for metal; - the camera itself; - patience; - alcohol; - cucumber; - another cucumber, it went well! (c) 1. To install the camera, you need to remove one of the license plate lights, the saber (which then needs to be cut with a hacksaw so that the camera fits), the lining of the trunk lid, a manual will come to the rescue with this, which you can download here www.drive2.ru/c/689639/. The cover lining does not need to be completely removed; I only took out the top pistons and bent the top half - this is quite enough. Done? Well, this was the easiest part) After we removed the license plate light, we need to remove the lampshade and the light bulb, we will no longer need them (if you have a similar type of camera to mine), only the lamp socket will remain, we will use it later. We install the camera in the free space, having previously taped it with double-sided tape. First I glued on a few strips - wrong decision! As shown in the photo, if you glue it in separate strips, there will be gaps, which is unacceptable. I had to tear it off and redo it, unfortunately I forgot to take a photo, so I’ll explain it with my fingers. I cut off 8-10 centimeters of tape to completely seal the hole of the backlight, then along the contour of the hole I cut out a place for the camera and placed it. This time it turned out better, so I stopped there.
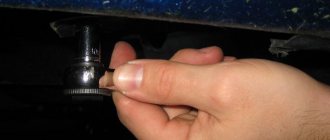
2. Remember we still have a cartridge? I performed a small operation with him. It (the cartridge) has contacts that I pulled out - then we will attach the camera backlight power to them. This is also easy to do - there are contact fastenings on the side of the cartridge, they need to be bent inside the body. Then push the contacts (from the side of the block with the backlight power lock) and pull them out. We solder/wrap/attach the camera backlight power wires to them and push them back into the socket. The camera backlight wires (red - plus, black - minus) were connected in accordance with the polarity of the power supply wires (green plus, white-black minus).
All that remains is to put on/shoe the cartridge, I used heat shrink 25/10 and wrapped it around the edges with electrical tape, it turned out something between a collective farm and “it will do.” That's it, we've sorted out the lighting! 3. Next you need to stretch the video cable from the camera to the radio. This can be done along one of the sides. Everything is done quite simply: we lift the rear on the side on which we will lay the cable. We run the cable under the rear seat into the trunk, remove the sill trim and the center pillar and pull the cable under them, securing it next to the factory wires.
Everything is held on by pistons, so it’s quite easy to remove, for which thanks to the Japanese engineers (but if suddenly we don’t know how to do it, look at the manual). I ran the cable behind the glove compartment to the radio. It's all here! 4.Before connecting the camera to the radio, we disassemble the front panel, the pistons also rule the show there, so there should be no problems (if anything, the manual will help). Connecting the camera to the radio, in my case, was not difficult (for those who have difficulties, see here -
Many motorists have difficulty parking. Especially beginners. This is not such a big problem - installing a rear view camera on a Toyota Corolla car can partially solve it. Although, of course, you will still have the need to use the steering wheel and gearbox correctly and “swap left and right.”
Radio Toyota Corolla 150
The standard audio system of the Corolla produces high-quality sound, but is characterized by weak power - the stock unit does not support the installation of additional components, as a result of which many car owners resort to tuning the acoustics.
Replacing the radio in the E150 is necessary to install new speakers and cut frequencies, as well as to connect multimedia functions: a video monitor or a rear view camera.
Location
There are two main places where the rear view camera is most often installed on the Toyota Corolla E120:
- under the trunk lid;
- under the turn signals.
Installing a rear view camera on a Toyota Corolla under the trunk lid allows you to see what is located at the bottom of the car near the bumper as closely as possible. However, you will not be able to see anything other than the curb, and in other cases, for example, when parking backwards to another car, it may be useless if the second car is a truck and its bumper is much higher than the image coverage.
Installing under the turn signals shows the bottom area near the wheels less clearly, but allows you to better see everything behind your car. However, in this case it is shifted to the left or right, under the left or right lamp. Some people find this not entirely convenient. In addition, the camera itself is clearly visible from the outside and is accessible to those who want to unscrew something from your car.
What can be installed on a Toyota Corolla E150 and what is needed for this
The design of the E150 provides for the installation of a radio of any format, which allows you to expand the functionality of the car several times. When replacing a standard radio with an upgraded head unit, it is possible to:
- Connecting a subwoofer and an additional pair of speakers;
- Installation of parking sensors and rear view camera;
- TV or satellite navigation connection;
- Installation of radar detector and video recorder;
- Interactive control via remote control, buttons on the steering wheel or using a smartphone.
When choosing a power unit for the E150, you should take into account the device interface: it is recommended to purchase a model with a wide touch screen and an installed Wi-FI or Bluetooth module. The performance of the processor is also important: the clock frequency and number of cores will optimize the load on the device and produce better sound: the greater the processor power, the more clearly you can cut frequencies and calibrate the equalizer.
| Manufacturer | vendor code | CPU | Screen size | Display type | Readable formats | Approximate cost, rub. |
| Nekvox | NEKV7892 | MTK3360 800MHz | 8 inches 1080*720 | Multi-touch, with active LCD matrix | MP3, MPEG4, WMA, WMV, MPEG. | 11280 |
| CarWinta | CF 3007 | Allwinner T8*1.8 Ghz | 8 inches 800*480 | Multi-touch, active matrix LCD, multi-color | MP3, MPEG4, WMA, WMV, MPEG. | 20100 |
| LeTrun | Trun 1423 | MTK 3561 4*1.3 Ghz | 8 inches 1080*720 | multi-color, multi-touch, resistive | MP3, WMA, JPEG, AVI, WMV, MPEG. | 22300 |
| Roximo | RX-1104 | MTK 3561 4*1.3 Ghz | 7 inches 800*480 | multi-color, multi-touch, resistive | MP3, MPEG4, WMA, JPEG, AVI, | 23800 |
| Carmedia | KD 8010 P3-7 | RockChip PX3 4×1.6 Ghz | 7 inches 800*480 | multi-color, multi-touch, resistive | MP3, MPEG4, WMA, WMV, MPEG. | 25900 |
| Carmedia | OL 8694 | MTK3561 4×1.8 Ghz | 8 inches 1080*720 | With active matrix LCD multi-touch, resistive | MP3, MPEG4, WMA, JPEG, AVI, WMV, MPEG. | 27980 |
Please note! When purchasing an audio system in a Toyota Corolla E150, it is necessary to take into account the compatibility of the device with the design of the transition frame: the 1din model does not provide for the possibility of installation in a 2din frame, at the same time, an inversely proportional installation will cause a number of difficulties.
Installation and calibration of a new GU: pumping up the Corolla correctly
Installing a radio is not a complicated procedure, but it has a lot of technical features that should be taken into account - for stable operation it is important to connect the device correctly.
The installation procedure for the head unit will take no more than 1-1.5 hours and will require pliers, a fixed knife and a long slotted screwdriver.
It is also recommended to purchase additional consumables: adapter frame, electrical tape, heat shrink tubing and wiring. Installation of the radio on the E150 is carried out as follows:
- First, turn off the power supply to the car by disconnecting the “negative” terminal from the battery;
- Next, we dismantle the central panel under the car’s dashboard and pull out the panel towards ourselves. It is necessary to snap off the plastic pistons that fix the panel using the tip of a slotted screwdriver, having previously wrapped the slot with masking tape;
- Then remove the cassette player casing and unscrew the fixing screws securing the audio system to the bracket. Now we remove the frame and pull out the radio towards ourselves, after which we disconnect all the wiring from the device;
- If necessary, install the transition frame by snapping the product into the plastic latches on the panel and mount the new control unit, securing the device with screws;
- Now we connect the cables to the radio: audio output, TV and GPS antennas, as well as laying audio streams to all speakers in the car, after which we add power cables and a USB interface;
- Next, if available, we connect the control buttons located on the steering wheel to the control unit and assemble the trim in the cabin.
Note! Connecting cables to the audio system must be carried out strictly according to the instructions supplied with the device: depending on the brand and quality of the components, the color and interface of the wiring may differ. It is also recommended to install a fuse on the supply “positive” wire to prevent a short circuit due to overload.
How to install a rear view camera on a Toyota Corolla E150: step-by-step instructions
Tuning or replacing a stock power unit allows you to increase the functionality of the car by installing additional electrical equipment - the most popular upgrade is installing parking sensors or a rear view camera. To install the KZV you will need no more than an hour of free time, as well as a set of tools: a set of wrenches and screwdrivers, pliers, electrical tape and a utility knife.
The installation procedure consists only of connecting the components to the general electrical circuit of the car - for the correct functioning of the camera at the front of the power unit, the following connectors must be connected:
- P1 – power supply to the short circuit;
- V1 – video signal output to the car head unit;
- V2 – analog video signal extender;
- P3 – cable for automation: designed for autonomous switching of the monitor to the short circuit;
- A1 – “positive” wire for the license plate illumination;
- A2 – license plate power supply mass.
To connect a rear view camera you need:
- Remove the trunk trim and the left side of the passenger compartment - there is a main cable duct there;
- Next, we lay the video signal wiring and the automatic camera switching cable, after which we restore the casing;
- Then we install the camera in the left license plate lamp, having first unscrewed the fasteners and fixed the device;
- Now we connect the camera to the power supply for the license plate illumination and connect the necessary cables to the control unit according to the diagram.
If you install additional acoustics to the power unit, it is recommended to power the rear view camera directly from the battery, which will reduce the overload on the wiring. When installing to a battery, it is important to find a powerful ground on the car to close the circuit - connecting to the “minus” of the license plate in this case is fraught with consequences.
Types of KZV
There is a huge variety of these devices on sale and sometimes it is difficult to make a choice in favor of a specific model. Let's analyze the classification of rear view cameras and figure out what indicators of these devices you need to pay attention to when choosing the most suitable model.
Standard or universal
Standard devices are those that are adapted to the body and structure of a particular car, while universal devices are those that can be used for different models.
Each car owner decides which type to choose. A standard camera is more convenient to install and is designed for the electrical equipment of a specific vehicle. But this also limits the choice of technical characteristics of the device.
On a Toyota Corolla car, it is allowed to install universal KZVs, as well as devices designed for other cars (although you will have to tinker with their installation).
Image quality
When choosing a device, pay attention to its image quality:
- Resolution. This characteristic increases synchronously with the price of the device, but, in principle, even cheap models have a sufficient level of resolution and provide normal video quality.
- Color. Devices come in color and black and white. Moreover, color ones are more sensitive in the daytime, and black and white ones are more sensitive at night. The ideal option would be a camera with the ability to switch color modes.
- Viewing angle. Depending on the price, this figure ranges from 120 to 180 degrees. The larger it is, the more area can be controlled when maneuvering, but too much visibility is often not convenient for the driver.
Installation method
The KZV can be installed without violating the integrity of the body (instead of or together with the license plate light, in the trunk handle or in a license plate frame with an already prepared hole), or using fasteners in the trunk lid.
If the device is not sealed, then it can only be installed under the rear window, which significantly reduces the functionality of this device and the comfort of its use.
Connecting a rear view camera
Whether or not to install a reversing camera is up to each driver to decide for himself. In this article we will tell you how to connect a rear view camera, and it’s up to you to decide whether you need it or not. Connecting a rear view camera requires some knowledge and skills, so not everyone can do it themselves. But if you still decide that installing a standard rear view camera is necessary for you, then use the tips from this article. With a small set of tools and basic removal skills, you can easily figure out how to connect a rear view camera.
Side mirrors, and even your head turned 180°, will not give the desired effect; you may still not notice some little things, or maybe not little things. And then a showdown with the owner of the scratched car may begin, and this can cost you tens of times more than connecting a reverse camera. Later in the article we will look at which camera you can choose, whether a Chinese manufacturer is right for you, or whether you prefer something more solid. We will also discuss whether it is possible to install a rear view camera yourself, and how to properly connect the device you have chosen.
What cars are they installed on?
First of all, these are long and oversized machines. For example, Toyota with the new E150 body version has slightly increased dimensions. This affects your visibility - you see a little worse behind you, especially below, near the pavement. In addition, parking comfort is greatly influenced by the shape of the rear. The hatchback and sedan are easy to park. But if you have “wings” at the back above the lights (as happens on some variations of the E150 and E120 body), then installing a rear view camera is advisable. If you are the owner of a coupe body, then the camera is simply a must have.
How to choose a camera
The modern electronics market, and especially China, is overcrowded with a variety of cameras, and this makes choosing the right thing more complicated. In order to make your work easier, decide on your priorities, what worries you more – price or quality. Not everyone needs high-definition cameras, or cameras that can show even in low light. For some drivers, an inexpensive rear view camera for the radio is enough.
What parameters should you pay attention to if you decide to purchase a higher quality product, then in this case there are at least five points that need to be taken into account when purchasing:
- What resolution does the camera record in? The higher the video resolution, the better the recording quality. And high image clarity is not always needed.
- The next point is the camera’s sensitivity to lighting. With cheaper models, low-light recording quality can be very poor. Therefore, if, due to circumstances, you often use a car in the dark, then this point is worth paying attention to.
- If, before purchasing, you have already decided where to install the rear view camera, then you need to pay attention to the installation method of this particular model.
- The next point is this viewing angle that the camera lens captures. Usually it is in the range from 120 to 180 degrees. It is better to take something in between these two indicators, so that you have a good view of the rear view, but do not have a panorama, because it distorts reality.
- Selecting the monitor on which the camera will display the image. But if you already have a radio with a screen in your car, then you just need to think about how to connect the rear view camera to the radio.
Monitor position
The screen can be of several types:
- with image display on the screen of the recorder or navigator. The recorder or navigator must have an external additional video input;
- output to the radio screen. Typically, a Toyota Corolla's interior is equipped with a radio with a large screen. This allows you to easily display an image on it;
- mirrors with monitor. This option has both pros and cons.
The screen of the recorder or navigator allows you to quickly display the image without any additional work. This is one of the cheapest options. However, they are usually small in size. Therefore, when parking, you will have to strain your eyesight. In addition, you can configure the recorder to record not only from the front, but also from the second camera at the back. This may be helpful.
Displaying the radio on the screen is a good option if you just need to estimate the distance to the curb. The screen is big enough. You see everything that is behind you large and clearly. However, it is located at the bottom. When moving backwards, you are focused on the screen, and you can accidentally hit the hood, fenders or mirrors of cars standing on the side - you are not looking forward through the windshield.
How and where should it be installed
Later in the article we will look at how to install a rear view camera. There is more than enough space in the car to install a video camera, but we need the most advantageous position. The camera eye must have a good view, which is not limited to any parts of the machine. Any camera will reveal its full potential if it is installed in the most advantageous location.
In our case, such a place is a niche above the rear bumper of the car; the camera should be placed in its upper part above the license plate number of the car. What this gives is viewing angles, your car radio will only show the road and not parts of your car. But it must be positioned so that it is not too recessed, but also does not stick out.
True, there is a minus here - your camera is accessible to dirt and the hands of others. If you place it inside the cabin on the rear window, then half of the screen will be occupied by the trunk, viewing angles will decrease and the image quality will suffer to some extent due to the glass. But it will be clean and inaccessible to strangers.
So you personally will have to calculate all the pros and cons of the external and external location of the camera.
Mirrors with monitor
When installing, you deliberately give up part of the central mirror for the monitor. This impairs normal visibility and the use of the mirror as a mirror rather than a camera. If you are using a combination mirror/camera where the mirror surface is solid and the image turns on automatically when you reverse, you may accidentally catch something. For example, in a traffic jam you are forced to back up to take a turn, and your mirror camera automatically turns on while reversing. You may not expect this, your view to the rear will be blocked, and you could crash into a car standing behind you.
All of these options are good in their own way, but they also have disadvantages. The choice is yours.
The procedure and diagram for connecting the rear view camera
And now in more detail about how to install and connect a rear view camera to a Pioneer radio. Why go to this model, because it is the most common. If we take into account the unsafety of our video camera, and the best view, then its place should still be above the number, outside.
It should be installed closer to the edge to improve visibility, but not so that it is exposed. The installation of the camera itself is not complicated. The camera has the bracket necessary for installation; you only need to drill a couple of holes for the mounting bolts and one hole for the cable.
And then comes the inclusion of the rear view camera in the general electrical network of the car. If you are not strong in electrics, then it is better to turn to car service specialists, but if you have at least basic knowledge, then you will be able to figure it out on your own. So, the order of connection in stages:
- Any camera has two wires, one for transmitting the video signal from the camera to the monitor, and the second wire for power. Since the camera itself has short wires, you will need to extend them so that they are enough from the front panel to the end of the trunk (as a rule, an extension cord for the video signal is included in the kit).
- Where can I get power for my video camera? Usually the camera is connected to the rear lights. Therefore, immediately after reverse gear is engaged, the rear view camera also turns on.
- All wires running throughout the cabin and in the trunk must be secured and hidden. This will help avoid unexpected network breaks while driving.
- If you use a monitor instead of a radio, you will need to find a power source for it as well. If you have a Pioneer multimedia radio, this issue is resolved automatically.
Connecting a reversing camera to a Pioneer radio
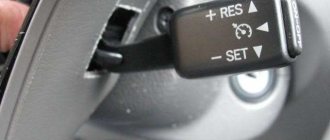
Now we will talk specifically about how to configure and connect the reverse camera to the Pioneer radio. There are small nuances here that mislead everyone. We connect the camera to the reversing light, all the power is on the camera, then the wire through which the video signal will go. In Pioneer this is a brown tulip not to be confused with a yellow one. Go to the settings, find the section in the rear view camera menu, set the item to on, and switch the polarity to battery mode.
Our camera is working, you can check this by going to the main menu and selecting the camera icon, but it will not turn on automatically. This can be fixed by connecting the purple wire to the rear light (where the camera is). As a result, when reverse gear is engaged, the light comes on, power is supplied to the camera, and the radio understands that it is necessary to switch to reverse gear.
The entire connection diagram for a rear view video camera is quite simple, and therefore most drivers often cope with installing it themselves. In cars equipped with an automatic transmission, random activation of the rear view camera may occur.
To eliminate this problem, you need to install an additional camera turn-on delay sensor. In each car model, the camera installation may differ, but in small details, the connection principles are similar. The connection process is more complicated for video cameras that transmit a signal via radio, but they have the advantage that several of these cameras can be connected. There are more and more cars on city streets, so a rear view camera is already a necessity. It will not only help you park correctly, but will also preserve evidence of your innocence in the event of a collision.
Often, a reversing camera is installed after purchasing a new radio; for this case, we have an article “how to connect a radio” in which you will learn about adapters, adapter frames and much more.
Let's sum it up
It is very important to choose the location of the rear view camera that suits you. Which method do you prefer? Leave the answer to this question in the comments.
Recently, the demand for rear view cameras for Toyota Corolla cars has increased significantly, which has a simple explanation. The number of car owners is growing exponentially these days, and it has become a problem not only to find a place to park a car, but also to park in it. Reversing is considered one of the most difficult driving maneuvers and requires a certain level of driving skill. You have to deal with it almost every day: when parking, entering a garage, or when there is no room to make a U-turn.
We should also not forget about the difficulties of driving a car when the view through the rear window is limited (due to ice or tinting). To solve all these problems, a special device was created: a rear view camera (RCC).
Many versions of Toyota Corolla cars already have a rear view camera of satisfactory quality. But in cases where the car was not originally equipped with it or if the quality of the installed device does not suit the driver, it becomes necessary to select and install a new rear view camera.
In this regard, you should consider in detail the questions: what kind of rear view camera should you purchase for a Toyota Corolla car, and whether you can install it yourself.
Toyota Corolla Miss Practicality › Logbook › Installing a rear view camera.
Hi all! There was a desire to install this device for myself. Well, since it arose, why not fulfill it) The camera was ordered from a well-known Chinese online store, it cost 660 rubles.
At the request “installing a rear view camera for corolla 150,” Google returned a lot of information, but very incomplete, like “bought it, installed it, look how it shows!” I found only one normal, more or less intelligible installation instruction. So I decided to write my own.
So, let's begin. What you need: wrench + extension cord with a 10mm head, Phillips screwdriver, electrical tape, utility knife, scissors, heat pipes + lighter (optional), free time.
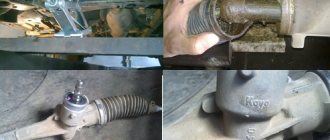
Attention! Before starting work, I advise you to coat the plastic joint on the camera (shown as a red oval) with some sealant to prevent water from getting inside!
We start by installing the camera itself: remove the decorative covering of the trunk lid (not completely, half, secured with 4 clips), then remove the decorative strip on the trunk lid (4 M10 nuts + 2 M10 nuts securing the trunk lock + 1 clip).
So, the bar has been removed, it makes sense to wipe off the dirt there and begin dismantling the license plate light. We disconnect the chip, press the latches - and the lampshade together with the “socket” and the light bulb in it are in our hands. Next, we pull out the “cartridge” itself from the lampshade (unscrew it counterclockwise). We take the lampshade with the camera and move the cartridge there (screw it into the grooves clockwise). Naturally, Chinese products would not be Chinese if everything fit perfectly the first time. I also had to “modify” the fixing holes with sandpaper, because... the cartridge simply did not want to “twist”.
The kit also included a seal, let's install it.
Then we put everything in place. I changed the seal on the second lamp too, because... There it was to hell, the lampshade was dangling. I also lubricated the trunk lock and sealed its connection with the lid. Well, I replaced the backlight bulbs, the original ones had burned out, and installed “Narva” bulbs in both lampshades.
It's time to work on the strap, which will have to be trimmed a bit so that the camera fits properly. So we take a utility knife and cut off the “extra” plastic a little at a time, sometimes trying on the bar so as not to cut off the excess.
There were rubber gaskets on the bolts of the strip so as not to spoil the paint, but over 10 years some of them became unusable, so I replaced them with something like this:
We collect everything, tighten the nuts, fix the clip, and throw on the chips.
The second phase of Operation “Camera” has begun - connecting and laying the cable to the main station. First I wanted to install a cable. I decided to do this on the left side, where the main “braid” of the wiring goes, and for this I had to disassemble the interior a little, namely: the floor lining on the driver’s side and the rear left passenger side; plastic trim of the pillar between the driver and passenger; a rear sofa and a small cushion on the side of it; plastic behind this pad. Everything is easy to disassemble, everything is on clips, only there is an M10 bolt at the base of the side pad. We also disassemble the luggage compartment a little, namely, we remove the left side carpet. (There is a lot of information on disassembling the interior, including a video; I think it’s not a problem to google it, so I won’t describe it in detail here).
Before laying the cable, I tidied up a little, washed off the dirt, vacuumed the space under the rear sofa, where, by the way, I found a treasure - 20 rubles))).
I don’t see any point in describing the gasket - pull the cable and pull it, sometimes fix it with electrical tape. Here are some photos:
Toyota car radio pinout and individual connection diagrams
Toyota car radio pinout
The pinout of a Toyota car radio is practically no different from the connection diagram for other car radios. The pinout for Toyota car radios is a circuit consisting of two rows of connectors. Our article will tell you how to connect Toyota devices, what you need to know for this and how to install car radios with your own hands.
Several connection schemes
Pinout of toyota car radio connectors
It is believed that the main mistake when connecting Toyota car radios is pulling the positive wire from the cigarette lighter. This will in no way have any effect, since the power of the head unit will drop several times (this is easy to verify if you pay attention to the flashing backlight while the device is operating at high volume). In addition, connecting Toyota car radios through the cigarette lighter will not eliminate sound distortion, which will begin to appear noticeably earlier. On the other hand, in some cases this option may be considered suitable for implementation. The ideal option for connecting Toyota car radios, as well as all others, is to provide the main power supply from the battery. It is advisable to use high-quality wire (it is in no case recommended to skimp on the cable) and be sure to use a fuse, which must be placed as close to the battery as possible.
Note. Let us note right away that car radios have not one, but two power wires. As a rule, yellow is responsible for the main power, red for control (goes to the lock).
In addition, the pinout of the remaining wires:
In addition, the car radio is also equipped with speaker wires (they go to the rear and front speakers):
- B, C-th – wires for front speakers;
- Z, F – wires for rear speakers.
Note. You also need to know that each pair of acoustic wiring contains additional monotonic and negative wires. The latter is often marked with a black stripe over the main color.
Connection according to diagram 1
Connectors for car radios
- We connect the power wires to each other;
- We connect them to the battery.
The good thing about this scheme is that it is easy to implement. On the other hand, it is only suitable for car radios with low power consumption. If you connect a powerful device according to this scheme, then in just 2-3 days in sleep mode the car radio will completely discharge the battery.
Connection diagram 2
This circuit is suitable for any powerful car radio:
- We connect the power wires to each other;
- We connect them to the battery;
- We install an additional button (it is responsible for turning the device on and off).
This scheme involves manual control of the radio, but the settings will not go wrong and the battery will not run out in a couple of days.
Connection diagram 3
Connector for car radio
Individual scheme, implying the following:
- We connect the main power wire (yellow) to 12 V;
- We connect the additional one (red) to the side lights (via a relay, the winding of which is connected to the ashtray light bulb).
This scheme provides the following advantages:
- The device turns on simultaneously with the “dimensions” automatically;
- The driver will never forget to turn off the side lights and headlights;
- While stopping, you can listen to music without turning on the ignition;
- If you replace conventional small bulbs with LED ones, the electricity consumption will be very low.
There are many more schemes for connecting Toyota car radios, such as connecting via ACC or via an alarm. As a rule, they are not that common and are not suitable for everyone. In particular, connecting via ACC (lock) is inconvenient because the device will not function without a key in the lock.