Hello! I have long noticed a small, dull rattle in the steering column, which is clearly transmitted to my hands when driving on bad roads (in the city) and on a dirt road, where I can hear it especially clearly.
At first I thought that the end had come for the steering rack (since it seems to be a weak point on the 120s), I didn’t worry too much, I waited and bided my time. I don’t know what, either extra money for the rail, or I was thinking that it would be better to repair it, or buy a SAT rail. The original with current prices is definitely NOT.
On a generally warm April day, I was working on a YATOUR in the area of the steering column, I decided to tug the shaft, so to speak at the “root”, a very serious play was discovered in the elastic coupling of the steering shaft, reproducing the same knocking noise that I heard with my hands and ears on the primer .
Having googled the Internet and Prado clubs (as always helps out), having sifted through 60 pages on this resource describing similar problems like mine and ways to solve them, I came to the conclusion that the knocking is caused by: 1) Steering shaft bearing, in the steering column (Treat HERE ) 2) Wear in the flexible coupling
The first reason can be solved by completely disassembling the steering column and gluing the bearing onto the shaft, Loctite 638 (labor-intensive and time-consuming), but the procedure is necessary.
The second reason, play in the elastic connection, damper (45220-60140) of the shaft, does not take long to remove. You can try to repair it. I decided to go from simple to complex. Removing the damper
Look at the diagram below to see what to unscrew to remove the damper:
A knock in the Prado 120 steering wheel is a problem faced by owners of these cars. It especially often manifests itself when driving at low speeds on uneven roads and bumps. Let's figure out why the Prado 120 steering column is knocking and how to fix the problem.
Why is there a knock on the speaker?
There are several reasons why a knock occurs in the steering column of the Toyota Prado 120:
- weakening of the connection of the speaker to the body, sometimes the bolts are unscrewed, resulting in extraneous sounds;
- play in cardan joints;
- the knock is caused by a violation of the steering wheel tilt adjustment system, if any;
- defects in the steering shaft - cracks, bends, etc.;
- damage to supporting structures - cardan joints, shaft.
If the last option is confirmed or there are no visible reasons, a visit to the service center is necessary for a more in-depth diagnosis of the machine.
How to remove a column
Repairing such a malfunction can sometimes be done on your own, but to do this you need to know how to remove the Prado 120 steering column. This process is not so simple. But by following detailed instructions, you can avoid difficulties.
The algorithm of actions is as follows:
- Disconnect the battery cables and remove the airbag.
- Unscrew the steering nut, having previously tightened the steering wheel to simplify the task, then it can be removed without any problems.
- Unscrew the three screws and remove the cover from the steering column.
- Using a shaped screwdriver, unscrew four more screws and remove the rotating mechanism.
- Disconnect the terminals from the turn signals and wipers.
- Remove the steering column switches.
- Remove the threshold, left step and trim.
- In the area of the lower point of the steering shaft, unscrew the 4 plastic nuts, then remove the casing.
- Take a 12mm wrench and unscrew the bolt that secures the shaft with the cross.
- Disconnect the ignition terminals and unscrew the nuts that secure the column to the body.
As a result, the column can be easily removed and will be available for repair.
Reassembly after troubleshooting is done in the reverse order.
If you do not deviate from the diagram, removal and further disassembly of the Prado 120 steering shaft will take place without any problems.
Cardan shaft crosspiece and its replacement
The replacement operation is performed in stages:
- The machine is lifted by a lift or driven onto an inspection pit. It is not necessary to lift the entire car; it is enough to place jacks under the front part.
- The steering wheel is set at an angle of 90 degrees with rotation locking.
- The front wheel on the driver's side is removed. Work on replacing the crosspiece on the Prado 120 begins in the interior, from where access to the bolt securing the steering column is possible. It needs to be unscrewed first. As a result, the steering shaft can be easily released.
- The top and bottom covers are removed from the bottom of the car, and the driveshaft is cleaned of dirt. The casings are not always protected by anthers - to purchase and install such a seal, you will have to spend about two hundred rubles.
- The mounting bolt is unscrewed. This is not easy to do. To overcome resistance, VD is used. After unscrewing the bolt, the steering shaft is removed from the rack by hand.
- The shaft is removed downwards. The dismantled unit is cleaned and washed from contaminants.
- The shaft is clamped in a vice.
- The connecting block is knocked out using the attachment, first in one direction (the bearing race is removed), then in the other (with a similar operation).
- A new part is installed and the assembly is assembled in the reverse order. A vice is used for pressing. The operation is performed carefully so that the metal does not deform.
- The bearing housings are aligned and rolled using a chisel and hammer.
Column repair
It is possible to repair the steering column on a Prado 120 yourself, especially if you follow the video on Youtube.
The main problem with these cars is the malfunction of the lower bearing, which sometimes breaks over time. Troubleshooting occurs as follows:
- The mechanism is removed from the car and disassembled.
- The spitz connection of the steering shaft is being restored.
- The lower support bearing is replaced with a bushing, this significantly increases the life of the column.
- Upon completion of the work, the mechanism is assembled back and installed in place.
The second common cause of a knocking sound in the steering wheel is a faulty steering rack. Operating the car in this condition is prohibited: this can lead to permanent rack failure or even an accident. The problem is solved by purchasing a new steering rod.
There are several types of rack defects:
- A leak through which fluid flows out of the power steering. Occurs due to broken seals or corrosion on the rod. To eliminate the malfunction, replace bushings, anthers with seals, and oil seals.
- The knocking noise occurs due to wear of the anthers and sliding bushings. In this case, the damage is eliminated and the rack is adjusted.
- Steering wheel play, which appears after a broken rack or a defect in the column cross. For repairs, the steering control of the Prado 120 is disassembled, the rack and worn-out components of the device are replaced.
How to fix the problem
Knocking in the Prado 150 steering column can be eliminated by carefully tightening all bolted connections of the mechanism. If this is the problem, the sound will go away.
However, if you seriously experience a knocking noise in the steering wheel of your Toyota Prado 150, then you will have to undergo a major repair, although not very expensive.
Most often, the Toyota Land Cruiser 150 steering column knocks due to wear on the ball joints. There is nothing wrong with this, these are consumables for any car, and they are relatively cheap. Once you change them, the knocking will stop.
When the support bearings fail, in this case the Prado 150 steering column is repaired by replacing them.
But the rack, unlike the previous parts, on the contrary, can be repaired, and it needs to be changed only in the most extreme, advanced case. Anyone who has restored the steering column on a Prado 150 knows that today there are specialized workshops, many of which will repair this mechanism at the highest level, and it will be no worse than new.
The only thing you need to remember is that there are different workshops and you should only use the services of trusted mechanics so as not to do the job twice.
Well, in conclusion, about the repair of bearings and silent blocks: these parts cannot be restored and only need to be replaced.
Prado 120 Eliminating a mysterious knock in the steering column of Toyota Land Cruiser
When seated in the bearing, the shaft remains weakened, resulting in play and knocking on uneven surfaces. Let's call this an outright marriage, but the essence does not change - the imbalance must be eliminated.
Repair:
First, disconnect both battery wires and unclip the airbag wiring.
Now unscrew the nut on the steering wheel. To do this, we tighten the steering wheel and hit the steering shaft through the spacer. We move the steering wheel that has come off to the side.
After unscrewing the three screws, remove the casing from the steering column.
Next, unscrew the four screws with a figured screwdriver and remove this rotary mechanism with contacts.
Now we disconnect the terminals for the turns and wipers.
After unscrewing the next three screws, remove the steering column switches.
Next we remove the threshold, the step under the left foot and the trim from the floor to the instruments.
You need to reach the bottom point of the steering shaft and unscrew the four plastic nuts there to remove the plastic casing. It is cut at the top and can be easily removed from the steering shaft, so do not imagine that it is not removable.
Next, we arm ourselves with a 12mm wrench and completely unscrew the bolt that secures the shaft at the point of contact with the cross.
Now disconnect the ignition terminals and unscrew the four nuts securing the column to the body. Then we take out the steering column.
Next, you need to repair the steering, completely removing the play in the shaft-bearing connection.
Source
Steering rack Prado 120: design, signs of malfunction, diagnosis and repair
At first I thought that the end had come for the steering rack (since it seems to be a weak point on the 120s), I didn’t worry too much, I waited and bided my time. I don’t know what, either extra money for the rail, or I was thinking that it would be better to repair it, or buy a SAT rail. The original with current prices is definitely NOT.
On a generally warm April day, I was working on a YATOUR in the area of the steering column, I decided to tug the shaft, so to speak at the “root”, a very serious play was discovered in the elastic coupling of the steering shaft, reproducing the same knocking noise that I heard with my hands and ears on the primer .
Having googled the Internet and Prado clubs (as always helps out), having sifted through 60 pages on this resource describing similar problems like mine and ways to solve them, I came to the conclusion that the knocking is caused by: 1) Steering shaft bearing, in the steering column (Treat HERE ) 2) Wear in the flexible coupling
The first reason can be solved by completely disassembling the steering column and gluing the bearing onto the shaft, Loctite 638 (labor-intensive and time-consuming), but the procedure is necessary.
The second reason, play in the elastic connection, damper (45220-60140) of the shaft, does not take long to remove. You can try to repair it. I decided to go from simple to complex. Removing the damper
Look at the diagram below to see what to unscrew to remove the damper:
A knock in the Prado 120 steering wheel is a problem faced by owners of these cars. It especially often manifests itself when driving at low speeds on uneven roads and bumps. Let's figure out why the Prado 120 steering column is knocking and how to fix the problem.
Toyota Prado steering rack - design
The design of the Prado 120 rack differs little from the racks of other cars equipped with hydraulic power steering.
- The Prado 120 rake consists of several parts, namely:
- The crankcase is made of light alloy, it is hollow inside and covered with a cover.
- Drive gear - installed in the crankcase.
- Bearings are necessary for the smooth running of the gear.
- Toothed bar - interacts with the gear, ensuring the shaft moves in one direction or another.
- Springs - ensure a snug fit of the bar to the gear, preventing any backlash.
- Restrictive ring - ensures the shaft moves in the desired range.
What is a steering rack
If you imagine the wheels and steering wheel as planes, then they will lie perpendicular to each other. And to make them interact, a system is needed to connect the nodes. This is what the steering rack serves for, which not only forces the wheels to turn along a vertical axis by transmitting force from the steering wheel, but also softens its movement.
The system forces the front wheels to synchronously deflect from the zero point (that is, the position when the wheels are strictly parallel to the car body).
Steering rack components
Under the influence of the steering force, the wheels are deflected due to a system of gears and a notched beam. Since all modern Toyota vehicles are equipped with power steering (hydraulic or electric), a system with technology-appropriate parts is being considered. Thus, the steering rack consists of the following parts:
- drive shaft;
- gear;
- distributor;
- gear beam;
- housing with hydraulic cylinders;
- pressure pipelines;
- protective anthers;
- internal traction.
In the unit, all the above parts are interconnected. Failure of one or more parts will result in serious operating difficulties. First of all, this concerns rubber boots and cuffs, which protect the mechanism from moisture, sand and dirt flying from the road.
However, all rubber parts are consumables. They, as a rule, change during routine repairs of rods and tips. However, things are much more complicated if the main shaft gear or rack wears out. In this case, you cannot do without a complete overhaul of the unit or even replacement with a new one.
Reasons why steering gearbox repair is required
Possible gearbox malfunctions:
- Device leaking. A malfunction can be detected by the presence of oil under the machine. The cause of the breakdown may be a leaking oil seal or corrosion in the material of the input shaft. This can be corrected by changing the seals, gaskets and cuffs. Grinding the shaft will help eliminate corrosion, then a gas-thermal spraying procedure is carried out so that the shaft takes on standard dimensions.
- “Tightness” of the steering wheel. Due to the increased effort required to turn the steering wheel, you may experience a feeling of “stiffness” in the steering wheel. To diagnose, you need to use a torque wrench to determine the degree of force with which the steering wheel turns.
- It is required to compare the information with the result provided by the manufacturer. If the indicators are different, it is necessary to conduct a diagnosis. You don't need to fix the problem yourself. It is recommended to send the regulator for service.
- The appearance of play on the steering wheel. In this case, complete disassembly, analysis of the condition of the device components, and replacement of loose parts is required. Next, setup is carried out at the stand.
- Knock in the mechanism. This breakdown can be determined by the “kickback” in the steering wheel. Damage to the part is due to worn bearings. To fix the problem, you need to replace the loose elements and adjust the gearbox on the stand.
- Repeated movements cause the steering wheel to become heavier. This is due to the jamming of the car's governor driveshaft. Looping occurs due to corrosion on the mechanism. The problem can be fixed by repairing or replacing the cardan.
- Biting the steering wheel in both directions. Failure occurs due to failure of the cylinder in the middle position, or due to wear of the crankcase. The damage can be eliminated by completely rebuilding the mechanism. Damaged elements also need to be replaced.
Toyota Prado steering rack - causes of malfunction
The Toyota Prado steering rack is distinguished by its durability and reliability. With proper operation, problems with it begin no earlier than 120 thousand kilometers. There are cases when this unit “crumbles” earlier, but this is more the exception than the rule and is directly related to extreme operating conditions.
Repairing the Prado 120 steering rack is a costly undertaking, both in time and money. To prevent this from happening prematurely, you need to know what factors influence the wear of parts:
- Regular collisions with high curbs, stones and other obstacles, driving the front wheels into holes and potholes at high speed.
- Sharp acceleration when the wheels are turned to the extreme position.
- The torn oil seals were not replaced in time, which caused water and dirt to get inside the rack housing.
Important! If you notice the first signs of problems, you should not delay visiting a car service center - this can lead to complete failure of this mechanism.
Causes of malfunction
There are no spontaneous problems with the operation of the steering rack of Kruzaks. Malfunctions appear at a later date - with a mileage of 120 thousand km. But if the driver operates the car incorrectly, the mechanism fails much earlier and more often. There are a number of reasons for the malfunction of this spare part:
- driving fast over potholes, bad roads, over speed bumps, railway tracks, curbs;
- parking with the wheels turned out in winter;
- moisture inside the case;
- dust, sand particles clogging the rail.
These factors increase the level of wear and tear on individual device components. Repairing the Toyota Prado 150 steering rack is an expensive proposition, so it’s easier to prevent the problem by taking care of the car than to solve it later.
How to protect your steering rack from damage
Sooner or later, the driver has to repair or completely replace the units. But this moment can be postponed, ensuring the car a long life. To prevent damage to the steering rack, it is recommended to follow some rules for operating a car:
- periodically check the unit and replace the Toyota Prado 120 steering rack boots as necessary;
- in winter, before driving, turn the steering wheel so that the oil reaches all spare parts;
- keep the steering wheel in the extreme position for only 5 seconds and no more;
- avoid deep potholes on the roads, reduce speed when crossing rails, speed bumps.
Only careful responsible driving and timely diagnostics will allow the car to last longer, and driving will be safer and easier.
Steering rack Prado 120 - signs of malfunction
Let's look at the symptoms indicating problems with the Prado steering rack.
The most common breakdown is power steering fluid leaking from the rack. Indicates that the integrity of the O-rings or seals has been compromised. You can check this by looking under the hood.
When driving on a flat road, the car “floats”, you have to steer so that it goes straight. This may indicate a failure of the silent blocks on which the rail is attached.
If the car is standing still, and when you turn the steering wheel you hear a knocking sound, this indicates wear on the internal mechanisms of the rack. But such a conclusion can only be made if the tie rods and tie rods are in good condition and the car engine is running.
When driving on uneven roads, the steering wheel vibrates and a knock is heard from under the hood.
Play in the steering wheel. Also, when turning the steering wheel, it does not return to its original position in normal mode.
Replacement of protective covers and maintenance of CV joints of Toyota Land Cruiser
Replacement of protective covers and maintenance of CV joints
| If defects in the protective cover are detected, the condition of the corresponding CV joint must be carefully examined. Often, on an exchange basis, you can purchase completely restored drive shaft assemblies, which greatly simplifies the situation and reduces time costs. Before you begin dismantling components, do some marketing by finding out the prices of the parts you need. Compare them with the costs of purchasing refurbished assemblies. Remember that the outer CV joint cannot be disassembled and must be replaced together with the shaft. |
| Execution order |
| Remove the drive shaft (see Section Removing and installing drive shafts). |
Disassembly
Drive Shaft Assembly Components
| 1 — Boot 2 — Inner CV joint housing with axle 3 — Retaining ring 4 — Protective cover 5 — Bandage tapes | 6 — Protective cover 7 — Retaining ring 8 — Tripod assembly 9 — Outer CV joint assembly with drive shaft 10 — Boot |
| Execution order | ||||
| 1. Clamp the shaft in a vice with soft jaws. Check the hinge for radial play, indicating wear on the internal components. Check the smooth movement of both hinges in all directions provided for by their design. If the protective boot is damaged, disassemble the CV joint, thoroughly wipe its components and assess their condition. 2. Using a small screwdriver, bend the locking tabs and remove the protective cover securing straps. 3. Using a screwdriver, pry up the edge of the cover and remove it from the hinge assembly (old and damaged covers can simply be cut off) (refer to the illustration above). Remove the hinge housing from the tripod assembly. 4. Mark the position of the tripod assembly on the shaft journal. 5. Remove the retaining ring. 6. Using a brass drift, knock the tripod assembly off the shaft journal. 7. If you have not cut them off yet, remove the protective covers of both hinges. Wrap the splined inner shaft journal with a protective layer of insulating tape to protect the new boots from damage when they are placed on the shaft. Examination
Assembly
Video about “Replacing protective covers and servicing CV joints” for Toyota Land CruiserReplacing the caliper boot Replacing the boot on the caliper https://youtube.com/watch?v=sRuaxu7NYkk Replacing steering gear boots |
How to disassemble the steering rack
Before disassembling the steering mechanism, it is necessary to make notches on the housing and the cover of the guide, which tightens the steering rack, this must be done so that during assembly the adjusting nut is not overtightened.
Unscrew the cover of the guide rail with the locking nut and remove the guide with the spring.
We remove the control valve body by unscrewing two bolts, take out the control valve and change all the rings, bushings and seal.
We remove the clamps securing the steering rod boots and move the boots to the steering tips.
We unscrew the tip of the rack, having first bent the locked washer.
Using a gas wrench and a special puller made from a pipe, unscrew the guide rack cover, pull out the steering rack itself and remove the old internal oil seal.
We check the rack for wear (scores, potholes, rust), if there is no strong wear in the working surface (where the oil seal runs) you can use this rack in the future. If there is still serious damage, it is necessary to replace it, although in some cases restoring it by spraying metal with subsequent grinding helps.
Diagnostics and repair of Prado 120 steering wheel
Repair of the Prado 120 steering rack is carried out only after qualified diagnostics at a service station and identification of parts that require replacement. The technician will check for fluid leaks, dents on the body, corrosion, shaft deformation and other mechanical damage. Mechanical damage is detected visually, the presence of leaks by applying high pressure to the hydraulic system.
Repair of the Prado 120 rack includes a whole range of measures, both restorative and preventive; the complexity of the repair directly depends on the degree of wear of the mechanisms.
- Regardless of the condition, seals and o-rings are replaced.
- Faulty parts (for example, shafts) are restored or replaced.
- Parts that cannot be repaired are replaced with original ones.
- The steering rack shaft is cleaned of corrosion.
- Checking the shaft balance.
- Flushing the power steering system.
- If it is impossible to carry out repairs, the Prado rack will be completely replaced.
- Bleeding the hydraulic system, adjusting and re-diagnostics of the unit.
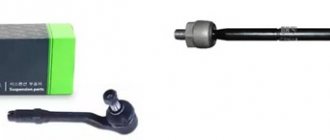
- Replacement of steering rods and ends if necessary.
- Wheel alignment adjustment.
Column repair
It is possible to repair the steering column on a Prado 120 yourself, especially if you follow the video on Youtube.
The main problem with these cars is the malfunction of the lower bearing, which sometimes breaks over time. Troubleshooting occurs as follows:
- The mechanism is removed from the car and disassembled.
- The spitz connection of the steering shaft is being restored.
- The lower support bearing is replaced with a bushing, this significantly increases the life of the column.
- Upon completion of the work, the mechanism is assembled back and installed in place.
Signs of a faulty steering shaft crosspiece
The need to replace the steering column cross on the Prado 120 (as well as for the 150 model) arises if the following characteristic symptoms are present:
- There is noticeable steering resistance when turning at speeds above 70 km/h. As time passes, the rotation becomes tighter.
- Delay in turning wheels and loss of sensitivity.
- Increased wheel play.
- Uneven rotation of the steering wheel with sudden jerks.
- There is a distinct knocking and grinding noise when the steering column operates.
Most drivers contact a car service center after waiting for the last signs listed to appear. Such neglect is dangerous. A malfunction of a control on a Toyota car (like any other) can lead to an accident if measures are not taken in a timely manner.
If the slightest problem with handling occurs, diagnostics and repairs should be carried out immediately (if necessary).
Repair features
Every car has vulnerabilities. Toyota Prado is no exception. Speaking about the steering rack and repairs, a car mechanic pays attention to silent blocks - rubber-metal hinges that serve as fastening of the steering rack to the body or subframe of the car. The fact is that the Prado's factory silent blocks are weak and thin for such a large car. The thickness of the rubber layer is 2 millimeters, so they do not last long.
To prevent serious problems, car mechanics advise owners to replace factory parts with more reinforced ones.
Steering rack repair Prado - what are the features
Like all cars, the Prado has “sores”. If we talk specifically about the rail, the weak point is the silent blocks with which it is attached. The problem is that the factory silent block is very weak for such a heavy machine. The thickness of the rubber on it is only 2 millimeters, which negatively affects durability. A competent technician will always advise you to change them to reinforced ones, which will help avoid problems in the future, since the cost of the issue is low.
Tips for Toyota Land Cruiser Prado owners
To summarize, it is worth noting that replacing or repairing the Prado 120 steering wheel is not a cheap pleasure! But if there are the slightest signs of a malfunction of this unit, you should not postpone your visit to the car service center. Firstly, this is fraught with even more large-scale repairs of the unit with high financial investments. Secondly, the serviceability of the steering mechanisms is the safety of you and those around you, and this is not the case when risk is a noble cause!
And in order for the rail to serve you faithfully for many years, you must follow a number of rules:
- Deep holes and high curbs should be driven at minimum speed.
- Try to twist the steering wheel to the extreme position as little as possible - this harms the rack and power steering pump.
- Before starting to drive on a frosty day, shake the steering wheel from side to side to warm up the fluid in the system. This must be done with the engine running.
- Regularly check the condition of the boots on the steering rods; if damaged, do not delay replacement.
Finally, we wish you good luck on the roads and hope that these simple tips will protect your car from breakdowns!
Replacing the steering shaft crosspiece on a Prado
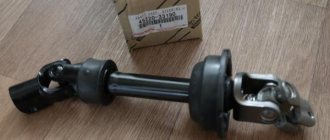
The steering shaft cross is an integral part of the cardan shaft, designed to transmit torque to the rack. This part includes four elbows equipped with needle bearings. For the manufacture of the connecting block, high-strength steel is used, designed to work under high loads.
There are two such connections installed on the car’s steering – at the top and at the bottom. The latter fails more often.
When the first signs of a malfunction of the driveshaft crosspiece on the Prado 120 appear, you should contact a car service center. If the initial diagnosis is confirmed, the node will need to be replaced.
Repairs are carried out in a specialized service station. But if the owner is confident in his abilities and skills, it is possible to perform the work at home. You must first purchase a spare part to replace the worn one. The digital marking index of an element suitable in size for Toyota Prado is 1368, 1639 or 1640. The last two are pressed in a little tighter, so the first option is preferable.
The price of a new spare part ranges from 300 to 500 rubles, depending on the manufacturer.
If the replacement is not carried out on time, you will have to change the entire steering assembly, which will cost up to 9 thousand rubles.
Removing the steering rack
To repair this system in Toyota cars with your own hands, first of all you should take care of the necessary set of tools and working conditions. Lying under a car in the yard, this is very difficult, if not impossible. What to do:
- A special fluid is drained from the power steering reservoir.
- The nuts securing the rods are unscrewed.
- The rod ends are pressed out. To do this, you will need a special tool that allows you to quickly and effortlessly remove this control unit.
- The front axle is detached from the body. In common Toyota models, for example, Vanguard, Imi, Premio and Vish, these are ten bolts with a head size of “19” and five nuts with a head size of “17”.
- To completely dismantle the rack, it is necessary to disconnect the collector. To do this, unscrew two bolts at “12”.
- The steering protective shield is dismantled, which protects the device from mechanical damage while driving.
- The steering cross is disconnected from the steering rack.
- The power steering lines are disconnected. It is important to mark which one is the input and which is the output, so as not to get confused during reassembly. It is best to first unscrew the top fastening of these hoses.
- The rack has been released and must now be removed. To do this, it first moves to the left, which allows you to move the steering rod down. Then the entire assembly is shifted to the right and removed from its seat. For complete dismantling, the mechanism is lowered down.
Source