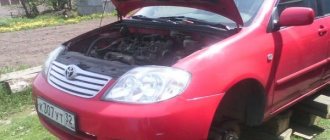
Faults in a car's suspension can cause knocking, squeaking, breakdowns, loss of stability when cornering and many other problems. Any of the possible manifestations of breakdowns, first of all, negatively affects the safety of operation.
Only diagnostics on a special stand or visual inspection will help identify a faulty chassis part. In the Toyota Camry 40, the most common cause of a dull knock or squeaking noise in the front or rear suspension is wear on the stabilizer bushings.
Stabilizers are responsible for car stability in turns and when maneuvering, redistributing axle loads between the wheels. It is thanks to the bushings with which the stabilizer is attached to the subframe that vibrations of the suspension and wheels are dampened.
Symptoms of a problem
The Toyota Camry 40 steering column cable often fails. As a result of damage to the Camry 40 cable, the following equipment may fail:
- sound signal;
- multimedia complex control system;
- airbags (SRS);
- Cruise control;
- other elements that are controlled from the steering wheel.
The main signs indicating damage to the Camry 40 cable include:
- failure of one or more control buttons on the steering wheel;
- periodic absence of sound signal;
- crunch from the steering column;
- The SRS indicator light on the dashboard comes on.
It is recommended to start searching for damage with computer diagnostics. Then the integrity of the wires is checked with a multimeter. Before performing the operation, you will need to de-energize the on-board network by disconnecting the contact from the negative terminal of the battery. If the Camry 40 is equipped with a separate SRS , just set it to the off position - OFF .
A comprehensive assessment of the condition of the Camry 40 steering column cable is carried out after dismantling. To do this, you will need to follow a certain procedure so as not to damage individual elements of the device.
Removing the steering column cable
How to change the steering column cable. Sequence of cable dismantling:
- Remove the steering column plugs. For dismantling, you can use a regular credit card. This will prevent damage to the latches.
- Unscrew the steering wheel nut. The nut should not be completely unscrewed initially. When dismantling the steering wheel, it is usually secured to the stand with tension. In this case, it is possible that at the moment of its separation from the steering axis, the movements will be uncontrollable. You may get injured or the connections may break. After the steering wheel is separated from the axle, unscrew the nut completely and remove the steering wheel.
- Remove the chip connecting the wiring of the steering column cable. To do this, move the latch as indicated in the picture below.
- When removing the steering wheel position sensor, use physical force to a minimum, otherwise the fragile latches may be damaged.
- Remove the old steering column cable.
- Assess the external technical condition of the device.
- Subsequent installation of the cable is carried out in the reverse order.
Causes of malfunction
The Toyota Camry 40 steering column cable is a ribbon cable that consists of insulated wires. Identical elements are used on personal computers.
The steering cable, placed in a special bay, ensures the transmission of control impulses from an electronic device rotating along the axis of the steering column. This design made it possible to achieve greater reliability compared to that used previously. It consisted of a ribbon cable that carried signals directly from small switches.
Despite the refinement of the design, problems with the Camry 40 steering column cable failing to function periodically occur. Among the main causes of malfunction are:
- Natural wear and tear – the operation of a ribbon cable is subject to mechanical stress, which over time leads to the rupture of individual conductors.
(Link to photo source)
- Increased currents when the SRS system is activated – a resistor with a resistance of 2.2 Ohms is installed in the airbag power supply circuit. It takes time for its fuse link to burn out, during which the cable overheats excessively.
- Rust formation - penetration of moisture into the steering wheel provokes corrosion of individual conductors in the soldering areas of the Camry 40 ribbon cable.
- Road traffic accident - getting into an accident is also dangerous due to excessive mechanical forces on the steering wheel. What can lead to a break in the Camry 40 steering column cable.
Sequence for restoring loop functionality
First of all, you should disassemble the plastic structure in which the cable is located. Next, you need to unwind the train to its full length. If it has a break or other type of damage to the current-carrying tracks, you can use sequential testing of the tracks to determine the specific track that has a break. The test can be done with a conventional multimeter.
The most difficult step is to detect the specific location of the wiring violation (track). To do this, use a magnifying glass (loupe) and a powerful light source. There are special electronic means for detecting the location of an electrical circuit break, but they are expensive. Usually at the break point there is faintly visible damage to the insulation, or the place itself can be seen through the light.
The next step is to clear the breakage area from insulation. This can be done using local heating with a soldering iron or using a scalpel. It is advisable not to touch adjacent current-carrying paths, otherwise they will have to be restored to their functionality.
Next, the break point is tinned using low-temperature solder, for example POS-60. To do this, you can use active flux. Restoring the break point is carried out by soldering using a stranded copper conductor of small cross-section.
Articles
To replace the Camry 40 steering column cable with an original, a Toyota spare part is used - article number 8430648030 . As an analogue, you can use parts from the following manufacturers:
Toyota steering column cable 8430648030
- Quattro Freni – catalog number QF00E00010;
- Premium Parts – TY8430448030;
- Henshel – K8430648030;
- Roadrunner – RR3002FX;
- Sunko – S8430648030;
- Ruei – RU843030T.
Replacing rear stabilizer bushings
The rear stabilizer bushings of the Prado 150 with KDSS are easier to change. You will need a wrench, a 14 mm socket and a crowbar instead of a mounting tool, since the KDSS pressure is higher here. The work takes 20 minutes.
The repair begins on the left side, where the KDSS cylinder is installed. Unscrew the bolts under it. Next, supporting the stabilizer by the transverse rod with a crowbar, move to the right side. The stabilizer and clamps are cleaned. New bushings are installed in the same way as originally: the left one is cut forward, the right one is cut back. The assembly procedure is the same as for disassembly. First, assemble the left side, then the right, raising the stabilizer and pressing the KDSS cylinder.
Repair
To repair the Toyota Camry 40 steering column cable, you will need to prepare a soldering iron and tin. Initially, the device is dismantled as described in the replacement paragraph.
Next, the following operations are performed:
- The ring is removed from the internal hole of the Camry 40 cable.
(Link to photo source)
- The device casing can be disassembled into two parts, overcoming the resistance of the clamps.
- The ribbon cable is removed and inspected for damage. If there are no visual breaks in the conductive paths, then you will need to check their integrity with a multimeter.
- Damaged sections of the tracks are cleaned and connected using tin.
After repair
Before assembly, you will need to ring the contact part with a multimeter.
Replacing front stabilizer bushings
The work requires tools such as a ratchet, a mounting tool, a hexagon, a 17mm socket, water, and rags. To access the suspension you will have to use an overpass, pit or lift. Replacing the front stabilizer bushings of the Prado 150 takes 30 minutes.
You should first check the play. To do this, the mounting is placed against the shock absorber nut and pressed down. The play in the bushing usually appears more on the right due to the additional pressure created by the KDSS cylinder located there.
A hex wrench is placed in the access slot on top of the clamp to lift and hold it for access to the bolts. They are unscrewed with a mounting tool, holding the suspension part to prevent it from moving under KDSS pressure. The bushing is removed with the clamp.
The stabilizer is washed, which is not usually done at a service station.
The clamp is cleaned by removing dirt pressed inside with a flat screwdriver, washed and wiped dry. The new part is inserted into the stabilizer and the clamp is installed, bringing it in with an assembly line. The bolts are tightened with a hexagon through the slot. This operation is done for both sides of the stabilizer. Upon completion of the work, the play is checked again.
For future owners of Prado 120 and more
There are more than enough offers to purchase the Prado 120 on the secondary market. These are mainly cars from Europe and the Gulf countries. A lot of SUVs were sold here in Russia by official dealers. Finding a truly worthy example is not so easy, and most cars have a long mileage.
In fact, SUV owners often drive 30-40 thousand km a year, or even more, which significantly exceeds the statistical average of 20-25 thousand km. But there are exceptions - cars with real low mileage. Land Cruiser Prado remains liquid for a long time, very slowly losing value.
Such a “valuable” car is not ignored by car thieves.
Toyota Land Cruiser Prado 120 was equipped with naturally aspirated gasoline engines and a turbodiesel. There are even versions with atmospheric diesel. The line of gasoline engines was represented by in-line 4-cylinder units with a displacement of 2.7 liters - 2TR-FE with a power of 163 hp. with automatic variable valve timing system VVT-i and 3RZ-FE 150 hp.
without VVT-i, as well as a V-shaped “six” with a displacement of 4 liters 1GR-FE - 249 hp. and 3.4 l 5VZ-FE – 185 hp. (for the Japanese domestic market). Diesel versions are represented by 4-cylinder engines, mainly a 1KD-FTV turbodiesel with a power of 163 hp, since 2004 - 166 hp, and since 2006 - 173 hp. Also on Arab Prados there is a 1KZ-TE turbodiesel with a power of 131 hp.
and diesel 5L-E – 94 hp.
Gasoline engines are very reliable. The timing drive is a chain drive with a huge resource. Even on cars that had been running for a long time, there was no need for major engine repairs. The valves are adjusted using washers, as a rule, over 200-250 thousand km the gap goes no more than 0.1 mm, and there is no need for adjustment. Unstable operation of a gasoline engine, increased consumption and decreased traction are often caused by dirty injectors. After cleaning the injectors, the engine comes to life again. As a rule, the need for this appears after 60-100 thousand kilometers.
On cars with a mileage of more than 300 thousand km, cleaning the injectors will most likely no longer be an option; they will have to be replaced. The cost of one nozzle is from 11 to 18 thousand rubles. Exactly the same symptoms appear after running more than 150-200 thousand km due to the submersible filter of the fuel pump in the tank being clogged with dirt. To replace the filter, the tank will have to be removed. The fuel pump itself runs more than 180-220 thousand km. A new pump will cost 8-9 thousand rubles. On a 2003-2004 Prado with a 1GR-FE engine, sometimes it becomes necessary to replace a broken cylinder head gasket.
Diesel engines are less reliable compared to their gasoline counterparts. The reason is low-quality fuel at domestic gas stations. The timing belt drive has a replacement interval of 120 thousand km. The valve clearance adjustment is also implemented here using washers. On diesel engines of 2003-2005, it became necessary to open the engine to replace burnt-out pistons. Fuel injectors may “ring” with a mileage of more than 80-100 thousand km, but their 150-200 thousand.
km they still nurse. The cost of an injector is from 13 to 18 thousand rubles. Problems with “supercharging” appear due to the failure of the turbocharger actuator, which changes the angle of the turbine blades. The reason is the drive mechanism with plastic gears that wear out due to the high resistance of the “dirty” turbine blades. Periodic cleaning of the turbine air path from foreign deposits will significantly extend the life of the actuator.
With a mileage of more than 150-200 thousand km, the radiator of the engine cooling system begins to leak. The original one will cost 20-28 thousand rubles, an analogue can be purchased for 5-10 thousand rubles. The cooling system pump (pump) runs more than 120-150 thousand km. The starter may fail with a mileage of more than 250-300 thousand km
The SUV was equipped with a 5-speed manual and 4, later 5-speed automatic transmission. Prados with “mechanics” are rare. There are no complaints about the “automatic machine”. Some owners complain about the appearance of shocks when switching. Moreover, this is noted on cars older than 4 years. Often, changing the oil in the box helps get rid of the shocks. Cases of failure are rare, and even then they occur after quite significant runs on 2003-2004 copies.
The all-wheel drive transmission provides power distribution between the axles in a ratio of 40% and 60% between the front and rear. If necessary, interaxle blocking with a lowering row is possible. Problems with locking can arise at high mileage due to the failure of the center lock actuator, which is a small unit with an electric motor on the transfer case. The price of a new unit is 7-12 thousand rubles. The seals of the front and rear gearboxes can become snotty with a mileage of more than 200-250 thousand km.
The boots of the internal CV joint often require replacement after a mileage of more than 140-180 thousand km. The cost of a new boot is 1.5-2 thousand rubles. Front wheel bearings run more than 100-150 thousand km. The cost of the bearing assembly with the hub is about 5 thousand rubles.
Toyota Land Cruiser Prado 120 was equipped with both conventional and more comfortable air suspension. Shock absorbers last more than 200-250 thousand km. To replace all the racks you will have to shell out about 20-25 thousand rubles. Ball joints last about 150-200 thousand km and are replaced as an assembly with lower control arms (about 10 thousand rubles). Suspension arms last more than 150-200 thousand km.
The front stabilizer struts last more than 120-150 thousand km. With a mileage of more than 150-200 thousand km, cases of destruction of the rear stabilizer are not uncommon. For a new one you will have to pay about 5 thousand rubles. On cars older than 7-8 years, there is often a slight bias to the left side. The reason is due to the peculiarities of weight distribution, the left side is loaded more.
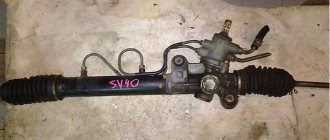
Toyota Camry 40 steering rack: replacement, how to tighten it, repair - AutoExpert
Do-it-yourself steering rack tightening
Experienced car enthusiasts know that the average lifespan of a steering rack varies from 12 to 15 years. Similar numbers are often indicated in the technical documentation for the machine.
But these values will be relevant in cases where the vehicle is operated correctly: recommended and high-quality oils are used, the racks are serviced by specialized services, and the car is driven on smooth roads.
In all other cases, car owners invariably face the question of how to tighten the steering rack with their own hands. This is quite expected, since our compatriots have to drive exclusively on roads with potholes. In this case, you can no longer do without regular car repairs. Pulling up or adjusting is a type of such work.
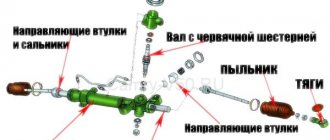
Before starting any repair work on the car, it is necessary to find out the operating principle of a particular mechanism. The steering rack is needed to transfer the physical forces applied by the driver when turning the steering wheel to a helical gear located on a bearing. Pressure springs guarantee high-quality contact between the gear and rack.
Adjusting the steering rack is an inherently simple task, and any driver can handle it. On average, this procedure takes from 1 to 2 hours, taking into account the preparatory activities. In what cases is such a lift required?
Distributor housing wear
In the vast majority of cases, tightening the steering rack is required if there is knocking and play in this mechanism. However, you need to be aware that such repairs do not always help. These malfunctions may indicate banal wear of the gear or rack or its individual parts.
Tapping and pronounced play in the steering rack often occur for the following reasons:
- the transmitting pair (its engagement zone) requires adjustment and adjustment;
- there is a loosening of the fixation of the lever bracket, steering system housing, bipod;
- natural wear and tear of parts, ball joints.
A properly adjusted steering mechanism will eliminate any knocking and improve the comfort of driving an aged car. Therefore, if you notice that the car’s steering wheel turns tightly, you should not limit yourself to tightening the corresponding device; it is strongly recommended to add lubricant to the crankcase.
Toyota Camry steering rack: signs of rack malfunction, diagnostics, steering rack repair, price of service in a car service center
The steering rack in a car is a part of the steering mechanism, which performs the function of transmitting torque from the steering wheel to the drive discs using a cardan drive. Most modern vehicles are equipped with hydraulic power steering racks, which are equipped with a pump that pumps high fluid pressure into the rack cavity.
Features of air suspension on Toyota Prado cars
In traditional automobile suspensions, springs, springs, and steel torsion bars are used as elastic elements that absorb the load. Prado 120 is a mid-size SUV of the Toyota brand. A high level of comfort, controllability and cross-country ability is ensured by an adjustable rear air suspension.
Features of air suspensions
Good absorption of road surface unevenness and the ability to adjust ground clearance depending on driving conditions are provided by adjustable air springs. These elements often fail and require replacement due to wear or mechanical damage. Pnevmadoc online store https://www.pnevmadoc.com.ua/products/land-cruiser-prado-120-2002
sells high-quality air springs for Land Cruiser Prado.
The design of the Toyota Prado model uses body level sensors. Based on their readings, the computer unit changes the air pressure in the pneumatic cylinders to adjust the lift depending on the number of passengers and cargo. The manufacturer provides the ability to switch the suspension to manual switching mode, in which the driver can independently adjust the ground clearance. The presence of such a function has a positive effect on the comfort, controllability and maneuverability of the car. Available modes:
- High (HI) – used to increase ground clearance, which is especially useful when driving over obstacles and when driving off-road;
- Medium (Normal) – best suited for normal driving;
- Low (LO) - in this option, the vehicle has a minimum ground clearance for the convenience of boarding passengers, unloading and unloading cargo.
When selecting the automatic pneumatic operation function, the control unit will follow the programmed program:
- When driving in Normal height mode, the car will rise to the maximum level (HI) if the speed drops to 50 km/h or below. When accelerating, the reverse process will occur;
- LO mode will be activated if the Normal option is slowed down to 12 km/h, and vice versa.
The manufacturer does not recommend using automatic switching of the Toyota Prado air suspension at temperatures below -30 ℃. In such conditions, manual control should be engaged and the vehicle height should be set to average. If you need to tow the machine with a flexible or rigid hitch, you should also set the position to Normal and disable automatic mode change. Do not use the automatic height adjustment system when parking on an inclined surface or when jacking up the vehicle.
Air suspension design
The Toyota Land Cruiser Prado 120 uses rear air suspension - the role of elastic elements in it is played not by steel springs, but by rubber cylinders filled with compressed gas. The functionality of the system is ensured by a complex set of interconnected parts and assemblies:
- Air bags are rubber cylinders filled with air at high pressure. The main working element of the system, which perceives and absorbs the energy of wheel impact. Due to constant contact with moisture and dirt from the road and constant friction, this element most often wears out and ceases to perform its functions. The Pnevmadoc store offers a wide range of air springs, including for Toyota Prado 120;
- An air compressor is an electric pump that pumps increased gas pressure into air cylinders. The air humidity in the system is reduced in the dehumidifier. The release valve releases excess pressure to reduce vehicle lift. The air entering the compressor passes through a filter;
- The control unit regulates body height by sending commands to change gas pressure to the valve block and compressor;
- The receiver is designed to speed up the change in vehicle lift. This tank is designed to temporarily store air;
- Speed , door opening, and body height sensors are designed for precise operation of the air suspension.