Let's consider which circuits are protected by individual Land Cruiser 200 fuses. If any of them fails, the following is prohibited :
- Install a protective device with a higher rated current .
- a piece of wire as a replacement , even for short-term restoration of the electrical circuit.
- Make design changes to power units or individual elements.
Failure to follow these recommendations may result in a short circuit or vehicle fire.
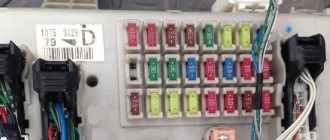
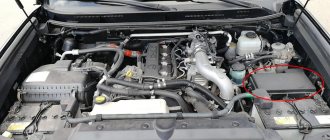
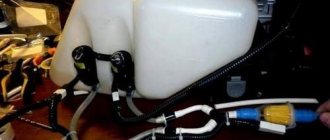
Fuse box under the hood
Fuse box diagram under the hood
The power fuse box of the engine compartment of the Land Cruiser 200 is mounted on the left wing . It consists of the following elements (the rated current of the fuse in Amperes is indicated in parentheses):
- 1 – heating system A/F (15);
- 2 – signal supply circuit (10);
- 3 – fuel pump, heating complex A/F, EFI (25);
- 4 – ignition system, injector and readings (30);
- 5 – heating device controller (50);
- 6, 63 – ventilation, heated front row of seats (25);
- 7 – until 2014, heating of the rear sofa, and subsequently a condenser fan (20, 25);
- 8 – until 2014, a heating complex for the resting area of the front windshield wipers, and after heating the rear sofa (20);
- 9 – condenser fan, front fog lights, respectively before and after 2014 (25, 7.5);
- 10 – until 2014, a circuit for powering the headlights on a trailer, and then the main and additional brake lights, ABS, VSC, ECU, EFI, brake controller, connector for connecting a tow hitch (30, 15);
- 11 – began to be used only after 2014 for heating and ventilation of seats (25);
- 12 – generator capacitor (10);
- 13 – fog lights (15);
- 14, 16 – main, auxiliary brake lights, ECU, ABS, VSC, EFI, connector for towbar (5, 15);
- 15 – heating, ventilation of seats (25);
- 17 – circuit for powering the headlights on the trailer, and for the diesel modification of the Land Cruiser 200, an auxiliary heating complex (30, 7.5);
- 18 – rear air conditioning circuit (50);
- 19, 20, 21 – PTC heater 1, 2, 3 (50);
- 22 – RH-J/B (40);
- 23, 44 – tug (40, 30);
- 24 – VGRS (40);
- 25 – cleaning device for front optics (30);
- 26 – rear window heating system (30);
- 27 – used only since 2014: SUB-R/B (100);
- 28 – front air conditioning circuit (50);
- 29 – not used;
- 30, 39, 45 – ECU (150, 5, 25);
- 31 – generator (180);
- 32 – not used, but for Land Cruiser 200 with a diesel engine: DRIVER (80);
- 33 – heat of the power unit (50);
- 34 – DRL, headlights (40);
- 35, 36 – ABS (50, 30);
- 37 – starting system (30);
- 38 – program for starting the power unit with a button and an intelligent door opening system (7.5);
- 40 – module on the ceiling, illumination of the interior rear-view mirror (7.5);
- 41 – program for fixing the driver’s position (5);
- 42 – until 2014, multimedia, and later audio system (5, 30);
- 43 – device for entertaining rear seat passengers (7.5);
- 46 – program for steering wheel locking (20);
- 47 – turn signals and side repeaters, counter and trailer chain (15);
- 48 – used only on diesel Land Cruiser 200: fuel pump (20);
- 49 – EFI (10);
- 50 – IC-ALT (5);
- 51 – radio, audio system (30);
- 52 – DSS2, radio, navigation (10);
- 53 – central locking, ECU gateway, VGRS, position controller, steering wheel control sensor, overload and speed sensor, cooling chamber, meter, module on the ceiling, program for starting the Land Cruiser 200 power unit and opening doors without a key (5);
- 54 – clock, door sill illumination (5);
- 55, 60 – left, right high beam (15);
- 56, 61 – left, right low beam, light corrector (15);
- 57 – ignition, injector (10);
- 58 – counter (5);
- 59 – GBS, ECU gateway, ABS, VSC, SRS, steering lock, program for starting the internal combustion engine and opening doors without a key, open circuit (10);
- 62 – AFM, EVP VSV, 02 SSR, AI DRIVER, AI EX VSV, ACIS VSV (7.5);
- 64 – used on diesel Land Cruiser 200: EGR E-VRV B2, D-THROT SOL B2 (7.5);
- 65 – heating system for external mirrors (5);
- 66 – DRL (5).
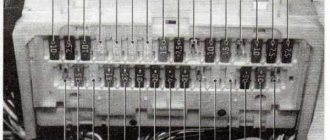
In Fig. The left side shows the location of the fuse box on the left side; in Fig. on the right - fuse box on the right (if equipped)
One more node
Diagram of an additional fuse box under the hood
Additional fuses in the engine compartment of the Toyota Land Cruiser 200 protect the following circuits :
- 1, 3, 4, 11 – not used;
- 2 – brake controller (30A);
- 5 – heating complex for the rest area of the front windshield wipers (20A);
- 6 – generator capacitor (10A);
- 7 – alarm fuse (5A);
- 8 – heated seats (25A);
- 9 – additional heating system (10A);
- 10 – circuit for powering the headlights on the trailer (30A).
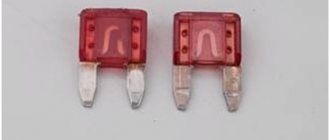
Automotive fuses sizes
Main unit
The main block contains most of the fuses and relays.
They are responsible for the performance of many systems. The location diagram is shown in the image below. Also, after the diagram there is a table showing a breakdown of the main elements of the unit.
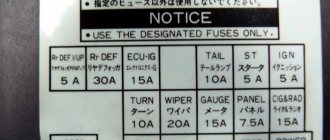
| Designation | Purpose |
| 2 | Responsible for the operation of the RTS heater. |
| 5 | Controls the operation of the rear window heating. |
| 6 | Responsible for turning the rear fog lights on and off. |
| 12 | Provides timely and uninterrupted sound signal. |
| 20 | Controls the operation of the condenser fan. |
| 23,24 | Provides switching on and off of high beam headlights. |
| 26 | Responsible for the performance of the windshield wiper. |
| 34 | Regulates the operation of the fuel pump. |
The block also contains fuses and relays that ensure the functionality of towing the vehicle, are responsible for the lighting inside the car, and turn its side lights on and off.
A more detailed diagram is located under the cover of the main unit. Also, together, the car from the manufacturer is equipped with appropriate documentation, with the help of which you can find the necessary element and find out what it is responsible for.
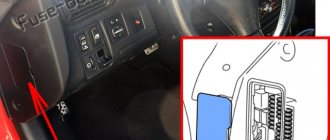
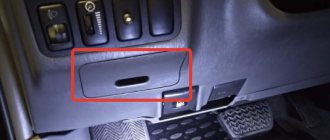
Fuse boxes in the interior of the Land Cruiser 200
The fuse diagram in the interior space of the Land Cruiser 200 provides for the installation of two blocks. The first is located in the lower left part relative to the steering wheel, and the second is under the glove box.
Driver's side
Diagram of the first fuse box in the cabin
The first power block in the Land Cruiser 200 cabin has the following fuse diagram :
1 – cigarette lighter fuse (15A);
- 2 – towbar, reversing lights (10A);
- 3 – clock, DSS2 ECU, power unit start program with a button, intelligent door opening system, mirror and ECU units, radio and display units, stereo amplifier (7.5A);
- 4 – 4WD, PANEL RLY, DAC, VSC, ECU mirrors, cruise control, cigarette lighter, ashtray, cooling chamber, heated seats, differential lock between axles, information display with various functions, air conditioning, glove compartment lighting, emergency stop light, radio , cleaning complex for front optics, light corrector for front optics, auxiliary heating complex, module on the ceiling, program that remembers the position of the driver's seat, switches for the gearshift lever, steering wheel, center console, rollover sensor for side curtains (10A);
- 5 – air conditioning, heating complex, module on the ceiling, clock, sunroof, steering sensor, brake lights, EC MIR, VSC, J/B ECU, ABS, overload and speed sensor (10A);
- 6, 23 – not used;
- 7 – RR MGC VLV, MG CL, cooling chamber, rear window heating complex, compressor, condenser fan (10A);
- 8 – front, rear fog lights, tail lights, license plate lighting, brake lights, circuit for connecting electrical wiring for a trailer (15A);
- 9 – front wiper fuse (30A);
- 10 – windshield washer complex (20A);
- 11 – rear wipers (15A);
- 12 – 4WD (20A);
- 13 – heating of the rest area of the front windshield wipers, heated seats, generator, gearbox switch, emergency stop warning light, pre-tensioning of seat belts (5A);
- 14 – central locking, driver’s seat position memory program, information display with various functions, automatic windshield wiper and ECU gateway, DSS2 ECU, VSC, ABS, steering wheel position adjuster, gearbox lock program, cruise control, front optics cleaning complex, system emergency seat belt tension, tow hitch (5A);
- 15 – hatch (25A);
- 16, 18, 19, 20 – drive for raising windows in the rear right and left, front left and right doors (20A);
- 17 – heating complex of external, ECU mirrors (15A);
- 21 – rear fog lights (7.5A);
- 22 – air conditioner (7.5A);
- 24 – steering wheel position corrector (15A);
- 25, 30 – adjustment of the front seats (30A);
- 26 – socket (15A);
- 27 – DLC3 (7.5A);
- 28 – emergency seat belt tensioning system (30A);
- 29 – ECU (25A);
- 31 – inverter (15A).
In Fig. on the left is the location of the fuse box for left-hand drive vehicles; on the right - for right-hand drive vehicles
Passenger side
Diagram of the second fuse box in the cabin
The fuses under the glove box of the Land Cruiser 200 are designed for the safe operation of the following equipment :
- 1, 2, 3, 4, 13 – not used;
- 5 – central locking (20A);
- 6, 9 – AHC (20, 10A);
- 7 – multimedia complex (5A);
- 8 – towing (7.5A);
- 10 – sensor for fixing air pressure in tires, AHC, VGDS (5A);
- 11 – cooling fans (10A);
- 12 – heated seats (20A);
- 14 – cruise control (5A);
- 15 – heated steering wheel (10A);
- 16 – information display with various functionality (10A).
In Fig. on the left is the location of the fuse box for left-hand drive vehicles; on the right - for right-hand drive vehicles
Replacing fuses for Toyota Land Cruiser Prado 150
The occurrence of a problem with an electrical appliance (the signal on the panel does not light, the air conditioner does not work, etc.) is most often associated with a malfunction of the corresponding part. Due to a power surge, it burns out - it is replaced with a new one. This procedure is simple, but before carrying out it the driver should familiarize himself with some rules:
- Turn off the ignition and disconnect the battery from the main system to avoid electric shock.
- Select the same element by marking and function. For example, the number of the HORN horn fuse for Toyota Prado 150 is 12, so to replace it you need to take the same one.
- Do not use metal tweezers.
Replacement is carried out as follows:
- ignition switch off;
- block access;
- dismantling the cover;
- inspection of elements for damage (the faulty component is darker than the others);
- if a burnt-out element is detected, use tweezers to pull it out of the block and install another one in its place;
- cover installation;
- establishing a connection between the battery and other car systems;
- turning on the ignition.
For example, a cigarette lighter fuse for a Prado 2021 costs about 250 rubles (used - 100 rubles). Removing the old one and installing the new one takes little time. But if the problem cannot be solved in this way, it is recommended to contact a service station so that knowledgeable people can carry out diagnostics and determine the source of the malfunction.
Changing fuses correctly
Not every Prado 120 driver knows what to do if the fuse fails. Before you familiarize yourself with the sequence of actions for replacing a part, you need to understand whether it really needs to be replaced:
- They are looking for a block of fuse links to which non-functioning units lead.
- Find the fuse connected to the electrical appliance. The diagram will speed up the search.
- Use special tongs to remove the fusible insert.
- Inspect it for visual damage and defects. If the owner finds deficiencies, then it needs to be replaced.
The damaged fuse is replaced with a serviceable one, which is purchased at the store. Plastic must have a flat surface, and on metal there should be no change in cross-section. If you have any concerns, test it before installing.
Instructions:
- Buy a second Prado 120 fuse link as a spare for the main one.
- Attach to the metal bases of the cable fuse.
- Connect one end to the plus, the other to the minus.
See how the fuses behave. A high-quality one will burn out, a low-quality one will melt.
Replacement consists of installing a new fuse-link instead of the damaged one. Check out some details:
- If necessary, identify and eliminate the cause of the short circuit so that the new product does not deteriorate again.
- There are three types of machine fuses: mini, medium and maximum. Each size fits into its proper place.
- The current strength in the fuse link should not exceed the nominal value, otherwise the Prado devices will burn out.
- The unit should not contain bare wires that are connected to the housing to prevent a short circuit.
- After installation, the parts are checked for correct functioning of all electrical components.
Video
Checking and replacing fuses
If an electrical component is not working, it may be due to a blown fuse. In this case, it is necessary to check and, if necessary, replace the fuses.
1. Turn the ENGINE START STOP switch to the OFF position (step 1).
2. Fuses are located in the locations shown below. To check the fuses, follow the instructions below (step 2).
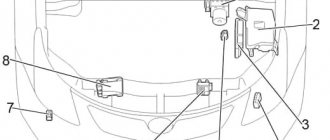
Engine compartment
Press the tab and lift the cover upwards.
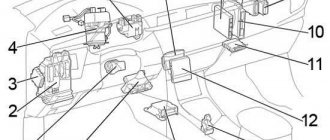
Under the instrument panel
- Driver's side instrument panel:
Remove the bolt and cover.
- Passenger side instrument panel:
3. For details about which fuse should be checked after a system malfunction occurs, please refer to the table. "Fuse Locations and Amperage Ratings."
4. Remove the fuse using the supplied puller (step 4).
5. Check to see if the fuse has blown (step 5).
1. Good fuse.
2. Blown fuse.
Replace it with a fuse rated for the appropriate current rating. The amperage rating is indicated on the fuse box cover.
1. Good fuse.
2. Blown fuse.
Contact your Toyota dealer.
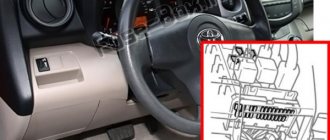
Location of fuses and their replacement
1. Engine compartment:
2. Driver's side instrument panel:
3. Passenger side instrument panel:
After replacing the fuse:
- If the lights do not turn on even after replacing the fuse, the lamp may need to be replaced.
- If the replaced fuse blows again, have the vehicle inspected by a Toyota dealer.
When electrical circuits are overloaded, fuses are designed to blow before the associated wiring harness is damaged.
Note
: To prevent the system from malfunctioning and causing a fire in the vehicle, the following precautions must be observed. Failure to do so may result in damage and possibly fire or personal injury.
- Never use a fuse with a higher amperage rating than specified or other items to replace a blown fuse.
- Always use a genuine Toyota fuse or equivalent. Never replace a fuse with a piece of wire, even for a short time. This can cause serious damage and even fire.
- Do not modify the fuse or fuse box.
Changing fuses Prado 150
It often happens that drivers do not consider it necessary to replace fuses in a timely manner. But if the circuit burns out or starts to melt, the driver does not know what to do first.
Before you start replacing the element, you need to make sure that it has burned out. To do this, you need to identify the block associated with the damaged devices, and then select a specific fuse. The element to be replaced must be removed from the block using tongs or tweezers. The diagram needs to be carefully studied.
If there are external defects, the element must be replaced
You can purchase a new electrical fuse for the Prado 150 at any car store, but it is important to choose a good spare part. The sample should be carefully examined to ensure that there are no distortions, notches on the metal part, or manufacturing defects in the plastic. Before installing a new block, it is tested:
Before installing a new block, it is tested:
- A spare electrical fuse is purchased.
- Wiring is attached to the metal parts of the fuse and connected to the battery.
- A high-quality element will burn out, a defective element will melt.
- If a defective part is mistakenly installed in the machine, it will cause a fire.
- After the test, you can start replacing - install the working part in place of the old one in the Prado 150.
- Before directly installing the circuit, you need to eliminate the conditions that led to damage to the previous element.
There are three possible fuse sizes: mini, medium, maxi. In each case, a special place in the block is allocated for it. The current strength in the fuse must be greater than the current strength in the corresponding device; it can be determined by the color of the case. There should be no bare wires on the circuit, as they can again damage the circuit, causing a short circuit. At the end of the work, you should make sure that all electrical circuits are working properly. The unit has been correctly replaced if there are no problems in its functioning, as well as in the operation of other systems.