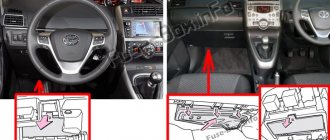
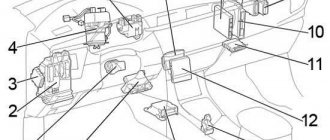
Fuses and relays in the Toyota Prado 120 interior
The main mounting block in the Toyota Prado interior is located on the driver’s side (independent of the location of the steering wheel) at the bottom of the control panel, under the protective cover. On the front side you see fuses, on the back side of the mounting block you will find a relay.
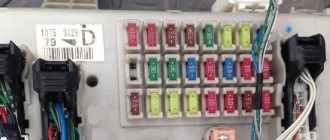
Fuses for Toyota Land Cruiser Prado 120
Fuse box diagram for Toyota Land Cruiser Prado 120
Description
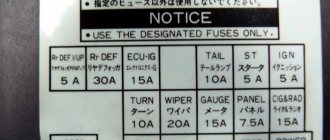
| № | Name | A | Purpose |
| 1 | IGN | 10 | Fuel pump control unit, multiport fuel injection system/sequential multiport fuel injection system, ABS, VSC, A-TRC |
| 2 | SRS | 10 | SRS airbag system |
| 3 | GAUGE | 7.5 | Instrument cluster |
| 4 | ST2 | 7.5 | Multiport fuel injection system/sequential multiport fuel injection system |
| 5 | FR WIP−WSH | 30 | Windshield wiper and washer |
| 6 | TEMS | 20 | Electronically adjustable suspension |
| 7 | DIFF | 20 | Rear differential lock, center differential lock |
| 8 | RR WIP | 15 | Rear wiper |
| 9 | — | — | — |
| 10 | DP/SEAT | 30 | LHD: Power driver's seat |
| PP/SEAT | 30 | RHD: Power Passenger Seat | |
| 11 | PP/SEAT | 30 | LHD: Power passenger seat |
| DP/SEAT | 30 | RHD: Power Driver Seat | |
| 12 | PWR OUTLET | 15 | Socket |
| 13 | IG1 NO.2 | 10 | Air conditioning, refrigerator |
| 14 | RR WSH | 15 | Rear window washer |
| 15 | ECU-IG | 10 | Gearbox selector lock, power windows, ABS, VSC, A-TRC, air conditioning, sunroof, sockets |
| 16 | IG1 | 10 | ABS, VSC, A-TRC, air conditioning, charging system, heated rear window, reversing lamps, turn indicators, hazard warning lights |
| 17 | S.T.A. | 7.5 | Fuel pump control unit |
| 18 | P FR P/W | 20 | Front passenger window lift |
| 19 | P RR P/W | 20 | LHD: Rear right power window |
| D RR P/W | 20 | RHD: Rear right power window | |
| 20 | D RR P/W | 20 | LHD: Rear left power window |
| P RR P/W | 20 | RHD: Rear left power window | |
| 21 | PANEL | 10 | Instrument panel lighting |
| 22 | TAIL | 10 | Side light, license plate light |
| 23 | ACC | 7.5 | Automatic transmission control unit, power outlets, power mirrors, audio system |
| 24 | C.I.G. | 10 | Cigarette lighter Toyota Prado 120 |
| 25 | POWER | 30 | Windows, sunroof |
Relay diagram in the interior of Toyota Prado 120
Description
| № | Relay |
| R1 | Sound signal |
| R2 | Side light |
| R3 | Power relay (window lifters, sunroof) |
| R4 | Sockets (ACC SKT) |
Changing fuses correctly
Not every Prado 120 driver knows what to do if the fuse fails . Before you familiarize yourself with the sequence of actions for replacing a part, you need to understand whether it really needs to be replaced :
- They are looking for fuse block to which non-functioning units lead.
- Find the fuse connected to the electrical appliance . The diagram will speed up the search.
- Use special pliers to remove the fusible insert .
- Inspect it for visual damage and defects. If the owner finds deficiencies, then it needs to be replaced.
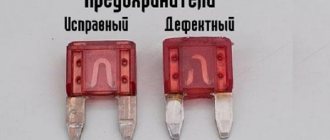
Checking the fuse: 1. Good fuse.
2. Blown fuse. The damaged fuse is replaced with a serviceable one , which is purchased at the store. Plastic must have a flat surface, and on metal there should be no change in cross-section. If you have any concerns, test it before installing.
Fuse set
Instructions:
- Buy a second Prado 120 fuse link as a spare for the main one.
- Attach to the metal bases of the cable fuse.
- Connect one end to the plus, the other to the minus.
See how the fuses behave. A high-quality one will burn out, a low-quality one will melt.
Replacement consists of installing a new fuse-link instead of the damaged one. Check out some details :
- If necessary, identify and eliminate the cause of the short circuit so that the new product does not deteriorate again.
- There are three types of machine fuses: mini, medium and maximum. Each size fits into its proper place.
Three possible fuse sizes: mini, medium, maxi. - The current strength in the fuse link should not exceed the nominal value, otherwise the Prado devices will burn out.
- The unit should not contain bare wires that are connected to the housing to prevent a short circuit.
- After installation, the parts are checked for correct functioning of all electrical components.
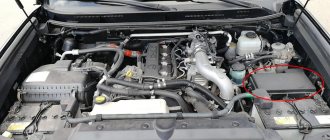
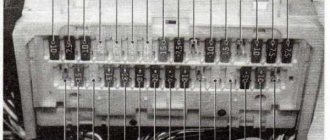
Fuses in the engine compartment of Toyota Prado 120
Description
| № | Name | A | Purpose |
| 1 | SPARE | 10 | Spare fuse |
| 2 | SPARE | 15 | Spare fuse |
| 3 | CDS FAN | 20 | Cooling fan |
| 4 | RR A/C | 30 | Rear air conditioner |
| 5 | WORLD HEATER | 10 | Heated mirrors |
| 6 | STOP | 10 | Brake Lamps, Auxiliary Brake Light, Shift Lock, ABS, VSC, A-TRC, Height Adjustable Rear Suspension |
| 7 | — | — | — |
| 8 | FR FOG | 15 | Front fog light |
| 9 | VISCUS | 7.5 | Viscous heater |
| 10 | OBD | 7.5 | Diagnostic connector |
| 11 | HEAD (LO RH) | 10 | Low right light |
| 12 | HEAD (LO LH) | 10 | Low left light |
| 13 | HEAD (HI RH) | 10 | Far right light |
| 14 | HEAD (HI LH) | 10 | Far left light |
| 15 | EFI NO.2 | 10 | Oxygen sensor, mass air flow sensor |
| 16 | HEATER NO.2 | 7.5 | Air conditioner |
| 17 | DEFOG | 30 | Heated rear window |
| 18 | AIRSUS NO.2 | 10 | Height-adjustable rear suspension |
| 19 | FUEL HEATER | 20 | Fuel heating |
| 20 | SEAT HEATER | 20 | Heated seats |
| 21 | DOME | 10 | Interior lighting, personal lighting, wireless remote control system, ignition switch lighting, door lighting |
| 22 | RADIO NO.1 | 20 | Audio system |
| 23 | ECU-B | 10 | ABS, VSC, A-TRC, air conditioning, refrigerator, power windows |
| 24 | ECU-B NO.2 | 10 | Body electrical control unit |
| 25 | — | — | Short pin |
| 26 | ALT−S | 7.5 | Charging system |
| 27 | — | — | — |
| 28 | HORN | 10 | Sound signal |
| 29 | A/F HEATER | 15 | Air fuel ratio sensor |
| F/PMP | 15 | 1KD−FTV: Fuel pump | |
| 30 | TRN−HAZ | 15 | Direction indicators, hazard warning lights |
| 31 | ETCS | 10 | Multiport fuel injection system/sequential multiport fuel injection system |
| 32 | EFl | 20 | Fuel pump control unit, fuel pump, multiport fuel injection system/sequential multiport fuel injection system |
| 25 | 1KD−FTV: Fuel pump control unit, fuel pump, multiport fuel injection system/sequential multiport fuel injection system | ||
| 33 | D FR P/W | 20 | Driver's window regulator |
| 34 | DR/LCK | 25 | central locking |
| 35 | — | — | — |
| 36 | RADIO NO.2 | 30 | Audio system |
| 37 | ALT | 120 | without PTC: Rear window defroster relay, ignition relay, fuses: “HEATER”, “CDS FAN”, “AM1”, “J/B”, “VISCUS”, “OBD”, “MIR HEATER”, “STOP”, “ FR FOG”, “AIRSUS”, “RR A/C” and “STOP” |
| 140 | with PTC: Rear window defroster relay, ignition relay, fuses: “HEATER”, “CDS FAN”, “AM1”, “J/B”, “VISCUS”, “OBD”, “MIR HEATER”, “STOP”, “ FR FOG”, “PTC-1”, “PTC-2”, “PTC-3”, “AIRSUS”, “RR A/C” and “STOP” | ||
| 38 | HEATER | 50 | Air conditioner |
| 39 | AIRSUS | 50 | Height-adjustable rear suspension |
| 40 | AM1 | 50 | Fuses: “ACC”, “CIG”, “IG1”, “IG1 NO.2”, “ECU-IG”, “FR WIP-WSH”, “RR WIP”, “RR WSH”, “DIFF”, “TEMS” ” and “STA” |
| 41 | PTC-1 | 40 | Auxiliary heater (PTC) |
| 42 | J/B | 50 | Fuses: “PWR OUTLET”, “P FR P/W”, “P RR P/W”, “D RR P/W”, “DP/SEAT”, “PP/SEAT”, “POWER”, “TAIL” and "PANEL" |
| 43 | PTC-2 | 40 | Auxiliary heater (PTC) |
| 44 | PTC-3 | 40 | Auxiliary heater (PTC) |
| 45 | ABS MTR | 40 | ABS, VSC, A-TRC |
| 46 | AM2 | 30 | Starting system, fuses: “IGN”, “GAUGE” and “SRS” |
| 47 | ABS SOL | 30 | without stability control: ABS |
| 50 | ABS (anti-lock braking system), VSC (stable stability control), A-TRC (active traction control) | ||
| 48 | GLOW | 80 | Glow plugs |
| Relay | |||
| R1 | Cooling fan (CDS FAN) | ||
| R2 | Auxiliary relay (ACC CUT) | ||
| R3 | Fog light | ||
| R4 | Starter (STA) | ||
| R5 | Ignition (IG) | ||
| R6 | Heater | ||
| R7 | Air Conditioning Compressor Clutch (MG CLT) | ||
| R8 | — | ||
| R9 | Heated rear window (DEFOG) | ||
| R10 | Anti-lock brake pump (ABS MTR) | ||
| R11 | Active Traction Control (TRC MTR) | ||
| R12 | Anti-lock brake system (ABS SOL) | ||
| R13 | Downhill Assist Control (DAC) | ||
| R14 | Fuel pump (C/OPN) or EDU | ||
| R15 | — | ||
| R16 | Engine control unit (EFI) | ||
| R17 | Air fuel ratio sensor (A/F HEATER) | ||
| R18 | Fuel pump | ||
| R19 | Headlights (HEAD) | ||
Relay block No. 1 Toyata Prado 120
Description
| № | Relay |
| R1 | Starter (STA) |
| R2 | Glow plugs (GLOW) |
Relay block No. 2 Toyota Prado 120
Description
| № | Relay |
| R1 | Air suspension (AIR SUS) |
| R2 | Dimmer (if equipped with daytime running lights) |
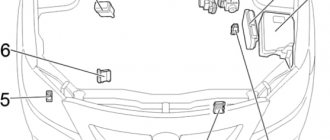
Fuse box under the hood of Prado 150
Fuse box in the engine compartment of the LC Prado 150
The Prado 150 fuse box is located on the left in the direction of travel near the battery. In the diagram below we will take a closer look at the structure of the Prado 150 fuse box.
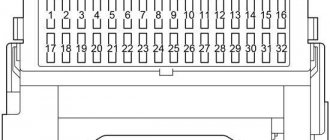
Fuse layout in the engine compartment.
Number 1 indicates the air conditioning system, number 2 indicates the heater. These parts ensure the temperature balance under the hood. The number 4 indicates one of the most important blocks of the Prado 150 - an inverter or voltage converter. Heated rear window (5), heated mirrors (15), fog lights (6), de-icer for wipers (7) help to drive safely at night and in low temperatures. 8, 9, 10, 13, 16 – heaters, with the eighth fuse directly interacting with the fuel and controlling its temperature.
The eleventh part is responsible for the serviceability of the ignition and injector of the Prado 150, and the twelfth is responsible for the car’s sound signal. 17 and 18 – folding front seats. Numbers 19 and 25 are air conditioning systems, 23, 24 29, as well as 54 and 55 are headlights, the first two for high beams, 28 is their cleaner. The windshield wipers are controlled by number 26, the turn signals are attached to 31. The twenty-first part of the circuit guarantees the operation of the brake lights of the Prado 150, and is also necessary for towing along with number 35. To lock the doors and open the hatch, block 32 is required.
Fuse box under the hood of Prado 150
Another equally important part of the circuit is 34 - the fuel pump. 39, 41, 43 – navigation and audio system. For multi-point gasoline injection, elements 42 and 47 are used, and 40 and 48 regulate the starting process. Part 49 is necessary to lock the steering control. 52 and 53 regulate many processes, including interior lighting, heaters, folding seats, steering sensors and others. 59 – car glass cleaner; 60, 61, 62 – spare.
Individual fuses provide several actions at once, others regulate the same process in pairs. Each individual part of the circuit operates under different current conditions. This figure is 7.5 - 50 A.
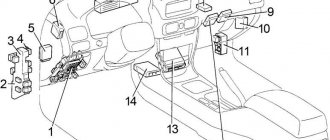
Main unit
The main block contains most of the fuses and relays. They are responsible for the performance of many systems.
The location diagram is shown in the image below. Also, after the diagram there is a table showing a breakdown of the main elements of the unit.
| Designation | Purpose |
| 2 | Responsible for the operation of the RTS heater. |
| 5 | Controls the operation of the rear window heating. |
| 6 | Responsible for turning the rear fog lights on and off. |
| 12 | Provides timely and uninterrupted sound signal. |
| 20 | Controls the operation of the condenser fan. |
| 23,24 | Provides switching on and off of high beam headlights. |
| 26 | Responsible for the performance of the windshield wiper. |
| 34 | Regulates the operation of the fuel pump. |
The block also contains fuses and relays that ensure the functionality of towing the vehicle, are responsible for the lighting inside the car, and turn its side lights on and off.
A more detailed diagram is located under the cover of the main unit. Also, together, the car from the manufacturer is equipped with appropriate documentation, with the help of which you can find the necessary element and find out what it is responsible for.