Toyota fuse box
Here are the designations and explanations of fuse blocks for various Toyota car models - Toyota Supra, Toyota Avensis, Toyota Corona Premio, Toyota Corolla, Toyota Auris, Toyota RAV4, Toyota Estima, Toyota Camry and some others. You can look at the electrical diagrams of these cars in another section. Each fuse protects its own circuit and on the fuse panel there is a designation of the circuit protected by this fuse. Of course, never replace fuses with wire, even as a temporary fix. This may cause serious damage to the wiring or even a fire. The fuse capacity is indicated on the fuse itself. If the new fuse blows immediately, you need to find the cause before installing a new fuse. If you do not have a fuse with a rated value, then you should use a fuse with a lower value, as close to the rated value as possible. The most likely cause of a blown fuse is a short circuit in the circuit caused by a broken or frayed wire. The second part of the collection.
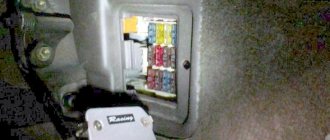
Fuse box for Toyota Corolla and Auris
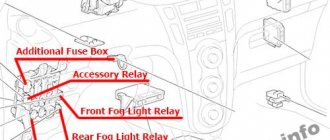
Relays and fuse links in the mounting block located in the car interior
Designation of fuses and relays in the mounting block in the engine compartment
Fuses for Toyota RAV4 from 2005
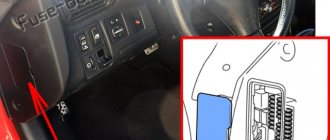
Mounting block in the cabin - on the left side of the instrument panel at the bottom under the plastic cover
Right mounting block - engine compartment of Toyota RAV4
Left mounting block - fuse and relay designations
Fuses for Toyota Estima, Estima Lucida 1990-1999
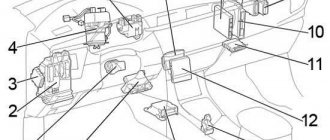
Fuse box in the car interior
Fuse box in the engine compartment
Fuse diagram for Toyota Corolla, Marino, Ceres, Trueno cars
Toyota Camry mounting fuse block
Engine compartment fuse box
Fuse box under the dashboard of Toyota Camry
How to change doors on VAZ family cars. Detailed instructions for removing and installing front and rear doors on a VAZ 2108-15 and VAZ.
Advice for motorists: how to wash the engine yourself and why you should not clean the engine at a car wash. Sooner or later before each
All modern cars, especially after 1996, include a diagnostic system using the universal OBD protocol - OBD-II. These devices can be built on bases.
Correct replacement of fuse links
To replace the fuse in a special block of the fourth generation Toyota Rav 4, you will first need to check the suspicious element. To do this, you will need to find the required fuse number, in accordance with the failed electrical appliances. Next, remove the fuse from the socket and inspect the fuse link. If the protective device is faulty, the insert will have mechanical damage.
In the future, it is necessary to identify and eliminate the cause of the fuse damage.
At the final stage, a new element is installed, which has an identical rated current of the fuse link.
Replacing fuses in Toyota Porte. Better than the officials!
Tell me, does this method work on a 406 engine? A colleague from work with a fuse on the port is still in trouble >)
consoles for fools
. I took everything apart, unscrewed 2 bolts from the rack and no longer need to remove anything) You can talk endlessly about the fuse 
People! Help the sucker!) How to download and install this program? Chrome is blocking this website link. But the explorer won't let me download runtaimepack
I did the same on the Golf 3 about a year and a half ago, of course I hadn’t seen the video before, but almost everything was the same - it’s true that I had a better oil seal and made it simpler - I lubricated the seat on the oil seal with sealant and after 10 minutes I put the engine in place. It works until no problems so far. This is an instructive video, thank you.
Can I have a color diagram, thank you)
All Toyota Porte repair services on the interactive map
Discussion of the section Replacing fuses Toyota Porte
I changed the clutch every 2 years. she got me. and cost about 3000 rubles in 2014. + replacement for another two-room apartment. In general, whoever designed this car (4216 engines) is to blame. in a solarium, bastard!)
Why . your BMW pod weighs 1850 I understand the pod G)) It would be nice if I would recommend in more detail about the fuse on port G))
THANK YOU brother, I only got 10 at the top
Guys, tell me why the fuel pump works when the ignition is turned off. After washing
The relay is responsible for heating, which is located on the other side of the board after 5 relays, no more than 6, and it is responsible for heating. signed on the solder side. and the one that fell out and behind the inscriptions is a bad inscription, that’s what it is.
My neighbor in the garage has a fuse on the port so far everything is fine, thank God >) And there is a fuse for the heated seat of a Kia Rio 2 2009.
Great manual! If you don't want to be sent to corona-club.
how to find the ignition system relay and fuse
Damn useful info
A friend told me that without a fuse on the porte there’s a lot to do with your hands, boring guy. specifically how to check the pump.
2:52 — Of course I see. You can just see everything amazingly clearly.
Please tell me, I have a Ford Mondeo 3 diesel 2.0, when I press the gas quickly, the engine stalls, if it doesn’t stall smoothly, what could be wrong, maybe the control unit! Rare hemorrhoids with a fuse are not particularly annoying)))
And elect. How much does a kettle cost?)
This block is not in the manual and cannot be found in the diagram. It took two hours to find and replace it, from .
It would be desirable to explain the fuse in detail. Thanks for the video. Tell me what contacts go to the washer and where does the +' come from?
Thank you. Did I fucking suffer?
link to the cable, it’s some kind of NC and without a switch, will it definitely work?
Everything that is not done is for the better!
A colleague from work still has no problems with a fuse on the port))). Why do this 10 times a day? Fuck you. with such renovation!
Bela ⚠CapsLock warning
STILL NOT WORKING.
This question is, do you need to install any drivers on the ELM 327 before installing the firmware? Those. I received exactly the same ELM as yours, and with it a small disk of some kind, do I need to install anything else besides Runtime and ELMConfig? Or can I just plug it into the laptop and into the machine and sew?
Fuses and relays located in the passenger compartment
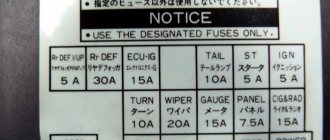
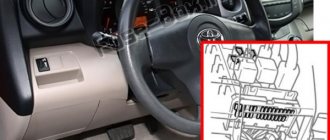
The main fuse box in the cabin (in Fig. No. 6) is located below the steering wheel, closer to the door (for models with left-hand drive). We open the panel, which is a pencil case for small items and pieces of paper. Remove it by pulling it up and towards you. Below it is the fuse box:
- TURN (7.5A) - direction indicators and hazard warning lights
- reserve
- GAUGE (10A) - lighting, dimensions, air conditioning system, reversing lights, sunroof control system, power windows, rear window defroster
- WIP (20A) - (wiper) windshield wiper and washer, and rear door glass
- I-UP/M-HTR (10A) - idle speed increase system / heated side mirrors
- ECU-IG (10A) - fuel injection system
- IGN (7.5A) - battery charging system, fuel injection system, airbag system (SRS)
- STOP (15A) - brake lights, additional brake light
- TAIL (15A) - rear lights, gauges and gauges, clock, cigarette lighter, audio system, rear window defroster, license plate light, fuel injection systems, air conditioning system, hazard warning lights, central locking
- Reserve
- Reserve
- OBD (7.5A) - OBD-2 diagnostic system
- ECU-B (7.5A) - airbag system, rear fog lights
- ST (5A) - starting system
- D/L (30A) - central locking
- FOG (15A) - fog lights
- S-HTR (15A) – (Seat Heater) heated seats
- reserve
- CIG (15A) - audio system, clock, cigarette lighter, electric side mirrors
- DEF (40A) (gray) - rear window defroster, fuse: DEF I-UP/M-HTR
- Power (30A) (pink) - electric windows, electric sunroof
'05 - '14 Toyota Aygo
Passenger compartment
right hand drive
- Power steering ECU
- Central connector
- Multi-mode manual transmission ECU
- Power window relay
- LHD: Before February 2012: Tail light relay From February 2012: Rear fog light relay
- Door control unit with receiver
- Relay block No.1
- Air conditioner amplifier
- LHD: Fog Light Relay
- LHD: Running light relay
- Fuse box
- Airbag Sensor Assembly Center
- RHD: Relay Block No. 2
- RHD: Before February 2012: Ignition Relay (IG) From February 2012: Power Window Relay
- RHD: Before Feb 2012: Power window relay From Feb 2012: Rear fog light relay
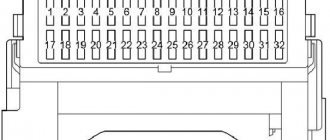
Fuse box in the passenger compartment
Remove the meter cover screws using a Phillips head screwdriver. If the steering lock is on, please turn it off.
Hyundai Porter 2nd generation was assembled in 2005, 2006, 2007, 2008, 2009, 2010, 2011, 2012, 2013, 2014, 2015 and 2021 mainly with diesel engines. In our material you will find a description of the fuses and relays of the Hyundai Porter 2 with block diagrams and their locations. Let's highlight the fuse responsible for the cigarette lighter.
p, blockquote 1,0,0,0,0 —>
p, blockquote 2,0,0,0,0 —>
The purpose of the elements in the blocks may differ from that shown; check the purpose with your diagrams on the cover of the blocks.
Wrong model generation? Here is the description for Porter 1.
p, blockquote 4,0,0,0,0 —>
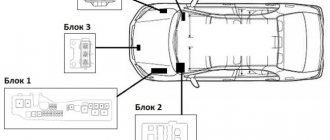
The 2nd generation Hyundai Porter has 2 main blocks with fuses. One is located under the hood, the other in the cabin, under the instrument panel on the driver's side.
p, blockquote 5,0,0,0,0 —>
p, blockquote 6,0,1,0,0 —>
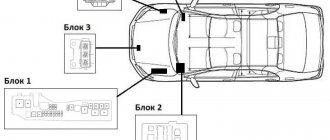
Blocks under the hood
Mounting block
In the general diagram it is designated as Block 1. It is located on the left side, next to the battery.
Example of a circuit from a block cover
Scheme
Decoding
| A | Electric power steering relay |
| IN | Air conditioning compressor clutch e/m relay |
| WITH | Horn relay |
| D | Injection relay |
| E | Radiator fan relay #2 |
| F | Radiator fan relay #1 |
| A | EMPS (50A) - electric power steering |
| b | HEAD MAIN (40A) - headlights |
| With | A/PUMP (50A) - engine control (2ZZ-GE) |
| d | ALT (100A) - charging system, rear window defroster |
| e | H-LP CLN (30A) – headlight washer |
| f | RDI FAN (30A) - radiator and condenser fans |
| g | ABS No. 1 (30A) or VSC No. 1 (40A) - ABS |
| h | ABS No. 2 (40A) or VSC No. 2 (40A) - ABS |
| 1 | HEAD RH (15A) - right headlight |
| 2 | HEAD LH (15A) - left headlight |
| 3 | HORN (10A) - sound signal |
| 4 | HAZARD (10A) - direction indicators and hazard warning lights |
| 5 | ALT-S (5A) - charging system |
| b | spare |
| 7 | EFI (15A) - engine control, automatic transmission operating mode indicators, headlights, interior lighting, automatic air conditioning, radio, headlights warning system, remote control central locking, ABS (VSC) |
| 8 | DOME (15A) - clock, instrument cluster, headlights, interior lighting, air conditioning with automatic control, radio, warning system, lights not turned off, remote control |
| 9 | AM2 (30A) - circuit AM2 ignition switch |
| 10 | backup circuit |
| 11 | backup circuit |
| 12 | backup circuit |
| 12 | backup circuit |
Block 3
Installed next to radiators and cooling fans.
Scheme
Description
- Radiator fan relay #1
- Radiator fan relay #2
- Radiator fan relay #3