Special offer for Toyota RAV 4
Especially for Toyota Rav 4 owners, our specialists have prepared solutions that will protect against theft and damage. The complexes include alarms and parking sensors from renowned manufacturers, which have long established themselves in the market and are ideally suited for installation on this car model. In case of purchasing one of the options located below in the table, the client is provided with a discount on devices and work on their installation.
Each of the proposed security systems uses an interactive data encoding method in its work, which cannot be succumbed to any code grabber. During their operation, system components will repeatedly exchange keys of 128 bits in length. The use of alarms will be convenient by notifying the owner about alarming events. Auto start, in the case of a complex that supports this function, will help warm up the interior in winter and cool it down in summer before a trip. Installing an immobilizer, even in cars that have a standard one, makes sense, because car thieves can easily deal with devices installed from the factory, while ours have interactive authorization of the owner and do not have wired connections.
Installing parking sensors helps reduce the risk of damaging your car. Small and large objects often end up in blind spots, and in the city you have to park in cramped conditions. The parking system will notify you of obstacles and help avoid unwanted contacts.
Installation and connection map for car alarm with auto start on Toyota RAV4 2021
9.1. Disassembling the interior for installing a car alarm
To access the security system connection points, remove the driver's door sill trim (latched)…
...and the left kick panel cover (with latches and a clip).
Door sill and kick panels removed
Then remove the decorative trim to the left of the steering column (on the latches).
Decorative trim removed
Remove the instrument panel.
General view of the front panel
To do this, you need to remove the top decorative trim of the front panel (on the latches)…
...and the air duct to the left of the radio (with latches).
The air duct to the left of the radio has been removed
Then, removing the dust cover (with latches)…
...remove the decorative trim of the instrument panel (on the latches).
Next, unscrew the two screws securing the instrument panel and remove it, disconnecting the connectors.
Instrument panel removed
To access the ignition switch connector harness, remove the steering shaft housing.
General view of the steering shaft casing
To do this, you need to unscrew two screws - on the left...
...and to the right of the steering shaft.
Remove the casing (with latches).
Steering shaft cover removed
9.2. Connecting and installing a car alarm on a Toyota RAV 4
9.2.1. Working under the hood
Install a siren and an engine temperature sensor under the hood.
Install the hood switch.
Wires from the interior under the hood can be routed through the standard seal on the left side of the engine shield.
9.2.2. Alarm connection
Install the antenna, LED and service button.
The car alarm unit can be located behind the instrument panel.
Ground connection in the left kick panel in the normal place.
We connect to the CAN bus in the harness of the black connector of the instrument panel.
CAN-H - green, CAN-L - white
You can also connect to the can line in the white BCM connector.
Location of the connector in the BCM for connecting to CAN
CAN bus - green and white
From can you can read information about door switches, ignition, running engine, brake pedal, parking for automatic transmission and handbrake for manual transmission. Can controls the central locking and emergency lights. You can open the trunk (only a latch occurs), raise the driver's window, organize the Slave mode and block the engine (if the can functionality of the car alarm module allows this).
Table with can settings using the Starline alarm system as an example
Connect the engine starting power circuits in the ignition switch connector harness.
Accessories (ACC) - red
Ignition 1 (IGN1) - white
Ignition 2 (IGN2) - pink
Starter (ST) - white
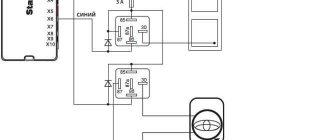
On vehicles with a manual gearbox, connect an imitation of pressing the clutch pedal in the clutch pedal connector harness according to the diagram below.
Clutch pedal connector location
Connection diagram to the clutch pedal connector using the Starline alarm system as an example
Connect the car alarm power supply and the autostart power module to the fuse mounting block.
Power supply +12V - white
9.3. Bypassing the standard immobilizer
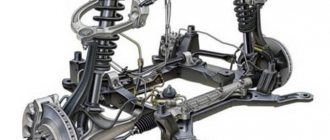
To bypass the standard immobilizer, remove the battery from the key and place the key in the immobilizer bypass module. You can use not a key, but an additionally manufactured chip. Then place the bypass module antenna on the standard antenna located on the ignition switch.
Location of the immobilizer bypass module antenna on the standard antenna
Toyota RAV4 (3rd gen.) – Alarm connection
Toyota RAV4 2008 (third generation, XA30 body, with Start-Stop button). Connecting an alarm system, implementing the autostart function.
Client's choice:
Security and telematics complex StarLine with intelligent autostart, non-scannable dialog control code, integrated multi-system CAN-LIN.
To bypass the standard immobilizer, iDataLink Start IB - a keyless immobilizer bypasser.
Connection points and diagrams for Starline car alarm and iDataLink keyless crawler, for a Toyota RAV4
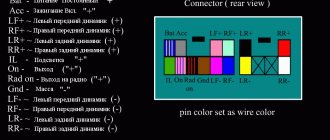
StarLine car alarm with CAN+LIN interface. Reading functions, control functions and additional functions for this vehicle.
Keyless immobilizer bypass iDataLink Start IB . Connectors, their pinouts and wire colors of the car's standard electrical wiring. Device connection diagram.
IMPORTANT! Although the Starline A93 CAN+LIN “sees” the ignition and brake via the CAN bus, when installing the iDataLink Start IB , these wires should be connected analogously! That is, we connect the immobilizer bypass module strictly according to the diagram above.
Type and location of connectors in a Toyota RAV4 car, for connecting a car alarm and a keyless crawler
To access the connection points for the car alarm and the keyless immobilizer bypass module, the minimum required disassembly of the car interior is shown in the photo below.
1. Start-Stop button connector.
- 7 pin – Push-To-Start button (-) – White
- 9 pin – TXCT (Data) – Blue
- 10 pin – Code (Data) – White
2. Fuse box connector (Body ECU)
On the lower 1-pin connector, on the left, you can connect a constant +12V power supply:
- 1 pin – Power (+12V) – Blue
3. Brake pedal switch connector.
- 1 pin – Brake pedal (+) Blue
- 2 pin – +12V Constant (+) White
- 4 pin – +12V Ignition (+) Black
4. OBDII diagnostic connector.
- 6 pin – CAN-High (Data) – Black
- 14 pin – CAN-Low (Data) – White
Car alarm installation maps for Toyota RAV4
You can download full instructions and alternative installation maps using the following links:
If you have any questions or have clarifications to the article, you can always voice them in WhatsApp, Viber or Telegram groups.
Our news
Attention! We moved. New address st. Vysotskogo, 33/3 (on the territory of the Research and Production Enterprise “Engineer”).
Our car service becomes the official Partner of ARS ADAKT LLC.
Our car service has been certified and received permission to install, repair and maintain WEBASTO heaters.
Electrical wiring of Toyota Rav 4 1999
| ignition | black or black and white on steering column |
| starter | black and white or red with silver dots on the steering column |
| acc | blue with red on the steering column |
| heater | black with yellow on steering column |
| engine blocking | Injectors - 4 black and white go into a box under the hood |
| dimensions | green (+) in the white connector at the top of the driver's side |
| tachometer | black and white on a coil on the partition of the engine compartment on the driver's side or red and black (-) injector wire on the 26-pin connector of the engine control unit, which is located in front of the center console |
| door switch | Front - red with white (-) in a white connector at the top of the driver's side or red with yellow on the driver's pillar; Rear and trunk - red with white (-) in a white connector at the bottom of the driver's side or red and white on the driver's pillar ( all doors). 2nd option: red with white and red with yellow in the 2-pin brown connector at the base of the driver’s side (decouple with diodes) |
| central locking | Negative control Locking - blue with white; Unlocking - blue with yellow in the blue connector on the driver's side (good ground required) |
| window lifters | Left front window up: green with red; Right front window up: green; Left rear window up: blue with red; Right rear window up: red with yellow on control buttons |
| brake lights | green with white in the white connector at the top of the driver's side |
Car alarm connection points for Toyota RAV4 2012, Left-hand drive, automatic transmission
Ignition switch: + 12V – blue ACC – red thin IGN_1 – white IGN_2 – pink thin Starter_1 – yellow Starter_2 – white thin (you can feed Starter_1 through the 1N4007 diode)
Harness to the upper left connector of the fuse box: Fuel pump - yellow (thick) Trunk - light green thin Left front door end - white thin
Thick harness above the glove compartment: The right front door end is thin brown. The right rear door end is thin light green.
Left rear door limit switch - blue thin on the upper left connector behind the cheek near the driver's left foot Central locking - black (open) and pink (close) in the lower connector harness from the driver's door Tachometer - gray in the harness to the diagnostic connector
Harness to the large connector on the fuse block, connector on the left, top, second: Turns - blue and yellow Brake pedal - blue thin
The RAV-4 is very similar in wiring to the Corolla. The interior is also easy to disassemble.
Remove the entire top cover of the torpedo. Everything is held there by clips, two screws and two 10mm bolts. You also need to remove the radio. And unscrew the airbag, this is done by removing the glove compartment. We look at the top above the glove compartment for two 12mm bolts and unscrew them with the head through the extension. Disconnect the pillow - yellow connector. You also need to remove the left and right pillar trims.
When starting up, the system will complain about a malfunction of the airbag, no big deal; when you connect the airbag, this error will disappear on its own.
We hide the signaling and lineman units on the left behind the wiring harnesses, above the fuse block. When assembling, make sure that the block and the lineman do not rest against the air ducts.
The lineman fits the Saturn AU-50. You can hide the entire key there, but it is better to remove only the chip from the key and hide it in the crawler. Shredded the third spare key, which does not have central locking control buttons. The outer shell is rubber and can be cut off with a knife. There is a plastic case inside and you can see the chip there; it is pulled out.
The car is simple, like all Toyotas.
Toyota Rav4 2011, Signal Connection Points (Problem Solved)
#1 Phaeton
CTE-Power.ru 8 985 179 8582
- APC administration
- 3064 messages
- City: Elektrostal Russian Empire
- Gender: Man
I'll sign everything
#2 Phaeton
CTE-Power.ru 8 985 179 8582
- City: Elektrostal Russian Empire
- Gender: Man
I'll sign everything
#3 academician
- City: Ekaterenburg
- Gender: Man
- Phaeton likes this
#4 Phaeton
CTE-Power.ru 8 985 179 8582
- City: Elektrostal Russian Empire
- Gender: Man
I'll sign everything
#5 ALEX-TUNE
- City: Naro-Fominsk municipal district
- Gender: Man
Attached files
- toyota_rav_4.pdf 708.97K 112 Number of downloads:
- toyota_rav_4.rar 681.48K 78 Number of downloads:
- toyota_rav_4.rar 681.48K 59 Number of downloads:
- Phaeton likes this
The customer is always right, but not in relation to his car!! Regards, Alexey
#6 Rinty
- City: Ufa
- Gender: Man
Do we take out the battery so that the doors do not open when the key is in the car? Does the immo still read the key without a battery? Only at a short distance or something? How to press the button at start? Disassemble the button? Should I tear the battery power to turn on the key fob before starting? but then it seems like you can open the doors from the outside?
Toyota Rav-4: weak points. Maintenance and repair
Taking the best from a powerful SUV and an economical passenger car, the Toyota Rav-4 cannot but please its owners.
This SUV is famous for its rich equipment and reliability, efficiency and modern technologies, but, like any other car, it needs high-quality technical maintenance, and over time, repairs.
The Rav-4 is primarily intended for city driving, and it shows its true character both in winter and during trips into nature. Don’t forget that even though the car is a crossover, it is not suitable for regular off-road “testing” unless you are prepared for constant breakdowns and expensive repairs.
Maintenance
Rav-4 owners are recommended to check the level of the vehicle's operating fluids (engine oil, coolant and brake fluid, etc.) every 400 km.
Before doing this, you should make sure that the machine is standing on a flat, horizontal surface, otherwise it will be impossible to obtain reliable readings. After such a run, the integrity of the tires, their pressure, and tread wear are also checked.
Every mileage exceeding 5,000 km is a signal that it’s time to change the engine oil and oil filter in your Rav-4.
Regular maintenance of your Rav-4, both weekly preventative maintenance and at a service center, should become a habit. This is a guarantee of your safety, and your Toyota will stay on the road longer.
weak spots
Toyota Rav-4 is a car with great capabilities, but it also has its weak points. The most problematic is the first generation of machines. After 100 - 150 thousand kilometers, they begin to have problems associated with oil seals, fuel tank, coolant pump, gearbox mount, etc.
Second-generation crossovers are very sensitive to consumables. If you refuel the Rav-4 with low-grade fuel, be prepared to regularly clean the injectors every 20 thousand km. After 50-60 thousand
kilometers, the oxygen sensor and ignition coil may fail. There are frequent problems in cars with automatic transmissions, the electronic components of which can fail after 150 thousand km.
At the same time, problems may appear in the clutch system.
The third generation of Rav-4 is much more reliable than its predecessors. However, replacing the front suspension bushings may become necessary after 50 thousand km, and the suspension itself will most likely have to be thoroughly repaired even before your Rav-4 reaches the 150 thousand km mark.
Rav-4 owners who carefully operate their vehicle and do not neglect maintenance should not worry that their Toyota will quickly break down. This durable machine does not give up easily, and, despite some shortcomings that are characteristic of all machines, it will serve you faithfully for many years.
Summing up
In general, these cars have proven themselves well and, with proper care, last a long time and are inexpensive. However, this is not a real jeep and off-roading is not its strong point. It also won’t show any sporting qualities on the highway or at traffic lights. This budget option is very good for everyday driving and for solving everyday problems.
Installation and connection of car alarms on Toyota RAV4 2012-2016
We will install an alarm system with auto start on a Toyota RAV4. As a standard immobilizer bypass, we use a regular transponder bypass.
We partially disassemble the interior for ease of connection and installation of the alarm system on the Toyota RAV4.
6.2. Installing an alarm on a Toyota RAV4
On the Toyota RAV4 via CAN it is possible to read the statuses of the doors, hood (if there is a hood switch), trunk, ignition, tachometer, standard security, brake pedal, handbrake and control of the central locking, hazard warning lights, raising the driver's window, unlocking the trunk.
Connect the alarm ground in any convenient place under the standard bolt or nut to the car ground.
CAN-HCAN-L
Nutrition
Ignition 1
Ignition 2
Starter 1
Starter 2
Connect power to the immobilizer transponder bypass in accordance with the manufacturer's instructions.
Install a siren, engine temperature sensor and, if necessary, a hood switch under the hood. Possible installation locations:
Installation of alarm system on Toyota RAV4 with Start-Stop button, Connection points, Toyota RAV 4
Installation of Starline A93 alarm system on Toyota Corolla RUMION
Two internal ovals located perpendicularly symbolize the strong relationship between the client and the company. Zoom Information about mileage, fuel quantity and errors from Can tires. Approximately how long will it take to disassemble the panel and get to the block?
Toyota RAV4 “Standard+” › Logbook › Installing the StarLine A alarm system Hello, I have a Starline E90…
Zoom Rav4 dashboard number Please tell me there is one relay included in the kit. Below are some photos during the installation process. Zoom Getting ready for work 2.
All wires that are involved in the connection were additionally protected with electrical tape! At the same time, I carried out work on noise and vibration insulation of the front panel, the effect was colossal. I recommend it to everyone! Zoom Front panel removed 2.
FakeHeader
From the passenger compartment to the hood I pulled a corrugated cable with wires through a standard rubber band. The wiring was carried out along OEM routes!
Below are some photos during the installation process. I took few photos due to lack of time. And I think it’s unnecessary to show where and how I installed the equipment!
The installation took 16 hours.
At the same time, I carried out work on noise and vibration insulation of the front panel, the effect was colossal. I recommend it to everyone! I didn't expect such a result. One sheet of STP Aero 2mm vibrator and one sheet of 5mm bitoplast were gone.
I set up the telematics complex within three days. I suggest reading the Installer's ABC! Zoom Documentation, SIM cards, personal login card Starline.
Zoom Security and service functions programming table.
Zoom Flexible programming of main channels. Zoom Preparation for work 1. Zoom Preparation for work 2. Zoom Removed front panel 1. Zoom Removed front panel 2.
Zoom Front panel removed 3. Zoom Antenna mounting location. Zoom Information about mileage, fuel quantity and errors from Can tires.
Toyota 4 Runner alarm connection points
Zoom Rav4 dashboard number Please tell me there is one relay included in the kit. They installed an alarm for me and told me that they did it to the engine... now I think it could have been done to the fuel pump or the crankshaft position sensor...
Installation of the StarLine A94 alarm system - Toyota RAV4 “Standard+” logbook of the year on DRIVE2
If possible, tell us about GSM, advantages, minutes. I already found the tariff below, 2 rubles per day. Approximately how long will it take to disassemble the panel and get to the block?
We connect the CAN bus in the diagnostic connector. We connect the blue wire of the power starting module to the blue wire of the Toyota RAV4 on the brake pedal switch connector. We put the frame of the standard immobilizer bypass module on the Start-Stop button.
We make an antenna from the thin black wire included in the VR module kit and place it on the key with the battery removed.
New Toyota rav 4 transmission is junk!
We connect the frames according to Diagram 1. With the service button pressed, apply power to the system, wait for 5 short siren signals, release the button, then press once to enter the vehicle selection mode.