Drivers of the Toyota Corolla 150 are indignant that some trim levels did not have fog lights. And fog on the roads is a reason that leads to car accidents. The main thing is that light bulbs and fog lights on the Corolla 150 are installed manually, since this does not require the skills of professional electricians, and will take five minutes if you strictly follow the instructions.
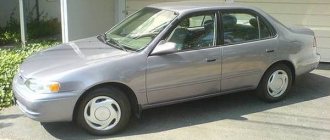
Corolla 150 may look epic)
Selecting lamps for Corolla 150
When choosing low beam lamps for a Toyota Corolla, remember that a feature of the car’s optics is that not every type of base (the part that fixes the lamp in the body and conducts current) will fit it. Therefore, when selecting lights, you should focus on the lamp base suitable for the Toyota Corolla.
The ideal low beam lamp option for the Corolla 150 is HB4 Koito Whitebeam 12V 55W lamps. Few lamps can compete with them in reliability and, at the same time, brightness of lighting. However, they also have a minus - not all car owners can afford them.
A good solution would be to equip the Corolla with Philips Crystal Vision HB4 lamps, which can provide illumination.
- You can select a specific type (lighting) of low beam lamps
- All-season
- Durable
- With increased light output
- Blue lighting.
- All-season lamps
They are also known as all-weather. All-season lamps are suitable for those whose road runs along city highways. The main difference between all-season models is the yellow-coated bulb. The yellow light emitted by such lamps is many times more effective than white light when it comes to wet weather. Due to the fact that yellow light has a 20% lower scattering coefficient than white light, light from all-weather light is less scattered by wet particles. Using these lamps, you don’t have to worry about your visibility in bad weather.
Durable
The name Long life also appears. Ideal for those who often have to drive in the dark. It’s not for nothing that they are called “durable” - their service life is twice as long as ordinary ones. The secret of their long life lies in the high vibration resistance of the base and the special composition of the gas in the flask.
With increased light output
Long-lasting lamp with HB4 socket
Over time, headlights become less transparent than before and their ability to transmit light decreases. In this case, you should seriously think about replacing it with lamps with increased light output. The filament of such lamps is heated to a higher temperature than conventional ones, which provides a more intense and powerful flow of light. And the special composition of the gas inside the flask protects such a thread from burning out.
Blue color
A light bulb with a blue HB4 socket.
A real salvation for those whose eyes get very tired when driving. The blue light does not cause eye fatigue. The blue glow is provided by a blue coating on the bulb. Do not under any circumstances confuse such lamps with xenon lamps, which, although similar, are incomparably more powerful.
Replacing lamps on a Corolla 150
There are two ways to change light bulbs on a Corolla 150.
- From the inside
- Outside
Let's consider both options.
First method: replacement from the inside
In order to improve the front optics of the Corolla 150, first of all, open the hood of the car. The engine compartment of the Corolla 150 is partially hidden under a plastic cover to reduce noise from the operation of the components. We need to remove it.
The clips inside can be pulled out in several ways. The first one is to press the clip, after which it jumps out. Or you can pry it with a knife and pull it out. So we pull out all the clips and carefully remove the cover.
The Toyota Corolla is designed in such a way that replacing the left headlight bulbs is much easier than replacing the right one. Disconnect the low beam headlight from the power supply.
The plug of this headlight is inserted into the base itself. We press the latch, take the plug and smoothly pull it towards ourselves, after which the tab itself is removed from the base with a slight turn.
Now all we have to do is get a new lamp, carefully insert it into the base, and fix it clockwise inside. We connect to the power supply and that’s it. It is done.
But it is also worth remembering that to replace the light bulbs on the right side of the Corolla 150, you will have to remove not only the casing, but also the expansion tank. Using a 10mm wrench, unscrew the two bolts that hold the tank in place. We take out the bag itself.
That's all. After replacement, return the barrel and casing to their place.
Second method: replacing lamps from outside
To replace low beam lamps on a Corolla 150 using this method, you will need a jack or a garage pit. This is required to remove the front bumper. And since the Corolla has a low seating position, the car will have to be raised to reach the headlight mounts.
First you need to use the same 10mm wrench to unscrew one bolt under the headlight and two on the sides. Next, use a curved screwdriver to unscrew the self-tapping screw. We press the latch, which is located near the radiator grille, and carefully remove the headlight from the car. But since there are wires running to each lamp, removing the headlight simply won’t work. Each wire must be disconnected from the power supply. This is easy to do: press the latch and pull the wire towards you.
There are five bulbs in the headlight of a Toyota Corolla. And it is the high and low beam lamps that are the largest, compared to the others. The low beam lamp is located at the edge. And you need to take it out. We do this in the same way as in the first method.
Next we do everything exactly the opposite. We connect all the wires to the power supply, insert the headlight into the hole in the Corolla bumper and tighten the bolts and screws.
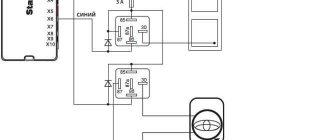
Electrical connections in the cabin
To install the PTF relay, you need to disassemble the center console. The plastic covers of the central panel, which are secured with latches, are dismantled, then the four screws holding the radio are unscrewed.
After this, the climate control unit is removed, behind which is the connection point for the PTF relay. The block is screwed to a horizontal bar. To connect the relay, you need to unscrew the fasteners and unfold the connector. After completion of the work, the center console is assembled in the reverse order.
Next, you need to remove the lower part of the steering column housing to get to the left steering column switch connector. The button is connected in accordance with the electrical diagram of the purchased PTF wiring kit:
- The wire going according to the diagram to the PTF relay is connected to the green wire of the steering column switch;
- The wire for the button illumination is soldered to the wire for the dimensions or the ashtray illumination;
- The ground wire is connected to any available screw that has contact with the car body.
This completes the electrical connection. Before checking the functionality of the PTF, you should make sure that the corresponding fuse is present and in good condition in the mounting block.
Choosing fog lights for Corolla 150
Replacing the PTF on a Corolla E150 begins with the selection of fog lights. The first thing to consider here is the cost. Don't be greedy and don't skimp on Corolla optics, as your safety still depends on it.
Next, focus on ensuring that the lens is glass and not plastic. Because in the second case, there is a possibility that this plastic will begin to melt.
The choice should be made based not on the diameter, but on the model of the car. One has only to say that fog lights are needed for the Toyota Corolla E150. The kit will indicate the number and article.
Installing fog lights on a Toyota Corolla 150
Installation of PTF on a Toyota Corolla car will include the installation of fog lights and, in fact, the connection.
To replace, you will need an inspection hole or a lift.
To install fog lights you need to install a relay
First remove the plastic cover. To do this, unscrew the three large bolts that secure it. It is behind it that all the wiring is located, to which our fog lights will be connected.
After removing the fender liner, the main plug will be revealed, to which we will connect the lighting.
Unscrew the bolts securing the plastic plugs. The holes for these bolts are identical to those needed for the foglights, so no drilling is necessary.
Next we connect the fog lights to the plug. To simplify the work, two letters “L” and “R” (Left and Right) are written on the PTF. So you haven't mixed them up.
Relay installation
To install the relay, we need to climb inside and disassemble the main console. To do this, you just need to unfasten all the latches and pull it towards you, without fear of breaking it. To remove the radio, you need to unscrew four small bolts. Then we take it out and disconnect all the wires. Also, to make everything convenient, we take out the climate control plate. It is attached with latches and screws.
On the left side we see a small bolt, which we unscrew and connect there to the relay from the Coroll fog light.
Then we assemble everything in the same way as we took it apart, but in the reverse order.
Installing a button
The first thing you need to check is whether there is a fuse that is responsible for the PTF. He is usually the first one there. When checking, it is best to study the diagram, where which fuses are located. If you don’t find anything in the right place, you need to install a fuse.
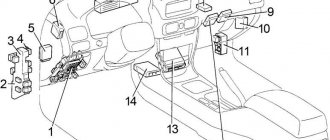
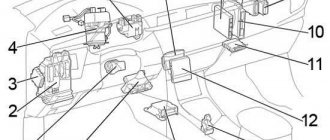
Fuse box Corolla 150
To do this, you need to remove the bottom panel, which is held on by two small screws. We disconnect the adjacent panels in the same way, and disconnect the buttons from the plugs. Next you will need exactly the same plug as there, and a green wire. The wire that goes with the rest has three wires that need to be soldered. Don't forget to disconnect the negative terminal from the Corolla 150 battery before soldering.
The blue wire must be soldered to the green one, the black one to the green one of the first plug, and the red one to the body ground anywhere.
The button is installed and will be displayed on the dashboard when turned on.
PTF installation procedure
For ease of operation, fog lights are installed on the removed front bumper. To do this, you need to open the hood and unscrew the upper fasteners (latches and screws) above the radiator grille. Then you need to unscrew the fasteners of the front part of the fender liners. Behind the mudguards are the side latches and bumper screws, which should also be removed. Finally, the bolts on the lower edge of the bumper are unscrewed, after which it is removed from the side fastenings and pulled forward.
A similar procedure is performed if it is necessary to remove a faulty headlight for subsequent repair or replacement.
The decorative plugs are removed from the bumper, and the fog lights are attached to their regular places using self-tapping screws. The PTF joints can be pre-treated with a transparent sealant, and the glass can be protected with a special film. The front PTF trims are installed on the outside of the bumper, and the bumper is placed on the car in the reverse order.
After this, the PTF connectors are connected to the standard wiring blocks. Standard PTF blocks for Toyota Corolla 150 are designed for light bulbs with an HB4 base, so when using other fog lights (for example, H11), the connectors will have to be replaced. Vertical adjustment of the PTF light beam is performed using an adjustment screw on the headlight housing.
conclusions
It's easy to modify the bumper to accommodate fog lights. Indeed, in sedan, station wagon, and hatchback bodies of the Toyota Corolla 150, the manufacturer took into account everything that allows the PTF installation to be carried out quickly and without specialized skills. So, the Corolla 150 is provided with: a connector for the headlight and for the button, as well as a plug for connecting to the standard wiring. The main thing here is the high quality of fog lights. Such lamps work longer, and the brightness of the glow will not disappoint. The main thing is to remember that the permitted colors of lights are white and yellow; other color variations are prohibited for installation.
Original PTF and compatible analogues
The choice of front PTFs for the Corolla is quite wide, but trying to save money can lead to dire consequences: Chinese analogues from the lower price category do not provide a sufficient level of illumination and often fail in one autumn-winter season due to poor sealing of the housing. Owners of Toyota Corolla 150 recommend using one of the following options for fog optics:
| Brand | vendor code | Equipment | Applicability | Price |
| TOYOTA (original) | 81210-0D040 81220-0D041 | headlights (without bulbs) | Toyota Corolla E150 | 7500 rub. (for 1 headlight) |
| DEPO | 2122079PAQ | wiring, relays, light bulbs, power button | Toyota Corolla E150 from 2010 to 2013 | 4,000 rub. |
| SAT | ST 2122052 CR – right; CL – left | headlights without bulbs (for H11 socket) | Toyota Corolla E150 from 2010 to 2013 | 450 rub. (for 1 headlight) |
| DLAA | DTY-291 | headlights (with bulbs) | Toyota Corolla E150 from 2007 to 2009 | 1,500 rub. |
| DLAA | DTY 422B+WB | wiring, relays, light bulbs, power button | Toyota Corolla E150 from 2010 to 2013 | 2100 rub. |
| DLAA | DTY 422CLED+WB (with LEDs) | wiring, relays, light bulbs, power button | Toyota Corolla E150 from 2010 to 2013 | 4700 rub. |