Toyota Rav 4 cars suffer from one significant drawback. After the odometer shows a figure from 40 to 70,000 total mileage, a hum begins in the viscous coupling bearing .
Changing the oil seal will prevent further moisture and dirt from entering the Rav 4 gearbox. But the clutch bearing of the Rav 4 rear gearbox needs to be replaced. It includes two stages:
- dismantling the small and large rings;
- installation of original parts from the manufacturer.
If the problem is not corrected immediately, you will have to completely replace the rear axle gearbox.
replacing the RAV4 rear gearbox bearing
Category: Posted on December 14, 2012 springs, knocking controls and creaky plastic interior. The third generation Toyota RAV4 (designation CA30W) went on sale in its homeland in November 2010, and in December in the USA and Canada. A little later, the RAV4 reached Europe.
In 2010, the small crossover underwent a restyling. As a result, the head and rear optics and radiator grille were changed. The palette of power units and gearboxes has been slightly adjusted.
Before restyling, the European Toyota RAV4 was equipped with gasoline engines with a displacement of 2.0 liters (1AZ-FE) and a power of 152 hp. S. And 2.4 l (2AZ-FE) 170 l. WITH.
The South American version came with 2.4 liter and V6 3.5 liter (2GR-FE) 269 hp petrol engines. C. P After restyling on European modifications, the 1AZ-FE engine was replaced by a refreshed 2.0 liter (3ZR-FE) with a power of 158 hp. On the American side, the 2AZ-FE gave way to a 2.5 liter unit (2AR-FE) 170 hp.
C. There are RAV4s also with diesel engines with a displacement of 2.2 liters (2AD-FHV, 136 hp and 2AD-FTV, 177 hp).
All gasoline engines are generally reliable and do not cause any problems. In exceptional cases, it becomes necessary to replace leaking oil seals. Owners of a converted Toyota RAV4 with a 2.0 liter gasoline engine note a noisier operation of the engine: diesel, clattering. Most likely, this feature is caused by the Valvematic system, created for a smooth configuration of valve lift height.
2.4 liter engines often start to take oil when the mileage is more than 70-100 thousand km, about 2-3 liters. from replacement to replacement. Diesel engines are more reliable than their gasoline counterparts, provided they use high-quality fuel. Fuel injectors confidently walk up to 200-300 thousand.
Km. The idyll is spoiled by the liquid cooling system pump (pump), which often begins to leak already after a mileage of 40-60 thousand km.
In some cases, it reaches 80-100 thousand km.
The work of replacing auto mechanics is estimated at 2-3 thousand rubles. A squirrel tail can grow out of the exhaust pipe after 40-60 thousand km.
Km run. This is a poorly secured internal thermal and sound insulation of the muffler. With a mileage of more than 50-80 thousand km, the tensioner or guide roller of the drive belt of outboard units often begins to make noise.
On the RAV4, a widely popular problem with Toyota cars is the accelerator pedal sticking in the pressed position. Real cases are rare. Toyota officially announced that the reason was the floor mats getting under the pedal.
But not enough, who knows that Toyota was ordered to install an additional metal plate on the pedals of the CTS office, which ensures that the pedal returns to its original position. There are no similar modifications foreseen on DENSO pedals. clutch is responsible for dispersing torque between the axles .
The coupling seals may leak after the 50-100 thousand km mark. With a mileage of more than 100-150 thousand km, the clutch may hum. The reason is the loss of the properties of the lubricant embedded in the bearing during assembly.
A new bearing costs about 700-900 rubles, replacing it will cost 1.5-2 thousand rubles. The axle seals of the front and rear gearboxes may leak after a mileage of more than 50-100 thousand km.
A little later, with a mileage of more than 100-150 thousand km, the shank of the front or rear gearbox begins to snot. The engines are paired with a 5-speed manual or 4-speed automatic. After restyling, the 5-speed manual transmission was replaced by a six-speed gearbox, and a CVT was installed with the 2.0 liter engine. All boxes are generally reliable and have no serious complaints, with a few exceptions. Thus, owners of a Toyota RAV4 with a 5-speed manual note that the lever bites in first gear.
It is possible to turn off the speed only after squeezing the clutch twice. Owners also note a slight howl when driving in 1st and 2nd gears. The clutch lasts more than 150-200 thousand km. The machine may shut down after replacing the working fluid, and not immediately, but after several tens of kilometers. Such cases are not uncommon.
Official dealers confirm the presence of a similar problem and recommend changing the oil after a mileage of about 60 thousand km. If the mileage has far exceeded these figures, then it is better to drive until the last minute (which is also not entirely correct). Dealers do not talk about the reasons for the failure of the box. But still, in most cases, a partial oil change ends successfully.
One of the Toyota service campaigns is checking and replacing the lower rear suspension arms. When assembling a RAV4, due to insufficient tightening of the nuts during operation, they become loosened, which leads to a shift in the alignment of the rear axle wheels and a decrease in stability at high speeds, and breakdowns also appear on uneven surfaces. The front stabilizer bar bushings last more than 30-50 thousand km. Racks live longer up to 80-100 thousand km.
Rubles. The rear stabilizer struts and bushings have been used for more than 100 thousand km.
With a mileage of 60-100 thousand km, the front shock absorbers begin to sweat. The analogue is 2 times cheaper (about 3 thousand).
Rubles). The rear shock absorbers are more durable, their service life is more than 150-200 thousand km. The silent blocks of the levers last the same amount of time. Wheel bearings run more than 100-150 thousand km.
The bearings are replaced as an assembly with the hub, and replacement work costs about 1-1.5 thousand rubles.
As a rule, there are no complaints about the braking system. In rare cases, it is necessary to replace a failed ABS sensor. Knocks in the steering are not uncommon after 40-80 thousand km.
As a rule, the culprit is either the steering cardan (4-5 thousand rubles), or the steering shaft (from 5 to 11 thousand rubles), or the steering rack (20-25 thousand rubles). Steering rods have been running for more than 100 thousand.
km, but their replacement is not provided by the manufacturer. Steering rods only come with a new rack. But in auto parts you can pick up an analogue for 700-800 rubles and replace it.
The paintwork on the body, as on most cars, is weak, easily scratched, and chips appear. The restyled Toyota RAV4 also suffers from pockets of corrosion on the hood around the chrome trim on the radiator grille. The problem mainly concerns regions that use aggressive reagents in winter: Moscow and St. Petersburg. When yellow spots appear, dealers will repaint the hood under warranty. Also, owners of Toyota RAV4 11-12 years of production complain about corrosion of steel rims in the area where they are secured with nuts. Some people are able to convince dealers to replace the discs under warranty.
With a mileage of more than 50-100 thousand km, the fender liner in the wheel arch of the rear wheels often comes off. The plastic in the cabin often gets annoying with its squeaking sound.
Moreover, there are more complaints from owners of the restyled version. The interior of the Toyota RAV4 has been nicknamed a rattle in our hearts. The cause of rattling in the trunk is the spare wheel, which over time presses through the rubber seals under the cover.
The leather upholstery of the driver's seat often cracks. The leather chair itself creaks in the area where the plastic pads come into contact with the skin. Water in the cabin, under the passenger's feet on the right, may appear as a result of disconnection of the washer fluid supply line to the rear window. The system hoses are routed along the right threshold. But water can also get into the cabin due to a leaky seal under the frill (the outer lining at the bottom of the windshield). With a mileage of more than 60-80 thousand.
READ Changing the oil in a Volvo xc60 diesel automatic transmission
The heater fan may hum. Extraneous sounds go away after lubricating the rubbing elements. The gears of the air conditioner blower direction dampers may also creak. In this case, lubricant will also help.
The cause of noise (crackling noise) when changing modes can also be the flyaway rods of the dampers or the displacement of the gear due to the destruction of the clamps. The air conditioning compressor may stop turning on due to the destruction of the compressor clutch damper plate. Electricians in general do not cause any problems.
Sometimes there is a glitch in the air conditioning system that disappears after disconnecting the terminal from the battery. The generator, as a rule, runs more than 150 thousand km, after which it may be necessary to replace the diode bridge. The third generation Toyota RAV4 is a completely reliable car. The main components - the engine and gearbox - do not cause problems.
Replacing viscous coupling Toyota Rav4
The service for replacing the Toyota RAV4 viscous coupling is one of those that is rarely needed; in her case - as a rule, no more than once every 200,000 km. It must be ordered in a timely manner, because its purpose is to restore the normal functioning of the engine cooling system. In Moscow, you can order it in our Toyota club service, where it will be provided by qualified craftsmen using original spare parts.
Why does the viscous coupling break?
The viscous coupling is a round chamber filled with silicone gel. Through the latter, it transmits torque to the fan installed on it and regulates its rotation speed. Being a reliable mechanism, the viscous coupling on the Toyota RAV4 rarely requires replacement. Its breakdown occurs due to:
- Wear due to natural causes;
- Bearing failure;
- Loss of viscosity of the gel, its leakage;
- Deformation due to mechanical stress.
How much does it cost to replace a viscous coupling at Taganka Service?
You can view the basic tariffs in the price list in this section of our website. Our approximate price for this service starts from 2,500 rubles, but the final price may be slightly higher, since it depends on:
- Volume/complexity of upcoming work;
- The cost of a new copy when purchasing it from us.
It is calculated individually based on diagnostic results.
How can you tell if the viscous coupling is broken?
Our experts recommend replacing the viscous coupling with a Toyota RAV4 if:
- When the fan is turned on, extraneous noise and clearly noticeable vibrations appear;
- The fan maintains speed at the same level when the engine is cold and hot;
- Streaks of leaking gel are visible.
The price of this part is low, as is the work to replace it, and it will cost several times less than eliminating the consequences of internal combustion engine overheating.
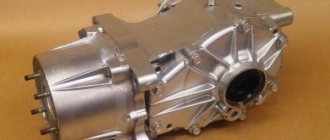
Replacing the RAV4 rear gear clutch bearing
Many automakers produce cars with conventional all-wheel drive, but with the ability to disengage and engage the rear axle in moments of slipping. With this scheme, fuel is significantly saved, because during normal driving the car’s drive remains front-wheel drive, only when it slips the car becomes more stable and passable. This is especially noticeable in winter. One of the popular mechanisms for connecting all-wheel drive is an electronically controlled all-wheel drive clutch.
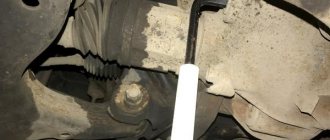
Many cars of the Toyota and Lexus family have an electromagnetic coupling for connecting all-wheel drive; in common parlance it is also called a viscous coupling. The main and most common failure of this coupling is the failure of the bearing located in it. This bearing fails at 40-70 thousand kilometers and is accompanied by an increasing dull hum in the rear of the car when accelerating. From outside you can hear a metallic whistling sound. We also suggest immediately changing the rear differential oil seal in order to protect your differential from oil leakage in the future. If the bearing is not replaced in a timely manner, this can lead to failure of the expensive coupling. In the original RAV4 catalogs, you will not find the code for this bearing by VIN number, since according to the regulations, the officials change the entire electric clutch for 35-45 thousand rubles! work 10-15 thousand rubles.
For us, this work costs only 6,000 thousand rubles; spare parts. You can also change the oil in the rear differential at the same time, free of charge, you only pay for the oil.
There are several types of electromagnetic clutches that were installed on the RAV4 (III):
- Electric coupling 41303-42020 with bearing width 17mm
- Electric coupling 41303-42021 with bearing width 13mm
- Electric coupling 41303-42022 with bearing width 13mm
As a rule, on cars produced before 2010 there is an electric coupling 41303-42020 with a bearing width of 17 mm
We also repair clutches on other Toyota models: Sienna, Opa, Caldina, Ipsum, Gaia, Nadia, Estima, Noah/Voxy, ISIS, Venza, Wish
Replacing the bearing and oil seal in the all-wheel drive clutch:
- Work 6000 rubles
- Bearing 17 mm. Toyota 5600 rubles or NSK 13 mm. 5500 rubles
- Differential oil Addinol 75W90 800 rubles
- AXIOM cleaner 200 rubles.
Total: 13,700 rubles
Spare parts are always available.
We heard a hum from under the Rav 4 - it’s time to change the gearbox bearing
Toyota Rav 4 cars suffer from one significant drawback. After the odometer shows a figure from 40 to 70,000 total mileage, a hum begins in the viscous coupling bearing .
Changing the oil seal will prevent further moisture and dirt from entering the Rav 4 gearbox. But the clutch bearing of the Rav 4 rear gearbox needs to be replaced. It includes two stages:
- dismantling the small and large rings;
- installation of original parts from the manufacturer.
If the problem is not corrected immediately, you will have to completely replace the rear axle gearbox.
Replacing bearings in the rear gearbox of Toyota RAV4
All-wheel drive is good for everyone, but it has one drawback. Everything would be fine, but it works well on small cars, and the most unsuccessful in this regard was the Toyota Gaya. Or rather, the car itself is wonderful, in words. The result is jamming of the viscous coupling and complete blocking of the rear wheels when the bearing falls apart.
Perhaps on clean Japanese roads it lasts forever, but when it gets into Russian reality and an aggressive environment it dies.
And it all starts with a rumble. At first it is quiet, then louder, and then it jams, preventing the cardan from rotating.
Accordingly, the rear wheels do not spin, and the car does not go anywhere at all. To avoid such problems, humming bearings are usually replaced. And just below you can see how you can change the bearing yourself.
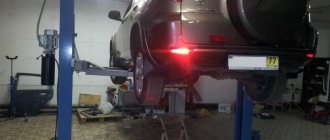
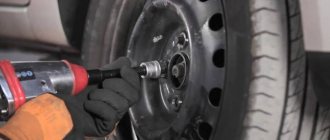
Or rather, you will see how they change it with someone else’s hands, and then you can try it with your own. To begin with, we lift the car onto a lift, or simply climb under it and see the device that hangs on the cardan and is tightly screwed to the rear gearbox.
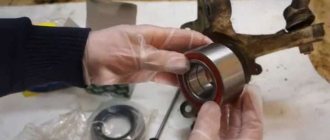
This is the viscous coupling we need. And take a close look at the spare parts that were purchased as replacements. But let it be, in case it is needed. Please note that the outer race of the bearing does not have a rubber seal like a standard bearing , so we will need sealant.
I am silent about the sledgehammer; without it, not a single job can be done. Taking the keys in our hands, we dismantle this wonderful device from its rightful place and place it in a vice.
Please note that the hammer is rubber, not metal. There is one nuance here.
If you remove the retaining ring, the clutch . If the stopper is left in place, the bearing remains on the coupling, and the whole thing pops out of the housing. And then you have to remove the bearing from the coupling with a regular puller. Instead of a hammer, you can use a hydraulic press.
Symptoms of a problematic all-wheel drive clutch
Having cleaned off the rust to a mirror shine, placing the housing in a clean place, orienting the bearing correctly, we take a sledgehammer in our hands and carefully hammer it onto the viscous coupling. There is no need to knock hard, everything will easily fall into place. It’s not worth playing the game: I’ll score from three, from two, from one shot, quality is important. As a result, we get this result, and we check whether we can put the retaining ring in place. If we can, then we stop knocking, otherwise we look at what is stopping us from doing it.
Operating principle and replacement of viscous coupling bearing
The principle of operation of the clutch in a radiator fan
Watch the video and everything will become clear:
The viscous coupling rotates the cooling shaft thanks to a special fluid. It is round in shape and filled with lubricant. This part regulates the operation of the fan by rotating the crankshaft, which transmits energy to the first clutch shaft. As you accelerate, the viscosity of the silicone increases, as a result of which the assembly is blocked and the second shaft begins to rotate. Due to its high reliability and safety, Viscomfuta is used on almost all engines. For example, it is equipped with a special protective mechanism that blocks the operation of the unit if it is accidentally hit by a hand.
Functional testing: basic principles
After a long period of inactivity of the machine, it is necessary to check the viscous coupling for the presence of oil. It is also recommended to test its overall performance, as this part is vulnerable to wear. To check performance, pay attention to the speed of the engine when the engine is cold and when it is warm. If at first everything is fine, but then as the engine warms up, extraneous noises are heard, this indicates faulty bearings.
Replacing the viscous fan coupling bearing on a Mitsubishi Pajero
fan
To begin repairing the viscous coupling, you need to unscrew the three bolts that hold the part in the engine compartment. After this, the oil fluid is drained and the bearing is removed using a puller. Please note: using improvised means instead of a special tool can damage the unit. Viscous coupling repair ends with installing a new bearing and pouring silicone fluid. Thus, the main difficulty in carrying out such manipulations is finding a puller, which is not sold in every specialized store.
Also pay attention to the following two factors:
- Not every viscous coupling has a hole for filling oil. If you are a beginner, do not attempt this procedure yourself.
- When manipulating the disk, it is forbidden to use force, as it may become deformed and further repair will be impossible.
Before starting repairs, you need to find out the exact name of the viscous coupling lubricating fluid (in case you remove this protective layer during manipulations). After that:
- Remove the three bolts that secure the impeller.
- Remove the three bolts that secure the cover.
- Remove the clutch and remove the upper disk blocking the fan operation.
- Grind off the flare on the shaft.
All-wheel drive viscous coupling. Principle of operation
In a sealed housing there are two rows of disks connected to the driven or drive shaft. The driving and driven disks are interspersed. The space inside the case is filled with viscous silicone liquid. The liquid thickens when the shafts rotate unevenly, which leads to the transmission of torque.
Replacing a viscous coupling bearing on a Toyota RAV4
The problem bearing sounds like this:
new clutch bearing
A faulty bearing is a common cause of service calls. This is all due to moisture that gets into the housing and damages the unit. Such a malfunction can be identified by the characteristic unpleasant sounds from the bearing. For repairs you will need a pit (lift), a bearing and 2-3 hours of free time. It is best to install the new part on a thin layer of sealant.
To ensure long-term service of this node, you need:
Let's sum it up
A device such as a viscous coupling not only regulates the operation of the cooling fan, but is also used in the transmission to transmit torque to slipping wheels. To repair it, you need to purchase a new bearing, silicone grease and a puller. During manipulations, you must be careful not to damage the disks. If this happens, a complete replacement of the unit will be required. Replacing bearings yourself will cost you much less than service from a service station. The fact is that most dealers simply install a new unit, which costs tens of times more.
Repair of viscous coupling on Toyota RAV4
The effect will be the same, with the only difference that the viscous coupling will receive less concussion. Pay attention to the protruding pin; it will interfere with placing the body on a plane. Sorry for not saying this earlier, I thought you would see it and guess for yourself. Having pulled out the bearing , or rather, before tearing it out, you need to look at which side it was facing in order to install the new one like this.
At the same time, bring the rear gearbox breather to life. Just in case, although this should be done every time you are under the car. Copyrights and other joys that are usually written down here are Electrical equipment, repairs and blah blah blah.
Replacing the rear gearbox shank oil seal on a Toyota RAV4
If you don't remember, it is usually placed with the brown side inward. bearing in your hands and compared it with the new one, pay attention to the rust and the rubber ring of the old bearing. Also for rust on the seat that needs to be removed.
And we compensate for the missing ring with sealant.
RAV4(III). Problems With Rear Gearbox
Having seated the bearing in place, we calm down and apply sealant to the seat of the outer race of the bearing in the housing. After working with the sealant, we wipe our hands on our pants, pick up and orient the coupling correctly, pay attention to the pin and the special squiggle, and very carefully put it all together, getting this result.
We remove excess sealant so that it does not interfere with the bearing’s rotation, do not forget to check whether the retaining ring is in place, although it could be installed immediately, it does not interfere. You can also stick a dirt reflector in place, which will hide traces of the sealant. Let's turn the coupling over and see if everything is correct?
READ Kia RIO automatic transmission oil change
Otherwise the operation will have to be repeated. We return the wires to their place and get ready to put this wonderful device in place. Don't forget to connect the tube and the electrical connector.
Urgently need advice, tell me
Buying a car Miscellaneous useful Travel. Partners and friends. Newsletter Your name: Email:.
Replacing the gearbox and clutch shank oil seal :) — Toyota RAV4, 2.4 l., 2008 on DRIVE2
In general, I noticed that the front part of the electromagnetic coupling was sweating, a competent person levsha21 said unequivocally that it was the oil seal leaking (so it was). An original oil seal 9031154006, (koyo) K90311-54006 was purchased. The tank was also removed and the cardan was suspended from the tank mount. Just in case, I marked how the cardan was positioned on the coupling. Then there were a lot of calls to Alexey))) We drain the oil (first try to unscrew the top filler plug. There was everything, wd40, kerosene and a hexagon with a half-meter pipe, the lower one unscrewed in about the same way. You need to unscrew the gearbox fastenings so that you can remove the coupling, the outer two nuts you can simply loosen it (one on each side). And sex began. You need to remove the sensor connector from the coupling (attention, apparently there are two of them, one on the wire, one right in the housing, removes the one in the housing). Inconvenient is not the right word, it is necessary rinse it well and loosen it, and by pressing the lock, you can try to remove it with a screwdriver. I unscrewed the screws of the clutch and tried for an hour to disengage it from the diff housing. I knocked on all sides with hammers of different calibers, to no avail. In general, in the end, it hit the wood and the stiffener towards the engine moved from its place. Oil leaked... it is clear that the diagnosis was made correctly. I removed the housing (it seemed that there was a slight play when it rests on the studs) I removed the retaining ring that holds the coil itself, unscrewed the coil housing (3 hexagon screws) there are two washers on the shaft, remember how they stand (order and position of the first). and the oil seal appeared. With difficulty I pulled it out of there (carefully with screwdrivers, I made burrs on the walls and then removed them with sandpaper). I took a new oil seal, made a device for setting it from a can of carb cleaner (do not repeat it) and began to plant it. As a result, the can crumpled, the seal slipped 11mm further, and then hell, you can pull it back out... I swore and started looking for the seal around the city. Good fortune turned out to be both the original and the koyo, but all at double the price. Let's go and buy a koyo (no different from the original in terms of markings and lubrication). And then, using a narrow piece of wood and a caliper, I carefully set it back to 7mm as it was.
We collect. Filled with Wolf VitalTech 75W-90 GL-5 oil
Toyota RAV4: Replacement of rear differential shank oil seal
Capfa.Ru » Repair » Toyota RAV4: Replacing the rear differential shank oil seal Look at the driveshaft flange and the front part of the rear differential housing of your Toyota RAV4, if there is fogging (fur coat), then it is guaranteed to be time to change the oil seal. First thing to do. This is to drain the oil. On the gearbox housing there are 2 hex plugs: the bottom left plug. drain, and the top right. aspic. First, it is better to unscrew the upper one, and only then take on the lower one. Filler and drain plugs of the rear differential. The plugs should be unscrewed with a ratchet wrench and a special hexagon so as not to tear them off. Otherwise, you will create problems for yourself and spend a lot of time unscrewing them. Hexagon for drain plugs When the oil is drained, we proceed to unscrew and remove the propeller shaft. We unscrew the 4 bolts connecting the cardan flange to the gearbox flange and separate them by using a screwdriver to pry them into the special recess between them (red arrow on the gearbox flange in the photo below). To remove the gearbox shank, you need to unscrew the brackets that are attached to it with a 17mm wrench. 2 bolts on each side (white arrows in photo below). We take out these bolts, use a 17mm wrench to loosen the bolts securing the pillows (green arrow in the photo below) and remove the brackets down from the gearbox. Next, take a 12mm wrench and unscrew the 4 bolts (blue arrows in the photo below) that hold the gearbox shank. We place a container under the gearbox for residual oil and use a lever to remove the housing. Remove the gearbox shank. The next step is to pull out the black magnetic ring that is inside. To do this, you must first disconnect the terminal that is located on the top right side of the gearbox. Disconnect the terminal to remove the magnetic ring. Once the magnetic ring is removed, you will see 3 bolts inside. We take the hexagon and start unscrewing them. this will allow us to remove the metal holder of the magnetic ring. We remove the magnetic ring and unscrew the 3 bolts. Inside we will see the oil seal, which needs to be replaced. However, before proceeding with the replacement, we take a caliper and measure the seating depth of the old oil seal (usually about 7 mm) in order to seat the new one is exactly the same. We measure the seating depth of the oil seal. Now, wipe the entire internal cavity from oil and dirt, degrease and dry. We also remove any remaining sealant from the edge. We take a new oil seal (Toyota 90311-54006) and put it in its original place so that there are no distortions. Next, we proceed to assembly in reverse order and install the gearbox shank with DONE DEAL DD6733 sealant. We find the breather in the upper part of the gearbox and clean it from dirt. Then, you can safely screw everything else into place. And at the very end, fill in half a liter of gear oil with a viscosity index of SAE 90. Final rating: 0.0 out of 10 (votes: 0 / Rating history) Comments (1)
READ How to reset it on Peugeot 308
Replacement of oil seals and bearings in the rear gearbox! — Toyota RAV4, 2.0 l., 2008 on DRIVE2
Good day everyone! I recently noticed an oil seal leak from the left drive in the rear gearbox. I don’t have time to write much about it and I think there’s no point, because... There is enough information on replacing oil seals and bearings on the Internet)) and so let’s begin... I immediately decided for myself to remove the entire gearbox and inspect it, change 2 drive oil seals, the shank oil seal and the bearing , so as not to mess with it again later. My bearing did not make any noise; in principle, I could have left it, but... I had already bought a new one and decided to change it anyway.
drive seals, they are the same (left, right)
The gearbox shank seal was apparently leaking at some point, so I decided to change it too
the work process began with removing the cardan
the drive was removed using a chisel, three good blows through a special protrusion on the gearbox housing and the drive snapped out of the housing
Before that, I read a lot of forums on pulling out drives from the gearbox without removing the wheels... when I started doing it myself, I realized that this was not realistic. I had to disassemble the left side of the suspension. I removed the wheel, unscrewed one shock absorber mounting bolt, unscrewed one lower bolt from the hub, removed the camber rod, and only then was I able to pull the left drive out of the gearbox. I didn’t touch the right side at all when I removed the gearbox from its mounts, and then the right drive was removed.
The new bearing was repressed using a 5 ton jack.
it shows that water definitely didn’t get into this unit))) I saw somewhere on the forum it was all rusty
I washed everything inside, cleaned it of old grease, be sure to put it on sealant. I took the company ABRO 999. Gray color, heat-resistant.
It’s a pity that more photos can’t be uploaded... I bought another liter of IDEMITSU SAE 75w-90 oil. I used 600 ml. I drove for 3 days, watching the results of my work! While it's dry!
Toyota RAV4 Khaki-Assholes › Logbook › Shame on OD! Replacing the rear axle electric clutch bearing.
Hello everyone friends! I want to share with you a story that I think will be useful for all Ravavods. Some have already encountered this and others have not.
My rear axle electric clutch bearing also began to hum. The officials’ verdict is that the replacement will be completely assembled “the whole thing.” The price tag came out as much as 1350 cu.
I’m very ashamed of them, of course, but they assured me that it couldn’t be repaired and even strongly advised me not to drive like that… . Everything inside me was revolting and I didn’t believe, intuitively, that Toyota could do this, in my heart I sent them three letters and went home. I called all the other Toyota service centers - no one does repairs, and they probably don’t know that it’s possible... “Such” price tag for my problem didn’t make me happy at all, so I started digging. Our site helped me with this. WITHIN 15 MINUTES I FOUND A WAY OUT OF THE CURRENT SITUATION. On the drive, this problem is described by some breeders on this resource - thanks to them for this.
As a result, what we have
— the clutch itself is partially removed from the rear axle,
IT IS DISASSEMBLY AND REPAIRABLE!
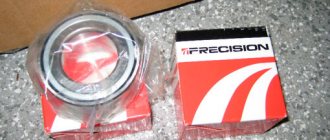
! ! The work takes 2-3 hours at most. The bearing itself is pressed out of the housing and thrown out, a new one from Toyota is ordered in its place (why they produce it if the clutch cannot be repaired - I don’t know)) and is pressed in there just as easily. "Bearing original Toyota Lexus 90363-95003 120x95x17mm
«
From the subtleties of this matter:
I realized that the new bearing needs to be mounted on sealant, because... the old one (factory) had a rubber ring, there are no new ones - they come without a rubber band.
Also on Ravliki they installed different couplings over the years, and there are large bearings of different sizes - there are two of them: 13mm and 17mm. Therefore, we select a bearing strictly by VIN number. In my case, the car is 2008, the clutch is numbered 41303-42020 - it comes with a 17 mm bearing (90363-95003 120x95x17). There is also a small bearing in the clutch, but according to all reviews and the experience of the master, in 99% of cases only the big one starts to hum.
May be needed in some way. In cases, transmission oil 75W-90 GL5 is about 450g.
90363-95003 is a large bearing, 90363-65002 is a small bearing
And in general, if we look deeply into this problem, then in all cases when this bearing failed, the drivers swam their cars through deep puddles or fords. We draw our own conclusions. In my case, the day before I swam twice through a deep puddle.
I put everything back together in the reverse order, I ride around and am happy with the silence and most of all that I saved $1,300. I'll spend this money on my family! So hello to you OD! More to you NINOGY! ! !
UPDATED 07/07/2020 - “I have an official response from the dealer that they do not have such a spare part in stock and will not have it, and they do not repair it. Thus, the dealer admitted that I could throw away my 2008 Toyota. to a landfill due to lack of spare parts... . So that's a double shame! ) ) ) )"
Was it useful or interesting? —RePost.
Replacing the rear gearbox seal of RAV4 (III) — DRIVE2
A short note about replacing the rear gear oil seal. There is no problem in determining that it is the one that is leaking - if there is fogging (fur coat) on the cardan flange and/or on the front part of the housing, then the cause is 100% the gearbox seal.
The work is quite simple, but it can take up extra time due to not knowing some of the nuances.
First, unscrew the filler plug on the right
Next, disconnect the cardan shaft, having previously placed marks. To disconnect the cardan from the flange, you need to use a screwdriver to pry it into a special recess on one side of the flange and pull the flange away from the gearbox.
The ears of the guides will prevent you from removing the viscous coupling - they rest against the pillow brackets, so you need to unscrew these brackets from the gearbox and turn them down.
not a very good photo, nevertheless I tried to indicate everything that needs to be unscrewed
Don’t forget to place a container under the oil, since if you disconnect the gearbox housing, oil will flow that shouldn’t be there.
Toyota Rav4 2012. The clutch bearing of the rear-wheel drive gearbox is noisy. Let's experiment
more oil leaked out than from the drain plug
To remove the magnet, you need to disconnect the terminal on the back of the gearbox
We wipe the entire cavity of oil and the edge of sealant. We measure the seating depth of the oil seal so that the new one can be seated in the same way.
The oil seal used was an original Toyota 90311-54006; it comes with lubricant, unlike its analogues. In addition, the price of the original is not higher than good duplicates. Koyo oil seal is installed in the original and from the factory
RAV4 Electric coupling bearing, replacement!
We assemble everything in the reverse order, seal the body with sealant - as always DONE DEAL DD6733
Subtleties of gearbox maintenance
NSK Rav 4 rear gearbox clutch bearing size 120*95*17 mm
, the NSK part size 120*95*17 mm is most often suitable . But there are cars in which the Rav 4 rear gearbox clutch bearing has a non-standard size of 120*95*13 mm . It is difficult to find and will take time to ship to order.
That is why, when making repairs yourself, it is recommended to look for the part in advance.
Several manufacturers produce bearings measuring 120*95*13 mm:
- ISB 120x95x13mm - Italian concern ICGroup,
- SKF 120x95x13mm is the largest Swedish manufacturer of the SKF group of companies.
ISB Rav 4 rear gearbox clutch bearing size 120x95x13mm
New parts do not have a rubber ring. In order for the part to hold tightly, it is placed on sealant compounds .
In addition, Toyota Rav 4 cars are equipped with couplings for large bearings of 13 and 17 mm, which differ by year of manufacture. To avoid mistakes, the selection of parts should be made according to the VIN number.
Location of the plate with the Vin number on the Rav 4
For example, if a Rav 4 produced in 2000 is equipped with a clutch numbered 41303-42020 with a bearing 120x95x17 mm, the part numbers will be as follows:
- 90363-95003 for the big one,
- 90363-65002 for the little one.
And when installing the rear gear oil seal, you may need 450 ml of 75W-90 GL5 gear oil .
Rear gear oil seal
Service station technicians say that when a hum occurs in the viscous coupling, it is the large bearing that fails .
In most cases, the failure occurred due to the vehicle crossing deep puddles or small rivers.
Toyota RAV4: Replacement of rear differential drive shaft oil seal
Capfa.Ru » Repair » Toyota RAV4: Replacement of the rear differential drive shaft oil seal With a mileage of 50 thousand km or more on Toyota RAV4 cars, the rear differential drive shaft oil seals begin to leak (mainly on the left side). Some drivers, having learned about this problem, do not rush to service, but continue to drive the car (sometimes up to 10 thousand km), only periodically checking the oil level in the rear differential. If the leak is not large, then this is quite acceptable. However, it is still advisable not to delay and to replace the seals at the first opportunity in order to avoid more serious problems in the future.
So, to replace the rear differential drive shaft oil seal, you need to:
- Remove the muffler;
- Unscrew all cardan bolts;
- Unscrew the bolts of the 3 mounting points of the rear differential to the silent blocks (2 bolts in the front and one in the rear, indicated in the photo with red arrows).
It may happen that one of the bolts rests on the gas tank, then you should unscrew the bracket from the differential completely (2 bolts on the differential, indicated by blue arrows);
Unscrew the rear differential mounting bolts
- Place a jack under the differential and remove the bracket bolts, then carefully lower the differential down. When it is lowered enough, disconnect the cardan and move it to the side. If the cardan is not removable, then you can easily hit it with a sledgehammer a couple of times;
- Pull out the drive shaft using a pry bar or pry bar and a hammer. To do this, insert the tip of the pry bar into the inner drive shaft joint. Then, using the ribbed part of the rear differential cup as a lever, disconnect the drive shaft.
- Using a special puller or a screwdriver, carefully remove the oil seal. Do this carefully so as not to damage the case. Cause of leaking old oil seal. this is abrasion of its edge; We take out the old oil seal from the differential
- We clean and degrease the seat, then insert a new oil seal there (Toyota 90311-37004).
- Apply grease to the oil seal seat on the drive shaft and begin to assemble everything in reverse order. Reinstall the drive shaft
Be careful not to scratch the shaft boot in the process and do not lose the retaining ring that is located on the shaft (indicated by a red arrow in the photo);
Pull out the rear drive shaft
You can hammer it into place with the old oil seal if it remains intact. From the edge of the seal to the edge, there should be approximately 0.5 Washing machine;
Until the differential is completely secured to the brackets, it is advisable to clean the breather, which is located on top, of dirt. If it is clogged, this may lead to repeated oil leakage. Replacing the drive shaft seal of the rear differential of a Toyota RAV4 is a rather labor-intensive operation, so it is recommended to change 3 seals at once (left/right shaft seals and shank seal) so as not to climb under the car anymore. Final rating: 0.0 out of 10 (votes: 0 / Rating history) Comments (4)
Sources:
https://trustautospb.ru/remont-muft-polnogo-privoda-toyota-lexus https://assortisport.ru/toyota/zamena-podshipnikov-v-zadnem-reduktore-toyota-rav-4.php https:// autochrome.ru/raznoe/tojota-rav-4-zamena-salnika-hvostovika-zadnego-reduktora.html