Periodic oil changes in the RAV-4 transfer case allow you to remove wear products and extend the life of the unit. When selecting the type of lubricant, the manufacturer's requirements should be taken into account. The use of materials that do not meet standards leads to accelerated wear of parts and costly repairs.
Changing the oil in the transfer case allows you to extend the life of your car.
Preparation for replacement and necessary tools
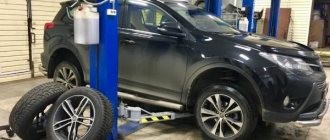
On Toyota Rav 4, changing the oil in the gearbox occurs in stages. First of all, it is necessary to carefully prepare for the stage of replacing the lubricant in the system. For these purposes, you should thoroughly warm up the car, driving it for about 3-4 kilometers. Next, you need to give the vehicle some time to cool down. This will cool the grease a little to avoid burns, but will also retain some of the temperature so it can drain more easily.
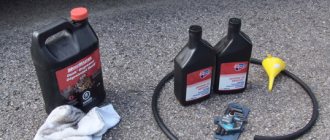
To change the oil in a RAV 4 3rd generation gearbox, the user will need the following tools:
- Hex screwdriver.
- Universal screwdriver set.
- New lubricant of the selected category and brand.
- Syringe for filling in new lubricant.
- Rags and gloves to protect the skin of your hands.
- Liquid intended for flushing the system.
It is very important to follow the sequence of actions when changing transmission lubricant on the specified vehicle
Draining old oil from the gearbox and cleaning the system
Draining old oil from the gearbox in a Toyota RAV4 occurs as follows:
- Unscrewing the drain plug in the system.
- Using a special container to drain the waste product of the system.
- Flushing the system using a special liquid, which is filled in using a syringe with a special hose when first gear is engaged.
- Removing residual dirt and metal shavings.
It is worth noting that complete draining of old lubricant, as well as cleaning of the system, occurs only at a car service station. Complete replacement is carried out only when disassembling the gearbox. At home, you can only perform a partial drain, which will renew about 40% of the lubricant in the gearbox. To increase efficiency, it is recommended to carry out a partial replacement three times at intervals of 100 kilometers, which will allow the old lubricant remaining in the channels and gears to mix with the new oil.
Filling with new oil
In order to fill in new lubricant, you must use a special syringe and hose to facilitate access. As a rule, about 450 grams of new transmission fluid enters the system after draining the used oil.
To fill the oil, follow these steps:
- Unscrew the special drain plug on the gearbox system.
- Fill the system step by step with several full syringes of new lubricant of the selected category.
- Carefully tighten the drain plug on the system.
Every car enthusiast should remember that the oil in the rear gearbox should be changed on a regular basis - every 25 thousand kilometers. It should also be noted that the frequency of changing transmission fluid depends on the mileage and nature of the vehicle’s operation.
Required amount of lubricant
The dimensions of transmission units depend on the generation of crossovers. Accordingly, the volume of the oil bath located inside the gearboxes also differs. For a complete replacement, 1 to 2 liters of gear oil is required. The remaining lubricant can be used for topping up. Please note that the shelf life of the material in an open container is limited (information is indicated on the sticker). The configuration and capacity of the units do not depend on the displacement and power of the engines (the rule applies to cars within the same generation).
First generation
The cars were offered only with a 2-liter gasoline engine, designed for a manual or automatic transmission. The dispensing unit was connected to the rear wheel gearbox by a cardan shaft. It is not possible to disable the all-wheel drive system. The capacity of the crankcases is 900 ml. During maintenance, some of the old lubricant remains on the walls and gears. 830-850 ml of material is poured into the units.
Second
The second generation could be equipped with gasoline engines ranging from 1.8 to 2.4 liters. For a number of markets, a modification with a diesel engine equipped with a supercharging system was supplied. The transmission retained permanent all-wheel drive (crossovers with front-wheel drive were offered for some regions), but a viscous clutch was introduced to lock the differential. The crankcase capacity remained unchanged.
When filling dry, you will need 1.8 liters of oil. When re-servicing, no more than 1.7 liters of lubricant will enter the units.
Third
Starting from the third generation, crossovers featured a plug-in all-wheel drive system with a multi-disc viscous clutch. Torque was supplied to the rear wheels when the front wheels were slipping. The driver can increase cross-country ability by pressing the differential lock button, which distributes the flow of torque between the axles. The viscous coupling in the rear axle gearbox supports the anti-skid function. The total capacity of the gearbox housings is 1 liter (500 ml each). During maintenance, the gearboxes contain approximately 0.95 liters of oil.
Fourth
The new generation has received modernized engines with improved performance and reduced fuel consumption. The spare wheel has moved from the trunk door to a niche under the trunk floor, eliminating a long-standing defect of crossovers - the gradual sagging of the lid hinges due to excess weight. The transmission migrated from generation III without changes.
To service the transfer case and rear wheel drive gearbox, you need to purchase 1 liter of gear lubricant.
Fifth
In 2021, a new generation of RAV4 debuted, receiving Dynamic Force series gasoline engines and a hybrid version. The diesel engine disappeared from the production line. The dispensing unit has a capacity of 450 ml, and in the drive of the rear wheels there are 2 types of gearboxes. The basic version with dynamic torque distribution requires 387 ml of oil. The version with dynamic power flow control (with additional couplings) uses a gearbox with a 500 ml oil bath.
Lubricant for Rav 4 4th generation
For gasoline Rav 4 4 generations, i.e. models 2AR-FE, 3ZR-FE, 3ZR-FAE, the following fluids are alternative to original oil from Toyota:
What kind of oil is in Rav 4 4 gasoline engines?
- Energy-saving SL or SM according to API, marked with the inscription “Energy Conserving” on the packaging.
- API class SN motor oils, marked “Resource-Conserving”.
- ILSAC certified motor oils with viscosity 15w-40.
For diesel engines 2AD-FTV or 2AD-FHV, alternatives to the original composition from Toyota are classes of lubricants C2, according to ACEA standards. Any other lubricant can damage the catalytic converter.
What kind of oil is in Rav 4 4 diesel engines?
All-season lubricant for diesel RAV4s is 0w-30. It is allowed to use 5w-30 in both summer and winter. In exceptional cases, C3 motor oils are allowed according to the ACEA classification, having a viscosity of 0w-30, 0w-40, 5w-30, 5w-40.
How much lubricant to fill (motor model - liters):
- 3ZR-FE, 3ZR-FAE – 4.2
- 2AR-FE – 4.4
- 2AD-FTV and 2AD-FHV – 5.9
- 2WW – 5.2.
Engine oil change procedure
To change the engine oil on a Toyota RAV4 you will not need much time plus a minimal set of tools. The Japanese have provided a fairly convenient design of the machine for easy access to all consumables, including the oil filter and the engine crankcase drain plug. If you have a crossover from 2001 and younger, such as 2010, 2013, or even a brand new 2016 version, then the procedure is approximately the same for all engines. There are some differences on the RAV4 before 2001. They touch the oil filter.
Let's start replacing.
- Drive the car into the pit. Be sure to park the car on a level surface. It is advisable to change the engine oil immediately while it is still hot. If your Toyota has been parked all night in a garage or parking lot, warm up the engine to operating temperature. This way the oil will come out in a larger volume and much faster than cold and viscous oil.
- The machine should be de-energized and immobilized. To do this, you need to remove the negative terminal from the battery, turn on the handbrake and place locking shoes under the wheels.
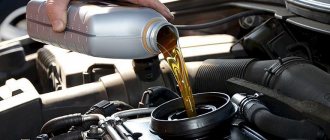
- Under the hood, find the filler hole and unscrew it. Go under the car, where the drain plug is located on the crankcase. Begin to unscrew it carefully, do not rush, so that the oil does not suddenly pour onto your hands and cause burns. As soon as the first drops begin to appear, place an empty container under the hole and begin to drain the liquid. Wait until the maximum amount of lubricant has drained out. If the plug on the “RAV4” does not lend itself when unscrewing it with your own hands, use a wrench.
- Once the oil is drained, let it cool slightly and visually assess its condition. The presence of abrasive particles, debris, or severe discoloration may indicate potential engine problems. Simply replacing the lubricant will not solve them, so it makes sense to conduct a more in-depth diagnosis or have the car checked at a service station.
- Using a dry cloth, thoroughly clean the plug and the engine oil drain hole itself. There is a seal on the plug that must be replaced. It costs a penny, but when worn it causes lubricant to leak from the engine.
- Next, move on to the oil filter. There is a difference here depending on the year of production of the Japanese crossover. On versions older than 2001, the filter is located on top, and on cars manufactured after 2001, it is located on the bottom near the drain plug. Some people unscrew the filter with their own hands, but usually a special puller is required. The main thing here is to loosen the fastening, after which the filter can be easily removed by hand.
- Oil will also leak from the old filter, so it is better to put it in some kind of container so as not to spill the grease on the floor or on yourself.
- We install a new filter element. Remove any dirt and old filter seal residue, if any. Then the sealing gasket must be lubricated with fresh oil and poured into the housing. The device is screwed into place until it stops, after which another 3/4 turn is made. Do this by hand as excessive force may damage the housing. If your hands slip due to oil, use gloves.
- Now all that remains is to pour new lubricant into the engine in the appropriate volume through the filler hole in the engine compartment. Its level should correspond to the “Full” label. Wait a few minutes for the liquid to distribute throughout the system. Take another measurement and, if necessary, add a little lubricant.
- Start the engine, let it warm up for 1 - 2 minutes at idle speed. Turn off the engine, wait another 2 - 4 minutes and take a control measurement of the level with a dipstick. It happens that the indicator drops, which forces you to repeat the procedure, adding oil again, warming up the engine and measuring the level with a dipstick.
The main task of car owners of RAV4 crossovers produced by Toyota is the timely replacement of consumables and their correct selection. Refer to the owner's manual specific to your vehicle with a specific engine. It contains all the specifications and key requirements for the oils, consumables and spare parts used. This will make it easier for you to maintain your crossover yourself.
How much oil to fill
First generation XA10, 1994-2000
The 1st generation RAV-4 is designed on the basis of the Celica GT-Four sports coupe. Initially, a three-door version was available, and in 1995 a five-door crossover was released. The car was offered with 2.0 liter petrol engines (3S-FE and 3S-GE, 135-178 hp). The engines were combined with a manual or automatic transmission, and the drive could be front-wheel drive or permanent all-wheel drive. In 1997, production of the RAV4 with a fabric body began. In addition, the car then received a minor restyling. The car was officially sold on the Russian market.
Oil in transfer case: volume – 0.9 liters; tolerance and viscosity: API-GL-3.4; SAE 75W-90, 80W-90
Rear axle gearbox oil: volume – 0.9 liters; tolerance and viscosity: API-GL-5 SAE 75W-90, 80W-90
Second generation CA20, 2000-2005
In the second generation, the RAV4 received a new streamlined design with dynamic shapes and a covered windshield. The family still consisted of three- and five-door modifications. The front-wheel drive version was offered mainly for the Japanese and American markets, and the most expensive versions had permanent all-wheel drive. The car with 2WD was equipped with a 1.8 liter gasoline engine (1ZZ-FE, 123 hp), and for all-wheel drive versions they offered more powerful units with a volume of 2.0 liters (1AZ-FE, 1AZ-FSE, 150 hp) and 2.4 liters ( 2AZ-FE, 2AZ-FSE, 161 hp). In Europe, a version with a 2.0 liter diesel engine (D-4D, 116 hp) was common.
Oil in transfer case: volume – 0.9 liters; tolerance and viscosity: API-GL-4, 5; SAE 75W-90, 80W-90
Rear axle gearbox oil: volume – 0.9 liters; tolerance and viscosity: API-GL-5 SAE 75W-90, 80W-90
Third generation XA30, 2005-2013
The 3rd generation RAV4 went on sale only in a five-door version. The developers changed the 4WD system, which received the function of connecting the rear wheels using a multi-plate clutch. Thanks to the increase in body dimensions and wheelbase, it became possible to install a third row of seats - in Japan this version (seven-seater) was designated Vanguard. The 3rd generation RAV-4 engine range included petrol engines with a volume of 2.0, 2.4 and 3.5 liters (152-273 hp), as well as diesel engines with a volume of 2.0 and 2.2 liters (from 116 to 177 hp). Transmissions are manual and automatic, and the CVT was offered only for the Japanese market. The updated 2008 RAV4 was distinguished by cosmetic improvements outside and inside, including through additional options. In addition, the 2-liter engine received a gas distribution system, as a result of which its power increased to 158 hp. With. After the next restyling in 2010, instead of the manual transmission-5, a 6-speed manual appeared, and the 4-speed automatic transmission gave way to a CVT (for the Russian market).
Oil in the transfer case: volume – 0.5 liters; tolerance and viscosity: API-GL-4, 5; SAE 75W-90, 80W-90
Rear axle gearbox oil: volume – 0.5 liters; tolerance and viscosity: API-GL-5 SAE 75W-90, 80W-90, 90W-140
Fourth generation XA40, 2012-2019
The 4th generation RAV4 has become more solid and luxurious, increased in size and wheelbase, and also received advanced equipment and higher quality interior trim. The car received gasoline engines of 2.0 liters (150 hp) and 2.5 liters (180 hp), and the old 170-horsepower 2.4 liter unit was abolished. The crossover was also offered with diesel engines with a volume of 2.0-2.2 liters (124-150 hp). The spare wheel was now located in the trunk (previously it was mounted on the fifth door), but it was no longer full-size.
Oil in the transfer case: volume – 0.5 liters; tolerance and viscosity: API-GL-4, 5; SAE 75W-90, 80W-90
Rear axle gearbox oil: volume – 0.5 liters; tolerance and viscosity: API-GL-5 SAE 75W-90, 80W-90, 90W-140
Fifth generation XA50, from 2018
The design of the 5th generation Toyota RAV4 is dominated by brutal and massive shapes with angular wheel arches. Such a strict and at the same time dynamic design makes the car look like a large and heavy SUV. In general, compared to previous generations, the design of the new RAV4 looks bold and impressive. Moreover, from now on the car is equipped with a powerful Dynamic Force engine range, consisting of 2.0 and 2.5 liter engines (150-200 hp). Their feature is a reduced level of harmful emissions and high efficiency, as well as the ability to work not only with a CVT, but also with the latest 8-speed automatic transmission. For the RAV4 XA50, there are two types of 4WD - with automatic connection of the rear wheels, as well as with two separate clutches (one for each rear wheel).
When should you change your oil?
According to the regulations, an oil change in the case of the Toyota Rav 4 should be done every 5,000 - 15,000 active mileage, which is equivalent to a period of 12 months. According to manufacturers, motor lubricant should not be updated frequently before the warranty period expires. However, in practice, an oil change may be needed much faster than after a year of active operation of the Toyota Rav 4.
The reasons for the need to update the technical substance in a car engine are the following:
- Obsolescence or low quality of the substance used;
- Wear of the Toyota Rav 4 engine mechanism;
- Features of the landscape. When driving on hilly terrain, the engine lubricant should be replaced more often;
- Climatic features. In hot weather, the oil in the Toyota Rav 4 engine is consumed faster;
- The owner of a Toyota Rav 4 is fond of extreme driving;
- Reducing the oil volume in a Toyota Rav 4 engine.
Signs of the need to replace technical fluid in a vehicle engine due to unsuitability or obsolescence of the lubricant include the following factors:
- The appearance of a burning or soot smell;
- Thickening of the technical fluid used;
- The appearance of rusty or metallic deposits, uneven lubricant;
- Loss of the original viscosity of the lubricant;
- Changing the color tone to a darker one.
It is important to remember that often the cause of a decrease in the volume of motor lubricant in a Toyota Rav 4 engine is a leak. Lubricant leakage may occur due to breakdown as a result of an accident or the deterioration of mechanism parts due to prolonged use.
Leaks are not always easy to detect. If this is caused by microscopic cracks in the tank, then the liquid does not flow through them, but evaporates, leaving no characteristic stains or streaks. If you suspect such a leak, you should contact a Toyota Technical Service Station.
In turn, checking for a sufficient amount of lubricating fluid in the Toyota Rav 4 engine is done using a dipstick. This part is located in the control hole. To check the oil, the meter is pulled out of the hole, wiped and placed back. Then you should release the dipstick again and inspect its indicators. If the engine oil level does not reach or equal to the minimum mark, then it is necessary to update the engine lubrication.
Top oils for 2021
Transmission units usually use the 75W-90 type. These are universal and common options, characterized by sufficient temperature viscosity and fluidity in cold conditions. Below we consider a number of oils that are rated by various resources.
- Motul Gear 300. Synthetic ester-based oil classified by the manufacturer as GL-4/GL-5. Due to the high strength of the film formed, which can withstand heavy loads in comparison with analogues, it has one of the highest welding rates in its class. The Gear 300's durability is certified to MIL-L-2105D. Based on the parameters shown, this option is recommended for high-end models. For Russian conditions, a good indicator of low-temperature fluidity is valuable. Among the top gear oils there is also a semi-synthetic version from the manufacturer - Motylgear.
- Castrol Syntrax Universal Plus. Close in load resistance to Motul at a lower cost. This option has greater high-temperature viscosity. However, low temperature viscosity is higher than Motul. Based on this, the considered Castrol model is considered optimal in terms of cost and performance ratio.
- ZIC GF Top. Characterized by high levels of low-temperature fluidity and load resistance. Users note a reduction in noise in transmission units, which indicates good anti-friction properties. Compared to premium analogues, ZIC has a low cost.
- Total Trans SYN FE. Complies with GL-4/GL-5 standards. It has high thermal stability and viscosity index, and a long interval between replacements. The oil remains fluid at low temperatures and does not thin out at high temperatures, which provides protection against corrosion and wear.
- Liqui Moly Hypoid-Getriebeoil TDL. Semi-synthetic with double approval, suitable for all types of drives. It is characterized by good anti-wear and anti-friction properties at a relatively low cost. In reviews, owners especially note the protection against corrosion. However, this option will have to be replaced more often. The manufacturer's range includes Hochleistungs-Getriebeoil with effective anti-friction properties and stable viscosity. The latter provides fuel savings.
- Mobil Mobilube 1 SCH. It has anti-scuff properties and is compatible with synchronizers made of non-ferrous metals. High levels of film strength, welding load and scuffing, which are important in difficult conditions, were noted. In average conditions it is superior to Motul. However, when heated, the viscosity drops sharply, and in cold weather it is higher than that of Castrol.
- THK Trans Gipoid Super. Among inexpensive semi-synthetic oils, it has decent characteristics. Complies with the GL-5 standard and, judging by reviews, retains sufficient fluidity at temperatures down to -25 ° C, which is 10 ° below the limit indicated by the manufacturer. Users note good corrosion protection. However, this oil is poorly compatible with non-ferrous metals.
It is important to select oil according to the recommendations specified in the technical specifications of the car.
1.5. Frequency of replacement of operating fluids and lubricants
| GENERAL INFORMATION |
Engine oil
must be replaced every 10,000 km. For a new car, it is necessary to change the oil after the break-in period (after 2500 km). When changing the oil, you must install a new oil filter (ZMZ-4062 engine) or its filter element (all engines). For the oil change procedure, see subsections 2.3.2, 2.3.2.2 and 2.3.3.3.
Into the engine crankcase
It is recommended to fill in the same brand of oil as was in the engine. If you fill in oil of a different brand, you must first flush the engine lubrication system with oil of the same brand that will be poured into the engine. To do this, drain the old oil and fill in new oil 2–4 mm above the “0” mark on the oil level indicator (dipstick). Start the engine and let it idle for about 10 minutes. Then drain the oil, replace the oil filter or its filter element and add fresh oil.
Coolant
must be changed once every 2 years or after 60,000 km (whichever comes first). For the procedure for replacing the coolant, see subsection 2.4.4. It should be borne in mind that the coolant is poisonous, so you should not suck it into your mouth when pouring it. When working with coolant, it is recommended to use safety glasses and not to smoke or eat. If the liquid gets on exposed skin, wash it with soap and water.
Gearbox oil
must be replaced after 60,000 km. For the oil change procedure, see subsections 3.3.2 and 3.4.2. Every 20,000 km, you need to check the oil level in the gearbox and top up if necessary. The oil level in the crankcase should reach the edge of the filler hole. If the drained oil contains metal particles or is very dirty, the box should be washed. To do this, pour 0.9 liters of fresh oil into its crankcase. Raise the rear of the car with a jack. Start the engine and, engaging first gear, let it run for 2-3 minutes. Then drain the oil and refill with fresh oil. When checking the oil level, you need to clean the surface of the breather from dirt and turn its cap several times to remove any dirt trapped under it.
Oil in the rear axle housing
must be changed after 60,000 km. The oil is changed in the same way as in a gearbox. After 20,000 km, you need to check the oil level in the crankcase and top up if necessary. The oil level should reach the edge of the filler hole. When checking the oil level, you need to clean the breather from dirt in the same way as you did for the gearbox.
Warning
Do not reuse drained brake fluid.
Brake fluid
In clutch and brake drives, they must be changed once every 2 years, regardless of the vehicle’s mileage.
Clutch and brake drives use domestically produced brake fluids “Rosa”, “Rosa-3”, “Tom”, “Neva” or their foreign analogues on a non-petroleum basis, the quality level of which is not lower than DOT-3. The use of other brands of fluids, especially petroleum-based fluids, is prohibited
.
Brake fluid is hygroscopic, so it should not be stored in open containers.
The procedure for replacing brake fluid is as follows:
1. Remove the brake master cylinder reservoir cap.
2. Remove the rubber protective caps from the air release valves on the wheel cylinders and place rubber hoses on the valves, the ends of which are lowered into glass containers.
3. Unscrew the valves no more than one turn and, pressing the brake pedal all the way, drain the fluid. As soon as liquid stops flowing out of the hoses, tighten the air release valves.
4. Pour the drained brake fluid out of the vessels and put them in place.
5. Pour fresh fluid into the master cylinder reservoir, unscrew all air release valves one turn and, pressing the brake pedal all the way, fill the brake system. In this case, you need to constantly add fluid to the master cylinder reservoir. After clean brake fluid begins to flow out of the hoses placed on the air release valves, tighten the valves.
6. Bleed the brake system to remove air from it (see subsection 6.9).
7. Close the brake master cylinder reservoir with a plug. Remove the hoses from the air release valves and put protective caps on them.
The fluid in the clutch hydraulic drive is replaced in the same way.
Useful tips and general recommendations
If the vehicle is operated in off-road conditions, water may enter the transmission units when overcoming deep puddles. Foreign liquid penetrates through the ventilation ducts and causes corrosion and accelerated destruction of parts. If, when checking the level and quality of the lubricant, traces of water are detected, unscheduled maintenance should be performed. The cost of purchasing 1-2 liters of gear oil is offset by an increase in the life of the gearboxes.
If a large amount of chips is found in the drained lubricant, and a constant hum emanates from the transmission units when driving, then the gearboxes should be disassembled for repair. Further operation without diagnostics will lead to the destruction of gears or bearings with subsequent jamming of the shafts. In some cases, fragments of parts damage body elements, which increases the cost of repairing the crossover.
When operating cars in northern regions, you can use oils of category 75W-90, which are resistant to low temperatures. But for crossovers under warranty, it is better to use recommended lubricants. If units break down due to a manufacturing defect, the owner will have a better chance of claiming repairs under warranty. The use of oils in the transmission that are not recommended by the manufacturer will cause the dealer to refuse to restore the units free of charge.
Source
The process of changing the oil in a manual transmission
To change the lubricant in mechanics, you need to prepare in advance. First, decide where this process will take place. It is most convenient to drive the car into a viewing hole or overpass, but if there are no suitable places nearby, you can use a jack. For safety reasons, put it on the handbrake and put it in neutral.
The oil change is carried out with the engine warm to increase its fluidity. Be careful: if the temperature of the liquid is too high, it may cause burns. Wear protective clothing and remember to protect your eyes.
The list of tools for changing the oil in a Toyota RAV4 manual transmission includes the following:
- set of wrenches;
- container for collecting old liquid;
- funnel with hose, oil pump or oil syringe;
- replaceable o-rings;
- 3 liters of gear oil.
It is best to take the original TOYOTA 75W-90 oil for Toyota RAV4 under number 0888580606.
When all the preparations are completed and all the “ingredients” are on hand, you can start replacing. This procedure consists of a number of sequential actions:
- First, you need to remove the crankcase protection shield. To do this, unscrew the mounting bolts using the appropriate keys.
- Next we find the filler plug. On the Toyota RAV4 it is located in the front of the crankcase housing and has a sticker. We unscrew it with a 22mm wrench. You can immediately check the oil level: if the amount is normal, it should reach the lower edge of the hole. If a small amount of liquid spilled out when uncorking, then the level is normal.
- There is a drain plug on the left side of the transmission housing. Unscrew it, after placing a container under the hole to collect liquid.
- When the oil has completely drained, clean the plug from dirt, replace the O-ring and reinstall it, tightening it carefully.
- You can start filling. This is best done with an oil blower. If you don't have one, use an oil syringe or funnel with a hose. In the latter case, it is more convenient to fill by passing the hose through the engine compartment. The liquid is poured until it begins to ooze from the filler hole. Typically, a Toyota RAV4 manual transmission holds about 3 liters of lubricant.
- The filler plug is cleaned of dirt, the sealing ring is changed, after which it is screwed into place.
At this point, the process of changing the oil in a manual transmission on a Toyota RAV4 is considered complete. All that remains is to mount the crankcase shield back and go.
Preparatory activities
Before starting work, it is necessary to warm up the transmission units by traveling a distance of 10-15 km. At low temperatures, the oil becomes thick; the draining procedure will take 30-40 minutes. No additional preparation of the crossover for servicing the gearboxes is required.
List of required tools and materials
The list of equipment and process fluids includes:
- fresh gear oil (original or from third-party suppliers);
- thread gloves with rubber coating;
- sealing washers for drain and inspection plugs (rings are unified);
- a rag for wiping cases and magnetic inserts on drain plugs from metal dust;
- a set of wrenches for removing engine protection and unscrewing plugs;
- container for collecting waste material;
- transmission syringe.
Replacement frequency
According to the official regulations, it is recommended to fill the RAV4 crossover engine with fresh oil at intervals of 10 thousand kilometers or once a year. But in practice, the interval can be reduced to 5 thousand kilometers. This is influenced by:
- aggressive driving style;
- dustiness and pollution of the area where the vehicle is operated;
- regular driving under high loads (using a trailer, off-road, etc.);
- low quality of fuel used;
- poor quality previous lubricant replacement;
- use of inappropriate motor oil;
- exceeding the speed limit, etc.
How much oil is in the engine of a RAV 4 car largely depends on its volume. Therefore, you should focus on the specific specifications of the motor installed on the car.
Information on the types of oil required
It is recommended to pour 75W-90 and 80W-90 oils of categories GL-4 and GL-5 into transmission units of Toyota Rav 4 of the third and fourth generations. 75W-90 and 80W-90 are all-season options, but the first is characterized by a wider range of viscosity: it is the same at operating temperature, but in the cold 75W-90 is lower. Oil classes GL-4 and GL-5 are characterized by resistance to stress, determined by the proportion of additives. GL-5 has higher these indicators, so it is recommended for more heavily loaded units.
Consequently, it is designed for hypoid units, however, not all such options, especially mineral ones, are compatible with gearbox synchronizers.
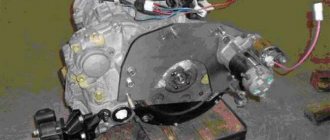
What is a transfer case and gearbox?
RK Rav 4 3rd generation
Transfer case (transfer case), being an element of the transmission of cars with all-wheel drive, allows the driver to distribute power from the internal combustion engine to the axles in different modes. Structurally, the Rav 4 transfer case consists of two devices (a multiplier and a splitter) placed in a housing. The multiplier expands the power capabilities of the installed transmission, and the splitter divides one output stream into two.
The operation of the Rav 4 transfer case as an independent unit is not adjusted by the gearbox (gearbox). The unit is also dismantled separately. The connection to the gearbox is via a driveshaft; sometimes the transfer case is connected to the rear of the gearbox. The material for making the transfer case housing is silumin.
Changing the oil in the transfer case and gearbox
To change the lubricant, you will need the following materials and tools:
- transmission of the appropriate degree of viscosity. The original Toyota 75w90 lubricant, or any other brand whose quality is beyond doubt (for example, Castrol 75w90) is suitable. Volume – 1–1.5 l;
- large-volume pharmaceutical syringe (150-160 ml);
- an extension hose through which the waste will be pumped out;
- fill tube;
- hex wrench No. 10;
- containers for waste;
- set of car keys.
The procedure for replacing a Rav 4 car:
- For comfortable work, the machine is placed above the inspection hole or driven onto an overpass.
- Remove the side control and filler plugs of the gearbox using a hex wrench.
- The container for processing is prepared, the lower drain plug is unscrewed. Now you can wait until the waste completely drains into the prepared container.
- Afterwards, the gearbox is cleaned of any remaining old lubricant. To do this, a syringe is attached to the hose (tube). The latter is inserted into the drain hole and pumping out of the remaining liquid begins.
- Then the drain plug is cleaned of dirt and installed back. Fresh oil is collected with a syringe and poured into the gearbox. The gearbox needs to be filled until oil begins to flow from the control hole (according to experience, it takes about 500 ml).
Changing the lubricant in the transfer case
Changing the oil in the Rav 4 transfer case is done in a similar way, but requires a preparatory procedure. To make replacement easier, the protection from the internal combustion engine is first removed using a regular car set of keys. The transfer case, again according to the crossover owners who changed the oil, receives a little less lubricant, about 450-500 ml. The numbers differ from the official information of the manufacturer.
Changing the oil in the Rav 4 gearbox
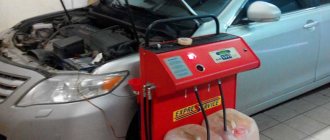
Changing the oil in the automatic transmission Rav 4
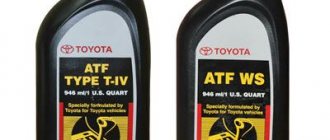
The oil in the Rav 4 automatic transmission is changed in accordance with the maintenance regulations for the Japanese crossover. Before replacing, you need to prepare tools and buy transmission fluid that meets the manufacturer's requirements.
Filter and pan gasket
Required Tools
The set of tools and materials for changing the oil in a Rav 4 automatic transmission yourself is as follows:
- spanners;
- flathead screwdriver;
- hexagon for plug;
- funnel;
- new gasket and oil filter;
- transmission fluid;
- capacity;
- rags;
- gloves;
- liquid for cleaning the carburetor (gasoline will also do).
Container for draining and topping up
Step-by-step description of a complete replacement yourself
You can change the oil in the Rav 4 system yourself.
The box pipe that needs to be disconnected
The procedure is as follows:
- The motor protection is removed. The gearbox dipstick is removed so that the lubricating fluid drains better. The plug on the drain is unscrewed. You can use 5-liter water bottles as waste containers.
- The plug is twisted. Take a clean container and fill it with the same amount of new transmission as was collected before.
- The return hose (lower right) is removed under the car. The end is lowered into a jar (you need two of them, one for the old one for the new transmission fluid). There is no help here. The work is done quickly.
- The containers change as they fill. The exhaust waste is replaced with fresh fluid until clean lubricant comes out of the system.
- The engine is turned off, the hose is put back in place.
Changing the RAV 4 automatic transmission oil filter
Automatic transmission without tray
Replacing the automatic transmission oil filter on a Toyota Rav 4 looks like this:
- The drain plug is unscrewed and the transmission fluid is drained into a clean, dry container.
- The pan with the remaining oil is carefully removed, which is also drained into a container prepared in advance.
- The tray is thoroughly cleaned of accumulated dirt, and the chip-catching magnets are cleaned.
- The old filter is detached (three fasteners are twisted).
Filter
Completing the lubricant change
The final stage of changing the oil in the Rav 4 automatic transmission involves installing a new oil filter and returning the pan (with a new gasket) to its place. The liquid drained at the previous stage is returned to the box through the filler hole.
Before checking the amount of oil, you can drive several kilometers and operate the selector in all positions. We check the lubricant level as described above.
Foam on the dipstick is a sign of excess lubricant, which is also bad