Payment for goods and downloading of the book in electronic form (PDF format) is made on the website.
To do this, you need to find the book you are interested in and click on the “Buy” button. The price of the book is indicated on the button.
For convenience, the price on the website for residents of Russia, Belarus and Kazakhstan is presented in rubles.
For residents of Ukraine in hryvnias, and for all other countries - dollars.
After clicking on the “BUY” button, a payment window will open where you can select a payment system with which you can pay for the selected book using any bank card (Visa, MasterCard, MIR, etc.)
When you click on the “Pay by bank card” button, the Portmone payment system will open, which is the easiest way to make a payment.
In addition, the website offers four payment systems for payment:
- Yandex (payment from any bank cards, Yandex Money account, QIWI Wallet, terminals, etc.);
- Portmone (payment from any bank cards, Portmone account);
- PayPal (payment from any bank cards, PayPal account);
- WebMoney (payment from any bank cards, payment from WebMoney wallets).
Payment via Yandex Cashier
After selecting payment via Yandex, the Yandex Cashier payment system will launch, where you need to select a convenient payment method (bank card, QIWI, Yandex Money account, etc.)
After specifying payment details and confirming payment, payment for the goods will occur.
If you have a bank card in a currency other than the ruble, then the money will be debited from the card at the rate of the Central Bank of Russia at the time of the purchase.
This payment method is optimal for residents of Russia, Kazakhstan and Belarus.
Official website of the Yandex Kassa payment system https://kassa.yandex.ru
Payment via Portmone
After selecting payment through Portmone, the payment system will launch, where you need to select the payment method: bank card or Portmone account.
The price in the Portmone payment system is converted into dollars at the exchange rate of the Central Bank of the country where you are located.
If you have a bank card in a currency other than the dollar, then the money will be debited from the card at the rate of the Central Bank of your country at the time of the purchase.
After specifying payment details and confirming payment, payment for the goods will occur.
Official website of the Portmone payment system https://www.portmone.com
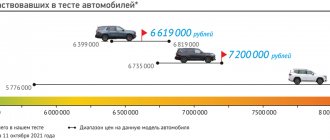
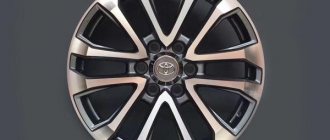
Toyota RAV4 - the secret of popularity
Toyota RAV4 was created by a Japanese company at the end of the 20th century. Currently, four generations and three restylings of the car have been produced. Since 2013, a modern modification has been presented on the domestic market. The five-door Toyota RAV4 is equipped with a 2.5 liter petrol engine. and 180 hp, which works with a 6-speed automatic transmission and all-wheel drive. Created for active recreation, the crossover has the highest levels of cross-country ability, spaciousness, and functionality. Eight trim levels provide the buyer with a wide choice.
Why should vehicle repair work be carried out in our car service center?
It is worth noting that we employ real experts in their field. Our car mechanics have extensive experience and never for a minute forget to learn new things. Also, we have high-quality equipment. Thirdly, we welcome your contact every day, our dear customers and clients!
We are one hundred percent confident in the quality of our repair work, and we provide a 1-year warranty on repairs and spare parts! Come to us and make sure that our RS service does not make impossible claims.
Payment via PayPal
After selecting payment via PayPal, the PayPal payment system will launch, where you need to select the payment method: bank card or PayPal account.
If you already have a PayPal account, then you need to log into it and make a payment.
If you do not have a PayPal account and you want to pay using a bank card via PayPal, you need to click on the “Create an Account” button - shown with an arrow in the picture.
PayPal will then prompt you to select your country and provide your credit card information.
After specifying the information required to make the payment, you must click on the “Pay Now” button.
Official website of the PayPal payment system https://www.paypal.com
Replacing the rear hub on a Toyota RAV4
If at some point, while driving a Toyota RAV4 (RAV4 A20 4WD) car, you heard a characteristic hum that increases with increasing speed, or when checking the condition of the suspension you noticed a change in play, then the cause of this may be wear of the hub bearing. After all, it is by making and increasing load (increasing speed) on a worn bearing, this hum occurs. However, here one can still suspect a malfunction in the rear axle gearbox.
And therefore, it is further necessary to determine on which side the bearing wear occurred, and also to refute the option with a gearbox. This happens using a special test - when driving, turning the steering wheel from side to side, increasing and decreasing the load on each side of the car (accelerating and slowing down the car when turning right and left), you need to listen to which side the hum is coming from. If you hear that when turning with increasing speed, the hum becomes louder than when turning the same turn without load, then here it is, our worn out hub. Also, with a worn hub, the nature of the hum will change as the speed increases/decreases.
Now, let's return to the gearbox, in order to exclude the possibility of its malfunction, or some other components of the car, you need to change gears while driving without changing the speed, and if the frequency of the hum has not changed, then its cause is definitely the wear of the hub.
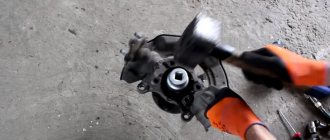
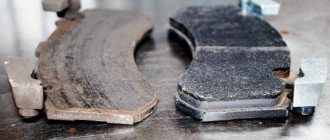
Next, having carried out the above tests, we determine that the rear hub on the right side is not only worn out, but also very neglected, because when hitting bumps, the hum changed significantly, and therefore, it must be replaced.
Now let’s figure out how to replace it; for this we have prepared step-by-step photo instructions.
So, let's start by removing the rear right wheel, followed by removing the cotter pin and removing the hub nut retaining cap. Then the threads on the drive shaft need to be cleaned of corrosion. Now, having removed the protective cap from the wheel, we install it (the wheel) in place and, having secured the car, press the brake pedal. Now, using an extended hex head at “30”, you need to unscrew the hub nut (tightening torque, which is 215 N*m). Pay attention to the thread; if it is rusty enough, then in order not to tear it off, you must first lubricate it, and only then unscrew it.
Next, using the “14” head, you need to unscrew the four nuts that secure the drive and gearbox of the rear axle. Now you can remove the drive, but before that you need to remember how the drive is located to the gearbox flange, this will be useful to us when assembling everything at the end, it will be necessary to align the marks.
Then, according to the instructions, you need to remove the ABS sensor, which is secured with a 10mm bolt to the knuckle. But, in our case (perhaps yours too), there is no way to remove it without unnecessary damage, because... he sat down very tightly. Therefore, we decided to leave the sensor in place; in principle, it won’t really bother us, but we need to be extremely careful with it. Thus, next you need to disconnect the drive and gearbox; it is removed from the hub by lightly tapping it through the spacer.
Next, on attaching the hub to the knuckle with a head on “14”, you need to unscrew 4 nuts, this is precisely why there are holes in the hub.
Now you can remove the hub, but if the car is not new, then problems may arise here, for example, if the hub has never been removed before, then it could simply stick and rust to the fist. Therefore, here you will need to have a lot of patience. In principle, this stage can be considered the longest and most labor-intensive, because here you will have to have a lot of patience. After all, even when hitting the outer race tightly, the hub does not give in.
The drive must be handled carefully to prevent damage to the ABS incremental ring.
The most correct solution would be to remove this entire structure from the car, and using the created stop in the plate along the entire perimeter of the hub, squeezing it out using a puller or press.
But because A continuous clamp is attached to the plate, which connects the brake tube and hose, then in order to remove the entire structure, we disconnect and air the entire brake system. To get better access to it, you need to remove the handbrake pads and cable.
Next, when the entire structure can move freely, we begin to squeeze out the hub using impact technology, but first you need to insert a stop between the fist and the hub cage. You can use a 5mm steel plate as a stop, which should fit tightly and not spring back. And finally, with the help of several dense blows around the perimeter, the foot gave way and “unhooked.”
Now we see that the outer ring could not resist rust and was completely covered with it. This is the plate and the steering knuckle. To clean the area for installing a new hub from rust, you need to use a scraper. In addition, you can get rid of rust by lightly tapping with a hammer, so it will fly off in pieces.
Surely you are wondering why both the hub and the fist with the plate rusted so badly. Most likely this happened due to the fact that the element is not protected from any external influences, and due to the lack of complete fit in place. Therefore, in the aggregate of all this, rust begins to appear abundantly.
This is a comparison photo between the old and new hub. Now we install the new one in place of the old one, there shouldn’t be any difficulties here, because She gets up very freely.
Next, we perform the entire reverse assembly, starting with tightening the nut (we use the tightening torque - N*m). Then we install the removed pads and cable.
Well, then everything else is strictly in the reverse order of how it was filmed.
However, it should be noted that when installing the brake disc, it is necessary to correctly position the hole for adjusting the hand brake and the recess on the flange at the hub.
Payment via WebMoney
After selecting payment via WebMoney, the payment system will launch, where you need to select the payment method: bank card or WebMoney wallet.
If you already have a WebMoney wallet, then you need to log into it and make a payment.
If you do not have a WebMoney wallet and you want to pay in another way, you need to select any of the methods that WebMoney offers and make the payment
After specifying payment details and confirming payment, payment for the goods will occur.
Official website of the WebMoney payment system https://www.webmoney.ru/
Downloading a book
After successfully completing the payment (by any method) and returning to the KrutilVertel store from the payment system website, you will be taken to the successful payment page:
On this page you need to indicate your e-mail, where access to download the book will be sent.
If you are already registered on our website, then simply follow the link to your personal account.
The book you purchased will be in your personal account, from where you can always download it.
Please note that after making the payment, you need to return back from the payment system website to the KrutilVertel website.
If for some reason you did not return back to the site and closed the payment system tab with a message about the successful completion of the payment, please let us know - we will send you a letter indicating access to download the book.
Rear wheel hub
Checking the technical condition without removing it from the car
2. Remove the rear left disc brake caliper assembly.
3. Remove the rear brake disc:
- Place assembly marks on the rim and wheel hub.
- Release the parking brake.
- Turn the pad adjuster until the disc rotates freely, then remove the disc.
- Install the parking brake pad adjustment plug to the rear disc.
4. Check the bearing clearance and hub runout:
- Using a dial indicator, measure the play near the center of the wheel hub. Maximum clearance: 0.05 mm. If the gap exceeds the maximum allowable, replace the wheel hub.
- Using a dial gauge, measure the runout on the surface of the hub on the outside of the wheel-to-hub bolt. Maximum permissible deviation: 0.08 mm for single-wheel drive vehicles, 0.06 mm for all-wheel drive vehicles. If the deviation exceeds the maximum permissible, replace the wheel hub.
Problems when paying with bank cards
Sometimes difficulties may arise when paying with Visa/MasterCard bank cards. The most common of them:
- There is a restriction on the card for paying for online purchases
- A plastic card is not intended for making payments online.
- The plastic card is not activated for making payments online.
- There are not enough funds on the plastic card.
In order to solve these problems, you need to call or write to the technical support of the bank where you are served. Bank specialists will help you resolve them and make payments.
That's basically it. The entire process of paying for a book in PDF format on car repair on our website takes 1-2 minutes.
If you still have any questions, you can ask them using the feedback form, or write us an email at [email protected]
5.2.4 Replacing rear wheel hub bearings
| You will need | |
| |
Remove the brake drum ( see subsection 7.2.1. ).
The hub has two single-row roller bearings. During operation, it is necessary to adjust the clearances and replace the grease in the bearings.
If, when rocking a suspended wheel, you feel play that cannot be eliminated by adjustment, or noise appears while driving, there is a possibility that the hub bearings have failed.
One of the hub bearings may fail. The bearings should rotate freely, without jamming. Rollers and bearing rings must not have holes, chipping or signs of wear. Replace the defective bearing.
1.
Through the hole in the drum (by removing the plug), knock the protective ring off the hub.
2.
Using a screwdriver, remove the oil seal from the hub.
3.
Remove the rear bearing from the hub.
4.
Using a punch or drift, press the outer rings of both bearings out of the hub.
5.
Rinse thoroughly with kerosene or white spirit and dry the inner cavity of the hub.
6.
Install the outer race of the rear bearing with a smaller inner diameter inside the hub and press the ring until it stops into the hub using a suitable mandrel.
7.
If there is no mandrel, select a flat metal plate and.
8.
. press the ring to the possible depth. Then.
9.
. push the ring all the way down using a punch, evenly striking the diametrically opposite sides of the ring, or using an old bearing race.
10.
In the same way, press the outer ring of the front bearing into the hub (with a smaller inner diameter inside the hub).
11.
Lubricate both bearings with Litol-24 grease.
12.
. the outer rings of the bearings, and also fill the inner cavity of the hub between the bearing rings with lubricant.
13.
Lubricate the working edge of the new oil seal with Litol-24 grease.
Source