Toyota Corolla. Removing the radio and Installing the YATOUR USB adapter.
Replacing the original radio of a corolla 2008 e150
Installing a Chinese Android radio in a Toyota Corolla e150
Toyota Corolla 2011 (E150) disassembling the central part of the panel
Review of GU Radio with AliExpress for Toyota Corolla 2007-2011
How to remove a Toyota Corolla radio
Installing AUX on Toyota Corolla radio.
Head unit Toyota Corolla (150) 2007-2012
Full review of the Asottu clkll9060 Toyota Corolla e150 radio
Removing the front panel of Toyota Corolla 140/150
The options for the Toyota Corolla are constantly changing. If in 2006–2008 the Japanese could offer a not very functional filling compared to other manufacturers, then the models of recent years (starting from 2014) are not only reliable, but also an interior with modern devices, among which the Toyota Corolla radio deserves much attention . This is a universal gadget that is a collection of creative technical solutions and is ready to offer the user not only high quality sound and a flash drive connection, but also navigation functions, as well as other additional options.
How to remove a Toyota Corolla 150 radio
Toyota Corolla.
Removing the radio and Installing the YATOUR USB adapter. Replacing the original radio of a corolla 2008 e150
Installing a Chinese Android radio in a Toyota Corolla e150
Toyota Corolla 2011 (E150) disassembling the central part of the panel
Review of GU Radio with AliExpress for Toyota Corolla 2007-2011
How to remove a Toyota Corolla radio
Installing AUX on Toyota Corolla radio.
Head unit Toyota Corolla (150) 2007-2012
Full review of the Asottu clkll9060 Toyota Corolla e150 radio
Removing the front panel of Toyota Corolla 140/150
The options for the Toyota Corolla are constantly changing. If in 2006–2008 the Japanese could offer a not very functional filling compared to other manufacturers, then the models of recent years (starting from 2014) are not only reliable, but also an interior with modern devices, among which the Toyota Corolla radio deserves much attention . This is a universal gadget that is a collection of creative technical solutions and is ready to offer the user not only high quality sound and a flash drive connection, but also navigation functions, as well as other additional options.
Functional
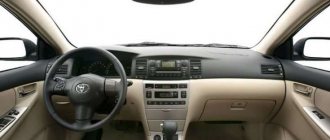
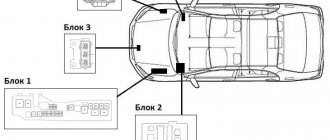
The Toyota Corolla radio in 120 and 150 body types is installed in a specially designed standard recess on the dashboard next to the steering wheel.
Combining a complex of control systems, navigation and attributes to improve comfort and entertainment, the car radio is a real on-board computer that any owner of a 2013-2014 Toyota Corolla, as well as all subsequent models, can afford.
Among the main functions equipped with Toyota Corolla radios of the 10th and 11th generations are the following:
- support for major video and audio file formats – R/VCD/CD/CD-R/CD-RW/DivX- MP3/MP4/WMA/DVD/DVD;
- menu interface in Russian;
- operating system based on Windows CE 6.0;
- 6 CD changer;
- operation of the radio in several modes simultaneously, for example, navigation and music files;
- built-in external antenna with GPS module;
- ability to connect an SD card;
- USB connector;
- aux connector;
- remote control.
The listed functions are not a complete list of what is included in the optional device in the Toyota Corolla 2013 and other years.
Due to the simplicity of execution and standard communication systems, installing a radio on a Toyota Corolla of each year of production will not cause difficulties and can be done independently.
For Toyota Corolla 10th and 11th generations, in the “Classic” and “Standard” trim levels, you can install the radio using a special frame made of plastic. Therefore, when buying a device, you should pay attention to its availability.
Description of the car radio
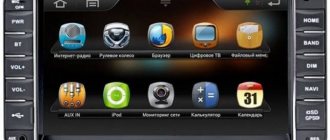
All standard radio models have a classic operating system designed for Android. This is basically Windows 8 or Google android 7.8.2 (upgradable to Android oreo). This device allows you to get more opportunities. Those. – now the tablet or smartphone has migrated to the radio.
All buttons on the device are touch sensitive. Those. – you can safely replace them at your request. Only the on/off button is non-touch.
Externally the design looks very nice. There is a desire to press each button in turn. But even an inexperienced user will be able to understand the system . Important icons are located on the desktop, but they can be replaced at any time. To do this, just click on any icon and hold your finger for a while. After this, a menu will appear where you can replace one icon with another.
By default, the interface has a set of standard functions that are typical for models of all touchscreen radios:
- uploaded video;
- all downloads;
- downloaded music;
- system settings;
- radio;
- phone (you can receive a signal via blue tooth);
- equalizer;
- software installer;
- browsers (usually Google);
- play market.
There are many more programs built into the radio. But there is no point in describing each of them. To do this, it is necessary to consider them separately.
Additional devices
The car radio combines a whole range of information devices, making it possible to display information from them on your screen - from built-in video cameras and remote devices, navigation equipment, parking cameras, and car condition monitoring devices. In addition, if necessary, you can output data from the on-board computer and car radio via an Internet connection, which provides communication with an external control center via a 3G modem.
The Toyota Corolla E150 is equipped with a standard radio 53816, manufactured by the Matsushita brand. Most Corolla 150 owners note that the volume of the acoustics is excellent, but the sound quality requires improvement.
Among the additional set of options that can be found on the 2013 Toyota Corolla radio, as well as all versions of the 10th and 11th generations of the Japanese legend (Fielder, Corolla Axio, etc.), the most notable are:
- antenna type radio signal amplifier;
- DVR CP-6001;
- DVB-T BOX;
- 2 DIN with navigation;
- the ability to connect the camera via Wi-Fi technology;
- Android system and the ability to synchronize with it.
The conveniently located monitor does not require you to turn or tilt your head to view the information on the screen. And the clear instructions describe in detail the process of installation, replacement and configuration; it is stored in the BC memory. In addition, all information that enters the on-board computer of the Corolla E150 and all cars of the 10th and 11th generations is displayed on the monitor. The presence of an aux output allows you to connect external audio media. For additional comfort and the possibility of convenient operation in the absence of lighting in the cabin, the standard Toyota Corolla radio in the 120 body and other cars of the 10th and 11th generations have backlighting of the control buttons using LEDs.
The “3-zone” mode allows you to simultaneously display the following data on the device monitor: information from the DVR, playing video or audio files, and navigation parameters.
Features of use, possible malfunctions
If replacement, adjustment or repair is necessary, checking the correct connection of the terminals, or other problems arise in the operation of the car radio on a 10th or 11th generation Toyota Corolla, then you should know how to remove the radio yourself without affecting the overall performance or damaging the car. This will help determine why the sound disappears or some functions are not available.
Before starting work, be sure to make sure that there is no voltage on all wires in order to prevent a short circuit in the entire electronic network of the Toyota Corolla 2013 and other years of production.
The removal and installation process follows the following scheme:
- remove decorative trims on the sides and top;
- remove the air duct curtains by pulling them out along the guides;
- disconnect the electrical contact and unscrew the 4 bolts, and then, carefully disconnecting, pull out the radio and lower it face down;
- Next, you should disconnect the speaker connector, power plug, radio antenna and connection to the buttons on the steering wheel.
Installation is in the reverse order.
Pinout of a head unit is an activity for marking or designating all outputs of the device to facilitate the subsequent connection of multi-devices or connection via aux or other outputs of various gadgets.
Step-by-step instructions for removing the radio on a Toyota Corolla
In fact, removing the standard radio is not so easy. You will have to unfold half of the central panel in order to get to the radio itself. Toyota's standard radio is unremarkable. Standard sound, no amenities, supports a small number of formats, of course, every self-respecting driver will want to replace it.
First we need to remove the silver trim. They are located on both sides of the central panel. Let's start, perhaps, on the right side. They are all held on with a latch. And to remove them you will have to pry off each of them - we used a special plastic knife or spatula in order not to damage the surface of the linings. The covers are removed from bottom to top. You need to pry from the outside of the panel. Let's look at the photo and everything will become clear.
Next, carefully pull towards you and remove the center panel trim of the Toyota Corolla. Place it aside. The result is the following - look at the photo.
We perform the same actions on the other side - the left. We also pry up the bottom trim and carefully remove it, then put it aside. We look at the photos, in principle, nothing has changed radically.
Next, we proceed to removing the upper linings, the removal principle is the same, but you should pry it off from below. Once you see the photos, you will understand everything. The same actions should be performed on the other side.
Having removed the covers, for your greater convenience, we decided to photograph the locations of the latches from the back side. The photos below should help you. There are four latches on each pad. They are highlighted with arrows.
After all four pads are removed, we begin to remove the air duct - the top one. To do this, we grab it with both hands - left and right, and then gently pull it towards ourselves. Everything is very simple. Let's look at the accompanying photographs.
Before pulling it out completely, you should carefully disconnect the hazard light button connector. In the photo, the connector is highlighted with a red circle.
After the air duct is pulled out, we turn our attention to where the Toyota Corolla air duct latches are located. They should remain on the panel and not in the seats.
Here it is worth saying that the disassembly process is almost complete, but now we need a tool 10 key, with which we will unscrew the four bolts holding the radio. In the photo, each bolt is marked with an arrow. So you don’t have to look too hard. Next, look at the photos and use the photos to unscrew the bolts.
After the bolts have been unscrewed, carefully pull out the radio unit towards you. This is not difficult to do, much the same as with an air duct. We take it with both hands and pull it towards ourselves.
After the radio is almost pulled out, carefully disconnect all the wires going to it, try not to damage the plugs, there is no need to pull anything, just carefully remove it. You can wrap the radio with a soft cloth to prevent it from scratching the surface of the interior and center panel.
This completes the disassembly process. We can say that the Toyota Corolla torpedo is waiting for its new guest. Let's look at the photo of the work done.
Installation and calibration of a new GU: pumping up the Corolla correctly
Installing a radio is not a complicated procedure, but it has a lot of technical features that should be taken into account - for stable operation it is important to connect the device correctly.
The installation procedure for the head unit will take no more than 1-1.5 hours and will require pliers, a fixed knife and a long slotted screwdriver.
It is also recommended to purchase additional consumables: adapter frame, electrical tape, heat shrink tubing and wiring. Installation of the radio on the E150 is carried out as follows:
- First, turn off the power supply to the car by disconnecting the “negative” terminal from the battery;
- Next, we dismantle the central panel under the car’s dashboard and pull out the panel towards ourselves. It is necessary to snap off the plastic pistons that fix the panel using the tip of a slotted screwdriver, having previously wrapped the slot with masking tape;
- Then remove the cassette player casing and unscrew the fixing screws securing the audio system to the bracket. Now we remove the frame and pull out the radio towards ourselves, after which we disconnect all the wiring from the device;
- If necessary, install the transition frame by snapping the product into the plastic latches on the panel and mount the new control unit, securing the device with screws;
- Now we connect the cables to the radio: audio output, TV and GPS antennas, as well as laying audio streams to all speakers in the car, after which we add power cables and a USB interface;
- Next, if available, we connect the control buttons located on the steering wheel to the control unit and assemble the trim in the cabin.
Note! Connecting cables to the audio system must be carried out strictly according to the instructions supplied with the device: depending on the brand and quality of the components, the color and interface of the wiring may differ. It is also recommended to install a fuse on the supply “positive” wire to prevent a short circuit due to overload.
Installing a new radio on a Toyota Corolla
You can install absolutely any radio suitable for Toyota Corolla, including head systems on Android, etc. However, we chose the Phantom DVM-1733G HD-i. This model is very convenient and has fairly good performance. Let's get started installing it.
First of all, we need to unscrew the mounting plates of the standard radio, they will be useful to us. We take a screwdriver (Phillips head), it is best to use a wrench, of course, since the bolts can be very tight. We unscrew only 4 bolts. In the photo they are highlighted with red arrows.
We also remove the four yellow plastic latches; they will also be useful to us when installing the radio. Let's look at the photo, there they are highlighted in circles.
After all this has been done, we no longer need the old radio; we can put it aside, or sell it to someone on the Internet. We attach the removed mounting plates and latches to the new radio; this is not difficult to do.
After that, we take all the wires and connect them, including the GPS antenna, and bring the USB cord into the glove compartment for the flash drive. Without fixing it, we check the functionality, if everything is good, we take our radio and insert it in place of the old one.
After that, we fasten it with four bolts, insert the air duct into its place, having previously secured the emergency brake lights. And in the end, we put the pad back on and rejoice at the update. After testing, the option we chose showed that it works better than the standard radio, and also better than any head system on Android.
Staff advantages and disadvantages
We recommend you watch the video below:
The touchscreen device for Toyota Corolla e150 and e120 has a number of advantages and disadvantages. The advantages include:
- reliable operating system full-featured Android 7.1.2 Nougat;
- 2GB RAM;
- HD resolution which allows you to watch videos in 1024x600 mode;
- standard memory, which has a size of 32 GB, it can be expanded using a card
- external SD;
- highly sensitive receiver;
- high-quality sound processor of the Hi-Fi standard, designed for a car;
- high-quality audio amplifier MOSFET TDA 7850 class AB;
- customizable equalizer with adjustable modes;
- crossover with program selection;
- Wi-fi, which allows you to control the radio from other devices; they must have exactly the same output (the mode is called Hotspot);
- supported 3 and 4G Internet if an external modem is connected;
- Bluetoth option, which allows you to connect any available phone to the radio and control it;
- the TMPS option allows you to check tire pressure without leaving the car (only possible via Bluetooth);
- 9-inch multi-touch screen (full-touch);
- internal vehicle diagnostics (OBD), which connects via Bluetooth;
- the ability to control the radio via buttons on the steering wheel;
- the ability to change the backlight on the desktop in RGB format;
- You can configure up to three functions on one icon, which are interchangeable;
- when you need to park in a parking lot and then back up, the rear view camera will help you realize this plan;
- in the same way, it is possible to configure the front camera for parking;
- a special mode that allows you to turn on the radio after a certain time;
- the radio has connectors for various external drives, such as USB, SD, HDD, etc.;
- for lovers of good quality, it is possible to watch videos in FULL-HD mode;
- 4-channel amplifier, which is connected externally;
- GPS navigation (external antenna included).
How to remove a Toyota Corolla 150 radio
Toyota Corolla. Removing the radio and Installing the YATOUR USB adapter.
Replacing the original radio of a corolla 2008 e150
Installing a Chinese Android radio in a Toyota Corolla e150
Toyota Corolla 2011 (E150) disassembling the central part of the panel
Review of GU Radio with AliExpress for Toyota Corolla 2007-2011
How to remove a Toyota Corolla radio
Installing AUX on Toyota Corolla radio.
Head unit Toyota Corolla (150) 2007-2012
Full review of the Asottu clkll9060 Toyota Corolla e150 radio
Removing the front panel of Toyota Corolla 140/150
The options for the Toyota Corolla are constantly changing. If in 2006–2008 the Japanese could offer a not very functional filling compared to other manufacturers, then the models of recent years (starting from 2014) are not only reliable, but also an interior with modern devices, among which the Toyota Corolla radio deserves much attention . This is a universal gadget that is a collection of creative technical solutions and is ready to offer the user not only high quality sound and a flash drive connection, but also navigation functions, as well as other additional options.
Functional
The Toyota Corolla radio in 120 and 150 body types is installed in a specially designed standard recess on the dashboard next to the steering wheel.
Combining a complex of control systems, navigation and attributes to improve comfort and entertainment, the car radio is a real on-board computer that any owner of a 2013-2014 Toyota Corolla, as well as all subsequent models, can afford.
Among the main functions equipped with Toyota Corolla radios of the 10th and 11th generations are the following:
- support for major video and audio file formats – R/VCD/CD/CD-R/CD-RW/DivX- MP3/MP4/WMA/DVD/DVD;
- menu interface in Russian;
- operating system based on Windows CE 6.0;
- 6 CD changer;
- operation of the radio in several modes simultaneously, for example, navigation and music files;
- built-in external antenna with GPS module;
- ability to connect an SD card;
- USB connector;
- aux connector;
- remote control.
The listed functions are not a complete list of what is included in the optional device in the Toyota Corolla 2013 and other years.
Due to the simplicity of execution and standard communication systems, installing a radio on a Toyota Corolla of each year of production will not cause difficulties and can be done independently.
For Toyota Corolla 10th and 11th generations, in the “Classic” and “Standard” trim levels, you can install the radio using a special frame made of plastic. Therefore, when buying a device, you should pay attention to its availability.
Modification of the standard radio for Toyota Corolla (Toyota Corolla) E120 body: Aux/Bluetooth/USB/SD
For a very long time I wanted to deal with the issue of refining the standard radio, but everything was somehow not leisure. I wanted to modify the standard head and at the same time maintain its functionality. Moreover, its sound suits me quite well.
From the beginning there was an idea to remove (as many do) the connector from the radio. I did this on my last car. But it is not convenient to switch radio-Aux. Place a switch somewhere. Or bother with automation.
Therefore, it was decided to connect the input instead of the CD player. It is used extremely rarely, and it is inconvenient to use. In addition, the task was to do everything as cheaply as possible and use the “earned” bonuses to replace the standard speakers with something more harmonious.
It should be noted. External output is activated by the Disc button. The drive must contain any CD. Even if the radio displays a disk error, the external input will still work.
So, let's begin. Unfortunately, I did not capture the moment of removing the radio. I will say one thing, it is quite easy to get. A little internet, attentiveness and effort coupled with caution.
Sorry for the quality of the photos, something didn’t work out... That’s it, we took out the radio.
Bulky and heavy. Even Panasonic! I can’t get enough of it). Let's analyze that too. The radio consists of three blocks.
The main board itself, the display and button block and the CD drive block itself. All you need to do is separate them from each other. There are no difficulties.
Regular screws, regular screwdriver. I would like to draw your attention to the cables connecting the blocks. Do not tear, pull gently.
We must pay tribute, they are quite durable, but still.
It will be quite difficult to restore, the connectors are small, it is very difficult to work with them.
There was a fear that the idea would not work out. Everything is too small and complicated. Everything turned out to be quite simple and convenient. There were unnecessary actions, but then easier ways and solutions were found.
The greatest joy was that the caring Japanese had everything signed down, which contact was responsible for what.
True, I saw this only later, after sitting for about an hour with an oscilloscope searching for the necessary signals)).
So, the blocks were divided, everything was neat, everyone remembered what came from where. We are most interested in the CD block.
Namely, this part of it (cable and connector):
As the attentive reader will notice, everything is signed (sorry I found out about this late) )
It's simple. ACOM – analog ground. RCH, LCH - it’s even simpler here: yes, exactly, RIGHT channel, LEFT channel. Thus, a regular analog signal comes out of the CD drive and goes to the main board via a loop and is then switched electronically.
Carefully solder the wire as shown in the photo (ACOM). We take a good wire! Not Chinese! I took our old Soviet MGTF, reliable, flexible and strong. 30 centimeters long.
UPD 02/05/2017: in general, this wire is not needed. Ideally, you probably need to connect it to the output cable braid. It worked for me with the common “land” too..
Perhaps someone will find a different way to bring out the wires we need. Mine is somewhat barbaric. Although, if you wish, you can restore everything as it was.
I didn’t want to work with the connectors, there were very small and very small tracks around. You can get damaged in flight! But it will be extremely difficult to restore.
Further. We take out the train. And we perform the following operation on the drive side (where the circle is). Regular good scissors. Carefully. Approximately to the bend.
In this way we cut off the contacts we need. The rest of the cable will fit into the connector. And these contacts will remain on top, above it.
Carefully solder two wires (30 cm) as in the photo. We need the first and third contacts of the cable. The soldering iron should not be for soldering buckets and pans! 30-40 watts is enough! Rosin should not evaporate instantly!
There is a possibility of damage to the plastic component of the cable. Although, we must pay tribute, it is quite heat-resistant and durable. But we’d better not test its heat resistance and strength).
Let's put this unit back together. Almost like it was. I additionally secured the whole thing with tape in several places. You can use hot melt glue.
Carefully assemble the main unit and the CD drive unit. We bring our wires out from above.
Well, the final stage (I confess, it was done terribly, but I really wanted to include everything, I was in a hurry):
I would like to note that the output was made with an audio cable, again made in the Soviet Union, shielded, flexible and durable. It comes out of the radio through a hole drilled in the aluminum radiator. Not the best solution.
It may be easier to route the cable from below. Then pay attention to whether there will be space in the car. I decided to route the cable to the same place as all the radio connectors.
A regular 3.5 mm mini jack was wired at the other end. The wire was routed into a pencil case above the ashtray through a hole. An MP3 player or telephone was used. The sound is wonderful. I was happy.
Many people can stop there. Why was it? But because I quickly got bored of constantly plugging the connector into my MP3 player or phone.
Which will ultimately lead to failure of the connectors on the devices. So I had to continue.
I purchased this from a well-known online store:
I’ll say right away that I don’t know the parameters for this. ). Everything that is stated works. If you wish, you can choose something more interesting.
It was also important for me that Uncle Liao’s handicraft fit perfectly in place of the plug for the car’s standard clock.
Of course it needs some modification. And in general everything is fine with the power supply, the standard power connector is present! )
Screw plugs are included in the kit. Not installed yet. Anyone with straight arms can of course do it all flush. It will certainly be more fun. Perhaps not entirely aesthetically pleasing, but it suits me. )
Problems. If there were no problems when connecting the player or phone, then when connecting a device from China, a background appeared in the speakers.
In Aux, SD, USB modes, the background is almost invisible, but present. In Bluetooth mode, the background can be heard well, especially at maximum volume.
A power filter and shielding should help. But that's a little later. I’ll definitely write back and add about this in the near future.
UPD… (02/05/2017)
The future has arrived. )
The filter is done. Installed and tested. Absolutely no interference and no background. Even at maximum volume the speakers are silent.
The sound is great. Now all you need to do is replace the speakers).
And so, the electrical circuit diagram:
Implementation:
C1, C4 - electrolytes 1000 uF at 25 V. I don't recommend buying cheap ones. C2, C3 - ceramic capacitor 100 nF 50V
The choke was taken from an old power supply from a computer. I want to note this is a powerful throttle. For several amps. Quite large. Our current is not large, any smaller one will do, or even two separate chokes, not connected. I think 500 µH will be enough.
Two gray chokes and two green capacitors were not useful. I wanted to turn it on via audio output, but it wasn’t necessary.
PS: the Chinese craft turned out to be not so bad. The sound is excellent, all functions work. Finds flash drive and SD instantly. Sees all folders (Russian, English and Arabic). Switches tracks.
On the phone too. In general, I'm happy with everything.
Additional devices
The car radio combines a whole range of information devices, making it possible to display information from them on your screen - from built-in video cameras and remote devices, navigation equipment, parking cameras, and car condition monitoring devices. In addition, if necessary, you can output data from the on-board computer and car radio via an Internet connection, which provides communication with an external control center via a 3G modem.
The Toyota Corolla E150 is equipped with a standard radio 53816, manufactured by the Matsushita brand. Most Corolla 150 owners note that the volume of the acoustics is excellent, but the sound quality requires improvement.
Among the additional set of options that can be found on the 2013 Toyota Corolla radio, as well as all versions of the 10th and 11th generations of the Japanese legend (Fielder, Corolla Axio, etc.), the most notable are:
- antenna type radio signal amplifier;
- DVR CP-6001;
- DVB-T BOX;
- 2 DIN with navigation;
- the ability to connect the camera via Wi-Fi technology;
- Android system and the ability to synchronize with it.
The conveniently located monitor does not require you to turn or tilt your head to view the information on the screen. And the clear instructions describe in detail the process of installation, replacement and configuration; it is stored in the BC memory. In addition, all information that enters the on-board computer of the Corolla E150 and all cars of the 10th and 11th generations is displayed on the monitor. The presence of an aux output allows you to connect external audio media. For additional comfort and the possibility of convenient operation in the absence of lighting in the cabin, the standard Toyota Corolla radio in the 120 body and other cars of the 10th and 11th generations have backlighting of the control buttons using LEDs.
The “3-zone” mode allows you to simultaneously display the following data on the device monitor: information from the DVR, playing video or audio files, and navigation parameters.
Connecting the camera according to the pinout
Knowing the pinout of the car radio, you can easily connect the rear view camera with your own hands. Using the example of the popular Toyota Ca-Fi device, we will learn how to do this. The process itself is divided into two parts: the actual installation of the device with the connection and the connection of the rear view camera.
Note. Installing and connecting the monitor is no different from installing the factory head unit. You just need to swap the connectors and that's it.
But connecting the camera can be difficult for some. Here's what you need to know:
- The rear view camera for Toyota Prado is powered by 5V;
- To connect it, you will need a connector from the factory monitor, which remains free after installing the new radio;
- This same connector is 14-pin. But we only need two video signal wires and a reverse signal;
- In addition, you will need to convert the voltage from 12V to 5V.
Note. To convert voltage means to carry out the process using a special converter, which is sold in any store.
The camera connection diagram has its own pinout. This is what she looks like.
Pinout of toyota car radio connectors
The circuit is positioned as if you were looking at it from the side of the wires. The photo in the upper left corner is placed for clarity. So, in order to connect the camera to the Toyota car radio, you must first connect together the reverse signal and the Reverse wire on Ca-Fi. In addition, it will be necessary to install a converter and make a tulip for transmitting video data.
Note. This does not mean that you will have to literally do everything from scratch. You just need to buy Scotchlocks in the same store where you purchased the converter (they will help connect the wires to each other).
The photo below shows how to splice wires using tape.
Features of use, possible malfunctions
If replacement, adjustment or repair is necessary, checking the correct connection of the terminals, or other problems arise in the operation of the car radio on a 10th or 11th generation Toyota Corolla, then you should know how to remove the radio yourself without affecting the overall performance or damaging the car. This will help determine why the sound disappears or some functions are not available.
Before starting work, be sure to make sure that there is no voltage on all wires in order to prevent a short circuit in the entire electronic network of the Toyota Corolla 2013 and other years of production.
The removal and installation process follows the following scheme:
- remove decorative trims on the sides and top;
- remove the air duct curtains by pulling them out along the guides;
- disconnect the electrical contact and unscrew the 4 bolts, and then, carefully disconnecting, pull out the radio and lower it face down;
- Next, you should disconnect the speaker connector, power plug, radio antenna and connection to the buttons on the steering wheel.
Installation is in the reverse order.
Pinout of a head unit is an activity for marking or designating all outputs of the device to facilitate the subsequent connection of multi-devices or connection via aux or other outputs of various gadgets.
Step-by-step instructions for removing the radio on a Toyota Corolla
In fact, removing the standard radio is not so easy. You will have to unfold half of the central panel in order to get to the radio itself. Toyota's standard radio is unremarkable. Standard sound, no amenities, supports a small number of formats, of course, every self-respecting driver will want to replace it.
First we need to remove the silver trim. They are located on both sides of the central panel. Let's start, perhaps, on the right side. They are all held on with a latch. And to remove them you will have to pry off each of them - we used a special plastic knife or spatula in order not to damage the surface of the linings. The covers are removed from bottom to top. You need to pry from the outside of the panel. Let's look at the photo and everything will become clear.
Next, carefully pull towards you and remove the center panel trim of the Toyota Corolla. Place it aside. The result is the following - look at the photo.
We perform the same actions on the other side - the left. We also pry up the bottom trim and carefully remove it, then put it aside. We look at the photos, in principle, nothing has changed radically.
Next, we proceed to removing the upper linings, the removal principle is the same, but you should pry it off from below. Once you see the photos, you will understand everything. The same actions should be performed on the other side.
Having removed the covers, for your greater convenience, we decided to photograph the locations of the latches from the back side. The photos below should help you. There are four latches on each pad. They are highlighted with arrows.
After all four pads are removed, we begin to remove the air duct - the top one. To do this, we grab it with both hands - left and right, and then gently pull it towards ourselves. Everything is very simple. Let's look at the accompanying photographs.
Before pulling it out completely, you should carefully disconnect the hazard light button connector. In the photo, the connector is highlighted with a red circle.
After the air duct is pulled out, we turn our attention to where the Toyota Corolla air duct latches are located. They should remain on the panel and not in the seats.
Here it is worth saying that the disassembly process is almost complete, but now we need a tool 10 key, with which we will unscrew the four bolts holding the radio. In the photo, each bolt is marked with an arrow. So you don’t have to look too hard. Next, look at the photos and use the photos to unscrew the bolts.
After the bolts have been unscrewed, carefully pull out the radio unit towards you. This is not difficult to do, much the same as with an air duct. We take it with both hands and pull it towards ourselves.
After the radio is almost pulled out, carefully disconnect all the wires going to it, try not to damage the plugs, there is no need to pull anything, just carefully remove it. You can wrap the radio with a soft cloth to prevent it from scratching the surface of the interior and center panel.
This completes the disassembly process. We can say that the Toyota Corolla torpedo is waiting for its new guest. Let's look at the photo of the work done.
Disk Cleanup:
- We take the DVD and go to the bathroom;
- We wash the disc with liquid soap using light circular movements;
- Rinse off the soap and shake off the water;
- We take a hairdryer or just wait for the disc to dry.
Lens cleaning:
- We remove the car radio;
- We remove accumulated debris and dust from the walls of the case;
- We disassemble the radio so that we can get to the read head;
- Remove accumulated debris and dust from the boards and internal components using a soft brush;
- Clean the laser lens with a squirrel brush as it does not leave scratches.
What not to do:
- Use cotton swabs as they can leave lint that will further interfere with the operation of the device;
- Use cologne and perfume, as this can spoil some types of plastic from which the lens is made;
- Use great force as the laser suspension is very sensitive.
Cleaning other components of the car radio:
- Use a clean cloth soaked in alcohol to wipe the seat on the drive motor and the upper pressure ring;
- Clean the laser carriage guides;
- Lubricate them with technical Vaseline;
- Check the fastenings of the drive motor to avoid excessive runout of the laser disk.
If after carrying out the above operations the car radio does not start working, then most likely the laser can no longer be restored, or the fault lies in another unit, in which case it is better to entrust the repair of the car radio to experienced specialists.
Installing a new radio on a Toyota Corolla
You can install absolutely any radio suitable for Toyota Corolla, including head systems on Android, etc. However, we chose the Phantom DVM-1733G HD-i. This model is very convenient and has fairly good performance. Let's get started installing it.
First of all, we need to unscrew the mounting plates of the standard radio, they will be useful to us. We take a screwdriver (Phillips head), it is best to use a wrench, of course, since the bolts can be very tight. We unscrew only 4 bolts. In the photo they are highlighted with red arrows.
We also remove the four yellow plastic latches; they will also be useful to us when installing the radio. Let's look at the photo, there they are highlighted in circles.
After all this has been done, we no longer need the old radio; we can put it aside, or sell it to someone on the Internet. We attach the removed mounting plates and latches to the new radio; this is not difficult to do.
After that, we take all the wires and connect them, including the GPS antenna, and bring the USB cord into the glove compartment for the flash drive. Without fixing it, we check the functionality, if everything is good, we take our radio and insert it in place of the old one.
After that, we fasten it with four bolts, insert the air duct into its place, having previously secured the emergency brake lights. And in the end, we put the pad back on and rejoice at the update. After testing, the option we chose showed that it works better than the standard radio, and also better than any head system on Android.
Source
Installation of Redpower 12063 on a Toyota Corolla E150
Redpower 12063 - review of our customer's self-installation.
It all started when I purchased a Toyota Corolla. I always wanted to have a factory-standard radio in the cabin. This is exactly what was in my Korollka. But over time, having seen enough of how other Korollovods changed their radios, I began to understand that I lacked the functionality of the GU. Having saved up some money, I started choosing a device for myself. There were a lot of offers on the market. After doing a little research, I looked at GI in China. But before ordering, I scoured the market again and accidentally came across the Redpower . Since I met a lot of good reviews on the products of this company, and the prices are not as steep as those of other flagships of this market, I was also pleased that the store is located in Russia and provides technical support. support and warranty service, I decided to purchase Redpower 12063 for Toyota Corolla.
I made an order (at the same time I ordered a rear view camera and a TV antenna), transferred money through Sberbank and, in less than a week, received the parcel.
Appearance
Having opened the parcel, of course, I eagerly began to inspect my purchases. I was pleased with the appearance. All details look high quality. Only the color of the front panel is slightly different from the color of the original radio. Native - a little lighter. Apparently, Redpower was tailored to the interior of the poor Corolla configuration. And I have a pre-top one, where the plastic is a little lighter.
The kit also included a bunch of wires, all sorts of adapters, a GPS antenna, a stylus, a book with instructions, and a warranty card.
The installation was not difficult. First of all, of course, we remove the negative wire from the battery (just in case). We remove the plastic on the sides of the radio (just pull it towards you and a little up), four “10” bolts are hidden under them. We unscrew it carefully, without dropping them inside, pull the radio towards you and pull out all the plugs.
If the original mounting brackets for the radio tape recorder do not fit tightly to the radio tape recorder, simply drill out the extra pegs on the brackets and you’ll be in order.
I glued the GPS antenna under the central block of the heater deflectors, pulling it out towards me. Everything is attached with latches.
We connect the adapter to the standard wiring, antenna power wires, and rear view camera. We wrap anything that can rattle with anti-noise material. The standard car antenna plug did not fit the new radio. The problem was solved by purchasing an adapter at a car audio store for 250 rubles.
USB extension cable pulled into the glove box
We put it in place, put the terminal on the battery, turn on the ignition and check how it works
The radio starts working about 12 seconds after the GU is launched. You can immediately notice how the sound has improved, and if you play with the equalizer settings, it gets even better. The “Jazz” mode is more suitable for my ears, but this probably also depends on the installed acoustics and the noise of the doors and rear parcel shelf. Everything has been noisy for a long time now, all I have to do is replace the acoustics for complete happiness.