The standard audio system of the Corolla produces high-quality sound, but is characterized by weak power - the stock unit does not support the installation of additional components, as a result of which many car owners resort to tuning the acoustics.
Replacing the radio in the E150 is necessary to install new speakers and cut frequencies, as well as to connect multimedia functions: a video monitor or a rear view camera.
What can be installed on a Toyota Corolla E and what is needed for this
The design of the E150 provides for the installation of a radio of any format, which allows you to expand the functionality of the car several times. When replacing a standard radio with an upgraded head unit, it is possible to:
- Connecting a subwoofer and an additional pair of speakers;
- Installation of parking sensors and rear view camera;
- TV or satellite navigation connection;
- Installation of radar detector and video recorder;
- Interactive control via remote control, buttons on the steering wheel or using a smartphone.
When choosing a power unit for the E150, you should take into account the device interface: it is recommended to purchase a model with a wide touch screen and an installed Wi-FI or Bluetooth module. The performance of the processor is also important: the clock frequency and number of cores will optimize the load on the device and produce better sound: the greater the processor power, the more clearly you can cut frequencies and calibrate the equalizer.
| Manufacturer | vendor code | CPU | Screen size | Display type | Readable formats | Approximate cost, rub. |
| Nekvox | NEKV7892 | MTK3360 800MHz | 8 inches 1080*720 | Multi-touch, with active LCD matrix | MP3, MPEG4, WMA, WMV, MPEG. | 11280 |
| CarWinta | CF 3007 | Allwinner T8*1.8 Ghz | 8 inches 800*480 | Multi-touch, active matrix LCD, multi-color | MP3, MPEG4, WMA, WMV, MPEG. | 20100 |
| LeTrun | Trun 1423 | MTK 3561 4*1.3 Ghz | 8 inches 1080*720 | multi-color, multi-touch, resistive | MP3, WMA, JPEG, AVI, WMV, MPEG. | 22300 |
| Roximo | RX-1104 | MTK 3561 4*1.3 Ghz | 7 inches 800*480 | multi-color, multi-touch, resistive | MP3, MPEG4, WMA, JPEG, AVI, | 23800 |
| Carmedia | KD 8010 P3-7 | RockChip PX3 4×1.6 Ghz | 7 inches 800*480 | multi-color, multi-touch, resistive | MP3, MPEG4, WMA, WMV, MPEG. | 25900 |
| Carmedia | OL 8694 | MTK3561 4×1.8 Ghz | 8 inches 1080*720 | With active matrix LCD multi-touch, resistive | MP3, MPEG4, WMA, JPEG, AVI, WMV, MPEG. | 27980 |
Please note! When purchasing an audio system in a Toyota Corolla E150, it is necessary to take into account the compatibility of the device with the design of the transition frame: the 1din model does not provide for the possibility of installation in a 2din frame, at the same time, an inversely proportional installation will cause a number of difficulties.
This is interesting: Automatic transmission, manual transmission Nissan Almera classic: fuel consumption, problems
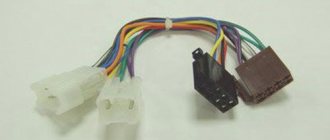
Several connection schemes
Pinout of toyota car radio connectors
It is believed that the main mistake when connecting Toyota car radios is pulling the positive wire from the cigarette lighter. This will in no way have any effect, since the power of the head unit will drop several times (this is easy to verify if you pay attention to the flashing backlight while the device is operating at high volume). In addition, connecting Toyota car radios through the cigarette lighter will not eliminate sound distortion, which will begin to appear noticeably earlier. On the other hand, in some cases this option may be considered suitable for implementation. The ideal option for connecting Toyota car radios, as well as all others, is to provide the main power supply from the battery. It is advisable to use high-quality wire (it is in no case recommended to skimp on the cable) and be sure to use a fuse, which must be placed as close to the battery as possible.
Note. Let us note right away that car radios have not one, but two power wires. As a rule, yellow is responsible for the main power, red for control (goes to the lock).
In addition, the pinout of the remaining wires:
- N* – negative wire. They are usually connected to the car body, providing ground. However, it is recommended by experts to connect it to a battery;
- C is the wire that is responsible for the amplifier or active antenna.
In addition, the car radio is also equipped with speaker wires (they go to the rear and front speakers):
- B, C-th – wires for front speakers;
- Z, F – wires for rear speakers.
Note. You also need to know that each pair of acoustic wiring contains additional monotonic and negative wires. The latter is often marked with a black stripe over the main color.
Connection according to diagram 1
Connectors for car radios
- We connect the power wires to each other;
- We connect them to the battery.
How to choose the right Android radio for Toyota Camry 40
Replacing the standard Camry radio is the desire of car enthusiasts who lack the functionality of the “native” head unit. Installing a USB MP3 adapter provides several convenient features, but does not completely solve the problem. Therefore, the only option is to install another entertainment system.
Before purchasing a new radio for your Toyota Camry, you need to understand what features you require. If you only need to play audio from a flash drive or phone, then installing a USB adapter is enough , but if you want to watch videos, surf the Internet or need navigation, then only replacing the head unit will help.
One of the main characteristics of the radio is the performance of the processor; do not rush to buy a head unit according to the principle: “The more cores, the cooler!” It is not always so. The second most important aspect is the amount of RAM; for a car radio, 2-4Gb is enough. Screen size and resolution are the next criteria.
There are Tesla-style entertainment systems for the Camry with a 12.1-inch monitor that look impressive and provide the owner with a huge list of options. But a Tesla-style radio in the Camry 40 interior will look foreign and will not be cheap. The antipode of such a GU is an entertainment system with a small display size of 7 inches, which is almost identical in appearance to the “native” radio.
The advantages of head units for Toyota Camry with the Android operating system are:
- high productivity, i.e. quick start of work and instant response to commands,
- playback of all possible audio formats,
- good screen resolution,
- availability of Bluetooth, USB and AUX,
- ability to connect to wireless Internet (3/4G),
- good sound quality of played audio files,
- installation of applications available for Android OS,
- synchronization with the phone, if it is also on Android.
The radio pinout on the Toyota Camry V40 may not be necessary; if you buy a good entertainment system, it will have plugs identical to the stock head unit.
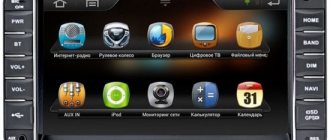
Review of Toyota Corolla Android 2006
Car radio Corolla Toyota
Car radio equipped with a good processor.
Description
So:
- The device is equipped with a 3D accelerator;
- The RAM size is 256MB;
- There is Internet access via modem or Wi-Fi;
- GPS navigation with dual-zone capability;
- There is a good equalizer that allows you to fine-tune the sound;
- Supports almost all currently known formats;
- The device has an 8-inch widescreen display with a control system that allows you to adjust brightness, contrast and color;
- There is a built-in digital radio receiver. It operates in the FM/AM bands.
Features of USB adapters for
It is not convenient to constantly record music and audio books for listening in the car onto discs. It’s easier to use a flash drive and a phone, but the native multimedia system of the Camry V40 does not have such functions, so car enthusiasts install USB adapters.
USB adapter (don't take it as an advertisement)
Advantages of installing an MP3 adapter in Toyota Camry V40:
- You can do the installation work yourself
- the cost of the device is not high
- Steering wheel music control is retained
- The CD changer continues to operate normally.
To install the USB adapter, you need to disassemble the head unit, this process is described above. Next, the MP3 adapter is pinned out, the cord is inserted into the plug of the CD changer at the back, be careful into the 12-pin connector (6+6). The adapter can be hidden behind the stock head unit.
It is best to pull the USB and AUX cords into the glove compartment to the farthest hole because the glove box guides move closer to it. To use a USB flash drive (flash drive) in a car, you need to format it in FAT32, create folders CD1, CD2, etc. and record music in MP3, WMA, AAC format. (The number of CD... folders that will be played depends only on the head unit and how many disks it is designed for). Jumping between the standard head unit and the adapter occurs after pressing the “DISC” button. Switching folders on a flash drive is similar to switching disks in a CD changer.
Pros of using an MP3 USB adapter:
- ability to play a large number of songs,
- Each folder can store up to 100 tracks,
- the last played song is saved,
- when started, the song plays from the moment at which it was interrupted,
- AUX allows you to play audio files from any device with a headphone jack.
How to properly connect the factory radio of a Toyota Corolla
In order to connect the standard Toyota Corolla radio, it is worth understanding the reasons why the device is being changed.
The fact is that the proprietary Japanese version upsets many because:
- has a crooked FM range;
- reads CDs that were not purchased from company stores rather poorly;
- can shoot CDs quite far;
- The disk reading function in MP 3 mode is completely absent;
- does not accept the flash drive;
- there is a TV available, but it often does not work;
- navigation has maps of Japan or does not work at all;
- inability to repair equipment.
Connecting the Toyota Corolla radio correctly will be much easier than connecting a huge number of wires to connect the MP 3 player. However, it would be better to replace the standard radio from the Japanese manufacturer with a European version for the Toyota Corolla, which can play high-quality video and audio files.
So, connecting the radio to Toyota 86120-60581 is done in stages:
- remove the frame by unfastening the semicircular frame from the clips;
- pry it up with a screwdriver and carefully pull it out towards you;
- you can help yourself remove the knob by piercing the rear holes with a screwdriver;
- unscrew the bolts of the radio;
- disconnect all connectors one by one;
- take out the old radio.
Removing the frame
It is worth understanding that the connectors of the Euro radio will not fit the connectors of a Japanese vehicle, so you will have to purchase adapters. The thing is that the Toyota receiver has a couple of connectors instead of one for some unknown reason.
Before connecting a new unit, it is necessary to correctly pinout:
- blue-yellow wire – to permanent plus;
- green-red – to the ignition switch;
- brown – negative or grounding;
- green – for illumination;
- blue-yellow and purple – left (-) front speaker;
- light green and blue – right (-) front speaker;
- black and yellow – left (-) rear speaker;
- red and white – right (-) rear speaker.
Radio pinout
Installation and calibration of a new GU: pumping up the Corolla correctly
Installing a radio is not a complicated procedure, but it has a lot of technical features that should be taken into account - for stable operation it is important to connect the device correctly.
The installation procedure for the head unit will take no more than 1-1.5 hours and will require pliers, a fixed knife and a long slotted screwdriver.
It is also recommended to purchase additional consumables: adapter frame, electrical tape, heat shrink tubing and wiring. Installation of the radio on the E150 is carried out as follows:
- First, turn off the power supply to the car by disconnecting the “negative” terminal from the battery;
- Next, we dismantle the central panel under the car’s dashboard and pull out the panel towards ourselves. It is necessary to snap off the plastic pistons that fix the panel using the tip of a slotted screwdriver, having previously wrapped the slot with masking tape;
- Then remove the cassette player casing and unscrew the fixing screws securing the audio system to the bracket. Now we remove the frame and pull out the radio towards ourselves, after which we disconnect all the wiring from the device;
- If necessary, install the transition frame by snapping the product into the plastic latches on the panel and mount the new control unit, securing the device with screws;
- Now we connect the cables to the radio: audio output, TV and GPS antennas, as well as laying audio streams to all speakers in the car, after which we add power cables and a USB interface;
- Next, if available, we connect the control buttons located on the steering wheel to the control unit and assemble the trim in the cabin.
Note! Connecting cables to the audio system must be carried out strictly according to the instructions supplied with the device: depending on the brand and quality of the components, the color and interface of the wiring may differ. It is also recommended to install a fuse on the supply “positive” wire to prevent a short circuit due to overload.
This is interesting: What kind of fuel pump for Mitsubishi Lancer 10 and its replacement
How to install a rear view camera on a Toyota Corolla E150: step-by-step instructions
Tuning or replacing a stock power unit allows you to increase the functionality of the car by installing additional electrical equipment - the most popular upgrade is installing parking sensors or a rear view camera. To install the KZV you will need no more than an hour of free time, as well as a set of tools: a set of wrenches and screwdrivers, pliers, electrical tape and a utility knife.
The installation procedure consists only of connecting the components to the general electrical circuit of the car - for the correct functioning of the camera at the front of the power unit, the following connectors must be connected:
- P1 – power supply to the short circuit;
- V1 – video signal output to the car head unit;
- V2 – analog video signal extender;
- P3 – cable for automation: designed for autonomous switching of the monitor to the short circuit;
- A1 – “positive” wire for the license plate illumination;
- A2 – license plate power supply mass.
To connect a rear view camera you need:
- Remove the trunk trim and the left side of the passenger compartment - there is a main cable duct there;
- Next, we lay the video signal wiring and the automatic camera switching cable, after which we restore the casing;
- Then we install the camera in the left license plate lamp, having first unscrewed the fasteners and fixed the device;
- Now we connect the camera to the power supply for the license plate illumination and connect the necessary cables to the control unit according to the diagram.
If you install additional acoustics to the power unit, it is recommended to power the rear view camera directly from the battery, which will reduce the overload on the wiring. When installing to a battery, it is important to find a powerful ground on the car to close the circuit - connecting to the “minus” of the license plate in this case is fraught with consequences.
Location
There are two main places where the rear view camera is most often installed on the Toyota Corolla E120:
- under the trunk lid;
- under the turn signals.
Installing a rear view camera on a Toyota Corolla under the trunk lid allows you to see what is located at the bottom of the car near the bumper as closely as possible. However, you will not be able to see anything other than the curb, and in other cases, for example, when parking backwards to another car, it may be useless if the second car is a truck and its bumper is much higher than the image coverage.
Installing under the turn signals shows the bottom area near the wheels less clearly, but allows you to better see everything behind your car. However, in this case it is shifted to the left or right, under the left or right lamp. Some people find this not entirely convenient. In addition, the camera itself is clearly visible from the outside and is accessible to those who want to unscrew something from your car.
Review of car radio Intro CHR-2178
The car radio is not only for Toyota Corolla, but also intended for other cars:
- Equipped with a 7-inch touch screen. A device was developed on a special platform that significantly increases the speed and quality of data processing;
- Navigation is carried out using a built-in GPS receiver. Maps of different countries of the world are supported;
- The radio picks up well. It is possible to work in the FM/AM bands. RDS supported;
- Menu in Russian. Possibility of connecting the control to the steering wheel of the vehicle;
- Possibility of flashing the device.
How to connect a camera to a radio with your own hands
Initially, you need to select an installation location. There is enough space in the rear of the car, but if you take into account the coverage of the broadcast picture, the choice is reduced.
It is worth considering the location of the camera eye. It must have a view of the entire shooting angle and not be obscured by other body elements.
There are two installation options: under the license plate and under the rear window. Here it is worth considering the type of car body. For station wagons, due to the lack of a long trunk, both methods are suitable. For sedans, the optimal location is in the license plate compartment.
Let's move on to the connection. Before starting work, you need to prepare the tool:
- the camera kit itself with wires;
- screwdriver;
- a set of keys;
- pliers;
- knife;
- plastic ties;
- electrical tape or heat shrink tubing.
Sometimes you may need to drill several holes to mount the rear camera. In this case, you should stock up on drills and drills. Some car models have a prepared place for the camera, for which you just need to remove the factory plug.
Prepare the car interior for wiring. Carefully remove the upholstery. Choose places where the cable will not experience deformation from the feet of passengers, and also avoid sharp bends of the wire. It will be reliable to strengthen the wire on the standard highway of the car. Secure the line with plastic ties.
Tip: For the safety of the machine's electrical circuits, all connections should be made with the battery disconnected. This eliminates the risk of an accidental short circuit to ground.
Installation of Car Audio in Toyota Corola
"Music for RAP"
Toyota King 2008 car
Installed acoustics:
Front:
- Hertz HV 165.4 L + Morel MT 22
Rear trunk lid:
- Morel Tempo 6
Subwoofer:
- Kicx QS 300
Amplifiers:
- Subwoofer: Kicx qs 1.350
- Acoustics: Blaupunkt GTA 4 special MK 2
Head device:
- Pioneer deh 3100 dvd
Let's start with the fact that the Customer's requirements for this car initially consisted of a budget of a certain amount (selection of components + cost of work) and a certain style for the musical genre - This is RAP. Also, he simply, like the most ordinary person, wanted to feel comfortable in his “plastic” car, we hint that it was necessary to do thorough noise and vibration insulation of the entire interior + anti-creaking of all plastic parts of the car.
As for the installation of acoustics and amplifiers itself, we proposed to do the following:
Make front podiums for the midbass in the doors and for the high frequencies on the windshield pillars. In the trunk, make a subwoofer using Stealth technology for the left wing of the car. Make amplifiers under the false panel on the back of the rear seat. But the customer did not make one decision right away! The conversation leads to the fact that in one of our works he saw on the trunk lid an interesting podium made specifically for listening with the trunk open on the street. Well, you understand, we all love barbecue, and it becomes more and more fun when our favorite compositions are played. Having calculated his budget, he still decided on this invention and when the time came to pick up his car, the client was probably most pleased with the fact that now he also had his own small “BBQ OPEN AIR”.
We decided on the selection of components right away. For the front, we chose a good combination of bassy midbass Hertz hv 165 L.4 from the new line (which is directly similar to the higher class ML 165 from the Mille series) and silky tweeters Morel mt 22, which softly play the most subtle notes of instruments without straining harshness and distortions. All this was shared through the Hertz 2w.10 passive crossover.
For the bass section, we decided to try the Kicx QS 300 Subwoofer, also from the new line of this company, equipped with two 4-ohm coils and a very good nominal power of 600 watts. The amplifier for the subwoofer was taken from the same company Kicx QS 1.350, connecting the subwoofer to the 2nd amplifier gave it a power of 630 watts, which was undoubtedly enough for the subwoofer.
Now we had to decide on our idea for the trunk lid, since the budget was already really tight, we decided to take, in our opinion, the most successful 2-component acoustics in terms of price and quality, Morel Tenpo 6. After all, our requirements are a paper diffuser and a silk tweeter, and the price is just right.
After all the determinations and purchases, we began the installation itself.
The first stage, accordingly, was complete noise and vibration insulation of the car interior. The floor and trunk were glued with Bimast standard 4 mm + splen 4 mm and accent 10 mm, the rear doors and roof were glued with Vibroplast Silver + splen 4 mm and roof accent 10 mm. The doors were already taken much more seriously, since rigidity was required for maximum midbass output. The inner and outer parts of the door were rolled with Vizomat MP, which has excellent rigidity, but when gluing it requires heating with a hairdryer and careful rolling with rollers, after which a second layer of 4mm splen was glued, and on the door trim there was a soft material, Bitoplast 5mm, which gave an anti-creaking effect.
After gluing the car, we began making podiums for the front. We mainly use plywood as a base and finish it with putty and fiberglass on top. The HF stands are cleanly removed from putty of the same series; it creates rigidity very well. The lower podiums were covered with black leather, and the pillars with light gray Alcantara.
The subwoofer housing was made using the “more volume, less trunk space” technology, that is, STEALTH. The frame and base were 21 mm plywood, the back wall was entirely made of fiberglass. The thickness of the walls of the back shell turned out to be 8 mm, but the volume itself was 44-45 liters. We also made a false panel for the amplifiers, and covered it all with Graphite-colored carpet.
Lastly, we started making the podium-case for the trunk lid. The inside of the trunk lid itself was painted semi-matte black to match the color of the podium and the inside of the lid. The base was also plywood, but thinner 10 mm, after which they stretched a strong fabric and impregnated it with resin, after drying, they put four more layers of glass mat inside, and then they stretched a second layer of the same fabric and again thoroughly impregnated it with resin. After everything was done, The wall thickness turned out to be 4 mm, which is quite enough for such a frame (we are not building a subwoofer). All the irregularities were then smoothed out using putty and holes were cut out for the tweeters (In Russian - PISCHALKI). We reupholstered this podium with black Alcantara, and on the lid itself we installed two switches to turn the speakers on/off.
Let's summarize the above. On the front: the midbass played very tightly, with good attack and speed, at the lowest frequency limits it handled very well, while the tweeters themselves did not sound intrusive and softly conveyed good coloration at high frequencies. Regarding the stage, I will say that the correctly chosen direction of the tweeters gave a good scene, which can rarely be caught in a non-processor system. The voice stood in front of the driver directly above the dashboard, practically not moving anywhere, localizing a good effect of the depth and width of the stage. Regarding the subwoofer, I will say one thing: what we wanted is what we got, soft, accurate and beautiful bass, which in RAP is only “Hurray” and the power reserve is really good. Last of all, having already opened the trunk and pressed the on buttons, we heard the rear parcel shelf, which, according to its purpose, will be used for sounding the street. The very good attack and soft silk of the Tempo tweeters worked well at high volumes, producing loud and clear sound without distortion. The owner of the car himself was very pleased with the entire installation.
SEE A PHOTO REPORT OF THE WORK PERFORMED BELOW.
Installation of podiums on windshield pillars covered with light gray alcanatara
Installation of podiums on windshield pillars covered with light gray alcanatara
Piner 3100 head unit and adapter frame installed
The bass control is neatly located in a pocket under the steering wheel
Completely finished trunk is ready for use
Completely finished trunk is ready for use
The amplifiers and capacitor are located under the false panel
The subwoofer is installed in its place
The subwoofer is installed in its place
The podium on the trunk lid was covered with black Alcantara. The trunk lid was painted with matte black paint.
The podium on the trunk lid was covered with black Alcantara. The trunk lid was painted with matte black paint.
The podium on the trunk lid was covered with black Alcantara. The trunk lid was painted with matte black paint.
The podium on the trunk lid was covered with black Alcantara. The trunk lid was painted with matte black paint.
Manufacturing process
Preparation for making a podium for the trunk lid
Preparation for making a podium for the trunk lid
The finished hull was covered with graphite-colored carpet
The finished hull was covered with graphite-colored carpet
case volume 44-45 liters, wall thickness up to 6 mm
The subwoofer is manufactured using stealth technology. The base is plywood, the back is fiberglass.
Door podiums covered in black leather
Door podiums covered in black leather
Podiums for midbass are made using plywood and putty with fiberglass
Podiums for midbass are made using plywood and putty with fiberglass
The process of making podiums into racks for tweeters
The process of making podiums into racks for tweeters