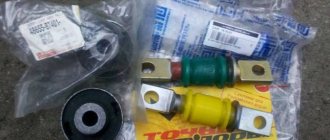
Hi all! I decided to replace the light bulbs in the interior, front doors, trunk and license plate lamps with LED ones.
A useful article about the types of light bulbs that are used in the Camry 40: toyotacamry.ru/blog.php?b=910&goto=prev I will briefly duplicate it in case it is deleted.
According to the manufacturer's recommendations, the following lamps are used on the Camry XV40:
1 – high beam lamp, type HB3; 2 – front parking lamp and license plate lamp, type W5W; 3 – low beam lamp, type H11 (halogen) or D4S (gas discharge); 4 – front and rear turn signal lamp, type WY21W*; 5 – fog lamp (FTL), type H11; 6 – rear brake light and side light lamp, type W21/5W; 7 – reverse lamp, type W16W; 8 – rear fog lamp, type W21W; 9** – side turn signal lamp (on the body), type WY5W*
*The letter "Y" in the name indicates that the color of the lamp is yellow, although in reality the color of the lamp is orange.
** Replacement of these lamps on the Camry XV40 is not provided; If the lamp burns out, you must replace the lamp assembly according to the instructions given in our reference book.
Lamps used in Camry XV40 interior lighting:
1 – lamp for general interior lighting (central lamp), type C5W (length - 31 mm); 2 – lamp for lighting the driver’s and front passenger’s seats (front lamp), type W5W; 3 – individual lighting lamp (behind the sun visor), type W5W; 4 – lamp for lighting the glove compartment (glove compartment), type T5; 5* – lighting lamp for the cigarette lighter contact cup (“cigarette lighter socket”), type T5; 6* – lamp illuminating the scale of the automatic control mode and the “travel” of the automatic transmission selector lever, type T5; 7 – left/right front door opening lamp, type W5W; 8 – luggage compartment lighting lamp, type W5W.
* A green rubber band-filter is stretched over the light bulb, simply called a “gadget” by car enthusiasts.
After researching the Internet, we purchased: 1) PHILIPS 127916000KX2 (6000k), W5W (T10) - 5 packs (2 pcs per pack). Purpose: — Front doors (2 pcs) — Interior lamp, front (2 pcs) — Visors, driver and passenger (2 pcs) — Trunk (1 pc) — Rear number (2 pcs)
2) PHILIPS 129416000KX1(6000K), C5W (length - 30 mm) - 1 package (1 piece per package). Purpose: — Interior lamp, rear. After installation, I noticed that the light from the diode was “more yellow” than the other diodes in the cabin, although all of them had a temperature of 6000K.
A little about the replacement process General: — Tools: flat thin screwdriver, Phillips screwdriver. — Keep in mind that the bulbs being replaced may be hot. — If you insert a light bulb and it does not light, swap the poles of the light bulb. — I did the replacement during the day, so in the photo there may be a feeling that the diodes give out little light.
1) Front doors There is no need to remove the door trim; the lamp can be easily snapped off if you pry it from below with a flat-head screwdriver. Result:
2) Visors, driver and passenger. It is better to remove both lamps by prying the latch on the left side of the lamp. “Holding” latch in the photo:
3) Interior lamp, front We pry up the plastic from the side of the windshield, they snap off quite easily.
4) Interior lamp, rear Upd:
: Without removing the lampshade, try to “unfasten” the glass. Please note in the photos below that there are 2 large latches along the diagonal of the lampshade, and you need to “defeat” them.
Having snapped off the lampshade, remove the reflector by prying it out with a screwdriver. After changing the light bulb, do not forget to insert
reflector in place.
5) Rear number Remove the trunk trim: snap off the pistons using a flat screwdriver and unscrew the handle.
As it turned out, one of my light bulbs burned out, because... moisture has entered the lampshade.
6) Trunk The light bulb is easily accessible from the trunk; it can be removed by snapping off the “protective” plastic.
To remove the courtesy light on a Toyota Camry we need the following tool:
- small slotted screwdriver;
- large slotted screwdriver.
Before removing the lampshade, it is advisable to disconnect the battery.
How to remove lampshades: front and rear passengers
1. Ceiling light for rear passengers
To remove the lampshade, you need to insert a small screwdriver between the lampshade body and the pressure glass of the lighting, then push it towards yourself and snap the glass out of the hooks, as shown in the photo. Be very careful! The plastic body of the lampshade is very soft and pliable; with excessive force, it turns white and wrinkles!
We perform the same operations with other glass.
The result of our operations is as follows
We did all this to open access to the ceiling and ceiling mounts. They are located around the perimeter of the lampshade, in the lighting niches, and are made of metal spring-loaded spacers. There are four of them in total, for better understanding, they are located in the photo below and circled in red. The photo shows the back side of the lampshade, namely the side fastenings, a similar situation with the fastenings on the other side.
After performing this technique with all four hooks, remove the ceiling lamp by disconnecting the electrical connector with a slotted screwdriver.
2. Ceiling light for front passengers
The front ceiling lamp is held in place by four dowels located in the corners. To clearly understand the mounting location, you need to look at the photo below, which shows the back side of the lampshade. Mounting points are circled in red.
Open the compartment for glasses (eyeglass case), grab the lid with both hands and forcefully pull (pull) down. During dismantling, some of the bulbs may remain on the body; they will need to be removed with a screwdriver and returned to the seats of the lamp.
Next, use a screwdriver to disconnect the electrical connector.
To remove the lampshade in a Camry you need to be extremely careful, the plastic is soft and parts can be repainted if handled carelessly.
Foot lighting
To install footwell lighting with your own hands, the car owner will have to purchase lampshades. The front nodes are made using tape. The rear lamps are attached with Velcro.
Surface Mount LED Bulbs
- Pull out the wires coming out of the cover to connect to the on-board network.
Connecting lampshades to the on-board network by welding
- Protect the weld with heat shrink cambric
Cambric shrinkage instead of welding
- To avoid damage to the insulation, protect the entire length of the laid cable with a sheet.
Protective sheath along the entire length of the wire
- We install the cables under the passenger seat and then move to the sills.
Cables under passenger seats
- Continue to pull the yarn across the threshold
Threads on the threshold
- Route cables for driver foot lighting.
Cable routing under the driver's feet
- Complete the electrical work on the second sill and install the rear footwell lights.
Electrical installation on the threshold
Driver side lighting
Passenger side lighting
Rear seat footrest lighting
photo report on installing bright white LED backlighting on v50
On the occasion, I made a photo report on the installation of bright white LED lamp boards in the standard interior lamps of a Toyota Camry V50.
The kit consists of 8 boards designed to replace standard incandescent lamps in all interior lamps. There are just 8 of them in the V50 interior.
Bright white LED lighting kit.
Let's start with the lampshades located in the doors.
Using a thin, flat, metal tool, pry the lampshade by the edge (closest to the front of the car) and remove the lampshade from its seat.
Next, use the same tool to press the latch and disconnect the wiring connector from the lampshade.
The next step is to disconnect the plastic heat shield from the lamp housing.
Now you can remove (by squeezing out) the standard light bulb.
Let's start installing the LED boards. This is what the kit boards look like, designed for installation in door lamps:
Using a pushing motion, we drive the board into the lamp socket.
All. Now you can connect the connector and install the lamp in its place.
Since LEDs do not emit as much heat as standard incandescent lamps, the heat protection cap is no longer used.
Front ceiling lamp.
Using the same flat tool, we pry up the glass and remove it from the holders.
We remove the standard light bulb.
We take two boards intended for installation in this lampshade.
Attention! When installing these boards, make sure that the cut on the board is located on the side where the casing bulge is located in the lampshade.
Insert the boards by pressing them all the way. Turn it on and check it.
Mirror lighting in sun visors.
We press out the fastening clip and remove the lamp housing from the ceiling.
Disconnect the lamp holder from the lamp housing.
We take out the standard light bulb.
Insert the LED board.
This is what the boards look like, designed for installation in mirror illumination lamps.
And in the reverse order, we assemble the lampshade and install it in its place.
And finally, the rear ceiling lamps.
We pry up and remove the glass diffusers of the lampshade.
We remove the standard light bulbs.
And in their place we install LED lamp boards.
This is what LED board lamps look like, designed for installation in the rear ceiling lamp.
We check the functionality and install glass diffusers.
All. We admire the result of the work done. ))
Let me remind you that the cost of a set of bright white ceiling LED lighting for the Camry V50 is 3,000 rubles. The cost of installation at the club auto center is 500 rubles.
You can purchase this backlight (with the ability to send it to any region of the Russian Federation) in the club store. Read more. Well, installing it (as can be seen from the above report) is, in principle, not difficult to do on your own.
Conventionally, light bulbs can be divided into those that are located in the cabin and outside it. The first provide illumination for the driver and passengers. Some of the interior lamps serve to signal various driver actions. There are separate dashboard lamps that serve to inform the driver about the condition of the car. Light bulbs outside the cabin provide illumination of the road at night, and also inform other road users about the driver’s actions.
The purpose and type of lamps used, shown in the figure above, are shown in the table below.
Table - List of main lamps
Location of lamps in the cabin
The list of lamps used in the Toyota Camry 40 interior is given in the table below.
| Number | Bulb type | Purpose |
| 1 | C5W | Central lamp. Serves to illuminate the car interior. |
| 2 | W5W | Front lamp. Illuminates the front passenger and driver's seats. |
| 3 | W5W | Individual lighting |
| 4 | T5 | Glove compartment lighting |
| 5 | T5 | Cigarette lighter illumination |
| 6 | T5 | Automatic gear selector illumination |
| 7 | W5W | Doorway lighting |
| 8 | W5W | trunk light |
Lamps used in Toyota Camry xv40
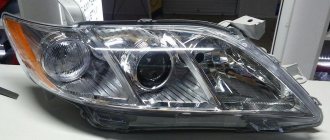
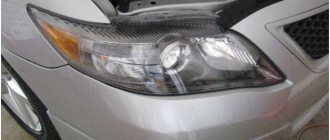
Owners of the "magpie" often complain about poor low beam. You can solve this problem by adjusting the headlights or replacing the light bulbs. We talked about how to adjust the optics and fog lights of the Camry 40 in this material.
In the manual for Toyota Camry 2006 - 2011 there is a table containing information about electric lamps.
Detailed information about light bulbs used in optics and flashlights of Toyota Camry XV40:
- high beam - HB3,
- side lighting and license plate illumination – W5W,
- low beam - halogen H11, gas discharge D4S (xenon),
- front and rear turn signals – WY21W,
- fog light – H11,
- rear brake light and dimensions – W21/5W,
- reverse gear – W16W,
- rear fog lamp – W21W,
- side turn signal (on the body) – WY5W.
The letter “Y” in the lamp labeling indicates that the lamp color is yellow. The manufacturer does not provide for replacing the bulbs in the side direction indicators; the lamp is replaced as an assembly.
Bulbs used in Camry 2009 interior lighting:
- general lighting, central lamp – C5W,
- light for driver and front passenger - W5W,
- lamp in the sun visor – W5W,
- glove compartment lighting – T5,
- cigarette lighter bulb – T5 (with green filter),
- automatic transmission selector travel light – T5 (with filter),
- front door opening lighting – W5W,
- trunk lamp - W5W.
Replacing low beam, high beam and headlight bulbs in Camry 40
If the lights on the Camry 40 stop lighting, the instructions below will help correct the situation. Restyling and pre-restyling lamps change in the same way.
Open the hood. When working with electrical equipment, the manufacturer recommends removing the negative terminal of the battery.
Left headlight
The following are instructions for replacing the low beam light bulb.
Low beam
- Hold the lamp by the base that supplies power to it.
Power supply for low beam lamp
- Turn a quarter turn counterclockwise.
Dismantling process
- Pull out the lamp.
Removed lamp
- Squeeze the latch.
The clamp compression process
- Disconnect the lamp from the terminal block.
Disconnected lamp
- Connect the new lamp, checking the secure fit.
Connecting the lamp
- Insert the lamp into the socket.
Lamp installation process
- Fix the lamp. For these purposes, you need to turn it a quarter turn clockwise.
Fixing the lamp
You can change the high beam bulb according to the instructions below.
High beam
- Turn the lamp by the base and terminal a quarter turn counterclockwise.
Rotating the high beam lamp
- Remove the lamp.
High beam lamp
- Disconnect the light bulb from the terminal.
Disconnected lamp with terminal block
- Install the new lamp into the socket.
Installation of a new high beam lamp
- Secure by turning it a quarter turn clockwise.
Fixed light bulb
Changing the size lamp will require a screwdriver.
Dimensions
- Dismantling the light bulb responsible for the side lights must begin by turning the wheel to the side.
Turn the wheel
- Pry off the clip.
Prying up the clip
- Remove one fastener first, then the second.
Removing the fastening
- Bend back the protection.
Gaining access to the light bulb
- Remove the size lamp in the same way as the high and low beam lamps.
Dimension lamp connector
- Install a new lamp.
- Check how the dimensions work.
Interior lighting Toyota Camry 1992-
- Repair manuals
- Repair manual for Toyota Camry 1992-1997.
- Interior lighting
15.17.6. Interior lighting
Replacing the interior light bulb
Replacing the personal interior lighting bulb
Replacing the glove compartment light bulb
↓ Comments ↓
1. Operating instructions
1.0 Operating instructions 1.2 Instrument cluster 1.3. Keys 1.4. Doors 1.5 Headrests 1.6. Seats 1.7 Setting the steering wheel height 1.8. Light switches, windshield wipers and direction indicators 1.9. Control devices 1.10. Indicator lamps 1.11 Econometer 1.12 Ignition switch 1.13. Automatic gearbox 1.14 Manual gearbox 1.15. Cruise control 1.16. Heating and ventilation system 1.17 Clock
2. Maintenance
2.0 Maintenance 2.2 Maintenance intervals
3. Four-cylinder engine
3.0 Four-cylinder engine 3.2 Engine repair operations on a car 3.3 Top dead center of the first cylinder 3.4. Cylinder head cover 3.5. Intake manifold 3.6. Exhaust manifold 3.7. Toothed belt and pulleys 3.8 Replacing the front crankshaft sealing ring 3.9 Replacing the camshaft sealing ring 3.10. Camshaft and pushers 3.11. Cylinder head 3.12. Oil pan 3.13. Oil pump 3.14. Flywheel / drive plate 3.15 Replacing the rear crankshaft sealing ring 3.16. Powertrain suspension
4. Six-cylinder V6 engines
4.0 Six-cylinder V6 engines 4.2 General information 4.3 Repairs that do not require engine removal 4.4. Top dead center (TDC) of the piston of the first cylinder is 4.5. Engine 3VZ-FE 4.6. Intake manifold 4.7 Exhaust manifold 4.8. Toothed belt and pulleys 4.9 Replacing the front crankshaft sealing ring 4.10 Replacing the camshaft sealing rings 4.11. Camshafts and pushers 4.12. Cylinder head 4.13. Oil pan 4.14. Oil pump 4.15 Flywheel/drive plate 4.16 Replacing rear crankshaft O-ring 4.17 Powertrain suspension
5. Engine overhaul
5.0 Overhaul of engines 5.2 General information 5.3 Compression check 5.4 Recommendations for engine removal 5.5. Removing and installing the engine 5.6 Engine disassembly sequence 5.7 Disassembling the cylinder head 5.8. Cleaning and inspection of the cylinder head 5.9 Assembling the cylinder head 5.10 Removing the pistons with connecting rods 5.11 Removing the crankshaft 5.12. Engine cylinder block 5.13 Pistons and connecting rods 5.14 Crankshaft 5.15. Inspection and selection of main and connecting rod bearings 5.16 Checking the play of the balancer assembly (5S-FE engine) 5.17 Sequence of engine assembly during a major overhaul 5.18 Installing piston rings 5.19. Installing the crankshaft and checking the working clearances of the bearings 5.20 Installing the rear sealing ring of the crankshaft 5.21 Installing the pistons and connecting rods, checking the working clearances of the bearings 5.22 Installing the balancer assembly (5S-FE engine) 5.23 Starting the engine after a major overhaul
6. Cooling, heating and air conditioning system
6.0 Cooling, heating and air conditioning system 6.2 General information 6.3 Antifreeze 6.4 Cooling system hoses 6.5. Checking and replacing the thermostat 6.6. Checking and replacing the radiator fan and relay 6.7. Radiator fan (V6 models from 1992 to 1994) 6.8. Radiator 6.9 Expansion tank 6.10. Water pump 6.11. Coolant temperature sensor 6.12 Heater fan 6.13 Heater fan resistor 6.14 Heater radiator 6.15. Heater control panel 6.16 Air conditioning system
7. Fuel system
7.0 Fuel system 7.2 General information 7.3 Relieving pressure in the fuel system 7.4. Checking the fuel pump 7.5 Fuel pump 7.6. Fuel level sensor 7.7 Fuel tank 7.8 Air filter 7.9. Accelerator cable 7.10 Electronic fuel injection system EFL 7.11. Fuel system 7.12 Checking the fuel injection system 7.13. Checking and replacing elements of the EFI fuel injection system 7.14 Fuel line and fuel injectors 7.15. Air conditioning idle speed valve 7.16 Air intake chamber (V6 engines only)
8. Ignition, starting and charging system
8.0 Ignition, starting and charging system 8.2 Battery 8.3. Ignition system 8.4. Checking the ignition system 8.5. Ignition coil 8.6. Ignition distributor 8.7 Checking and adjusting the ignition timing 8.8 Ignition unit (switch) 8.9. Pulse sensor 8.10 Charging system 8.11 Generator 8.12 Checking and replacing generator components 8.13 Engine starting system 8.14 Starter 8.15 Traction relay
9. Emission control and engine management system
9.0 Exhaust emission control and engine control system 9.2 General information 9.3 Electronic control system (TCCS) 9.4 Self-diagnosis system 9.5. Sensors 9.6. Engine air induction system (ACIS) 9.7 Evaporative vapor recovery system (EVAP) 9.8. Exhaust Gas Recombustion (EGR) System 9.9 Crankcase Ventilation (PCV) System 9.10 Catalyst 9.11 Fault Codes
10. Manual transmission
10.0 Manual transmission 10.2 General information 10.3 Gear shift cables 10.4 Gear shift lever 10.5 Reverse light switch 10.6. Removing and installing the gearbox 10.7 Repairing the gearbox
11. Automatic transmission
11.0 Automatic transmission 11.2 General information 11.3. Diagnostics 11.4. Adjusting and replacing the gear selection cable 11.5 Checking and adjusting the throttle control cable 11.6. Checking, replacing and adjusting the starter interlock switch 11.7. Gear selection lever lock 11.8. Replacing sealing rings 11.9. Checking and replacing gearbox supports 11.10 Electronic control system
12. Clutch and drive shafts
12.0 Clutch and drive shafts 12.2 General information 12.3. Checking and replacing the clutch disc 12.4. Release bearing 12.5. Clutch master cylinder 12.6. Clutch slave cylinder 12.7 Bleeding air from the clutch hydraulic system 12.8 Clutch start switch 12.9. Constant velocity joint (CV joint) 12.10 Replacement of protective covers and repair of constant velocity joints 12.10. Models with 5S-FE engine
13. Brake system
13.0 Brake system 13.2 General information 13.3 (ABS) 13.4 Replacing disc brake pads 13.5. Disc brake caliper 13.6. Brake disc 13.7 Replacing brake pads on drum brakes 13.8. Working brake cylinder 13.9. Main brake cylinder 13.10 Brake lines and hoses 13.11 Bleeding the hydraulic brake system 13.12. Vacuum brake booster 13.13 Replacing handbrake brake pads on rear disc brakes 13.14. Adjusting the parking brake 13.15. Replacing the hand brake cable 13.16. Brake light switch
14. Suspension and steering
14.0 Suspension and steering 14.2 General information 14.3. Front anti-roll bar 14.4. Front pillar 14.5 Repair of the front pillar 14.6. Lower arm of the front suspension 14.7 Replacing the lower hinge of the front suspension 14.8. Steering knuckle 14.9 Rear anti-roll bar 14.10. Rear suspension strut 14.11 Longitudinal rod of the rear suspension 14.12. Rear suspension arms 14.13. Rear suspension hub 14.14. Rear hub fastener 14.15. Steering wheel 14.16. Tie rod ends 14.17 Replacing the protective covers of the steering gear 14.18. Steering gear 14.19. Power steering pump 14.20 Bleeding air from the power steering system 14.21. Wheels and tires 14.22 Wheel alignment angles
15.0 Body 15.1 Safety measures during welding work 15.2. Body care 15.3. Caring for upholstery and rugs 15.4. Repair of minor body damage 15.5 Repair of severe body damage 15.6. Hood 15.7 Trunk lid 15.8 Rear door 15.9. Replacing support pillars 15.10 Door trim 15.11. Doors 15.12. Lock, lock cylinder and door opening handles 15.13 Door glass 15.14 Window lifter 15.15 Front bumper 15.16 Rear bumper 15.17 Outside rear view mirrors 15.18. Seats 15.19 Decorative trim for instrument cluster 15.20 Steering column covers 15.21 Center console 15.22 Glove box 15.23 Checking the condition of seat belts 15.24 Radiator grille 15.25 Engine splash guard
16. Electrical equipment
16.0 Electrical equipment 16.2 General information 16.3 Electrical circuits 16.4. Open circuit detection 16.5 Fuses 16.6 Relays 16.7. Multifunction steering column switches 16.8. Ignition switch 16.9 Rear window heater switch 16.10 Checking the rear window heater 16.11 Radio 16.12 Loudspeakers 16.13 Antenna 16.14 Replacing headlight bulbs 16.15 Adjusting headlights 16.16 Headlight 16.17. Replacing incandescent light bulbs 16.18. Windshield wiper motor 16.19 Instrument cluster 16.20 Sound signal 16.21 Cruise control system 16.22 Electric windows 16.23 Central locking system 16.24 Electric rear view mirrors 16.25 Airbag 16.26. Electrical circuit diagrams
Halogen, xenon (gas discharge) and LED bulbs
The 2007 Camry was equipped with halogen lamps from the factory. Advantages of this type of bulbs: accessibility compared to other automotive light sources. Halogen lamps do not require the installation of additional equipment (ignition units, headlight washers). Variety, this type of lighting has been used for decades, so there are a large number of reliable manufacturers producing high-quality products. The light is not of poor quality; in terms of luminous flux characteristics, halogens are inferior to xenon and diodes, but provide acceptable road illumination.
Recommendations
If the standard light does not sufficiently satisfy the car owner, then, if desired, you can install:
- xenon;
- bi-xenon;
- ice in the fog;
- LED lamps for low and high beam.
Xenon lamps are the brightest. They create a sporty image for the car. Their disadvantage is the need to install an expensive ignition unit. mtf products performed best.
This photo report is intended to show how to replace lamps on a 7th generation Toyota Camry V50 (2013). Namely, how to replace a low beam lamp, replace a high beam lamp, turn signal lamps and marker lamps.
Camry V50 lamp numbers:
- low beam lamp - H11;
- high beam lamp - HB3 (9005);
- turn signal lamp - 7440A (also 992 or 7444NA);
- lamp size - 2825 (also 168 or W5W).
Replacing lenses on Camry 2011
To replace a faded lens on a Camry 40, you need to disassemble the headlight. You can open the optics by heating the junction of the body and the lens in a circle with a hair dryer; be careful not to melt any element. The second method is to unscrew all the screws, remove the anthers and plugs, metal parts from the headlight, and place it wrapped in a towel in an oven preheated to 100 degrees.
After warming up the optics, begin to carefully remove the housing from the lens using a flat-head screwdriver. Take your time and gradually open the headlight. If necessary, warm up the optics again.
The sealant will form fibers that should not get into the inside of the optics. After opening the headlight, while it is hot, glue all the threads of sealant onto the headlight housing or lens.
The lens is attached to the body with three clamps, open one of them and carefully squeeze out the lens. Buy lenses with transition frames, which will greatly simplify your work. We replace the lens with a new one and wipe it with a 70% alcohol solution. You can remove dust and debris from the internal parts of the headlight with a dry, lint-free cloth.
Acetone should not be used! May damage surfaces of parts.
You cannot change the lower edge (cut line) of the shield slot; you will blind oncoming people.
The lens is in place, preheat the oven and place the headlight, wrapped in a towel, in there for 10 minutes. We remove and press the glass against the body, do not overdo it, the glass may crack, it is better to repeat the procedure 3 times. The glass is in place, screw in the screws and continue in the oven for 5 minutes.
How to change front lamps on a Toyota Camry
You don't need any tools to change the low and high beam bulbs. But to gain access to the front marker and turn signal lamps, you will need a small flat-head screwdriver.
It will be much easier to change the turn and clearance lamps from the wheel arch . To do this, you need to turn the steering wheel (and the wheel, respectively): to the left if the replacement occurs on the passenger side, and to the right if the lamps are changed on the driver’s side.
Then you need to remove at least two fastenings of the protection in the wheel arch, and unscrew the protection, gaining access to the lamps.
Replacing low beam lamp Camry V40
The low beam bulb is located in the center of the headlight assembly. Turn the base of the lamp a quarter turn counterclockwise and remove the lamp from the headlight. Then press the latch and disconnect the power connector.
Do not touch the glass of a new halogen lamp with your fingers, as the marks left behind will lead to rapid burnout. You can clean marks from the glass with a cloth moistened with alcohol.
The new lamp should be connected to the connector, inserted into the headlight and turned a quarter turn clockwise.
Button backlight
In order to install the backlight of the buttons on the steering wheel of a Toyota Camry 40, you must follow the instructions below.
- Disconnect battery.
- Wait 10 minutes and remove the airbag located in the steering wheel.
- Unscrew the two screws shown in the figure below. This will allow you to dismantle the button block.
The process of installing the backlight of the buttons located on the steering wheel
- Remove the block with buttons.
Dismantled button block
- Disassemble the button block and remove the boards.
Pay
- Remove old LEDs.
- Install new LEDs.
View of buttons at night
Threshold illumination
The simplest type of automotive lighting is ready-made solutions with lighting equipment, which can be purchased from a regular car dealership.
The installation process involves gluing special covers using double-sided tape. The wires must be connected to the door open button.
Setting threshold lighting
Threshold lighting
Tuning backlight in Camry V40
This topic is intended to summarize the answers to frequently asked questions about tuning interior lighting. Despite the fact that this time we will talk about the Camry V40, general principles and techniques can be applied to other models.
The door handles were removed (I will post the sequence of removal operations later), holes were prepared in the upper part of the bowls, into which miniature LEDs were fixed with hot glue, connected in series through 1 kOhm resistors to limit the brightness: