Replacing the lamps in the headlight of a Toyota RAV 4 is not a difficult task - you can easily change the lamps yourself. This detailed photo report will help with this, which will show in detail the replacement process using the example of the 2013 Toyota RAV4 (4th generation). Next, we will show you how to replace the low beam, high beam, turn signal, and parking lamps.
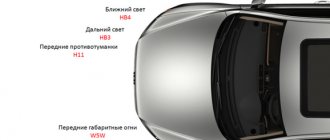
Toyota RAV 4 headlight bulb numbers:
- low beam lamp - HB3 (9005);
- high beam lamp - HB3 (9005);
- turn signal lamp - WY21W/5W (7444NA);
- lamp size - 2825, W5W or 168.
*The applicability of the lamps should be clarified before purchasing - depending on the year of manufacture and the country of manufacture of the car, they may differ slightly.
You don't need any tools to replace the driver's side bulbs. To replace the bulbs on the passenger side, it will be better if you remove the washer fluid reservoir.
Replacement features
In the first case, you should remove the clips that attach the protective plastic to the body. A special tool with a V-shaped cutout is ideal for this, but in the latter cases you can get by with a flat-head screwdriver. To remove the clamps, you need to apply a small force in the vertical direction.
Depending on which side the bulb needs to be replaced, access may differ slightly. If you need to replace the passenger side, first disconnect the windshield washer reservoir mount. On the driver's side, nothing should interfere with replacing this element.
Replacement procedure
The low beam lamp socket is located near the outer edge of the headlight housing, symmetrically on both sides. Be careful not to confuse it with the high beam lamp, which is located closer to the middle part of the headlight housing. Before proceeding with the replacement, remove the negative terminal from the battery.
In order to remove the light bulb, you need to do some minor operations.
- Disconnect the electronic connector. To do this, press the latch and pull it towards you.
- Then turn the protective cap counterclockwise.
- Disconnect the electronic connector by unscrewing the lamp 90 degrees, also counterclockwise.
Be careful not to touch the glass of a new lamp with your hands, because this may cause it to quickly fail.
This information applies to headlights installed on a vehicle in industrial conditions.
Replacing front fog lights
Sometimes a car owner may need to replace PTFs, which are located directly in the cuts in the car's front bumper. Given their low location during operation, they are often damaged, resulting in the need to replace them. To remove the fog lights, you need to unscrew the 3 screws holding each of the PTFs from the inside in the bumper section; you do not need to remove the bumper for this.
To remove the rear LED fog lights, you need to do a similar procedure, but only in the rear bumper area. In both cases, before unscrewing the lights, you must first disconnect the electrical connectors. It would also be a good idea to disconnect the negative terminal from the battery to prevent sparking.
Replacing low beam lamps in Toyota Rav4
The need to replace headlight bulbs may arise at any time, sometimes at the most inopportune time. That’s why experienced motorists always have one HB3 lamp in stock. Replacing the Rav4 low-beam lamp can be done in the field with your own hands without any special tools.
Replacing low beam lamps and fuses on Toyota Corolla 160 and RAV4 #2
Depending on the year of manufacture of the car, plastic protection may be installed in the front part. Specifically, it causes concern among novice drivers if they have to unscheduledly replace the headlight lamp of a Toyota Rav4. It is found in third generation cars. Toyotas produced since 2013 do not have it.
Replacing PTF lamps for Totota Rav 4 from 2013
The fog lights on the Rav 4 of the latest 4th generation are equipped with H16 12v/19W lamps. Lamps from the previous generation H11 will not work. More precisely, they can get into the fog lamp, but they will cope with it, since the new fog lamps are not designed for 55W lamps.
Which lamp to choose for Totota Rav 4 PTF
So, as I wrote above, the lamps in the fog lights are H16 12v/19W. Depending on the need, you can install conventional halogen lamps, LED or xenon lamps. The last two options are officially prohibited. However, some owners complain about the weak light from the standard lamps in the PTF.
- OSRAM H16-12-19 64219L - from 750 rubles pcs.
- H16-12- 19W PGJ19-3 PRIME from 350 RUR pcs.
- Koito H16 WhiteBeam III from 2100 RUR set.
- Philips H16 Standard Vision from 750 RUR pcs.
- Osram H16 Cool Blue Intense (+20%) from 900 RUR
Any of the above lamps will be suitable to replace the original one. Osram lamps are usually installed from the factory. If you want brighter light, you can install Koito lamps. At the same power they have increased light output.
Useful article: Resetting the service interval on Toyota Rav 4.
Instructions for replacing the lamp in the PTF yourself
You can get to the fog lamp either by unscrewing the lower boot or part of the fender liner.
We unscrew the three screws of the lower plastic cover and move it to the side.
Next, unscrew the self-tapping screw securing the fender liner and carefully bend it to the side.
Next, we climb with our hands and, pressing the latch, remove the block from the lamp. Then we take the lamp and turn it half a turn in the fog lamp.
We take the new lamp without touching the bulb and install it in the reverse order. We put on the block and check its functionality.
If after replacement the lamp does not light up, it is quite possible that the fuse located in the mounting block under the hood has blown.
Another reason for the lack of low beam
Your loved one's Rav's light bulb may not be illuminated because a fuse has blown. Therefore, before changing the light bulb, make sure that the fusible insert is in working condition.
To do this, open the fuse box located under the hood and check the serviceability of the inserts corresponding to the low beam. The left and right side of the close road illumination is provided by its own 10A fuse.
If the material was interesting or useful to you, publish it on your own page on a social network:
Replacement Instructions
The procedure is carried out in any comfortable place - in an open street area or in a warm garage with good lighting, if we are talking about the cool period of the year. No special tools or equipment are required. To remove the low beam lamp, carry out a number of preliminary operations:
- Disconnect the battery from the on-board network by removing the terminal with the “—” (minus) sign.
- Free up access to the headlights from the engine compartment.
- Lighting devices are hidden in plastic headlight housings, covered with caps at the back. Once you reach the box, remove the round protective cover.
Usually, parts of the unit prevent you from reaching the light bulbs by hand - the air filter housing, pipes and coolant expansion tank, and various plastic linings. In some car models, access is blocked by the battery itself, so it will have to be removed.
The engine compartment of a modern car is filled very tightly with blocks and assemblies. When you reach the back of the headlight with your hand, you won’t be able to look into the hole right away - you need to work by touch. Hence the recommendation: take a photo of the light bulb mounting element with a phone equipped with a camera.
READ Replacement Pump Ford Mondeo 2
A step-by-step guide to replacing a light bulb in most passenger cars looks like this:
- After removing the rubber plug, grab the terminal block where the power wires are connected with your hand. Gently shaking it from left to right, remove the connector from the lamp contacts.
- The iron base of the light bulb is pressed into the socket by a wire retainer. Press on its end, made in the form of a loop (or bracket), and move it down or up to disengage the spring from engagement with the eyes.
- The other end of the latch is fixed to the bracket. Move the bracket to the side and remove the lamp, noting the position of the housing. There is no need to twist the base during removal.
Recommendation. You can see in which direction the locking eyes are oriented in the photo taken earlier. You should not remove the spring completely - it will not be easy to put it back in. Simply release the retainer and remove the bulb.
To change a low beam lamp, wipe the new element with a rag and carefully insert it into the socket, holding it by the base. You cannot touch a glass test tube with your bare hands - fatty traces will remain. It is better to wear a narrow fabric glove. Then return the latch to its place and snap it into the eyes, moving it in the appropriate direction beforehand.
The last step is to connect the contact connector and install the plug. When finished, assemble the removed parts, connect the battery and check the functionality of the new low-beam element. If it glows noticeably brighter than the other working headlight, it is worth changing the second lamp.
Toyota spare parts catalogs
On the driver's side, nothing should interfere with replacing this element. Replacement procedure The low beam lamp socket is located near the outer edge of the headlight housing, symmetrically on both sides.
Be careful not to confuse it with the high beam lamp, which is located closer to the middle part of the headlight housing. Before proceeding with the replacement, remove the negative terminal from the battery. The main design changes affected the interior. The two-tier front panel, optitron instruments and unusually shaped door handles make a very suitable memory.
With all this, the car remains a purebred representative of Toyota - the quality of materials and workmanship is at the highest level, and all the artistic delights do not interfere with ergonomics at all - the upper flow of the dashboard does not overlap the screen and dual-zone climate control control buttons located a little lower; The instruments are informative and easy to read. The number of different compartments for small items has increased, and in addition to the large box in the central armrest, there are also two glove boxes.
A high-quality audio system with a 6-disc changer supports all common recording formats. There is enough space in the cabin for people of any height and build, both in the front and rear seats.
Compared to the previous model, the distance between the front and rear seats has increased by 55 mm, and the shoulder area has become more spacious. The luggage compartment of the new RAV4 has a volume of liters. Access to the trunk is through a huge hinged door, which is attached to the body in the Japanese style - with hinges on the left. Due to the fact that the spare wheel is mounted on the trunk door outside the car, the RAV4 can be worn out by its low loading height, and for comfortable placement of cargo, you can use different nets and hooks, as well as a couple of hidden compartments.
Replacing standard lamps in the headlights of Toyota RAV4 CA40 / Toyota RAV4 with LED ones
Replacing the lamps in the headlight of a Toyota RAV 4 is not a difficult task - you can easily change the lamps yourself. This detailed photo report will help with this, which will show in detail the replacement process using the example of the 2013 Toyota RAV4 (4th generation).
Next, we will show you how to replace the low beam, high beam, turn signal, and parking lamps.
- Toyota RAV 4 headlight bulb numbers:
- low beam lamp - HB3 (9005);
- high beam lamp - HB3 (9005);
- turn signal lamp - WY21W/5W (7444NA);
Selecting and replacing a fuel pump on a Toyota Land Cruiser 200
lamp size - 2825, W5W or 168.
*The applicability of the lamps should be clarified before purchasing - depending on the year of manufacture and the country of manufacture of the car, they may differ slightly.
Replacing a Toyota RAV 4 clearance lamp
The marker lamp is installed on the outer edge of the headlight. You need to turn the orange lamp socket the same quarter turn counterclockwise, then remove the lamp and pull it out of the socket. Install the lamp in reverse order.
- Bulbs installed on Toyota Rav4 model since 2013 - fourth generation XA40 body
- Low beam lamp Led or Hir2 - 9012
- Fog light H16
- Front turn signal WY21W baseless yellow (Amber)
- Rear turn signal WY21W baseless yellow (Amber)
- License plate lighting, luggage compartment W5W
- Vanity mirror lighting W8W
Lamps Toyota RAV4 body XA30 model from 2005 to 2013 - third generation
High beam HB3 Low beam H11 Parking lights W5W Front turn signal WY21W Fog lamps H11 Reversing light W16W Rear turn signal WY21W Rear fog light P21W License plate light W5W
Lamps Toyota RAV4 body XA20 model from 2000 to 2005 - second generation
High beam/Low beam H4 Parking lights W5W Front turn signal WY21W Fog lamps HB4 Side turn signal W5W Brake light W21/5W Reverse light W16W Rear turn signal W21W Rear fog light P21W License plate light W5W
Replacement procedure
The low beam lamp socket is located near the outer edge of the headlight housing, symmetrically on both sides. Be careful not to confuse it with the high beam lamp, which is located closer to the middle of the headlight housing. Before proceeding with the replacement, remove the negative terminal from the battery.
In order to remove the light bulb, you need to perform simple operations.
Replacing low beam lamps Toyota RAV4 (Toyota Rav4)
The next update came out this year.
Before proceeding with the replacement, remove the negative terminal from the battery. The appearance of the car has also changed.
Annotation on replacing Toyota RAV4 lamps. Repair and service of Toyota RAV4 from the year of manufacture. ...
Depending on the year of manufacture of the car, plastic protection may be installed in the front part.
RAV4 lost its 3-door version, although this is where the history of the model began.
Depending on the year of manufacture of the car, plastic protection may be installed in the front part.
Specifically, it causes concern among novice drivers if they have to unscheduledly replace the low beam lamp of a Toyota Rav4. It is found in third generation cars.
Toyotas released this year do not have it. Features of replacement In the first case, you should remove the clips attaching the protective plastic to the body. A special tool with a V-shaped cutout is ideal for this, but in the latter cases you can get by with a flat-head screwdriver. To remove the clamps, you need to apply a small force in the vertical direction.
READ Replacing Hydraulic Compensators Volkswagen T4 Video
Depending on which side the bulb needs to be replaced, access may differ slightly. If you need to replace the passenger side, first disconnect the windshield washer reservoir mount.
A successful mechanism for folding the rear seats is enough to pull the hook so that the backrest folds and at the same time immediately slides down and forward; the seat cushion allows you to increase the volume of the luggage compartment to liters, which allows you to transport cargo of significant dimensions, for example, a refrigerator or washing machine. This year the RAV4 underwent modernization.
RAV4 - replacing low beam lamps
First, the updates affected the engines: In addition, a version with a six-cylinder V-shaped engine 2GR-FE with a displacement of 3 became available to the European buyer. Previously, this engine was installed only on RAV4 created for the South American market.
Toyota RAV4 2012, 148 l. With. — tuning
The model's equipment has become richer: External configurations include the radiator grille and bumpers. There were virtually no configurations in the interior. The next update came out this year.
The Valvematic valve height configuration system makes this unit extremely economical. The appearance of the car has also changed.
The RAV4 gets a new shiny grille inspired by the Avensis and Verso models, redesigned headlights and fog lights, a different front bumper, hood and rear dimensions. The interior finishing materials have become much better, but the interior has not endured drastic changes.
Shock absorber. Which ones to choose? – Page 53 – We service Mazda 3 – Mazda 3 club (Mazda 3.ru) Rear suspension of Mazda 6: We study and repair together Buy Mazda Mazda 6 in Russia: sale of used and new Mazda Mazda6.
All videos New videos Popular videos Video categories
Auto Video blogs Accidents, tragedies For little ones Food, drinks
| Animals | Law and law | Celebrities | Games | Art |
| Comedy | Beauty, fashion | Cooking, recipes | People | Moto |
| Music | Cartoons | Science, technology | Announcements | Education |
| Policy | Holidays | Jokes | Nature | Incidents |
| Trips | Joys | Rzhach | Family | TV serials |
| Sport | Lifestyle | TV programs | Dancing | Technologies |
| Products | Fears | Films | Show Business | Humor |
Obstacles in the operation of the main headlights of a car become immediately noticeable - when the lights are turned on during the dark period of the day, one of the two lighting devices glows. The most common causes are a blown lamp or fuse, and less commonly, a lack of contact in an electronic circuit. To replace a low beam light bulb, you don’t need to go to a service station specially - study the instructions and do a simple operation without the help of others.
How to Replace License Plate Light on Toyota RAV4 Exterior
This is the simpler of the two approaches, in fact you will only need to remove the protective covers of the light bulbs. Unfortunately, in some years or car packages, these covers do not open from the outside, and in such a situation, we will spend some time in the second section of this content to teach you this method. So, let's start with replacing the license plate lamp by going through the exterior of your Toyota RAV4 . Regardless of whether we are talking about the front or rear of the car, the method will be the same. Here are some simple steps to follow to complete this service:
- With the engine off, disconnect the battery terminals from the vehicle.
- Turn your license plate over and use a flat head screwdriver or knife to place the flat part into the cutout provided for this purpose (usually on the clear cover). and press down on the plastic window to reveal the license plate light socket for your Toyota RAV4.
. - Use a screwdriver or knife to remove the bulb from its place, if you are worried about breaking something, you can also do this with your fingers.
- Finally installed a new license plate light
- The last step, before reassembling, is to reconnect the battery and check the indicator to confirm the process was successful.
Selecting a light element
Before you change a lamp that has failed, you need to purchase a new element that fits your car. The headlights of most modern cars are equipped with elements with a base of type H4–H7 of the following varieties:
- Cheap light bulbs with tungsten filament. They are characterized by a short service life and weak luminous flux.
- The most common are halogen lamps. They combine an affordable price with good light output and a long service life.
- Gas-discharge, they are also xenon. Reliable and inexpensive products, the corresponding feature is that they emit a catchy beam of bluish light.
- LED. Economical elements that create good illumination and have a long service life. The downside is the high cost of the product.
If desired, the standard halogen lamp can be replaced with an LED or xenon lamp, provided that the part fits the base. If you change the type of lighting parts, you will have to take and install a couple of light bulbs in both headlights. Regardless of the type, the electronic power of the part should be 55 W (marking on the package - 12V/55W). It is not recommended to replace the low beam bulb with a stronger one, so as not to dazzle drivers of oncoming cars.
Russian and Dialuch products are attractive due to their good price-quality ratio. Among the foreign brands, it is worth highlighting several recognizable brands:
- Philips;
- Bosch;
- OSRAM;
- General Electric;
- Koito.
Reasons for frequent light bulb burnouts
The manufacturer shows the working life of halogen and other lamps on the packaging - from 500 to 750 hours. But often elements do not fulfill the required deadline for the following reasons:
- The voltage level of the on-board electrical network does not correspond to the norm or constantly “jumps”.
- Water is leaking inside the headlight unit.
- In the power supply circuit of the lights, contact is lost due to oxidized terminals or broken wires.
For normal operation of lighting devices, a constant voltage of 12–13.5 volts is required. Exceeding the designated threshold leads to an increase in the brightness of the glow (not noticeable to the eye) and a reduction in service life. Frequent replacement of the low-beam lamp is the result of constant operation at high voltage, which is provided by the car generator.
READ Replacing Low Beam Lamps Toyota Corolla
The prerequisites lie in the following defects:
- electrical voltage regulator problems;
- drive belt slippage;
- problems with the generator.
Note. Power surges often cause fuses to blow. Before changing light bulbs, check the condition of the fuse links.
Detecting excess voltage is quite simple - connect a voltmeter to the battery terminals, start the engine and remove the freeze at idle speed. If the readings exceed 13.5 volts, look for one of the listed defects.
Philips lamp test results
- very good road lighting,
- short service life
- relatively expensive (but any lamp is tested at the factory).
Auto Express test favorite. According to the measurement results, the boundary of a striking light spot is 75 meters from the car.
Fog lights (if equipped)
To ensure sufficient working space, turn the control wheel in the opposite direction of the lamp being replaced. Turn the control wheel to the left when replacing a lamp on the right side, or turn the control wheel to the right when replacing a lamp on the left side.
Remove the fender guard clip, then remove the fender guard.
Disconnect the connector by pressing the latch.
Turn the lamp by the base counterclockwise.
Install the latest lamp. Align the three tabs on the lamp with the mount and install the lamp. Turn the lamp clockwise to secure it.
Install the connector. After installing the connector, shake the lamp base a little to check that it is securely attached. Turn on the fog lights and visually check that light is passing through the mount.
Reinstall the fender guard, then install the retainer. Insert the latch and twist to secure it.
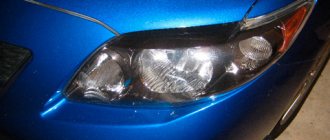
About the headlights on the RAV-4
Now, we will look at the question of how to make the light on a car brighter; we will test halogen lamps. How to achieve a more catchy glow without changing the design of the lighting device by replacing RAV-4 lamps.
Reasons for poor quality road lighting:
- Lamps must be kept clean at all times. Even slight contamination creates interference.
- Fogging: moisture gets inside. Reason: the seal is broken. These could be minor cracks, the glass has come off, the sealant has burst, there is no seal, or the rear cap is missing.
- The penetration of dust negatively affects the quality of the lighting device.
- The light bulb is not installed correctly.
- Low voltage.
- The main reason for poor light is the light bulbs themselves. They are not all the same.
If the problem is not resolved in time, the reflector may fail and the headlight will need to be replaced .
There are two ways to clean the kit: with or without disassembly. In case of cloudiness or the appearance of a yellow coating, external polishing of the glass helps.
A felt wheel, a drill attachment and an optical cleaner (polish) are used.
On first-generation RAV-4 cars, H-4 lamps are most often installed.
Philips DiamondVision - the brightest high beam bulbs
- visibility is 30% better compared to standard lamps,
- made of high quality quartz glass,
- emit truly white light .
These lamps are designed for off-road use and are not ECE certified.
For drivers who prefer crisp white light .
What we like best: From a distance it can be mistaken for xenon.
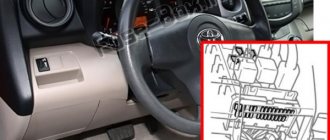
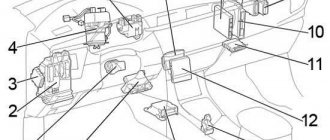
Blocks under the hood
Location
Scheme
Purpose
- Fuse and relay block No. 1
- 2AD-FHV, 2AD-FTV:
Injector control unit (EDU) (from December 2008) - 2AD-FHV:
Injector control unit (EDU) (before December 2008) - 2AD-FTV:
Injector control unit (EDU) (until December 2008) - Valvematic
- ABS control unit
- Fuse and relay block No. 2
- The engine control unit
- Transmission control unit
- Cooling fan control unit or left cooling fan control unit
- Glow plug relay
- Right cooling fan control unit
- Headlight wiper relay
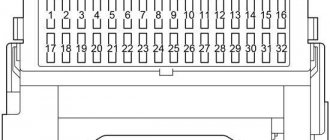
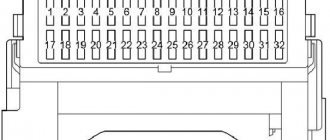
Fuse and relay box 1
Mounts on the right side under the hood.
Scheme
Designation
| 1 | Not used |
| 2 | Not used |
| 3 | Not used |
| 4 | 7.5A ECU-B2 - Air conditioning system, power windows |
| 5 | 7.5A ALT−S - Charging System |
| 7.5A RSE - Audio System (JBL) | |
| 6 | 20A STR LOCK - Steering Lock System (with Keyless Entry and Start) |
| 7 | Not used |
| 8 | DCC |
| 9 | 20A RAD NO.1 - Audio system |
| 10 | 10A ECU-B - Wireless remote control system, power steering, body electronics unit, clock, instrument cluster, keyless entry and start system, central locking, clock, audio system, navigation system, gauges |
| 11 | 10A DOME - Ignition switch illumination, engine start button illumination (with keyless entry and start system), ENGINE START STOP switch illumination (with keyless entry and start system), interior lighting, vanity mirror illumination, luggage compartment lighting, personal lighting, lower interior lighting |
| 12 | — |
| 13 | 10A HEAD LH - High left beam |
| 14 | 10A HEAD RH - High right beam |
| 15 | 10A HEAD LL - Low left beam |
| 16 | 10A HEAD RL - Low right beam |
| 17 | — |
| 18 | 15A AC INV - Outlet (115V) |
| 19 | 30A TOWING - Trailer Connector |
| 20 | 25A STV HTR - Autonomous interior heater |
| 21 | Not used |
| 22 | 20A DEICER — Heating of the windshield wiper blade rest area |
| 23 | 50A HTR - Air conditioning system |
| 24 | 50A PTC3 - Auxiliary heater |
| 25 | 50A PTC2 840W: Auxiliary heater |
| 30A PTC2 300W: Auxiliary heater | |
| 26 | PTC1 50A 840W: Auxiliary heater |
| PTC1 30A 300W: Auxiliary heater | |
| 27 | 50A HEAD MAIN - Fuses: “HEAD LL”, “HEAD RL”, “HEAD LH”, “HEAD RH” |
| 28 | Not used |
| 29 | 30A RDI - Cooling Fan |
| 50A FAN2 - 2GR-FE with coupling option: Cooling fan | |
| 30 | 30A CDS - Cooling fan |
| 50A FAN1 - 2GR-FE with coupling option: Cooling fan | |
| 31 | 30A H−LP CLN – Headlight cleaners |
| R1 | Light switch/high beam |
| R2 | Headlights/low beam |
| R3 | Daytime running lights (No. 4) |
| R4 | Daytime running lights (No. 3) |
| R5 | Except 2GR-FE: Cooling fan (No. 3) |
| R6 | Except 2GR-FE: Cooling fan (No. 2) |
| R7 | Except 2GR-FE: Cooling fan (No. 1) |
| R8 | Not used |
| R9 | Heating the rest zone of the windshield wiper blades |
| R10 | Daytime running lights (No.2) |
| R11 | Except 2GR-FE: Auxiliary heater (PTC NO.3) |
| R12 | Except 2GR-FE: Auxiliary heater (PTC NO.2) |
| 2GR–FE: Cooling fan (No. 2) | |
| R13 | 2GR–FE: Cooling fan (No. 1) |
| Except 2GR-FE: Auxiliary heater (PTC NO.1) |
Fuse and relay box 2
Installed on the left side of the engine compartment.
Scheme
Decoding
| 1 | 30A P-SYSTEM - 3ZR-FAE: Valvematic |
| 2 | 30A AMP - Audio System (JBL) |
| 3 | 30A AM2 - Starting system |
| 4 | 15A IG2 - Engine starting system, multiport fuel injection system/sequential multiport fuel injection system |
| 5 | 10A HAZ - Hazard Alarm |
| 6 | 10A ETCS - Multiport fuel injection system/sequential multiport fuel injection system |
| 7 | 7.5A AM2−2 - Starting system |
| 8 | — |
| 9 | 10A Multiport fuel injection system/sequential multiport fuel injection system |
| 10 | 10A EFI NO.2 - Multiport fuel injection system/sequential multiport fuel injection system |
| 11 | 7.5A EFI NO.3 - A/T; from December 2008: Multiport fuel injection system/sequential multiport fuel injection system |
| 7.5A STA - Starting system, multiport fuel injection system/sequential multiport fuel injection system | |
| 12 | 80A GLOW - Pre-heating system |
| 13 | 60A EMPS - Power Steering |
| 14 | 80A MAIN - Fuses: “HEAD MAIN”, “ECU-B2”, “DOME”, “ECU-B”, “RAD NO.1” |
| 15 | 120A ALT - Petrol engines, vehicles without towbar option: Fuses: “ABS 1”, “ABS 2”, “RDI”, “CDS”, “HTR”, “TOWING” |
| 140A ALT - Diesel engines, vehicles with towbar option: Fuses: “ABS 1”, “ABS 2”, “RDI”, “CDS”, “HTR”, “TOWING” | |
| 16 | 50A P/I - Fuses: "EFl MAIN", "HORN", "A/F", "EDU" |
| 17 | Not used |
| 18 | 30A ABS 2 - Anti-lock Braking System, Traction Control, Stability Control, Hill Start Assist, Hill Start Assist |
| 19 | 50A ABS 1 - Anti-lock Braking System, Traction Control, Stability Control, Hill Start Assist, Hill Start Assist |
| 20 | 20A EFl MAIN - Multiport fuel injection system / sequential multiport fuel injection system, fuses: “EFI NO.1”, “EFI NO.2”, “EFI NO.3” |
| 21 | 10A HORN - Signal |
| 22 | 25A EDU - Multiport fuel injection system/sequential multiport fuel injection system |
| 23 | 20A A/F - Gasoline engines: Multiport fuel injection system/sequential multiport fuel injection system |
| 20A A/F - Diesel Engines: Multiport Fuel Injection System/Sequential Multiport Fuel Injection System | |
| 15A IGT/INJ - 3ZR-FAE: Multiport fuel injection system/sequential multiport fuel injection system | |
| R1 | Vehicle Stability Control (VSC MTR) |
| R2 | Not used |
| R3 | Vehicle Stability Control (VSC FAIL) |
| R4 | Ignition (IG2) |
| R5 | Anti-lock braking system (BRK) |
| R6 | Air Conditioning Compressor Clutch (MG CLT) |
| R7 | Fuel pump |
That's all. And if you know how to make the material better, write in the comments.
Changing light sources in fog lights
For Rav 4 2014, fog lights with a power of 19 W type C (halogen H16) are suitable.
To ensure there is enough space when replacing a light bulb, turn the steering wheel in the opposite direction. Those. if the right fog light changes, the steering wheel turns to the left, and vice versa.
- The wing protection is removed after removing the clamp.
- After pressing the latch, the connector is removed.
- The base is unscrewed counterclockwise.
- When installing a new light source, its three protrusions must be connected to the mounting recesses and turned clockwise.
- Having installed the connector in place, shake the lamp by the base and check the strength of the fastening. Then turn it on and make sure that the headlight works and the light does not leak through the mount.
- The wing protection is put in place, secured and turned with a lock.
Sources:
https://drive2me.ru/2021/08/16/%D0%B7%D0%B0%D0%BC%D0%B5%D0%BD%D0%B0-%D0%BB%D0%B0%D0% BC%D0%BF-%D0%B1%D0%BB%D0%B8%D0%B6%D0%BD%D0%B5%D0%B3%D0%BE-%D1%81%D0%B2%D0% B5%D1%82%D0%B0-%D1%82%D0%BE%D0%B9%D0%BE%D1%82%D0%B0-%D1%80%D0%B0%D0%B2-4/ https://automaster67.ru/toyota/tojota-rav-4-zamena-lampy-blizhnego-sveta-razbiraem-podrobno