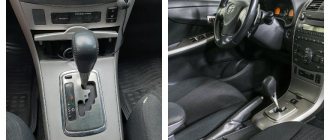
Blocks in the cabin
Location
General layout of electronic control units
Left-hand drive
Right hand drive
Description
- LHD:
Interior lighting relay (DOME CUT) - Headlight range control unit
- Fuse Box/Body Electrical Control Unit
- Steering lock actuator
- Power steering control unit
- Relay block
- Navigation control unit
- All-wheel drive control unit
- Parking sensor control unit (Clearance Warning)
- Driver assistance systems control unit
- Network Gateway Block
- Wiper relay
- Start-stop system control unit
- Gearbox selector control unit
- Airbag control unit
- Distribution connector
- Air conditioner amplifier
- Distribution connector
- RHD:
Double Door Lock Relay
Fuse box
Located under the instrument panel. In the diagram, this block is indicated by number 3.
Scheme
Purpose
| 1 | — |
| 2 | 7.5A STOP - Stop lamps |
| 3 | 10A S/ROOF - Hatch |
| 4 | 5A AM1 - Fuses: "IG1 NO.1", "IG1 NO.2", "IG1 NO.3", "ACC" |
| 5 | 7.5A OBD - Diagnostic connector |
| 6 | 20A D/L NO.2 - Before October 2015: Central locking, body electrical control unit |
| 7 | 7.5A FOG RR - Rear fog light |
| 8 | 10A D/L BACK - Central locking (tailgate) |
| 9 | 15A P/OUTLET NO.1 – Socket (cigarette lighter) |
| 10 | 20A DOOR D — Driver's side window regulator |
| 11 | 20A DOOR R/R — Rear right window regulator |
| 12 | 20A DOOR R/L — Rear left window regulator |
| 13 | 15A WIP RR - Rear wiper |
| 14 | 15A WSH - Front window washer, rear window washer |
| 15 | 7.5A GAUGE - Reversing lamps, auto-dimming interior mirror, Blind Spot Monitor |
| 16 | 25A WIP FR - Windshield wiper |
| 17 | 5A SFT LOCK-ACC - Transmission selector lock |
| 18 | 15A P/OUTLET NO.2 - Outlet |
| 19 | 7.5A ACC - Outlets, audio system, power mirrors, body electrical control unit, clock, current sensor |
| 20 | 7.5A PANEL - VSC OFF switch, instrument cluster, BSM switch, 4WD switch, heated brush rest switch, multiport fuel injection system/sequential multiport fuel injection system, park assist systems, heated seat switches, power outlets, power door switch trunk, air conditioning control unit, rear window heating switch, audio system, steering wheel buttons, cup holder lights |
| 21 | 10A TAIL - Side light, license plate light, fog light |
| 22 | 20A D/L NO.2 - From October 2015: Central locking, body electrical control unit |
| 23 | 5A EPS-IG - Power steering |
| 24 | 10A ECU-IG NO.1 - All-wheel drive (Dynamic Torque Control), steering position sensor, instrument cluster, gear selector |
| 25 | 5A ECU-IG NO.2 - Body Electrical Control Unit, Wireless Control System, Shift Lock, Intelligent Entry and Start System, Sunroof, Audio System, Tailgate Actuator, Tire Pressure Monitoring System, Blind Spot Monitor Spot Monitor), Lane Departure Assist (LDA) |
| 26 | 7.5A HTR-IG - Air conditioning, heated rear window |
| 27 | 10A S-HTR LH - Heated left seat |
| 28 | 10A S-HTR RH — Heated right seat |
| 29 | 7.5A IGN - Fuel pump, multiport fuel injection system/sequential multiport fuel injection system, brake lamps, steering lock |
| 30 | 7.5A A/B - Airbags, front passenger classification system |
| 31 | 5A METER — Instrument Cluster |
| 32 | 7.5A ECU-IG NO.3 - Generator, ABS/VSC, brush rest zone heating, brake lamps, fuses: “FAN NO.1”, “FAN NO.2”, “FAN NO.3”, “ HTR", "PTC", "DEF", "DEICER" |
Additional fuses are attached to the other side of the block.
Scheme
Designation
- 30A P/SEAT F/L — Electric left seat
- 30A PBD - Power tailgate
- 30A P/SEAT F/R — Electric right seat
- 30A P/W-MAIN — Front window lifts, window lift control unit
Relay block
Scheme
Decoding
| R1 | LHD: Anti-theft system (S-HORN) RHD: Interior lighting (DOME CUT) |
| R2 | Rear fog light (FOG RR) |
Additional items
Scheme
Description
- Sunroof control unit
- Receiver for central locking and tire pressure monitoring system Control unit for tire pressure monitoring system
- Central locking receiver
- Phone transceiver
- Parking assistance control unit
- Right Blind Spot Monitor Sensor
- Door control unit
- Left Blind Spot Monitor Sensor
- Fuel pump control unit
- Distribution connector
- Audio amplifier
Checking and replacing the Toyota RAV4 reverse light switch
- Repair manuals
- Repair manual for Toyota Rav4 1994-2000.
- Checking and replacing the reverse light switch
Examination
| Rice. 9.2. Reversing light switch location on top of transmission housing |
The reverse light switch is located on top of the transmission housing ( ).
Turn on the ignition and engage reverse gear; the switch should turn on the reverse lights.
If the reverse lights do not light up, check the fuse in the electrical circuit for the reverse lights.
If the fuse is working, then disconnect the electrical connector from the switch and use an ohmmeter to check the condition of its contacts, which should be closed when reverse gear is engaged (resistance is 0). Place the gear shift lever in the neutral position, the switch contacts should open and the ohmmeter should show infinite resistance (no conductivity). If faulty, replace the switch.
If the switch is working, check the condition of the electrical circuit between the fuse and the switch. If the electrical circuit is working properly, the bulbs in the reverse lights may have burned out.
If the lamps in the reverse lights are working properly, check the wire connecting the switch to the lamps.
Replacement
Disconnect the electrical connector from the reverse light switch.
Unscrew the switch from the gearbox housing.
Test the new switch before installation. Connect an ohmmeter to the contacts of the switch and make sure that when the switch plunger is pressed, the contacts are closed, and when released, they are open.
Screw the switch into the gearbox housing and tighten it to the required torque.
Connect the electrical connector to the switch.
Check the operation of the reversing lights.
↓ Comments ↓
1. Introduction
1.0 Introduction
2. Vehicle operation
2.0 Vehicle operation 2.1. Controls, instruments and equipment 2.2 Engine compartment 2.3. Keys and ignition switch 2.4. Starting the engine 2.5 Manual gearbox 2.6. Automatic transmission (AKP) 2.7 Recommendations for driving a car on rough terrain 2.8 Parking brake 2.9 Switch for direction indicators and headlights 2.22. Doors 2.25. Installing mirrors 2.27. Front seats 2.28. Rear seats 2.29. Seat belts 2.31. Lifting a car with a jack
3. Maintenance
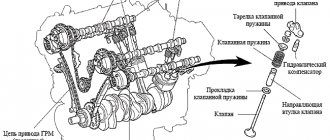
3.0 Maintenance 3.1 General information on operating materials and adjustment data 3.2. Scope and frequency of maintenance 3.3. Checking the levels of operating fluids 3.4 Inspecting the tires and checking the air pressure 3.5 Replacing the engine oil and oil filter 3.6 Checking and replacing the rubber bands of the wiper blades 3.7 Checking and adjusting the free play of the clutch pedal 3.8. Checking, maintaining and charging the battery 3.9. Checking, adjusting the tension and replacing the poly-V-belt drive of mounted units 3.13. Checking the condition of the brakes (every 24,000 km or 12 months) 3.18. Checking the condition of the suspension and steering 3.26. Replacing the coolant and flushing the cooling system 3.34. Checking and adjusting clearances in the valve drive
4. Engines
4.0 Engines 4.1. Repairing the 3S-FE engine without removing it from the car 4.2. Repairing the 1AZ-FE engine without removing it from the car 4.3. Diagnostics and preparation of the engine for major repairs
5. Cooling and air conditioning systems
5.0 Cooling and air conditioning systems 5.1. General information 5.2 Technical data 5.3. Maintenance and repair of the cooling system 5.4. Checking and servicing the air conditioning system
6. Fuel system and exhaust system
6.0 Fuel system and exhaust system 6.1 General information 6.2 Technical characteristics of the fuel injection system 6.3 Relieving pressure in the fuel system 6.4. General check of the fuel system 6.5 Fuel pump 6.6 Fuel pressure regulator 6.7 Fuel level sensor 6.8 Fuel tank 6.9 Air filter housing 6.11. Electronic fuel injection system 6.14. Exhaust system
7. Ignition system
7.0 Ignition system 7.1. General information 7.2 Precautions during operation and repair of the ignition system 7.3 Technical characteristics of the ignition system 7.4. Checking the ignition system and its elements
8. Systems for monitoring and reducing exhaust gas toxicity
8.0 Systems for monitoring and reducing exhaust gas toxicity 8.1 General information 8.2 Technical characteristics 8.3 On-board diagnostic system (OBD) 8.4. Information sensors and actuators 8.5 OBD-II system fault codes 8.6 Engine control unit (PCM) 8.7. Sensors and valves of the fuel injection system (EFI) 8.8 Positive crankcase ventilation (PCV) system 8.9 Exhaust gas recirculation (EGR) system on models since 2001
9. Clutch
9.0 Clutch 9.1 General information 9.2 Technical data 9.3 Clutch master cylinder 9.4 Clutch slave cylinder 9.5 Clutch hydraulic bleed 9.6 Clutch driven disc 9.7 Clutch release bearing 9.8 Clutch switch
10. Gearbox
10.0 Gearbox 10.1 General information 10.2 Technical data 10.3 Gearbox repair 10.4. Repair and adjustment work performed on vehicles with a manual transmission 10.5. Repair and adjustment work performed on vehicles with automatic transmission
11. Cardan shaft and drive shafts
11.0 Cardan shaft and drive shafts 11.1 General information 11.3. Front wheel drive shafts 11.4. Rear wheel drive shafts on all-wheel drive vehicles 11.5. Replacing the protective covers of the wheel drive shaft joints 11.6. Cardan shaft 11.7. Support bearing of the cardan shaft 11.8. Sealing cuffs of the rear final drive 11.9. Differential on all-wheel drive vehicles
12. Brake system
12.0 Brake system 12.1 General information 12.2 Technical data 12.3. Anti-lock brake system (ABS) 12.4 Replacing the front brake pads 12.5. Replacing the front brake caliper 12.6. Checking and replacing brake discs 12.7 Replacing rear brake pads 12.8. Replacing the working brake cylinder 12.9. Replacing the main brake cylinder 12.11. Replacing brake pipes and hoses 12.13. Checking and replacing the vacuum brake booster 12.15. Replacing parking brake cables 12.16. Adjusting the position of the brake pedal 12.17. Checking and replacing the brake light switch
13. Suspension
13.0 Suspension 13.1 General information 13.2 Technical data 13.3. Front suspension strut 13.4. Dismantling and assembling the shock-absorbing strut 13.5. Front anti-roll bar 13.6. Lower arm of the front suspension 13.7. Steering knuckle and front wheel hub 13.8. Rear anti-roll bar 13.9. Rear suspension shock absorber 13.10. Rear suspension arms 13.12. Rear wheel hub and bearing
14. Steering and chassis
14.0 Steering and chassis 14.1 General information 14.2 Technical characteristics 14.3 Removing and installing a steering wheel with an airbag 14.4 Removing and installing a steering column 14.5 Removing and installing tie rod ends 14.6 Replacing steering gear boots 14.7 Removing and installing a steering gear 14.8 Removing and installing a pump power steering 14.9 Bleeding the hydraulic system of the power steering 14.11. Wheels and tires
15. Body
15.0 Body 15.1 General information 15.2. Body care 15.3. Caring for upholstery and rugs 15.4. Repair of minor damage to the body 15.5 Repair of significant damage to the body 15.6 Maintenance of hinges and locks 15.7 Recommendations for replacing the windshield and fixed windows 15.8 Removing and installing the hood 15.9 Lock and cable for opening the hood lock 15.10. Removing and installing bumpers 15.14. Removing and installing door trim 15.15. Doors 15.16. Removing and installing door glass 15.17. Removing and installing window regulators 15.20. Tailgate 15.22. Removing and installing instrument panel trim elements 15.25. Removing and installing seats
16. Electrical equipment
16.0 Electrical equipment 16.1. General information 16.2 Technical characteristics 16.3. Electrical circuits 16.4. Checking the battery 16.5 Replacing battery cables 16.6. Fuses and relays 16.7 Checking and replacing the turn signal and hazard warning light relays 16.8 Checking the charging system 16.9. Generator 16.10. Engine starting system 16.13. Removing and installing instrument panel switches 16.15. Checking and replacing the windshield wiper motor 16.16. Radio and speakers 16.17. Replacing the antenna 16.27. Checking the central locking system 16.29. Airbags
17. Electrical diagrams
17.0 Electrical diagrams 17.1 Diagrams 1-10 17.2 Diagrams 11-20 17.3 Diagrams 21-32
How to change the oil in a Toyota Rav 4 engine and automatic transmission
The reader will learn what kind of oil to pour into the automatic transmission and Toyota Rav 4 engine. How to replace the used fluid, and what tools and materials will be needed. After reading, he will be able to evaluate his strength and understand whether it is worth taking the car to a service center or whether he can change the oil himself.
Automatic transmissions and the engine on any vehicle require care and maintenance. Once a year, or even every six months, you need to appear at the service center. Some procedures, for example, such as changing the oil in a Toyota Rav 4, can be done with your own hands.
For older cars manufactured in 2011, 2013, 2014 and operated in extreme conditions, it is recommended to change waste fluids more often than for those operating in mild climatic conditions.
Attention! The regulations for repairing and changing the oil of a Toyota Rav 4 car indicate that the mileage after which this procedure must be done is 10,000 kilometers.
Toyota RAV 4 maintenance schedule, table
When the car is taken to the service center in due time, technical problems are noticed and corrected.
At TO-1 they change the oil in a 2021 Toyota engine. If it has a volume of 2.0 liters (gasoline), then 4.2 liters of lubricant are used. For modification with a 2.2-liter power plant (diesel), 5.9 liters of working fluid are required. Change the oil and cabin filters at the same time.
The following nodes are diagnosed:
- Coolant, hoses and connections that serve it.
- All accessory belts, fuel lines.
- Angular velocity joints.
- Front and rear suspension.
- Crankcase ventilation.
- Threads at the junction of the chassis and body.
- Braking system, including handbrake.
- Steering wheel - check for play.
- Wheel alignment.
- Condition of the battery and spark plugs.
- Optics.
- How the hood is locked (latches and hinges).
- Clean the drainage holes.
At TO-2, when the car has covered 20,000 km, and TO-3 with a mileage of 30,000 km, they act as during the first technical inspection.
At a mileage of 40 thousand km, the regulations remain the same. But they add maintenance to the brake system - they change the brake fluid. The air filter, oil in the transfer case and rear axle gearbox must be replaced. The car is already 3-4 years old; the driver himself can ask for additional inspection of suspicious parts or systems.
At TO-5, as at the first service, the engine oil and filters are changed - cabin and oil. In 2021, such maintenance regulations correspond to the 2014 Toyota Rav 4.
When the car has reached 60,000 km and 70,000 km, repeat the first maintenance procedures.
Maintenance of Toyota RAV4 at 80 thousand kilometers is carried out as if for the fourth time. That is, with the replacement of brake fluid and filters. A clutch check is added to the list of maintenance works for a Toyota RAV 4 with a mileage of 80,000 km on “mechanics”.
For a Toyota RAV mileage of 4,100,000 km, maintenance includes the following list of works: changing the oil in the power unit, spark plugs and interior filter. Belts, fasteners, electrical networks, and other systems and components are checked. Every 100 thousand the fuel system is cleaned.
At 120,000 kilometers, the units in the automatic transmission are checked, spark plugs are changed, and the suspension and air conditioning system are diagnosed.
A visual representation of the maintenance of the Toyota RAV 4 2011 is given by the table:
What kind of lamps are installed on the taillights?
The Toyota RAV4 is a Japanese car, so it is unreasonable to install lamps on the taillights like other Japanese cars.
- Rear brake light: W21/5W or T20 12v
- Rear turn signal: W21W 12v
- Lamp gap: W5W 12v
- Reversing light: W16W 12V
So, below we will indicate options for replacing the lamp
Reversing lights
- AYWIparts AW1920014 from 20 rubles
- General Electric (USA) 21513 from 20 rubles
- KOITO 1781 from 45 rubles
- Osram 921 from 35 rubles
- Philips 12067CP from 50 rubles
- Bosch 1987302205 from 35 rubles
Stop signal
- General Electric (USA) 93448 from 90 rubles
- KOITO 1891 from 75 RUR
- NARVA 78169 from 70 RUR
- Osram 7515 from 130 rubles
- Philips 12066CP from 80 rubles
- Bosch 1987 302 252 from 100 rubles
Directional light
- AYWIparts AW1920020 from 50 rubles
- KOITO 1881 from 80 rubles
- NARVA 17632 from 60 rubles
- Osram 7505 from 110 rubles
- Philips 12065CP from 100 rubles
Back light
- AYWIparts AW1920001 from 10 rubles
- General Electric (USA) 27888 from 15 rubles
- KOITO 1583 from 25 rubles
- NARVA 78185 from 15 rubles
- Osram 2825 from 20 rubles
- Philips 12961CP from 25 rubles
Replacing rear lamps Toyota RAV 4 2013
From the instructions we will learn how to independently replace the lamp in the headlight of a Toyota Rav 4 car. Most often, lamps such as brake lights, rear turn signal lamps, reverse lamps and parking lamps can be replaced independently.
What tools will you need? This is a "ten" head. Screwdriver. The lamps are new.
- 1.The lamp that is suitable for the brake light is W21/5W. 2. The lamp that is suitable for rear turning is W21W. 3. A lamp that is suitable for standing lights is W5W. 4. Lamp that is suitable for reversing - W16W
- How to replace lamps: The rear lamps are located in the headlight unit. We need to remove the lamp. First, open the trunk and start working on the side where the bulb burned out. Next, unscrew the bolts that secure it and carefully pull the corner of the housing. There is also a fastening piston; to unscrew it you will need a flat-head screwdriver. We recommend that you wrap the screwdriver with a rag to avoid damaging the surface of the headlight.
AFTER we have dismantled the lamp, we need to unfold it in such a way as to gain access to the headlight. Now let’s place the headlight unit level so that the latches snap open. Tighten the bolts to 10.
In order to gain access to the lamps, we need to take a screwdriver, pry up the panel a little and put it aside. We change the llama and install the panel back.
Brake light lamp. First, let's turn the lamp a quarter turn counterclockwise, then take it out of the headlight. Then we take out the lamp and replace it with a new one and install it back. To fix the lamp, we need to scroll it clockwise.
Rear turn signal lamp: The lamp is located at the bottom of the steering wheel. To pull it out we need to twist it counterclockwise. We need to remove the lamp from the socket, then install a new one. We fix it by scrolling it in a clockwise direction.
Parking light lamps: The lamp is located in another, separate block on the trunk lid. In order to replace the lamp, we need to turn the cartridge counterclockwise 1/4, remove the socket, and change the light bulb. Then we install the socket back and fix it by turning the lamp in the direction of the clock.
Reversing lamp. The lamp is located in a block located on the trunk lid. We repeat the same thing as with other lamps.
The lantern is divided into two parts, they are separated by a trunk. The block houses the brake light and turn signal lamps.
We open the trunk.
The headlight block is fixed with bolts.
Let's take the head at "ten" and unscrew the bolts.
We take out the bolts and move them a little to the side for now.
Pull the body.
Let's take a screwdriver and pull it towards ourselves. We wrapped it with a rag so as not to damage the surface.
We remove the headlights from the pistons and turn them over so that we get close to the bulbs.
The photo shows the cartridges.
We turn the sockets of the hundred-signal light bulb a quarter turn counterclockwise.
We take the light bulb out of the socket.
We install a new light bulb.
We install the cartridge in the socket and turn it a quarter turn, clockwise.
We also turn the rear signal lamp clockwise.
We take it out of the nest.
The photo shows the access panel.
Carefully pry it off with a screwdriver.
We dismantle the panel.
Disassembling the rear lighting of a Ford Focus 3 sedan, video instructions
On Ford Focus III, optical drives may fail due to prolonged use and mechanical damage. Drivers can avoid visiting a car service center by completing the entire procedure themselves.
On Ford Focus III, optical drives may fail due to prolonged use and mechanical damage. Drivers can avoid visiting a car service center by completing the entire procedure themselves.
Replacing optical devices does not require complex steps, so when using the instructions, motorists will be able to complete all procedures without errors.
Preparing for withdrawal
On the car of the presented sedan model, the rear lights are divided into two sections. The process for replacing light fixtures is different between a hatchback and a van. The driver needs to prepare spare parts. If the flashlight is severely damaged, you will need to replace it completely. If the lamp fails, it can be replaced separately. First, drivers need to disconnect the cable from the negative terminal of the battery to remove the mechanism.
For motorists, replacing the rear light on a Ford Focus 3 will not be difficult if they prepare a standard set of automotive tools.
Disassembling the device
The replacement process is as follows:
- The fastening unit of the lamp nut to the car body is unscrewed;
- The canopy section is distracted from the body;
- Wiring harness gaskets are disconnected;
- The wing-mounted optics section has been removed;
- The trunk lid lining has been removed;
- Nuts and section clamps are turned off;
- The optics section is separated from the body;
- Wiring harness gaskets are disconnected;
- The lantern has been removed;
- New or updated device installed;
- The installation process is carried out in reverse order.
Video instruction
Motorists are advised to use the video tutorial to help you quickly and accurately replace optical devices on a third generation Ford Focus.
Consultation with specialists will ensure quick disassembly and high-quality installation of new devices.
As a result, drivers will be able to use new lighting equipment when working with the car. It is responsible for visibility and safety on the road, so worn parts must be replaced immediately.
Toyota Rav4 lighting system from 2021
Note
: Do not leave the headlight closed for more than 3 minutes. Headlight lenses are made of synthetic plastic, so they can easily melt or be damaged by excessive heat.
Note
: When checking the high beam direction of the headlight, close the low beam headlight or disconnect the connector.
- Start the engine.
- Turn on the headlights and check if the boundary line matches the preferred boundary line shown in the following illustration.
Note
: — Low and high beam headlights are single units. Correct adjustment of the low beam direction should lead to the correct adjustment of the high beam direction. — If the adjustment distance is 25 m (82.0 ft): With low beam headlights, the boundary line should be located no more than 83 mm (3.27 in.) and 375 mm (14.8 in.) below the horizontal line, and also at a distance no more than 249 mm (9.8 inches) to the left or right of the vertical line. — If the adjustment distance is 3 m (9.84 ft): When the headlights are low beam, the boundary line should be no more than 10 mm (0.394 in.) and 45 mm (1.77 in.) below the horizontal line, and no more than 30 mm (1.18 in) to the left or right of the vertical line. — When the adjustment distance is 25 m (82.0 ft): The horizontal line of the preferred low beam cut-off line is 249 mm (9.80 in.) below the horizontal line, and point A of the preferred low beam cut-off line is on the vertical line to the left or on right. — When the adjustment distance is 3.0 m (9.84 ft): The horizontal line of the preferred low beam cut-off line is 30 mm (1.18 in.) below the horizontal line, and point A of the preferred low beam cut-off line is on the vertical line left or right.
- Turn on the high beams and check that the center of intensity for each high beam matches the preferred center of intensity in the illustration.
Note
:- Since the low beam and high beam are one and the same, if the low beam installation is correct, the high beam should also be correct. However, check both beams to be sure. — If the leveling distance is 25 m (82 ft): The center of the high beam intensity must be within 175 mm (6.88 in) above and 249 mm (9.80 in) below the horizontal line H, and 497 mm (1. 63 feet) to the left or right of the vertical line to the right or left. — If the alignment distance is 3 m (9.84 ft): The center of the high beam intensity must be within 21 mm (0.82 in) above and 30 mm (1.18 in) below the horizontal line H, and 60 mm ( 2.36 inches) to the left or right of the vertical line to the right or left.
4. Adjust the orientation of the headlights.
- Use a screwdriver to adjust the direction of the light vertically.
A. Changing the direction of light vertically b. Changing the direction of light horizontally
- Using a screwdriver, adjust the beam direction of each headlight to the specified range using the adjustment screw.
Note
: — At the final stage, the headlight adjustment screw should be turned clockwise. If the screw is too tight, loosen it and tighten it again so that the last turn of the screw is clockwise. — The low and high beam headlights are single units. Correct adjustment of the low beam direction should lead to the correct adjustment of the high beam direction. — If you cannot adjust the direction of the headlight, check the installation of the lamp, the headlight itself and its reflector. — The direction of the light shifts upward when the adjustment screw is rotated clockwise and downward when the adjustment screw is rotated counterclockwise.
Assembly
Note
: - Keep components indoors as far as possible to prevent foreign objects from entering and contacting the headlight assemblies. — Do not reuse parts that have reduced fastening ability due to damaged threads. — Avoid touching the inside of the lens and metal surfaces as much as possible, otherwise they may become dirty. — Do not allow metal surfaces to get dirty, as such surfaces may be damaged even if they are lightly wiped with a soft cloth. — When installing components, ensure that the wiring harness is not pinched or strained. — Do not use solvent to clean components. Clean them only with a dry cloth.
1. Install the LED module onto the headlight housing.
Note
: — To prevent damage to electrical equipment, remove electrostatic voltage from your hands by touching a metal part of the body. — Use SST (Stop Anti-Static Discharge) countermeasures and take all precautions to prevent electrostatic discharge (ESD) damage to the system. — Use clean rubber gloves before starting work. — Do not touch the LED elements with bare fingers. — Avoid getting dirt on the metal surfaces of the headlights, as even the lightest touch can damage the surface. — Do not use solvent to clean headlight components. Clean only with a clean, soft cloth.
- Install the LED module assembly onto the rail and align it with the headlight's vertical and horizontal adjustment screws.
Note
: Put it in place, aligning the arrows shown in the picture: black with black and white with white.
How to remove backlight focus 3 videos
Subscribe to the channel: https://www.Youtube.Com/channel/UCEzRUWQ4fTtprEKmt_2Szsw.
Removing the backlight in focus 3.
Http://donatepay.Ru/donation/72889 How to remove the rear light from the trunk lid of a Ford Focus 3.
ZR specialists in the next issue of “Technical Environment” will tell and show how to remove and replace the lamp.
How to replace the rear left brake light on a Ford Focus 3 https://vk.Com/3focus. Ford Focus 3 Group Owners Group.
Removing and installing the rear left light on the hatch of a Ford Focus 3 (Ford focus 3 hatchback) Original, disassembled.
LED rear headlights for the BMW Focus 3 sedan in BMW style. More information about the headlights can be found here.
The topic of squeaks on the forum https://ffclub.Ru/topic/254359/new/
Removing the rear light for Ford Focus 3.
Replace light bulbs on Ford Focus 3. High beam, low beam, dimensions, brake light. ABC Ford 3. 3 series. Our.
In this video you can see how the taillights transform into a Ford Focus 3. The headlights are already covered.
Be sure to read the detailed instructions before replacing lamps.
Replace trunk light bulbs, rear view mirrors and reverse lights for Ford Focus 3 Change.
Replacement of rear windows of Ford Focus 3.
You need to replace your brake light, headlight
reverse or turn signal? find out
FORD BV6N-14A073-BP 230611 45L0000 00001172 51945L25M 163756 and many other auto parts, warranty https://vk.Com/avtorazbor_smol.
How to Remove the Tail Light of a Toyota Rav 4
Lamp Toyota Rav 4 (4th generation 2013). Divided into two parts by the trunk lid. The brake and turn signal lamps take center stage.
The headlight is secured with a pair of bolts
Loosen the head by 10 bolts.
Remove the bolts and set aside.
Lightly tighten the housing.
Remove the cover using a screwdriver (wrapped in cloth) or a plastic spatula.
Remove the headlight from the covers and turn it over to gain access to the bulbs.
Turn the lamp socket 1/4 turn counterclockwise.
Remove the lamp from the holder.
Insert the cartridge into the wall outlet and turn it 1/4 clockwise.
Turn the reverse light counterclockwise 1/4 turn.
Remove the light bulb from the holder and install the last light bulb.
Insert the last bulb socket into the socket and turn 1/4 clockwise.
Place the spotlight exactly in place to secure the covers.
But this is a very large block on the trunk lid, there are reverse lights and side lights.
Rear panel access panel.
Accessory lamp holders.
READ How to Remove Mirror Element Ford Focus 1
Turn the parking light 1/4, turn clockwise to turn it off.
Remove the old bulb from the socket and install the new bulb, then insert the socket into the socket and turn clockwise.
Rear light holder.
Turn 1/4 counterclockwise.
Remove the lamp from the holder and install the lamp.
Insert the last bulb socket into the socket and turn it a quarter turn clockwise.
Install the access panel.
This photo report will show you how it works. changing a lamp in a 2013 Toyota RAV4 (4th generation). Namely: change the brake light bulb, rear turn signal, reverse gear, dimensions. Replacing tail lights at home is not excluded; it will be useful for a ratchet with a 10-head head, a screwdriver and new light bulbs:
Replacing rear lights in a Toyota RAV4 with your own hands!
- stop signal. lamp W21/5W;
- reverse rotation. lamp W21W;
- park lights. lamp W5W;
- Reversing light W16W.
rear lamps in the headlights, which are broken by the trunk lid . It will be useful to remove the headlight, it is very easy to do. First you need to open the trunk and go to the side where the lamp is on. Then loosen a couple of 10mm bolts and pull the corner of the lamp housing towards you. It's still attached to the piston, so you'll need to use a screwdriver wrapped in cloth or a plastic putty knife (for removing door panels).
READ Replacement of Chery Amulet rear beam silent blocks
Once the lamp is removed, you can flip it over to access the replacement lamp. After replacement, the headlamp lock must be aligned so that the plastic clips are in place. Then tighten the bolts to 10 with a little tenacity.
To get to the lamps, which are mounted in a separate unit on the trunk lid, it is useful to remove the access panel using a screwdriver and slide it to the side. After replacing the lamps, you need to install the panel back.
The brake light lamp is located at the top of the headlight housing. You need to turn the bulb a quarter turn counterclockwise and remove it from the headlight. Then simply remove the old lamp from the holder and install it. Then you need to insert it into the headlight socket and turn it clockwise, fixing it.
The turning light is located at the bottom of the headlight. If you turn the lamp socket counterclockwise a quarter turn, you can disconnect it. Of course, just remove the old light bulb from the socket, just replace the light bulb. Then insert the chuck into the chuck and turn clockwise.
READ How to Remove a VAZ 2107 Beard
The parking light (parking light, extra size) is located in a separate block on the outside of the trunk lid. To replace, turn the socket counterclockwise a quarter turn, remove the socket and replace the lamp. Then insert the cartridge back and turn it clockwise.
HOW TO REMOVE Tail lights for TOYOTA COROLL
The reversing light is located in a separate block on the inside of the trunk lid. To replace it, you need to do exactly the same manipulations as with the other lamps.
Source
Materials for changing engine fluid
Before you start changing the oil in a 2011 Toyota Rav 4 vehicle, you need to prepare the materials and tools that will be required to successfully drain and fill the used fluid.
- oil 0W20, for more northern latitudes 5W30 is used. The latter can remain liquid at 30 degrees below zero. This means that in northern latitudes, in winter, there will be no need to push start the car;
- oil filter with Toyota catalog number 04152-YZZA-1. Any other may not fit in thread and size;
- gaskets for threads and on the oil filter cover;
- seal for drain plug;
- socket wrenches, preferably a set;
- oil filter puller diameter 64 mm;
- container for draining used liquid;
- torque wrench.
Having prepared all these tools and materials, you can start changing the fluid in the car.
Payment via PayPal
After selecting payment via PayPal, the PayPal payment system will launch, where you need to select the payment method: bank card or PayPal account.
If you already have a PayPal account, then you need to log into it and make a payment.
If you do not have a PayPal account and you want to pay using a bank card via PayPal, you need to click on the “Create an Account” button - shown with an arrow in the picture.
PayPal will then prompt you to select your country and provide your credit card information.
After specifying the information required to make the payment, you must click on the “Pay Now” button.
Rear dimensions of Ford Focus 3
How to remove the tail light and change the lamp on a Ford Focus 3 2017
Replacing the headlamp (dimensions) on a Ford Focus 3
How to change Ford Focus 3 light bulbs
How to remove the tail light in a Ford Focus 3. Tail lights
Removing the backlight in focus3
Remove the rear lights of Ford Focus 3
Replacing Ford Focus light bulbs. Mirrors, trunk, reverse.
When Your Ford Logo Peels Off (Lifehack. Ford Logo Decals
Video review of the connection of rear lights for the Ford Focus 3 sedan
Installing rear hatch lights for Ford Focus 3
- Armrest for Nissan Beetle number
- Windshield wipers for Suzuki Grand Vitara
- Clutch disc Toyota Yaris 2007
- Length and width of the Nissan Tiida sedan
- Choosing oil for Ford Mondeo
- Nissan example, p12 engine self-diagnosis
- Kia Rio air conditioner drive belt
- How to change the ball to Kia Spectra
- Filling the Skoda power steering
- CV shared in Citroen Berlingo 2008
- Cleaning Kia Sorento 2005 headlights
- How to connect obd2 to Mercedes
- For example, Nissan p10 front wheel bearing
- Replacing the exhaust manifold on a Lexus GS300
- Dump trailer 3 x KamAZ
Home »New» Rear dimensions of Ford Focus 3
Lamp replacement instructions
Open the trunk lid and look at the 2 rear light bolts.
Use a wrench or 10 sockets to open two bolts
Then carefully pull the flashlight towards you, removing it from the grooves. Now all you have to do is remove the required lamp base from the lamp
Just take the cartridge and return it for six months
Now all you need to do is remove the required lamp base from the lamp. Just take the cartridge and return it for six months.
After replacing the lamps, we check their performance and install the lamp in place
It is also worth noting that when installing LED lamps in exchange for halogen, you should pay attention to the polarity, otherwise the lamp will not work
Share this “Toyota Rav 4 Tail Light Light Replacement From 2013”
Headings
- Car accessories
- Auto law
- Auto electrician
- No category
- Replacing the pad
- Oil change
- Replacing the spark plug
- Replacing the filter
- Refill volumes
- News
- Engine repair
- Body repair
- Suspension repair
- Brake system
New entries
- Toyota Corolla XII lamps from 2021
- Mazda 6 GH lamps used in the car
- Mitsubishi ASX fog light
- New Geely Coolray will be available soon
- Ford Focus RS 2021 will receive electric drive
Login and follow our Instagram account. Car lamps, accessories and useful things. Competitions and lotteries.
VESKO-TRANS.RU
Good evening, in 1994 I am selling new front brake hoses for packaging, the production price is 6000 tenge.
Hello, sadness, sadness, Rav-4, short (3 doors), 95 hours. I settled on 100 written control rods - 2 pieces (restoration) 14 thousand, control tips - 2 pieces and silent blocks - 2 pieces (7 thousand), per ball 4 pieces (restoration). 20 thousand, silent blocks - 7 thousand. What do you think are the regular prices? Maybe there are other cheaper 100s? Please advise. Thank you.
Hello, sadness, sadness, Rav-4, short (3 doors), 95 hours. I settled on 100 written control rods - 2 pieces (restoration) 14 thousand, control tips - 2 pieces and silent blocks - 2 pieces (7 thousand), per ball 4 pieces (restoration). 20 thousand, silent blocks - 7 thousand. What do you think are the regular prices? Maybe there are other cheaper 100s? Please advise. Thank you.
Oh cheaper. I won't say, but I can only recommend avoiding that word "restoration". If you are for safety, then you should spend on new parts (preferably unique ones). Especially on control rods. Well, of course IMHO.
D.V. I wanted to change all the tail lights on a 2004 Rav 4. Unfortunately, I know almost nothing about this car. By heart, by heart, but I know nothing about the cruelty of the couple. The only correct way to change consumables. I decided to update all the tail lights, I don't know how to remove the lights myself. I know how to change them through the window in the trunk, I have changed it several times. Now I want to remove the light. Thank you in advance.
PySy. If this topic has been posted on the forum, please provide me with a link.
Post edited by O. Bender: 04/04/2014, 21:54:52
D.V. I wanted to change all the tail lights on a 2004 Rav 4. Unfortunately, I know almost nothing about this car. By heart, by heart, but I know nothing about the cruelty of the couple. The only correct way to change consumables. I decided to update all the tail lights, I don't know how to remove the lights myself. I know how to change them through the window in the trunk, I have changed it several times. Now I want to remove the light. Thank you in advance.