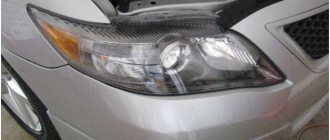
Optics in the car have a special role - ensuring proper visibility at any time of the day and in any weather conditions.
The quality of operation of optical devices directly determines how safe the ride will be. If the headlight is damaged and does not work, the very fact of operating the car is already a serious violation. Therefore, you need to choose and install headlights on the Camry 40 wisely.
Original and analogues
If there is a need to purchase fog lights for a Camry, then there are only two options:
- order original products - headlights from the Toyota plant;
- purchase analogues of the original headlights.
The original is, of course, preferable. These headlights are no different from those that were originally installed on the car. They fit perfectly in all respects, look harmonious, and perform their functions properly. The product is covered by a warranty. However, such a purchase will cost approximately 12 thousand rubles. The price of standard products varies within very wide limits. This allows the car owner to buy the product at almost half the price.
You should first study the labeling and read reviews about the manufacturer.
You can also find used optics on the market, which will cost very little. You can purchase not a pair, but only one headlight. This is required when the left or right headlight fails, for example as a result of an impact.
Depending on the need, you can choose LED fog lights, where diode elements are responsible for the lighting function. In place of the main lights, the owner can install darkened optics or regular mirror lights. Here it is better to take a closer look at the body design. A car with a dark body looks better with darkened headlights. This option is also preferable for cars that have undergone tuning or restyling. In other cases, dark lights are often installed on the taillights. Eyelashes can be used as headlight covers.
Which lighting elements to choose?
Location of Toyota Camry lamps According to the manufacturer's recommendations, the following lamps are used on the Camry XV40: 1 – high beam lamp, type HB3;
2 – front parking lamp and license plate lamp, type W5W; 3 – low beam lamp, type H11 (halogen) or D4S (gas discharge); 4 – front and rear turn signal lamp, type WY21W*; 5 – fog lamp (FTL), type H11; 6 – rear brake light and side light lamp, type W21/5W; 7 – reverse lamp, type W16W; 8 – rear fog lamp, type W21W; 9** – side turn signal lamp (on the body), type WY5W* This is interesting: How to replace the Hyundai Solaris cabin filter yourself: step-by-step instructions, where it is located
*The letter “Y” in the name indicates that the color of the lamp is yellow, although in reality the color of the lamp is orange.
Rear light elements of Toyota Camry
We recommend replacing all low beam lamps in your vehicle. Otherwise, differences in brightness and other light characteristics may disturb the driver and other road users.
Bulbs used in Camry
- 12V H11 55W halogen low beam or xenon standard D4S 12V/35W
- High beam lamp 12V HB3 (9005) 60W
- Front marker light 12V T10 W5W
- WY21W 12v LED indicator
- Reversing light 12V W21W
- License plate light 12V W5W T10
- Lamp / Dimensions W21 / 5W 12v
- Rear fog lights 12V W21W
- Reversing light 12V W16W
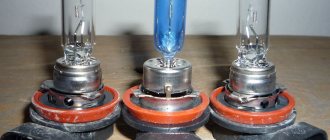
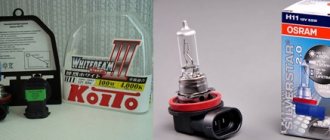
High beam Camry v50 H11
As we wrote above, in simpler factory configurations, H11 12V/55W halogen lamps are usually installed in the low beam, usually from Osram. The lifespan of these lamps depends on age and conditions, with an average of about 2 years.
- GE H11-12-55 (General Electric) 53110 from 500 rub.
- KOITO H11-12-55 0110K from 500 RUR
- MTF H11-12-55 30% standard long life x4 HS1211 from 300 RUR
- OSRAM H11-12-55 64211 from 550 RUR
- PHILIPS H11-12-55 LLECO VISION (4x Resource) 12362LLECOC1 from £55
- VALEO H11-12-55 Standard 032525 from 480 RUR
- DiaLUCH H11-12-55 PGJ19-2 Prime 12511PR from 300 RUR
- SUNRISE H11-12-55 80 192 from 120 RUR
- H11-12-55 LONG LIFE 48078LL from 470 RUR
H11 high brightness lamps for better road illumination
- AVS H11-12-55 110% 3700K Sirius Night Way from 600 rubles
- KOITO H11-12-55 W (100 W) Set of another brand from 2000 rub.
- OSRAM H11-12-55 NIGHT BROKER 110% PROTECTED 64211NBU from 1500 rub.
- OSRAM H11-12-55 60% SILVERSTAR 2.0 (2x resource) from 1400 RUR
- DiaLUCH H11-12-55 100% 4000K PGJ19-2 12511ELSDUO from 600 RUR
When choosing such lamps, you should remember that their service life is shorter than that of conventional lamps.
Low beam lamp Camry
- D4S Philips Xenon Vision. 42402VIC1 from 3000 rub.
- D4S Osram XENARC ORIGINAL. 66440 from 2600 rub.
- D4S Osram XENARC CLASSIC. 66440CLC from 2200 RUR
- D4S Osram XENARC ULTRA LIFE. 66440ULT from 2,800 rubles (with extended service life)
- D4S Philips X-treme Vision Gen2 (150%). 42402XV2 from 4000 rubles (at high brightness)
- D4S MTF-Light Absolute Vision 3700lm from the set 3500 rubles
- D4S MTF-Light Trend SBD4S5 from 1500 rub. things
- D4S Optima Service Replacement from 1200 RUR
- D4S AYWSection 4300K 35W Long service life from RUB 1,400.
- D4S 4300K Premium 20% 42V-35W XENITE from RUB 1,500
How to replace headlights on Camry 40?
Replacing optics on a Lexus is not a difficult task, but it requires certain skills. An experienced car owner will be able to handle the process independently. However, if you are not sure of the correctness of the actions, then it is better not to risk it and turn to a professional. Otherwise, you can damage the optics, which can lead to extra costs.
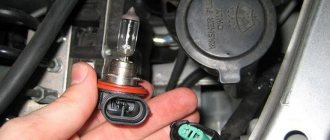
Replacing low beam
You can replace the low beam by performing the following procedure. You need to start installation by releasing the fasteners. Be sure to unplug the power plug. Next, the base of the device should be rotated slightly, which will allow you to remove the light bulb. An experienced master remembers that it is forbidden to touch the bulb of the element with your fingers under any circumstances. After such careless handling, traces will certainly remain, which will lead to rapid failure. If you cannot avoid touching the lamp, it is better to wipe it with a clean, soft cloth soaked in alcohol.
You need to install the new device in reverse order. If xenon is used, most likely you will also need to remove the headlamp, which also requires removing the headlight washer.
Replacing the high beam
If the main beam lamps are to be repaired, the process should be performed in a similar way with the replacement of the “low beam headlights”. This element can be found closer to the inner edge of the lantern assembly. The following procedure is followed:
- power outage;
- removing the lighting element;
- replacing an old element with a new one.
Here you also need to try not to touch the flask with your fingers in order to avoid further troubles.
Replacing turn signals and dimensions
In the case of turn signals, the lighting elements are located closer to the side of the body. Replacing them won't be difficult. It is enough just to remove the light bulb from the lantern along with the plug, and then remove the device from the socket. Next, a new lighting element is installed in the freed space. The same procedure is followed when replacing side lights.
Replacing xenon lenses and headlight glasses for Toyota Camry V40
Toyota Camry arrived at our service center with a broken headlight and zero low beam - the standard optics, as well as xenon lamps, were completely burnt out, so at the time of diagnosis, the light was reflected on the wall only as a thin line. Hella 3 R bi-xenon modules in place of the old lenses , and also replace the headlight glasses with new ones. Such work will completely restore the head light, thereby increasing safety to the required level.
The initial cut-off line and the appearance of the car at the time of handling. Light and view of headlights before work.Hella 3R bi-xenon lenses are one of the most popular headlight modules that we install in our service. Their advantage is that they have a standard three-inch diameter, so they fit without problems into most headlights, but, of course, not into all - you need to check with our managers here. Be that as it may, the modules are assembled with high quality and have a metal body, which is very important, since factory lenses are assembled from composite materials, actually from plastic, so carbon deposits form on their reflectors, which reduces the intensity of light scattering from the lamps.
Removing headlights from a car.
Typically, factory optics burn out from 70 thousand to 100 thousand kilometers, the decrease in light is slow and unnoticeable at first, but soon the driver realizes that driving at night has become problematic, there is no longer enough light. We do not recommend restoring factory lenses for two reasons: firstly, the technology is quite unreliable, so no one will give long-term guarantees - usually restored lenses stop shining after six months. Secondly, we do not consider it advisable to repair a plastic part, for which it would be necessary to remove the bumper, headlights and then disassemble them. It’s better to immediately install high-quality optics, like Hella 3R bi-xenon, which is confirmed by a five-year warranty on these modules.
The headlight is disassembled, as well as showing the housing crack, as well as the old and new lenses. Installing a new lens in the headlight.Replacing the standard lenses of a Toyota Camry begins with disassembling the front part: first we remove the bumper, then we dismantle both headlights and, one by one, place them in an industrial oven for depressurization. Having disassembled the headlights, we remove the old lenses from them and, using special adapter frames, install Hella 3R bi-xenon lenses. Here we will immediately make a digression: after disassembling the headlights, we discovered that the housing of one headlight had a large crack - we will patch it with sealant.
Headlight after installing a Hella 3R lens.
We seal the crack in the housing with sealant, as well as the new headlight glass.
Next, the headlights are sealed with new glass and as the butyl sealant sets, the car is assembled. Now it’s important to adjust the new optics so that the lenses shine relative to the horizon and each other - we calibrate the headlights using a faroscope, which allows us to set the cut-off line with high precision, achieving its perfectly even state without notches.
The final cut-off line between low and high beams.
The light and appearance of car headlights with new lenses and glass.
Now let's look at the result of our work: the photograph of the final cut-off line shows that there is now really a lot of light! The new Hella 3R xenon lenses in the headlights of the Toyota Camry have shown themselves to be excellent - the luminous flux is powerful in both the low and high beams. The effectiveness of dispersing darkness in front of the car has increased, but one should not think that such light will blind oncoming drivers - this is not the case; lateral (stray) illumination is minimal. Also, the bright light of shiny headlights with new glasses transformed the appearance of the car; it began to look beautiful, stylish and expensive, which, of course, was not the case with broken, cloudy headlights and burnt-out standard lenses.
How to adjust headlights?
In order for the optics to work properly, to ensure maximum comfort while driving and to ensure that the road surface is fully illuminated, the headlights must be adjusted. Adjustment is necessary because the level of low beam headlights is influenced by the corrector. Some underestimation occurs and the illumination area is sharply limited. The setting allows you to adjust the light level as the driver needs it. As a result of the adjustment, visibility will increase, which means the level of safety will increase.
The task is quite simple. All you need is a screwdriver, with which you can quickly adjust the corrector. The screwdriver is inserted into the gear and rotated clockwise. For original headlights, the best option is to raise the level by 5-8 cm from the original one. It is important to adjust the headlights so that the level of flow is the same on both sides. A detailed diagram of how to change the headlights on a Camry Eagle or carry out pre-styling is described in the video.
Lamps used in Toyota Camry xv40
Owners of the "magpie" often complain about poor low beam. You can solve this problem by adjusting the headlights or replacing the light bulbs. We talked about how to adjust the optics and fog lights of the Camry 40 in this material.
In the manual for Toyota Camry 2006 - 2011 there is a table containing information about electric lamps.
Detailed information about light bulbs used in optics and flashlights of Toyota Camry XV40:
- high beam - HB3,
- side lighting and license plate illumination – W5W,
- low beam - halogen H11, gas discharge D4S (xenon),
- front and rear turn signals – WY21W,
- fog light – H11,
- rear brake light and dimensions – W21/5W,
- reverse gear – W16W,
- rear fog lamp – W21W,
- side turn signal (on the body) – WY5W.
The letter “Y” in the lamp labeling indicates that the lamp color is yellow. The manufacturer does not provide for replacing the bulbs in the side direction indicators; the lamp is replaced as an assembly.
Bulbs used in Camry 2009 interior lighting:
- general lighting, central lamp – C5W,
- light for driver and front passenger - W5W,
- lamp in the sun visor – W5W,
- glove compartment lighting – T5,
- cigarette lighter bulb – T5 (with green filter),
- automatic transmission selector travel light – T5 (with filter),
- front door opening lighting – W5W,
- trunk lamp - W5W.
What to do if the headlights on the Camry 40 sweat?
It often happens that one of the headlights sweats in the cold or for no apparent reason at all. This occurs due to moisture accumulation. This is possible if the ignition unit is not tightly connected to the glass. Cool air enters the inside of the headlight, where the temperature is quite high. As a result, condensation forms and the headlight fogs up. The situation is extremely unpleasant for the driver. Visibility noticeably deteriorates, the beam of light is no longer as bright as before. Considering that moisture will no longer escape from under the glass, the situation will still have to be corrected.
The first thing you should pay attention to is whether there is any damage to the headlight. Perhaps they are the reason for the leakage of the seal and the penetration of cold air inside. If there are cracks or chips, the headlight will have to be replaced. If there is no visible damage, the lid is simply sealed, having first removed and eliminated traces of moisture. If the problem is poor sealing, this will help avoid condensation in the future.
Setting the fog lights
Adjusting the Toyota Camry headlights also includes adjusting the fog lights. The key to the correct operation of these light sources is their correct installation. There are certain recommendations for installing fog lights:
- level above ground – 250 mm;
- fog lights should not protrude beyond the main optics of the car. It is advisable to fix them 400-600 mm from the headlights;
- The efficiency of fog lights will be noticeably reduced if not properly adjusted.
The steps for setting up the foglights are as follows:
- The mobile screen is moved 7 meters from the car. If you are using a wall, then simply move the car to the desired distance.
- Mark the centers of the headlights, step back 10 cm from them and draw a horizontal line.
- Drive the car another 6-7 meters away from the wall (or move the screen) and turn on the fog lights again.
- If the light is set correctly, then its upper boundary should follow the horizontal line drawn earlier. The optimal distance between the centers of the beams is 120 cm.