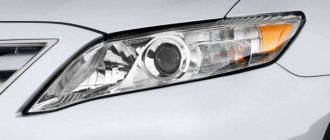
Repair and replacement of headlights on Toyota Camry
Insufficient illumination or an incorrect contour of the light beam is a common problem in the Camry 40. This malfunction occurs in the event of a failure of the head optics, the breakdown of which is possible when:
- Installation of high power lamps;
- Insufficient distance between optics and lamps;
- Acquisition of cloudiness or dulling of the reflector coating;
- Presence of chips and cracks.
Powerful or closely located lamps cause overheating of the headlight system, which leads to burnout of the internal coating of the reflector or lens on the optics, and darkening of the light flux or the appearance of blind spots in the light beam indicates depressurization of the headlight and condensation accumulation.
A weak or unfocused beam can also result from an accident or vibration.
In order to correct such situations and restore the quality of illumination of the main headlights and PTF to the factory level, it is not necessary to replace the entire headlight system - it is enough to change the car's optics.
Replacing lamps
The procedure for replacing headlight bulbs on a Toyota Camry is described below:
- If the low beam lighting element is changed, the bulb can be found in the center of the optics structure assembly. To dismantle it, you need to release the fastener and disconnect the power plug. After this, the base of the device is rotated 1/4 turn, as a result of which the light bulb can be removed without any problems. Remember that you should never touch the element’s flask with your hands, as marks will remain on it, and this, in turn, will lead to faster failure. If you accidentally pick up the lamp, then you need to treat it with a napkin, which must first be moistened in alcohol. The new device is installed at the installation site in the reverse order. If you use xenon, then most likely you will have to dismantle the flashlight, and along with it, remove the headlight washer, the purpose of which is to wash dirty optics. After replacement, you must remember to put the washer unit back in place.
- If we are talking about long-range lighting bulbs, then this element can be found closer to the inner edge of the flashlight assembly. The procedure is carried out in a similar way - the power is turned off, the lighting element is removed and replaced with a new one, while the bulb cannot be touched either.
- As for the turn signals, their lighting elements are located closer to the outer part of the structure. In this case, the light bulb is removed from the lantern along with the plug, after which the device is removed from the socket. A new lamp is installed in its place.
- The marker lamps are located in the further part, closer to the outside of the lamp. Replacement is carried out in a similar way - the device is removed from the structure with the connector, after which it is removed and a new lighting device is installed in its place.
Two universal ways to adjust headlights
Since the light bulb is fixed in the headlight with the help of three antennae, to rotate it, the easiest way is to cut off these antennae with ordinary scissors, and then insert the light bulb into the headlight, turning it in the opposite direction at a similar angle.
Due to the force of friction, the light bulb is held in the headlight quite reliably, however, if you are still afraid that it may turn during operation, when cutting off the antennae, do not cut them off completely, but leave about 0.5 mm from each antennae. These remnants, sharpened with scissors, will cling very well to the plastic housing of the headlight and prevent the bulb from turning.
The following photos show how the light bulb is positioned in the headlight before it is rotated, and after the antennae are cut off and installed in a new position. For clarity, the antennae on the light bulb base are painted over with a red marker. However, on some Toyota models, the mounting of the light bulb in the headlight is designed in such a way that there is no support rim in the headlight housing, and the light bulb is supported only by the antennae themselves. Having adjusted the horizontal according to whatman paper, the process of adjusting the head optics can be considered complete.
We roll up the Whatman paper, but don’t throw it away. Perhaps it will be useful to you or your friends.
Whether the process is complex or not is up to you to judge, but there is no denying that you will have to try to do everything right. How come the master didn’t adjust it for me so that they shine forward, and not almost at a right angle to the right? I think this happened because there the adjustment takes place point-blank to the stand; if I had moved five meters away, the jackdaws would have gone far to the right.
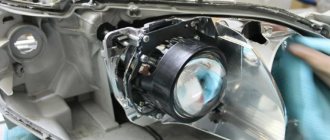
How to dismantle the lens yourself?
Installing and dismantling lenses on the Camry 40 is not particularly difficult and is carried out with a standard set of tools. However, during repair work you need to be careful - careless movements can damage the glass on the headlight. The appearance of chips, scratches or cracks on the glass can be corrected by repeated fine-grained sanding.
In order to remove the old optics, you need to unscrew all the lamps from the headlight system, and then warm up the lenses using a hair dryer or an air heater. Heating allows you to soften the structure of the sealant - if the substance is easily pressed through, the headlight can be removed.
Having picked up the glass on one side with a flat screwdriver, you need to move evenly to the other edge, removing the headlight from the car body. Upon completion, the surface is cleaned of old sealant and degreased. Removing the glass from the headlight opens up access to the fastenings that secure the lens to the reflector - four bolts.
According to the manufacturer's recommendations, the following lamps are used on the Camry XV40: 1 – high beam lamp, type HB3; 2 – front parking lamp and license plate lamp, type W5W; 3 – low beam lamp, type H11 (halogen) or D4S (gas discharge); 4 – front and rear turn signal lamp, type WY21W*; 5 – fog lamp (FTL), type H11; 6 – rear brake light and side light lamp, type W21/5W; 7 – reverse lamp, type W16W; 8 – rear fog lamp, type W21W; 9** – side turn signal lamp (on the body), type WY5W*
*The letter “Y” in the name indicates that the color of the lamp is yellow, although in reality the color of the lamp is orange.
Rear light elements of Toyota Camry
We recommend replacing all low beam lamps in your vehicle. Otherwise, differences in brightness and other light characteristics may disturb the driver and other road users.
Setting the fog lights
Adjusting the Toyota Camry headlights also includes adjusting the fog lights. The key to the correct operation of these light sources is their correct installation. There are certain recommendations for installing fog lights:
- level above ground – 250 mm;
- fog lights should not protrude beyond the main optics of the car. It is advisable to fix them 400-600 mm from the headlights;
- The efficiency of fog lights will be noticeably reduced if not properly adjusted.
Headlight selection
Black lights for Camry
If you decide to purchase fog lights (PTF), then you don’t have many options to choose from. You can buy standard fog lights manufactured by Toyota, or give preference to cheaper analogues. In addition, foglights can be LED, in which diode elements perform the lighting function.
As for the main lights, that is, head lighting, in this case the choice is also small. Depending on the desire, the car owner can buy regular mirror lights, or give preference to darkened optics. Darkened headlights are more relevant for cars with a dark body; they are also used when tuning a car. If you decide to change the taillights, then you can also opt for darkened options. If your car is equipped, you should take this nuance into account when choosing (the author of the video about tuning a Toyota Camry is the ZELENIY FURGON channel).
Which lenses to choose?
The most common and easiest option for a car owner is to purchase original lens modules or their duplicates for replacement. You can find them from major suppliers of automotive parts for Japanese cars. To select the correct part, you will need the vehicle VIN or body number.
But it is important to know that in this case the quality of road lighting will practically not improve, since a module similar to the old one will be installed, with all its shortcomings.
A more preferable option for car owners is to install universal bi-xenon lenses. Their advantages include a strong luminous flux, a clear line of light and shade, energy efficiency and a spectacular appearance. By type of design, bi-xenon lenses are divided into:
- round;
- semicircular;
- square;
- equipped with angel eyes.
The principle of their operation is as follows: a special metal shutter is installed inside the lens, driven by a built-in electric drive. In low beam mode, it cuts off the upper part of the light flux, forming a distinct “shelf” of lighting. When the high beam is turned on, the curtain rests on the partition, and the light flux leaves the lens without restrictions.
The principle of operation of a bi-xenon lens
For many car owners, replacing the lenses on a Toyota Camry in the 40 body with bi-xenon is a real salvation - the difference in the quality of road lighting is simply huge.
A special controller connected to the car’s standard wiring is responsible for moving the curtains and igniting the lamps.
Basic adjustment aspects
Adjusting headlights is one of the mandatory procedures faced by Toyota Camry car owners. This is due to the fact that the level of low-beam illumination of the optics is automatically reduced by the corrector. Accordingly, if you want the road surface lighting to be optimal, you will have to make adjustments. Even an inexperienced motorist can cope with this task, since there is nothing complicated about it.
So, in order to correctly adjust the light, you need to install a screwdriver in a special gear of the adjustment corrector. The screwdriver rotates clockwise, and you need to raise the level of luminous flux by 5-8 cm compared to what it was. Please note that the level rises quite slowly, so you will have to spend some time adjusting. When you notice that the edge of the luminous flux has increased to the required value, you will need to cover the adjusted flashlight with cardboard. The second headlight is adjusted in the same way.
Restyling of Toyota Camry 2009 model year.
Externally, the car has undergone changes - turn signal repeaters have appeared on the mirrors, the radiator grille and the design of the fog lights have changed. The maximum configuration includes Bluetooth and a touch monitor with navigation. The audio system now has a 10GB hard drive.
The chassis of the Toyota Camry V40 is simple and reliable
How to change a headlight bulb without removing the optics?
There are two ways to access the headlight to replace the Camry 40 size: from the wheel arch side and from the bumper side.
How to change a headlight bulb without removing the optics?
In the first case, this task is much easier to implement:
- turn the steering wheel in the direction opposite to the location of the headlight (if we change the bulbs in the left front headlight, then turn the wheel to the right, and vice versa);
- remove the wheel arch protection clamps and move it to the side by hand;
- take the base of the lamp and turn it 15 degrees counterclockwise, pulling it out of the socket;
- press the latch of the lamp socket connector with your finger and remove it completely from the headlight along with the socket.
Procedure for removing the headlight
It is worth noting that the procedure for removing optics is almost the same on all models of the Camry family. The differences are only in some minor details. This also needs to be taken into account when replacing dimensional lamps - for example, to perform this operation you will have to completely remove the headlight on the restyled version of the Toyota Camry v40, while on other car models it can be easily changed without such large-scale actions.
To remove the headlight unit, you need to release part of the bumper:
- Open the hood of the car and unscrew the 2 bolts located on the radiator grille - they are the fastenings of the car body kit.
- Then 2 pistons are removed. To do this, you need to “drown” their central part. Before assembling, you must remember to bring them into working order by pulling out the center of the pistons.
- In the same way, you need to remove the clips located on the front side of the plastic fender liner.
- Then the fender liner is carefully pulled out, after which the fastening screws are unscrewed using a 10mm head.
- The lower protection of the engine compartment, attached to 6 bolts, is unscrewed.
- Then the fastening latches located directly next to the headlights snap off.
- Part of the bumper is removed in the area of the head light units.
Before removing the headlight on a Toyota Camry, you should arm yourself with a long 10-point head.
Each element is attached with 3 bolts. When the headlight unit is unscrewed, it must be slightly pulled out towards you, then you can disconnect the wires going to the bulbs. Assembly is carried out in reverse order.
Only after removing all the fasteners can you dismantle the body kit and gain access to the optics.
Considering that the glass in headlights is made of plastic, the need to replace them arises every 2-3 years of intensive use of the car. It is also worth noting that most Camry models offer a wide selection of alternative optics, which differ from the standard ones in both cost and lighting quality.
The process of installing new lenses on the Toyota Camry 40
The new elements are fixed into the headlight housing using a transition frame, which allows the center of the lens to be correctly aligned with the light source. If installed incorrectly, the beam of light is distorted and goes to the sides, worsening the illumination of the roadway or blinding drivers of oncoming cars. After the car owner or technician has replaced the parts in the headlight, it is necessary to install the unit on the car and check the horizontality of the light beam. The plastic cap can be installed only after final fixation of the glass optics elements.
The plastic outer shell is polished inside and out, and then all parts of the headlight are wiped with alcohol. A heat gun is used to heat the sealant, and the diffuser is evenly glued to the body. Areas without adhesive composition cannot be left, since water and dust enter the internal cavities of the lighting device through the cracks. Lighting equipment is installed on the car using standard screws. If the plastic brackets on the headlights are broken, the parts can be restored using fiberglass and epoxy resin.