Mechanism parts wear out, despite the fact that this happens much more slowly than in other cars. The steering rack most often fails. This is unpleasant, because it is the basis of the entire management system.
Sometimes, to return the control mechanism to its original mode, it is enough to tighten a few bolts, but this does not always happen. Some trust only trusted car repair shops, but in our country men are capable of much, including doing repairs with their own hands.
How to replace the steering rack
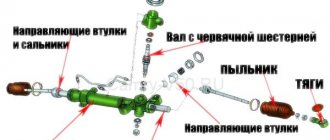
The Toyota Camry power steering consists of a steering rack, an expansion tank and a pump that runs from the internal combustion engine. Low viscosity oil is used as a hydraulic fluid, which is also suitable for the gearbox - ATF-3 or ATF-2.
When the driver rotates the steering wheel, force is transmitted to the rack via the steering shaft. On the sides of it there are special crosses. With their help, the position of the steering wheel is adjusted.
If the car's wheels are not balanced, large vibration loads are transmitted to the steering wheel. This causes increased premature wear of the crosspieces and cardan shaft, which in the future may require complete or partial replacement of the entire steering mechanism.
When the engine starts, a pressure of 8-9 megapascals is created in the power steering hydraulic system. When the driver turns the steering wheel, oil is pushed into the steering rack cylinders and greatly increases the human effort that is transmitted to the steering rods.
A rack-mounted valve allows oil to flow into the wheel cylinders when the steering wheel is turned, but when the vehicle's wheels are centered, the valve is closed, allowing oil to flow freely through the system.
Assembling the rack Rav 4 2010
The old metal bearing is replaced with a new plastic replacement during assembly. It needs to be pressed into the body. Next, lubricant is applied to the steering shaft and the part is inserted into place. Rotation of the shaft by hand should be carried out without significant effort. The play is checked by rocking. If there is one, you need to tighten the nut. If this does not help, then you need to check the upper radial ball bearing. The peculiarity of this element of the rack on the Rav 4 is that it should not play in principle. A new spare part is selected taking this factor into account. When installing a horizontal shaft, the vertical one must be removed.
We press in the bearing, lubricate and mount the shaft (photo)
The shaft should spin easily, check the play (photo)
Details about the steering rack bushings Rav 4 30
When using bushings with factory cuts, one of them must be cut completely . Below is a description of the processing of the old-style bushing (i.e. without cuts):
- On the side where there is no high shoulder, a chamfer is removed (the maximum width is taken). The collar itself is ground down in four places to form a mustache. Due to them, the part will fit into the steering rack housing more easily.
- We saw the processed bushing so that we get four cuts, each 3 mm wide. One is completed.
- Excess plastic is carefully removed, since the thermal gap of the part is minimal.
We remove part of the collar and make cuts (photo)
Put on two rubber gaskets in the form of a ring. The quantity can be increased if the shaft has been ground (to remove traces of corrosion).
To preserve the integrity of the rings, a 5-centimeter strip cut from a plastic bottle is placed on top of them, rolled into a tube.
The homemade design is inserted into the pre-lubricated mounting hole. The bushing itself is also lubricated. After installation, the strip must be pulled out while holding the sleeve.
The repair of the steering rack on the Rav 4 2011 (version after restyling) is similar, since the manufacturer did not make any major design changes to this unit.
We put on the rubber rings and install the bushing (photo)
Insert the horizontal shaft
Shaft grinding is carried out if there is corrosion or scratches. For processing, use fine-grit sandpaper (400). The cleaned and lubricated shaft is inserted inside the rack, and you need to control the position of the sleeve so that it does not come out of the socket. The shaft must move with the force of an outstretched arm, otherwise it is necessary to increase the tightness of the fit with another rubber gasket in the form of a ring.
We install the shaft and fix it, change the roller bushing to a plastic one, having previously modified it (photo)
Installing a new rack bushing Rav 4 30
The Rav 4 clamping bushing is being replaced with a plastic one , despite the seeming unreliability of the part. In addition, be sure to cut the plastic in the middle so that the resulting ends are compressed with the force of your fingers. Both corners are additionally ground down by 2 mm . The part is lubricated and put in place. The spring washers are folded together and sent inside the seat (cone inward). The nut is tightened while the shaft is rocked. The disappearance of the gap is a sure signal that it is time to complete the fixing process (you only need to tighten the nut 1/6 of a full turn). At the end, the locknut is also tightened.
After lubricating, insert the bushing and folded spring washers (photo)
As a test, the horizontal shaft is pulled strongly in four directions. The absence of play indicates that the steering rack was repaired correctly. After grinding in and settling of the clamping sleeve on the Rav 4 2012 car (the last year for the third generation), a tightening will be required. If everything is done correctly, the steering wheel will return to its original position (direct movement), and the knock will stop bothering the driver.
We assemble and seal the hole with sealant (photo)
Troubleshooting methods
Russian roads can hardly be called smooth and of high quality. All this is reflected in the service life of the crosspieces, because they bear the main load during control. As a result, when you have to turn the steering wheel on an uneven road, a knocking sound appears, which will only intensify over time and, ultimately, lead to a large amount of play in the steering wheel. This significantly increases the likelihood of an accident occurring.
In addition, the steering wheel may bite and hydraulic oil may leak. If this happens, repairs should not be put off for a long time. Driving with a faulty steering wheel is just as dangerous as driving with faulty brakes.
Diagnostics
The driver is recommended to regularly carry out self-diagnosis of the rear suspension pneumatic system. For this purpose, a special connector is provided in the car interior. The car is equipped with technical documentation with detailed instructions.
To avoid emergency situations with the Toyota Prado 120 air suspension, regular diagnostics at a service station are required with system adjustment or repair, depending on the examination results.
The need to contact service arises in the following situations:
- the clearance is not maintained, it “floats”;
- when the engine starts, the front or rear parts of the body are raised;
- when the engine is turned off, the suspension “falls”;
- the tightness of the valves of the electromagnetic unit is lost.
Before carrying out diagnostics, the car is washed and the body is inspected to eliminate defects and damage to the frame. If it turns out that the problem is directly in the air suspension, begin testing it.
Diagnostics is carried out in two stages:
- Computer - the correctness of the circuit is checked, the control unit valves and Prado 120 air suspension sensors are tested.
- Instrumental - a car mechanic checks the degree of wear of pneumatic elements by calibrating valve clearances, identifying and eliminating malfunctions.
A problem detected at an early stage will allow you to avoid emergency situations along the way.
Replacement of crosspieces and shaft
To replace the crosspieces, you need to set the steering wheel to the middle position and fix it firmly. Fixing is necessary in order to prevent breakage of the signal loop, steering wheel buttons and airbags, which can occur if the steering wheel is turned more than the prescribed two and a half turns. Only after these manipulations can you safely unscrew the bolts on the lower crosspiece with a 10mm wrench. It is located near the rack, under the hood. Then you need to unscrew the bolts of the upper crosspiece, which can be seen next to the brake pedal. In most cases, the lower crosspiece is faulty, but if the cardan shaft needs to be replaced, then both will have to be removed.
Next, you need to insert the mounting bracket between the rack and the lower crosspiece, and carefully pull the cardan out of the socket. From inside the crosspiece will have to be knocked down with a hammer, but this should be done carefully, otherwise the cardan splines may be damaged.
Why does the pneuma deflate on a Toyota Prado 120 series?
Many car enthusiasts complain about frequently occurring problems: in rest mode, the 120 Prado air deflates, and the car rests on the bump stops. When the engine is turned on, the compressor pumps up the air and the car levels out. When contacting a service station, specialists, without determining what is broken, offer to replace everything - from valve blocks to pillows. The material will help you understand the air suspension design and troubleshooting.
What is air suspension
Air suspension is a system that regulates the distance from the bottom of the car to the road surface, redistributing the air pressure in the airbags. Installed on premium cars and higher.
Consists of the following units:
- four air bags - one per wheel;
- receiver;
- air supply module;
- adjustable shock absorbers (not in all models);
- control systems.
The setting, depending on the model, is performed automatically or forcefully.
There are three types of air suspension:
- Automatic – maintaining a given position of the body, regardless of load. Height sensors monitor ground clearance, comparing indicators. Having detected an error, the actuators level the position of the vehicle.
- Manual - operating in three modes with a reduced, normal and increased level of clearance from the bottom of the car to the surface of the roadway. Modes are switched by the driver, depending on the quality of the road and the speed being developed. For SUVs, a fourth mode is provided - for unloading the car and disembarking passengers.
- Automatic, taking into account speed - stabilize the car when driving along the highway. A computer system monitors the speedometer readings. As the speed increases, the car “squats”, and when it decreases, it rises above the road surface.
How to replace the steering cardan
Then a new crosspiece can be installed, or the entire repair kit can be replaced at once. As practice shows, such a replacement is justified, because by replacing each spare part separately, you will have to constantly subconsciously expect that something else will break down in the power steering. This unit must be assembled in the reverse order.
Did the knocking and play go away after that? This means it’s time to pay attention to the wear of the steering rack. When designing this car, engineers left room for additional debugging. The adjustment is made with a bolt located next to the cardan shaft entrance. Tightening it clockwise reduces the backlash, but not for long. This will have its own inconveniences. After all, now controlling the car will require more effort from the driver, and in extreme positions, the steering wheel may bite. In this vein, such adjustment is akin to delaying the problem rather than solving it.
Sensor repair
Measuring instruments are required as a unit of the control system. Therefore, repair of the body position sensor on the Prado 120 is carried out using specialized equipment. Quality is assessed using diagnostic measures carried out upon completion of service.
Only after thorough testing can we judge the repairs carried out on external and internal units. Acoustic, light, and electrical parameters are checked. Specialists issue guarantees for the operation of devices.
Complete replacement of the steering mechanism
To be 100% confident in the steering of your car, it is best to completely replace the control system. To do this, it will be most convenient to drive the car onto an overpass or pit. As a last resort, when this is not possible, all that remains is to jack up the front of the car. Then you need to unscrew all the high pressure hoses and drain the liquid from them. Next, you need to unscrew the steering tips from the hubs of the front wheels, without unscrewing them from the rods located on the rack, so as not to adjust the wheel camber again later. To get to the rack fixing bolts, you need to unscrew the stabilizer.
After this, all that remains is to unscrew the lower part of the cardan and the rack mounting bolts. The rack can be sent for repair, but it is better to buy and install a new original one. Of course, you can get by with a Chinese non-original spare part, but it’s still unsafe to skimp on the steering mechanism, and the steering rack is not some kind of battery on the remote control, which you can throw out if something happens and install a new one. Too high a price may be paid later. As a last resort, you need to at least replace all the 19x35x7 bearings individually, as well as the boot and silent block.
Everything is assembled in the reverse order, and it is better to fill the power steering with new oil. If you have any questions, it is better to watch a video on this topic.
Articles
To replace the Toyota Camry 50 front stabilizer struts with the original, use article number 4882033070 from the TOYOTA/LEXUS concern. The spare part is suitable for both sides. Among the analogues, the following catalog numbers stand out:
- 56-02150A-SX – STELLOX;
- CLT-75 – CTR;
- TO-LS-13474 – MOOG;
- JTS845 – TRW;
- GSP301722 – GUD
Original Toyota stabilizer strut 4882033070
To replace the Camry 50 front side stabilizer bushings with an original spare part, article numbers 4881533101 and 48815-33090 . Analog options:
- PSE2459 – PATRON;
- QF23-D00011 – QUATTRO FRENI;
- TSB-ACV40F – FEBEST;
- ADT380140 – BLUE PRINT;
- 81942853 – SWAG.
Original Toyota stabilizer bushing 4881533101
Article number of the original Camry 50 rear stabilizer link – 4883033040 (identical for the left and right sides). Available analogue options:
- 1050070067 – DODA;
- CLT-57 – CTR;
- SL-T455-M – 555;
- TO-LS-14063 – MOOG;
- 10010615 – GMB.
Original Toyota rear stabilizer strut 4883033040
To replace the Camry 50 rear stabilizer bushings with the original, use catalog numbers 4881833101 and 48818-12160. Articles of analogue products:
- HR 822324 - HANSE;
- 1013225 – TOCHKA OPORY;
- QF27D00004 – QUATTRO FRENI;
- BS20178 – FENOX;
- PSE2504 – PATRON.
Original Toyota Stabilizer Bushing 4881833101