Experts recommend scheduled replacement of brake pads every 50,000 km, but, basically, the pads are replaced as they wear out. Grooving of brake discs is carried out as needed.
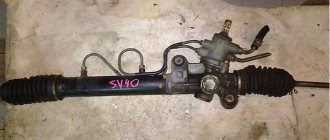
A Toyota Camry 2.4 2006 arrived at the service station. The owner of the car indicated that when braking, a beating was felt in the steering wheel and brake pedal.
With such “symptoms”, first of all, we check the brake pads and brake discs. After diagnosing the car, large wear on the brake discs was discovered, which prevents the pads from fitting tightly to the brake disc. To eliminate the problem, it was decided to resurface the brake discs, replace the brake pads and clean the wheel hub seat.
When is it time to change brake discs?
There are few indirect signs that most likely indicate wear of the brake discs of the Toyota Camry 40. However, it is worth checking them if you notice the following changes in the behavior of the car:
- The brake pedal sinks when pressed harder than usual.
- When braking, jerking and vibration are felt. The reason for this may be a change in the geometry of the element, the curvature of its plane.
- Vibration is transmitted to the steering wheel. This can also occur due to distortions and deformation of the Camry brake elements.
- A whistling or squeaking sound is heard when decelerating.
All these signs can be caused by either worn brake discs, critically worn pads or other problems. Therefore, if they occur, it is worth checking the entire brake system of the Camry 40 and replacing failed parts.
Additional Information
Fans of a sporty driving style, as well as adherents of aggressive driving, can recommend brake discs from the DBA campaign, manufactured using Thermal Stability Profiling technology, which provides the following operational advantages:
- The unique structure of the material ensures the resistance of the working surface to the effects of deformation processes.
- Immunity to the effects of sudden (prolonged) braking.
- Quick “grinding in” of working surfaces.
Source zapchasti.expert
«>
Checking for maximum permissible wear
In order to understand the condition of the brake discs, it is necessary to inspect them for strong grooves and cracks, measure their thickness and runout.
To begin with, let's look at the nominal sizes of Toyota Camry 40 brake discs.
Camry 40 front axle (all dimensions in mm):
- diameter – 296;
- thickness of the new one – 28;
- minimum thickness – 25;
- the maximum permissible runout is 0.05 mm.
Rear axle Camry 40 (mm):
- diameter – 281;
- thickness of the new one – 10;
- minimum thickness – 8.5;
- the maximum permissible runout is 0.15 mm.
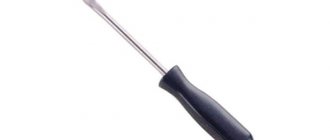
Now, about the actual process of checking Toyota Camry 40 discs. The process is not complicated. You will need a jack, a wheel wrench and a caliper.
(Link to photo source)
Checking the front and rear brake mechanisms on the Toyota Camry 40 follows the same algorithm:
- Raise the car with a jack on the desired side and remove the wheel.
- Now nothing prevents you from getting to the desired part. Inspect it and measure the thickness in 4 places.
- If you find visible curvatures, cracks, or a thickness that is less than acceptable, a replacement is needed.
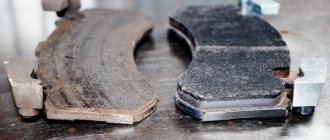
- At the same time, it will be useful to check the condition of the brake pads. To do this, use the same caliper to measure the thickness of the friction linings. The minimum permissible thickness of the friction clutches on the pads of the rear and front wheels of the Camry 40 is 1 mm.
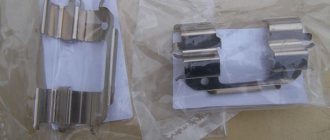
Old and new pads
Original pads and expensive analogues
They have the highest quality. They do not creak or knock during operation. The cost is high, like all original foreign-made spare parts. Made from wear-resistant material, they last as long as they should. The price for “native” Camry 40 pads is significantly lower than for other Japanese foreign cars. However, those who do not want to spend an exorbitant amount on brake pads from the manufacturer can buy cheaper brands, but also with high quality. The manufacturer of Japanese auto parts is usually Japan. However, sometimes parts are manufactured in other countries, which should be marked accordingly on the packaging. The most popular models are:
- Akebono is a fairly expensive Japanese original. The quality is time-tested and always at its best.
- Kashiyama - pads are sold from Indonesia. The quality is average: they do not generate dust, do not creak, and can withstand a mileage of 30-40 thousand km. Sold in blue and white packaging. The manufacturer is not indicated on the box. Previously, the Kashiyama brand was also produced in Japan. Japanese pads from this company were sold in a box marked “made in Japan”; the price of such mechanisms was higher and lasted longer. However, many car enthusiasts noted that the pads made a squeaking sound when driving.
NBK is a Japanese production of average quality. They do not sell on the Russian market under their own brand.
Mid-price models and cheap analogues
Mid-price items for lovers of an equal price-quality ratio. Such brands are quite reliable and also meet all the parameters. However, some models may be inferior to expensive ones in terms of service life and have certain disadvantages (dust, knock, creak when moving. In order to choose a suitable model, you will have to experiment. These are mainly brands of European manufacturers:
- Textar – production technology developed in Germany, sold in the UK. They have good reviews from car enthusiasts and sellers. The product packaging is reliably protected by the TDM Triction hologram. The set is complete, except for the anti-squeak plates.
- TRW (Lucas) is a fairly popular and expensive brand for its category. The quality is average and doesn't deserve the price. Based on reviews from car service centers and buyers, you can find equally decent brake parts at a lower price.
- Remsa is a Spanish brand of good quality: there are no complaints about creaking or fragility. They have a glued heat-protective plate. Many car owners prefer them.
- Bosch - most of the parts from this company are removed from the Chinese assembly line. The price is low, the quality is appropriate.
As you can see, the choice is varied. There are many options to choose a model based on your own needs and wallet.
Articles
During the process of replacing brake discs, you may find wear on other elements. Therefore, we will provide in advance the article numbers of all the parts that you may need to repair the Toyota Camry 40 braking system.
For front mechanisms:
original front brake disc - 43512-33130 , its dimensions (mm): diameter - 296; working part thickness – 28; total height – 49.2;
Original front brake disc 43512-33130
- pads - 04465-33440/04465-33450 (before 2009) or 04465-33470 (after 2009);
- repair kit for Camry 40 caliper - 04478-33100 (up to 2007) or 04478-33130;
- caliper piston - 47731-33340;
- top guide - 47715-52190;
- lower guide - 47715-33340.
For rear mechanisms Camry 40:
- original rear brake discs - 42431-33130 , its dimensions (mm): diameter -281; working part thickness – 10; total height – 66.8;
- pads - 04466-33160/04466-33180;
pads - 04466-33160
- caliper repair kit - 04479-33240 (for cars manufactured from 2006 to June 2007), 04479-33260 (from June to October 2007) or 04479-33280 (for all Camry 40 after October 2007);
- caliper piston - 47831-33210;
- top guide - 47814-33210;
- bottom guide - 47814-33211.
To these lists you can add TRW PFG-110 - an excellent lubricant for guide calipers.
TRW PFG-110 grease
There are also non-original brake discs for Camry 40. Here are popular options with catalog numbers.
Front:
- DELPHI BG4192;
- TRW DF4828S;
- BOSCH 0 986 479 768;
- REMSA 61189.10;
- FERODO DDF1646;
- NIBK RN1241;
- BREMBO 09A4171X;
- ZIMMERMANN 590.2810.52.
Brake discs TRW DF4828S
Rear for Camry 40:
- DELPHI BG4268;
- TRW DF6176;
- REMSA 61327.00;
- NIBK RN1432;
- BOSCH 0 986 479 R06;
- TEXTAR 92257803.
Rear disc BOSCH 0 986 479 R06
Review of the most popular campaign offers from brake disc manufacturers
When planning to buy brake discs for a Toyota Camry v40, almost every car owner asks a rather trivial question: “Which manufacturer campaigns offer truly high-quality products.” The main selection criteria, as a rule, are reasonable price and positive reviews from specialists. The question of how to improve the existing performance characteristics of the braking system is also relevant.
An analysis of this market segment shows a stable demand for products from such manufacturers as the German “TRW”, “Bosch”, “Delphi”, the Dutch “Nipparts” or the Japanese “Nibk”. There are also many supporters of brake discs in the “original” category.
The table below, based on monitoring the offers of the most popular campaigns - manufacturers, will provide the consumer with the necessary primary information, which is for reference only:
| Manufacturer's name | Item number | Estimated cost, rubles | Quantity and installation location |
| Delphi | BG4192 | 4140 — 4380 | 2 pcs. front |
| Delphi | BG4268 | 3940 — 4100 | 2 pcs. rear |
| TRW | DF4828S | ~ 4200 | 2 pcs. front |
| TRW | DF6176 | 3980 — 4100 | 2 pcs. rear |
| Nibk | RN1241 | 4900 — 5060 | 2 pcs. front |
| Nibk | RN1432 | ~ 3500 | 2 pcs. rear |
| Nipparts | 3302164 | 3940 — 3960 | 2 pcs. front |
| Nipparts | 3312070 | 2180 — 2200 | 2 pcs. rear |
| Bosch | 0986478968 | 4680 — 4780 | 2 pcs. front |
| Bosch | 0986479R06 | 2260 — 2340 | 2 pcs. rear |
| Toyota Motors | 4351233140 | 4580 — 4730 | 2 pcs. front |
| Toyota Motors | 4243133130 | 3200 — 3350 | 2 pcs. rear |
Replacing front brake discs Camry 40
Replacing this part on a Camry 40 is not difficult. You can do it yourself in the garage with a minimum set of tools. So let's get started:
- The first step is to jack up the Camry on the right side and unscrew the wheel.
- Next, use keys 14 and 17 to unscrew the caliper guides.
(Link to photo source)
- The caliper is now free. It can be removed and put aside so that it does not interfere. There is no need to disconnect the hose, but be sure to make sure that it does not get pinched, twisted or pulled out. The support can be tied with wire or rope to parts of the suspension.
- Inspect the caliper. If necessary, replace worn parts, torn boots and seals, or worn pads.
- To remove the brake disc from a Toyota Camry 40, you need to screw two bolts into the holes on it. By gradually tightening them, you will pull the part out of its seat.
- Clean the hub from dirt and lubricate it, possibly with a copper-based lubricant.
- Install a new element. If you are doing this for the first time, you may think something has gone wrong when you notice that the part is loose after installation. There is no need to worry about this - the part will subsequently be pressed tightly against the hub by the wheel rim.
- Reinstall the caliper and tighten the guides.
- Install the wheel.
It remains to replace the front brake discs on the second wheel of the Camry. Always replace these consumables as a set on both sides of the front axle. The same applies to replacing pads.
Disc brake repair
Replacing the front brake pads on a Toyota Camry is performed as follows:
- The car is jacked up and the wheel is removed.
- Then the lower bolt of the caliper bracket is unscrewed, after which it is turned upward, freeing the system elements.
- Then the pad installed on the back side of the disc is pulled out, after which the mounting is installed in the hatch located in the caliper.
- Acting as a lever, you need to completely compress the brake cylinder.
- Then the outer pads are installed, after which the caliper bracket is pushed into place and screwed.
- The wheel is put on, the car is removed from the jack.
This the replacement of brake pads on Camry 40, 50 or 30 with disc brakes. A similar operation is carried out with the other wheel.
Replacing the rear brake pads on a Camry with disc brakes will take no more than 20–30 minutes. However, there may be some difficulties associated with the handbrake system.
Diagram of rear brake pads on a Camry with disc brakes
There are 2 types of handbrake used on a Toyota Camry with a brake lever:
- Mechanical, the work of which is carried out by compressing individual brake pads.
- Electric handbrake. It is an electric motor that locks the rear disc brakes when you press a button. They are equipped with cars in the 50 body.
Since the second scheme of operation of the handbrake does not involve the use of separate pads, it is simpler. And it is for this reason that replacing brake pads on a Toyota Camry v50 is much faster.
Replacing Camry 40 rear brake discs
Now about replacing the rear brake discs on a Toyota Camry 40. Nothing complicated here either:
- Jack up the car and remove the wheel. Place wheel chocks under the front wheels. The parking brake must be turned off (the handbrake is lowered all the way down).
- Next, you need to unscrew the two bolts that secure the pad guides to the Camry's steering knuckle.
- Remove the caliper and secure it so that the hose screwed to it does not bend, stretch or twist. The caliper can be tied with wire to the shock absorber strut spring.
- Now the Camry 40 brake disc is free and can be removed from the hub simply by pulling it towards you.
- If the part sits tightly and you can’t tighten it by hand, you can screw it in with two holes with M8 threads located opposite each other. Bolts of suitable length must be screwed into them. Tighten the bolts alternately and evenly until the disc is pulled off the hub.
- The seat on the Camry 40 hub must be thoroughly cleaned of dirt, rust, sand and fine metal dust. It is necessary to achieve maximum cleanliness so that the disk sits evenly, without the slightest distortion, otherwise runout cannot be avoided.
- Install the new part and reassemble everything in reverse order.
- During the replacement process, you should carefully inspect the Camry 40 caliper and pads. If you notice damage or wear on parts, replace them.
12.7. Replacing brake pads on drum brakes
Warnings
Be sure to replace all the pads on one car axle, even if one pad has reached the wear limit. If the pads are to be reinstalled, they must be marked before removal.
When brake pads work, brake dust is formed, which contains asbestos, which is harmful to health. Therefore, when cleaning brake pads, do not use compressed air or inhale dust.
Rear brake with brake drum
| 1 – elements for fixing the brake pad; 2 – front brake pad; 3 – pin; 4 – brake shield; 5 – inspection hole plug; 6 – plug; 7 – piston; 8 – spring; 9 – bleeder fitting; 10 – nest; | 11 – dust cover; 12 – working brake cylinder; 13 – fastening bracket; 14 – hand brake lever; 15 – adjustment lever; 16 – ring; 17 – adjustment bar; 18 – rear brake pad; 19 – spring; 20 – tension spring; 21 – pad fixation spring |
| The maximum diameter of the inner part of the brake drum is stamped on the outer surface of the brake drum. |
PERFORMANCE ORDER 1. Raise the rear of the car and secure it on stands. Remove the corresponding rear wheel. 2. Release the handbrake. 3. Mark the relative position of the brake drum and the hub so that when installing the brake drum, the balancing is not disturbed. 4. Use two screwdrivers inserted through the hole in the brake shield to remove the brake pads from the brake drum. 5. Using a special fluid to clean the rear brake. 6. Remove the return spring from the top of the front brake pad. 7. Remove the brake pad retaining spring plate by pressing on the plate and turning it 90°. 8. Remove the front brake pad and disconnect the lower return spring from it. 9. Remove the rear brake pad retaining spring plate by pressing on the plate and turning it 90°. 10. Remove the rear brake pad along with the adjusting bar. 11. Disconnect the handbrake cable from the lever on the rear brake shoe. 12. Remove the adjuster spring from the rear brake shoe. 13. Disconnect the return spring and remove the adjusting bar from the rear brake shoe. 14. Remove the fixing bracket and remove the adjusting lever and handbrake lever from the rear brake shoe. 15. Install the adjusting lever and handbrake lever onto the brake shoe and secure with a bracket. 16. Apply a thin coat of high temperature grease to the threads of the adjuster bar. 17. Install the adjusting bar on the rear brake pad and secure it with a spring. 18. Install the adjusting lever spring. 19. Apply a layer of high-temperature grease to the brake shield where it contacts the pads. 20. Install the handbrake cable onto the handbrake lever. 21. Reinstall the rear brake pad, pass the pin through the pad, install the spring, and secure the spring with the disc by pressing the disc and turning it 90°. 22. Install the lower return spring on the pads, then install the front pad on the brake shield and secure it. 23. Attach the upper return spring to the front brake pad. 24. Using a screwdriver, move the handbrake lever and check that the upper return spring has not become detached from the rear brake shoe. 25. When moving the brake pads, check the reliability of their fastening. 26. If the brake drum cannot be removed from the hub, check that the parking brake is fully released. If the brake drum is still not removed from the hub, it is necessary to move the brake pads away from it. This can be done after removing the plug from the brake shield. Using a narrow screwdriver through the hole in the brake shield, move the lever away from the adjusting bar gear and with a second screwdriver, rotating the gear, move the brake pads away from the brake drum. 27
Using caution, clean the inside surface of the brake drum from brake dust and dirt. Clean the outside of the brake drum and check for obvious signs of wear or damage, cracks around the wheel bolt holes
Replace the drum if necessary. Measure the inner diameter of the brake drum. 28. Install the brake drum. 29. Install the wheel and lower the car. Pull the handbrake lever repeatedly to adjust the position of the rear brake pads.