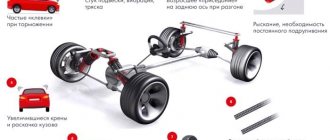
When driving over bumps, extraneous sounds may be heard from the suspension. They are created by the anti-roll bar due to damage or excessive wear on its rubber bushings.
While the car is moving, the anti-roll bar constantly changes its position when the car rolls. The load falls on the bushings, their diameter increases, and the stabilizer begins to be held less tightly. As a result, a knock appears and the vehicle's stability decreases.
The appearance of extraneous sound from the wheel arches often indicates damage to the stabilizer link. Due to the depressurization of the rubber bands, moisture gets into the gaps formed and the corrosion process starts. Bushings and racks are not repairable, so the problem with their excessive wear can only be eliminated by replacing them with new products.
Basic functions and symptoms
The suspension also ensures the absence of roll when cornering and maneuverability, and its part, which serves to connect opposite wheels, is called an anti-roll bar. The stabilizer on the Toyota Corolla is attached to the body using bushings. These are elastic parts made of polyurethane or cast rubber.
On models with a rear torsion beam, the stabilizer function is performed by the suspension itself. This can be said about the Corolla 150 and 120 body models, which only have a front stabilizer.
In the photo on the Internet you can see what features the suspension of this model has.
The job of the Toyota Corolla front stabilizer bar is to reduce the degree of lateral roll. The following signs indicate the unsatisfactory condition of both the stabilizer itself and the bushings:
- knocking in the steering rack, which appears when it is loose;
- the appearance of play in the steering wheel when turning;
- knocking and rattling of the steering wheel;
- lack of stability during movement, which was felt well before;
- the appearance of noise and vibrations in suspension units;
- uneven road, even at low speed causes extraneous sounds;
- lack of comfort and smoothness when driving.
If the listed problems become typical for the car, then it is better to contact a service center as soon as possible to diagnose the suspension.
During the inspection, it may be discovered that the front stabilizer does not work well precisely because of the contamination of the bushings, which should be cleaned of debris and dust, thereby preventing their accelerated wear.
The photo on the Internet shows the bushings that are equipped with the front stabilizer of the Corolla models of both 2008 and all subsequent ones.
Replacing stabilizer bushings, diagnosing the mechanism itself and carrying out repair work immediately after detecting a malfunction is the key to safe and comfortable driving in the future.
This is interesting: How to properly remove the battery from a car: instructions
Signs of bushing failure
Typically, the bushing and stabilizer can last up to 30 thousand kilometers. However, mileage on domestic roads is reduced; it is recommended to replace these parts a little earlier than the established deadlines. One of the first signs of instability in their work will be.
- The sound of a “loose” steering rack.
- There is play in the steering wheel when turning Toyota Corolla.
- You can feel the characteristic beating of the Toyota Corolla steering wheel.
- The car drives and is unstable on the road.
- Vibration and noise appear in the Toyota Corolla suspension units.
- When driving on uneven roads at low speeds, dull sounds appear.
- The comfort of traveling in a Toyota Corolla car decreases.
This means that it is necessary to replace the struts and bushings according to the regulations. Although, as we said earlier, given the current quality of our roads, it is better to do this in advance. You can't ignore the first signs. All suspension elements are closely interconnected. Timely replacement of these parts will prevent premature wear of other suspension components of the Corolla car.
If the above symptoms are found, you need to make an appointment, undergo diagnostics, and repair the suspension of your Toyota car.
Top 3. Febi
Rating (2021): 4.55
A wide range of products The company has in its catalog more than 30 thousand items, of which the bulk are occupied by suspension elements of both its own and third-party production.
- Characteristics
Average price: 900 rub.
- Country: Germany
- Year of foundation of the company: 1923
- Official website: febi.com
Once upon a time, the name of this company thundered throughout Europe. She was the first to come up with a unique spring bolt, marking the beginning of the development of independent suspension, which is still used today. For almost 80 years, the company produced only front and rear stabilizer struts, and later switched to producing shock absorber struts. But in 1990, its own story ended, and the manufacturer joined the Bilstein group, which supplies auto parts to the secondary market. Today, the company is both a manufacturer and a packer, which is why quality often suffers and it is difficult to determine what product you are buying and where it was made. However, the quality of the products remains at a high level.
Advantages and disadvantages
- Focus on suspension elements
- Development of unique technologies
- The brand is both a manufacturer and a packager
- There are defects and shortcomings
The procedure for performing work on replacing bushings
To replace the bushings, set the car to the handbrake. There is no need to disconnect the negative terminal from the battery. Next, perform the following operations.
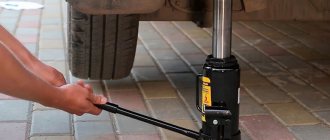
- Jack up the car on both sides so as to relieve the load on the front axle.
- Remove the plastic protection covering the chassis elements.
- Remove the metal plates that clamp the stabilizer bushing. When removing the bushing, rotate it so that it is convenient to remove it. Use a spatula to increase the gap. Before replacing the Toyota Corolla stabilizer bushings with new ones, lubricate the area with special silicone. The installation process will be faster, and the rubber will be covered with a water-repellent layer.
- When inserting a new bushing, pay attention to the hole in the metal casing into which the protrusion on the rubber product should fit.
- Reassemble in reverse order.
Description of replacing stabilizer bushings on a Toyota Corolla 120
Replacing the Toyota Corolla 120 stabilizer bushings is carried out according to the instructions given below.
- Raise the front of the car. This can be done using a pair of jacks or a lift. If you use jacks, you must secure the car with the hand brake.
- Remove the protection that covers the chassis elements.
- Clean the bushings from contamination. Treat the bracket fastenings with penetrating lubricant.
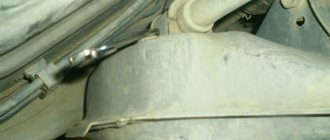
Left bushing location
Right rubber bushing and bracket
- Access to the bracket fastenings is difficult, so it is recommended to lower the subframe.
Subframe mounting location
- Unscrew the left bracket.
Removing the left bushing
- Raise the bracket. After this, pull out the rubber bushing from under it.
Raised bracket
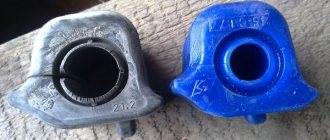
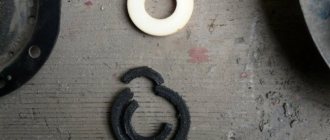
- The design of the original bushing has a special cut. It serves to secure the stabilizer more tightly. Also, thanks to the cut, installation and removal of the consumable is facilitated. If the car owner decides to supply a non-original product, then it needs to be modified. It is necessary to make a cut using a knife, focusing on the dismantled bushing.
Non-original bushing that needs to be cut
- Treat the bushing and seat with silicone grease.
- Insert the new bushing into its seat. In this case, it is necessary to check that the protrusion on it fits exactly into the hole in the metal casing.
- Tighten the bracket fastening.
Bushing installation
- To replace the right hub, it is recommended to remove the wheel and fender liner. This will provide more convenient access to it. Removal and installation of the right consumable occurs in the same way as the left one.
The process of replacing the right bushing
- After installing the new bushings, assemble everything in the reverse order of removal.
Features of stabilizer bushings
One of the first parts that begins to bother owners when driving over uneven surfaces is usually the anti-roll bar, or rather its rubber bushing.
If a knock is periodically heard in the front part, then it may be necessary to replace the Toyota Corolla 150 stabilizer bushings. The procedure can be performed without assistants and does not require special pullers. The reason for the need to replace Toyota Corolla stabilizer bushings is their wear. It occurs due to the fact that the anti-roll bar constantly changes its position due to the lateral roll of the car. At this moment, the rubber bushing takes on most of the load. Gradually its diameter increases, which causes knocking and does not contribute to the stability of the car when driving at speed.
Despite the fact that the place where the part is attached is structurally protected by a metal plate, moisture, reagents spilling onto the road in winter, fine sand get under the bushing and the process of corrosion of the stabilizer begins. Over time, the diameter of the part decreases. This means that the stabilizer in the standard bushing will not be held so tightly. Japanese engineers thought about this and made a cut in the bushing design, which is intended for a tighter fit of the part. It also facilitates more convenient installation (disassembly) of the part.
Stabilizer's pole
If the wear of the stabilizer bushings is significant, then the next element that may fail is the stabilizer link. Replacing the Toyota Corolla 120 stabilizer strut may be required after a mileage of more than 50 thousand km.
A part manufactured under license will last two or even three times less. In most cases, this is due to a loose fit of the rubber boot, as a result of which moisture gets under it and the corrosion process begins. You should pay attention to this fact when choosing a manufacturer.
If knocking noises come from under the wheel arches, this may indicate the need for work to replace the stabilizer struts. This item cannot be repaired. The operating procedure is as follows.
- Remove the front wheel.
- Jack up the lower arm.
- Turn the steering wheel in the desired direction for easy access to the part.
- Clean the connection from dirt and treat the threaded connection with BD-40.
- Break off the bolt, and then insert a socket wrench (hexagon and unscrew the nut holding the post. The upper connection is easier to unscrew. This is due to the fact that it is less susceptible to corrosion, since less moisture and dirt gets into it. If it is impossible to unscrew it in the usual way, then try preheat the connection or use pliers.
- Install a new one in place of the removed stand.
The procedure for replacing the Toyota Corolla 150 stabilizer bar is the same on both sides.
This is interesting: Vossen wheels: how to spot a fake, reviews
Replacing elements
You can replace worn parts yourself. At the very beginning of the repair, it is necessary to raise the car's axle. To do this, you need to tighten the handbrake and install reliable wheel chocks. The easiest way to lift the axle is with a jack, although you can also use a lift. This will position the entire suspension in balance. This procedure is required to prevent the stabilizer from pulling the entire suspension down. Otherwise, it will be impossible to install new racks. It is also important to clean the repair area, and this should be done even if there is no dirt as such.
The rear stabilizer struts are usually replaced first for convenience. First you need to grab the end of the axle shaft. To do this, you need to insert a hex key of the appropriate size. Then you need to unscrew the nut that secures the stand itself.
Purchased parts can be removed quite easily, but the factory original (if it has not been changed before) is secured quite tightly, so you need to strain a little to remove it.
The vacated space should be thoroughly cleaned. Now you can insert the new stand. However, you cannot immediately tighten the nut completely, since after returning the car to its original position from the jack, it is necessary for the part to take the correct position. This is done only at the very end of the procedure.
The front strut is a little more difficult to change. It all starts in the same way as in the case of the rear one: the axle shaft is secured, the nut is unscrewed. Next, remove the thrust washer (usually called the cup) and loosen the stem nut.
There are two bolts on the caliper mount: the top one needs to be disconnected and the bottom one needs to be loosened a little. After this, it is recommended to move the caliper a little.
Only after these procedures can you remove the bolts, having first loosened them. If the original is being replaced, it is better to release the brake hoses before disconnecting the strut. In other cases, you can do this after dismantling. Now you can insert the part and assemble it in reverse order.
What will you need?
New stabilizer bushings.
To change the stabilizer bushings on a Toyota Corolla E120, it is not at all necessary to go to a car service center. Many car enthusiasts have been carrying out the process on their own for a long time.
For a complete repair you will need a pit or a lift, as well as a set of tools.
Replacement algorithm
Before starting the procedure, it is worth noting that almost all operations will have to be done by touch, and therefore, those who are not confident in their abilities should head straight to a car service center. Let's look at the process of changing stabilizer bushings on a Toyota Corolla E120:
- We install the car so that there is full access from below. To do this, it is best to use a pit or a lift.
We find the stabilizer and bushings.
- Remove the engine protection, if any.
Remove the fixing protection of the stabilizer bushings.
- Using a wrench or ratchet, unscrew the bushing mount.
Now unscrew the bracket and remove the bushing.
- Carefully remove the mounting bracket.
- We remove the bushing from its seat.
- We install a new stabilizer bushing and mounting bracket. Tighten the mounting bolts and nuts.
We mount a new stabilizer bushing and tighten the fasteners.
- We carry out the operation from the other side.
Part selection
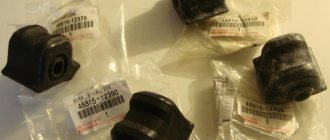
Original stabilizer bushings.
A high-quality part is the key to successful, long and safe operation of a vehicle. That is why special attention should be paid to the choice of product.
Original
48815-12370 – original catalog number of the stabilizer bushing for Toyota Corolla with E120 body. The average cost of a product is 1000 rubles.
Analogs
Also, there are a number of analogues of the original product that can be installed on a car:
| Manufacturer's name | vendor code | Price in rubles |
| Blue Print | ADT380125 | 500 |
| Febest | TSB-ZRE151LH | 450 |
| Febest | TSB-ZZE150L | 500 |
| Febi | 42840 | 750 |
| GSP | 513153 | 300 |
| Japan Parts | RU-286 | 450 |
| Masuma | MP-1078 | 450 |
| Nippart | N4272000 | 1200 |
| Sidem | 845822 | 750 |
| Stellox | 79-00006-SX | 750 |
| SWAG | 81 94 2840 | 1000 |
| Yamato | J72058YMT | 300 |
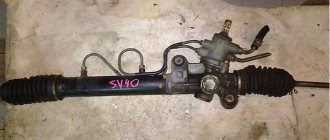
Article number and cost of original stabilizer struts for Toyota Corolla 150 and their analogues
Branded Toyota Corolla 150 racks have article number 4882042030. Their price ranges from 2000 to 4000 rubles. Since the cost for the original is too high, it is better to supply an analogue from a third-party manufacturer. The racks recommended according to reviews from car owners are shown in the table below.
Table - The best alternatives to the original stabilizer struts for the Corolla 150
| Company manufacturer | Article number | Approximate cost, ruble |
| Profit | 23050389 | 380-320 |
| Blue Print | ADT38580 | 600-800 |
| Nipparts | N4962054 | 300-350 |
| Starline | 9090735 | 350-500 |
| CTR | CLT62 | 650-1000 |
Third party stand
Toyota Corolla Terra Type › Logbook › Replacing stabilizer struts and bushings
Having driven for a couple of weeks after replacing the stub bushings with the “Fulcrum”, they creaked terribly on the sunbeds... I endured and endured, but could not stand it, I ordered the original for 800 rubles.
I installed them over the weekend in the village. The creaks disappeared) Also, before the weekend, another knock appeared. I rocked the car from side to side, there was something there. I reached under the hood, started tugging on the stub, yeah, there it is. With the wheels turned, everything was quiet. After replacing the bushings the knocking noise remained, which means the struts. I thought and wondered. what to choose and settled on QSTEN A01SL10380 - 624 rubles. a piece.
According to the reviews, everyone seems to be happy. I picked them up today and the first thing I noticed was the lack of rings on the anthers
Some people also wrote that the QSTEN type was the original, but I obviously didn’t have them. Yes, they are similar, but only the stick itself and the fact that the finger is held with a hexagon. On my relatives there was a ring on the boot and the back part was of a different shape
I've been on the CTR for almost 30k and a little less than a year and a half. After removal, I realized that the upper pins were in good condition, the anthers were all intact, but the lower pins on both racks were damaged.
The knocking noises have disappeared, or rather those that appeared last week have disappeared, but the rumble when driving over crushed stone or something similar remains... Honestly, they are already annoying me. When inspecting the suspension, no one finds anything. For some reason I am leaning towards the steering cardan. I tried removing the plastic under the steering wheel, checking the tightness of the bolts - they were sitting dead. I pulled on them and they didn’t seem to be loose. So tell me how to check them? Just shoot? Or is there some other way? I look forward to your advice) Thank you for your attention! Peace to everyone =)
Price: 2,050 ₽ Mileage: 135,500 km