Operation of the 3S FE power unit requires periodic replacement of the timing belt. Timely maintenance of the timing belt helps prevent the consumable from breaking or jumping one or more teeth.
Changing the belt will not be a big problem with your own hands. For a successful event, it is important not only to follow the instructions, but also to purchase consumables from trusted brands.
Replacing the timing belt on a Toyota 3S-GE engine
Replacing the timing belt ford focus 2
Discuss
Car: Toyota Caldina, fulltime 4WD. Year of manufacture: 1995. Mileage: 97300 km.
3S-GE engines on Toyota cars vary slightly depending on the year of manufacture. The engine that I had to “dissect” this time is similar to the engines on the Toyota MR-2. The timing belt and water pump on the car need to be replaced. So let's see how to do this.
In an amicable way, you must first wash the engine, and then start replacing the timing belt, and any other unit.
Well, we washed it. Previous variations of 3S-GE were also just as “cramped”, there was nowhere to fit.
Before starting work and loosening any nuts on the engine, you must remove the negative terminal from the battery. Then wait until the engine has cooled down sufficiently. Next, you need to disconnect the radiator expansion tank, the container with washing liquid for windshield washers; disconnect the generator.
Removing the timing belt cover will require some work as there is little room to maneuver. Previous versions of this engine had more room to remove the mounts. In our case, a large tool will not help, we will have to spin.
Now we unwind the drive pulley. This is done this way using a simple puller.
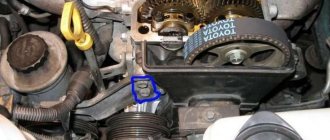
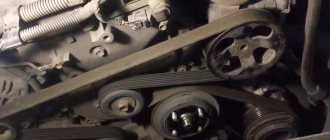
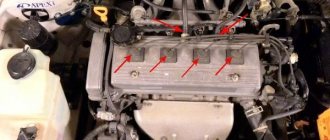
The photo shows the left side of the engine with the timing belt not yet removed. The problem with this type of engine is that the belt “clings” to quite a few units at once, which requires serious tension, and this, in turn, leads to faster wear of the timing belt compared to other types of engines. The 3S-GE engine uses automatic timing belt tensioning
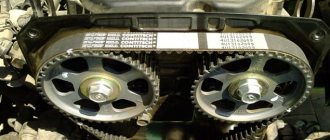
When replacing a belt, it is important to remember that the new one must meet the technical specifications. That is, the numbers on the back of the belt (they are often not on the packaging), indicating the number of teeth and length, must match for the new and replaced timing belt
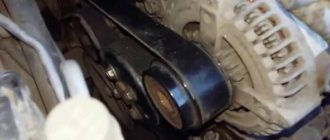
The automatic timing belt tensioner and bearing look as shown in the picture. An oil seal is inserted into the core of the tension roller and liquid is poured in, this facilitates the operation of the bearing.
This metal thing in the very middle is the tension roller rod. Carefully inspect to see if there are any traces of grease or oil on it. The rod is inserted into the groove using a press and secured with a cotter pin through a hole in the tensioner body for convenience during further installation. The tension roller rod plays an important role in the entire mechanism.
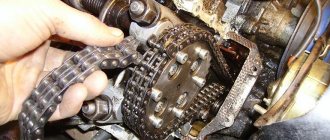
We put the tension roller in place. The picture shows a smooth polished metal roller. After we put the tension roller in place, we proceed to remove the water pump. It is replaced along with the timing belt. In our case, this must be done, since the time for its replacement has already approached.
In order to remove the pump, you will have to unscrew the bolts of the air conditioning compressor and disconnect the cover.
Place the timing belt so that the mark on the belt and the drive pulley are aligned as shown in the figure. The presence of a mark on the belt depends on the manufacturer.
When tensioning the belt, be careful not to damage it, create kinks, or knock the teeth out of their grooves.
Carefully replace (screw) the timing belt cover.
That's all. I think that the explanations on the main stages of replacing the timing belt will be enough to do everything yourself. Since I was still inspecting the dynamo and other engine components myself, everything took about 3 hours.
Connecting rod bolts
The connecting rod bolt numbers for the 3S-FE engine have not changed since 1994. But from 1996 to 2001, these engines suffered from insufficiently strong connecting rod bolts. They came off on their caps. This happened both during re-tightening and during operation. As a rule, after repairs involving the removal and installation of connecting rod caps on old bolts. It is now known that the Japanese replaced the connecting rod bolts with durable ones during the recall campaign. In general, when removing and installing connecting rod caps on a 3S-FE engine, a complete replacement of the connecting rod bolts is highly recommended.
You can choose and buy an engine for Toyota RAV4, Toyota Avensis or Toyota Auris, Toyota Yaris in our catalog of contract engines.
Here, using the links, you can see the availability of specific Toyota cars at the dismantling station and order auto parts from them.
Technical characteristics of 3S-FE
Inspection, replacement and adjustment of the chevrolet niva generator drive belt
The in-line 4-cylinder 16-valve internal combustion engine 3S-FE with a displacement of 2 liters (1998 cm3) is built on the basis of the 2S-FE. The designers equalized the piston stroke and cylinder diameter, making them 86 mm each. Engine performance increased to 115 hp. and 162 Nm. The power plant began to be equipped not only with a manual transmission, but also with an automatic transmission.
After the 1996 update, the unit received new characteristics:
| Engine | Power, hp at rpm | Torque, Nm at 4400 rpm |
| 3S-FE | 128/ 5400 | 178 |
| 3S-FE (2WD) | 140/ 6000 | 186 |
| 3S-FE (4WD) | 135/ 6000 | 181 |
| 3S FSE | 145/ 6000 | 196 |
The compression ratio of 3S-FE before 1996 was 9.5, after 1996 - 9.8. It is permissible to fill the engine with AI-92 and AI-95 gasoline. Fuel consumption when working with manual transmission:
- in a mixed cycle - 8.5 - 9.5 l;
- on the highway - 7 - 8 l;
- in the city - 11.5 - 13 l.
Oil consumption in a working 3S-FE engine ranges from 0.2 to 1 liter per 10,000 km. The manufacturer recommends changing the oil and filter every 10,000 km or once a year. Filling capacity - 3.9 l. Motor oils with a viscosity of 5W-30 and 10W-30 are suitable for filling.
Engine life is 300 thousand km according to the plant. However, with regular maintenance and proper operation, the 3S-FE can last over 500 thousand before overhaul. With good service, the unit will operate for more than 700 thousand km.
Crankcase ventilation
The crankcase ventilation system of the 3S-FE engine is not very diligent in sifting oil vapors from gases. Therefore, oil vapors settle in the intake manifold and on the throttle valve. To capture oil vapors, some owners install an external oil separator, or even 2 oil separators.
The standard oil separator in the form of a labyrinth is located in the valve cover. Crankcase gases from it are sent to the intake through two channels - before and after the throttle valve. When there are heavy deposits in the labyrinth, oil sifting practically stops, so the engine has an oil appetite: i.e. it “consumes” oil vapors entering the intake manifold. It is also a good idea to check the check valve in the gas supply tube behind the throttle valve. It may need cleaning, or better yet, replacement.
Article number and prices for good analogues of the branded timing belt 3S FE from third-party manufacturers
Replacing the alternator belt on a Chevrolet Niva without air conditioning
The price of a branded original timing belt under the Toyota brand is very high. Therefore, car owners are forced to resort to searching for analogues among third-party products.
Some non-original timing belts are of low quality, but there are also very decent options at an attractive price. The best analogues of branded consumables are summarized in the table below. They have mostly positive reviews among car owners.
Table - Recommended analogues of the 3S FE timing belt
| Brand | Article number | Cost, ruble |
| Contitech | CT998 | 800-850 |
| SUN | A513YS27MM | 1000-1100 |
| Bosch | 1987949599 | 800-880 |
| Bando | 267S8M1304 | 400-510 |
| Dayco | 94167 | 600-670 |
In the timing drive system, some components and parts have a service life similar to the service life of the belt
Therefore, when replacing it, it is recommended to pay attention to other elements. To simplify maintenance of the 3S FE timing belt, a lot of manufacturers produce ready-made special kits
The table below shows the best kits that are recommended to be purchased if you plan to replace the timing belt.
Table - Good alternatives to the original belt replacement kit
| Brand | Catalog number | Approximate prices, ruble |
| Gates | K015202XS | 2500-3300 |
| SKF | VKMA91003 | 2400-3200 |
| INA | 530026810 | 2600-3500 |
| Febi | 24790 | 2400-3100 |
| Bosch | 1987946308 | 2800-4000 |
Required tools and necessary materials for replacement yourself
To replace the belt on the 3S FE, it is important to first prepare a number of tools, the list of which is presented below. Table - Tools and materials
Table - Tools and materials
| Name | Description |
| Socket head | “at 10”, “at 12”, “at 14”, “at 19” |
| Vorotok | With ratchet and extension |
| Open-end wrenches | Set |
| Clamps | High strength |
| Hammer | Weighing 300-400 g. |
| Marker or stroke | To place timing marks |
| Pulley clamp | Can be made from improvised materials |
| Torque wrench | For tightening threaded connections to the required torque |
| Sealant | For hermetically sealed joints |
| Penetrating lubricant | For processing stuck threaded connections |
| Wire brush and rags | For cleaning work surfaces from dirt |
Design Features
The 3S-FE internal combustion engine is designed simply and thoughtfully. The cylinder blocks are made of cast iron, the cylinder heads are made of aluminum. There are two camshafts. There are no hydraulic compensators. The cylinder heads are poorly ventilated, so the engine is not suitable for forced loads. Fuel supply system is injection with electronic multipoint injection.
The disadvantages of the 3S-FE engine include the noisy operation of the exhaust system and noticeable rustling of the pulleys and rollers. After 200,000 km, a good oil appetite and high fuel consumption appear. The engine is piled up against the engine shield, making access for maintenance difficult.
Similar article Technical characteristics of VAZ engine 21127
A serious problem was discovered after the 1996 modernization. The designers reduced the mass of the piston group by 0.7 kg, leaving the crankshaft unchanged. To save money, the updated crank mechanism was not balanced, which led to vibration. Under its action, the bolt heads of one of the connecting rods are torn off. The part breaks loose and pierces the cylinder block. To prevent an accident during repair of the piston group, it is necessary to change the connecting rod bolts and tighten them strictly with the nominal torque.
Modifications to the unit in 1996 affected the ignition system. Mechanical distributors were replaced with dual coils that operate on 2 spark plugs. This doubled the load on the spark plugs and wiring.
Some 3S-FE models have an EGR gas recirculation system. An electric vacuum valve and a vacuum modulator-membrane are used for control. When the gas becomes rarefied, the EGR valve opens. After the EGR valve closes, the exhaust gases pass through the modulator filter. Every 2 years, it is advisable to blow out the filter with compressed air.
Adjustment of valves
Thermal clearances of valves are adjusted by selecting washers installed on disc pushers. Each original washer costs about $9. But today there are enough substitutes on the market. In addition, washers from many other engines are suitable here, incl. from licensed Geely units. The diameter of such washers is very common - 28 mm.
Owners come to adjust thermal clearances when a characteristic clicking sound of valves appears when the engine is running.
Engine fault overview
Despite the thoughtfulness and unpretentiousness of the 3S-FE engine, drivers face some problems:
- increased fuel consumption. Occurs due to improper operation of the throttle valve or one of the sensors that transmit incorrect information to the ECU. Contaminated injectors also interfere with the formation of a normal mixture. Carbon deposits on the pistons lead to excessive fuel consumption due to changes in the volume of the combustion chamber and loss of power;
- increased appetite for butter. Often found in cars with mileage over 200,000 km. Carbon deposits on the pistons indicate severe burns through compression and oil control piston rings and leaking valve seals. The malfunction may also be in the sensors: lambda probe, intake air temperature sensor or map sensor;
- Long cold start. The problem is due to a breakdown of the fuel injectors or temperature sensor;
- Unstable engine operation, loss of power. The reason is a breakdown of the EGR valve or engine oil getting into the spark plug wells: the ignition occurs with misfires, and the engine stalls at idle;
- motor vibrations. The problem occurs when the side cushions wear out or there is a loss of pressure in one of the cylinders.
https://www.youtube.com/watch?v=KcCTjpVy-sc
Injectors
Clogged fuel injectors cause the 3S-FE engine to start unsteadily when cold or hot. Replacing them solves startup problems.
You can select and buy gasoline injectors and a fuel rail for a Toyota engine in our catalog of contract spare parts.
Replacing the timing belt on a Toyota Passo
To independently replace the timing belt on a Toyota Passo, the car owner will have to make a lot of effort. The engines of these cars have a rather complex design, and since 2002 they have practically not been updated. As a rule, this line of cars had only minor modifications to the power plant.
When is replacement required?
The timing belt on a Toyota Passo needs to be replaced every 140 thousand kilometers. A preliminary check of the technical condition of the belt is carried out upon reaching 35 thousand km. Everything here will depend on the quality of the consumables, the technical characteristics of the timing belt and the driver’s driving habits.
Signs that the timing belt on a Toyota Passo needs to be replaced:
- Cracks appeared on the surface of the belt;
- When the belt was bent on the tension roller, the reinforcing mesh began to be visible on it;
- Oil stains began to appear on the surface of the part;
- Snacks (notches) appeared along the edge of the belt. Typically, such damage occurs when the belt stretches. This is a clear sign that this consumable needs to be updated urgently.
- The grooves of the belt (its guides) are completely or partially erased.
Selecting a new part
To choose the right new timing belt, the car owner needs to follow the recommendations:
- Purchase consumables only from the following manufacturers: Gates;
- Kit;
- Sat;
- Tayota;
- Basz.
- Belt length;
- 2AZFXE - has different series (1,2,3, etc.). Depending on the series, it may fit all Passo models;
Replacing the timing belt on a Toyota Passo with your own hands
Before you start changing consumables, the car owner will need to prepare the necessary tools:
- Set of spanners;
- Ratchet wrench with a set of replaceable heads.
Step-by-step instructions for changing the timing belt:
- The first step is to loosen the generator mount. To do this, we do the following: First of all, remove the right front wheel.
- Then remove the plastic fender liner. It’s worth considering here: it consists of two parts, so first unscrew the top part and then the side.
- Next, take a ratchet and a 14mm socket, and then loosen the generator mount
It is worth considering that the belt must be installed strictly as in the photo below, otherwise when the engine starts, the tension roller pin may break and the generator pulley guide may break.
Consequences of untimely replacement
To extend the life of the vehicle as a whole, it is necessary to regularly and timely replace the timing belt. Ignoring this recommendation can lead not only to belt rupture, but also to a number of more serious breakdowns. For example:
- Tension roller pin broken;
- bending of the shaft pulley guide;
- pressing pistons into cylinders;
- complete engine failure.
To avoid the above problems, it is necessary to carefully monitor the condition of the timing belt during each scheduled maintenance.
Step-by-step description of the work
Before you begin directly removing the timing drive on the 3S-FE, you will need to place the car in the garage so that there is free space near the front right wheel. Next, the negative terminal from the battery is disconnected, and the car is put on the handbrake. Wheel chocks are installed under the rear left wheel on both sides. The automatic transmission shift knob must be fixed in the “P” position.
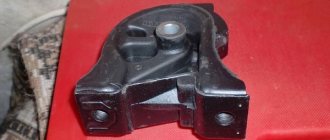
Engine mount bracket
In the future, you will need to loosen the nuts holding the right wheel at the front. Using a jack, we lift the car from the right front side, after which we finally remove the corresponding wheel. You will need to install a block under the 3S-FE pallet, having first placed a thick board on the pit. By slowly lowering the car from the jack, the pressure on the right engine mount will be reduced. This is ensured by a previously installed stop in the form of a block. Next, we begin to dismantle individual components of the 3S-FE power unit in order to get to the timing belt. Let's look at each stage of work in detail.
Removing the power steering drive
Removing the power steering belt
The procedure for removing the power steering belt is carried out in the following sequence:
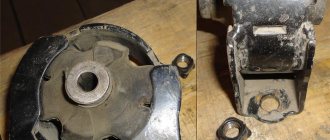
- Remove the engine mount. Using a 14mm socket and an end extension, unscrew the two nuts and three bolts of the shock absorber of the support. After this, the three bolts holding the pillow bracket are unscrewed. It is made in the shape of a corner. It is more convenient to unscrew the lower mounting bolt through the niche of the removed wheel, after first lifting the car with a jack;
- It is necessary to loosen the power steering pump mounting bolts. One is adjustable, the other is hinged;
- The pump is moved to the extreme left position, after which the power steering drive is removed.
Removing the power steering belt
Removing the alternator and air conditioner belt
To remove the 3S-FE generator and air conditioner drive, you will need to loosen the belt tension adjusting bolt. It is located on the generator. The bolt must be unscrewed until the drive can be freely removed from the pulleys. Then you will need to dismantle the generator. To do this, unscrew its mounting bolts. In order to save time on disconnecting the wiring from the generator, it is enough to simply place it in the space between the engine and the cooling radiator.
Removing the alternator and air conditioner belt
Removing the crankshaft pulley and marking
At this stage, you will need to follow the following procedure:
- To avoid kickback from the crankshaft, when performing manipulations to unscrew the pulley, it is necessary to disconnect the high-voltage wires and unscrew the spark plugs;
- Using a pulley locking device, secure it. If there is no special tool, then you can fix the pulley with a metal rod of the appropriate diameter. It is inserted into the technological hole of the pulley to a depth of no more than one centimeter. Otherwise, the 3S-FE timing belt guard may be damaged. It is necessary to select the length of the rod so that it can be rested on the floor. You can extend the rod by using an additional hollow pipe;
Dismantling the crankshaft pulley
- Use a 17mm socket to unscrew the crankshaft pulley bolt clockwise. If the bolt breaks, the power unit may lift. As a rule, the machine’s own weight is enough to unscrew the bolt;
- Next we set the labels. First you need to set the 3S-FE crankshaft to 0 degrees. In this case, the mark on the camshaft gear, in the form of a small hole with a diameter of 5 mm, should coincide with the mark in the form of a notch on the bearing cap. If this does not happen, then rotate the crankshaft one full revolution. In this case, it is necessary to check the alignment of the crankshaft marks. One is located between the teeth of the crankshaft gear in the form of a point, and the second is cast in the shape of a drop and is located directly on the power unit;
- After aligning all the marks, you should use a marker to mark the relative positions of the crankshaft and camshaft pulleys relative to 3S-FE. This will greatly simplify the reassembly process;
Crankshaft pulley
- Next, the crankshaft pulley is removed using a puller. If it is not there, then you can try, by gently shaking the pulley with your hands, moving it from its seat or knocking it with a hammer through a wooden backing.
Removing the old timing belt
To dismantle the old gas distribution mechanism drive of the 3S-FE engine, you will need to remove the plastic casing. It consists of an upper and lower part. They are fixed with bolts, size ten. After dismantling the casing, you will need to loosen the tension roller bolt and move it to the far left position, tightening the bolt back. Now you can easily remove the 3S-FE timing belt, followed by dismantling the tension roller.
Removing the plastic casing
Replacing gaskets and seals
During the process of replacing the timing belt, the condition of the gaskets and seals is checked. It is recommended to replace them together with the strap, but you can leave the old ones if they are in satisfactory condition. All seals, except the camshaft, are very easy to change. It is enough to pry them off with a screwdriver and insert a new one by hand. When installing a new camshaft oil seal, you should carefully tap it around its entire circumference to prevent it from warping.
Removing the old oil seal
First you need to remove the deflection roller. It is secured with one bolt. After this, the oil pump cover is removed. It is secured with six bolts; when removing it, oil will not spill out. Next, a new gasket is installed and the cover is installed. If you plan to replace the pump, then the coolant is drained first.
At this stage, it is necessary to thoroughly clean the inside of the timing belt guard.
Installing a new belt according to the marks
The procedure for installing a new 3S-FE timing drive is as follows:
Tensioner roller with spring
- Replace the idler and tension roller with the spring. In this case, the first is tightened with a bolt with an applied force of 42 N*m, and the second is simply tightened by hand in the extreme left position;
- The coincidence of all previously applied marks is checked;
- We begin laying the new timing belt from the crankshaft pulley. Then it is placed on the oil pump drive and tension roller, held in this position with the left hand. The right part is placed on the idler roller, the coolant pump drive and the camshaft pulley. The main thing is to carefully place the drive teeth in the appropriate grooves. If they do not converge, it is necessary to lightly turn the camshaft gear;
- In the future, it remains to adjust the tension. To do this, you will need to install the lower part of the protective casing and the crankshaft pulley. By rotating the crankshaft pulley, the tension roller spring itself will move to the required position, which will facilitate the necessary adjustment of the 3S-FE timing belt.
Assembling the timing belt guard
You can begin the procedure for assembling the timing belt casing after all the marks have been set. You will need to do the following:
Oil pump
- Secure the tension roller by tightening the bolt. A force of 42 N*m should be applied to it;
- Fix the timing drive guide washer and replace the lower part of the protective casing;
- Next, the bolt holding the crankshaft pulley is tightened. A force of 108 N*m is applied to it;
- The upper part of the protective casing is installed in its place.
Installing the attachment drive
The first step is to install the power steering belt. It is installed directly on the oil pump pulley, then driven to the crankshaft. In order for it to fit into the grooves, you need to turn the crankshaft slightly clockwise. The drive tension is carried out by an adjusting device located on the power steering oil pump. The deflection should not exceed 13 mm when a load of ten kilograms is applied.
After installing the generator, the generator and air conditioner belts are put into place. Its tension is carried out using an adjusting bar and a bolt. The deflection should be in the range from 9 to 11 mm.
In the future, all that remains is to install the right engine mount, spark plugs with high-voltage wires and the wheel. By connecting the negative terminal of the battery, you can test start the engine.
Replacing the timing belt. Toyota Ipsum 3S-FE
Replacing the timing belt. Toyota Ipsum 3S-FE
Yes, although they talked a lot about the maintainability of Toyotas, I’ll tell you that on the Passat it was easier to change the timing belt, although not by much, and maybe the denser layout on minivans makes itself felt. Knowledge is of course power! And if I knew the correct sequence of operations, I would have done everything twice as fast. I did it according to the book, but the sequence is such that they forgot to write the first line: Remove the engine and conveniently place it on the workbench. We have to perform this operation in a narrow space between the engine and the body. Well, enough of the lyrics, now just the sequence:
Replacing the timing belt. Toyota Ipsum 3S-FE. Updated version after the second replacement.
Introduction: Yes, although they talked a lot about the maintainability of Toyotas, I’ll tell you that changing the timing belt on the Passat was easier, although not much, and maybe the denser layout on minivans makes itself felt. Knowledge is of course power! And if I knew the correct sequence of operations, I would have done everything twice as fast. I did it according to the book, but the sequence is such that they forgot to write the first line: Remove the engine and conveniently place it on the workbench. We have to perform this operation in a narrow space between the engine and the body. Well, enough of the lyrics, now just the sequence:
You will have a great view of the shaft knee bolt.
2. Unscrewing this bolt is a separate matter. The main problem is fixing the pulley. I did it this way: I loosened the generator belt as much as possible, tied the belt tightly with a rope just below the generator pulley (see photo), pulled the generator belt again, the rope came loose. A similar thing can be done with the power steering pump belt, but you can’t pull it so tightly. Unscrew the bolt... don't think it will be easy. I managed to do this by hitting the knob with a hammer. In the end, you haven’t destroyed the car yet and there is a chance to put everything back together and go in search of pullers or to a car service center
3. Remove the power steering pump belt, after fiddling with loosening the tension of the belt, I loosened bolts 3 and 4.
4. Disconnect the battery terminals. Removing the generator, generator belt
5. Remove the power steering reservoir (pull up and release the latch between the body and the reservoir). Unscrew the power steering line (2 bolts 1 and 2, see photo).
6. Place a jack under the engine
and we begin to remove the support, I would even say disassemble it. First, unscrew 1 nut from the bottom (pictured No. 10), 1 nut and bolt from the top (pictured 8 and 9). Unscrew the 3 bolts that secure the support to the body. We take out the support... and the power steering line gets in the way.
7. We climb under the car. We lower the jack on which the engine stands. Unscrew the 3 bolts of the support bracket (pictured 5, 6 and 7).
8. Remove the upper timing belt protection cover. To do this, you need to jack the engine again to the highest position. The lid is removed with a rather tricky movement, because... The master brake cylinder and the power steering and brake lines are very much in the way.
9. Lower the engine again. And remove the crankshaft pulley and the lower protective timing cover. The crankshaft pulley may not come off so easily. But it has holes with threaded threads (like M6). The photo below shows my makeshift puller. those. The plates were screwed on and a pulley bolt squeezed out this entire structure.
10. Mark with paint the exact location of the belt on the crankshaft and camshaft. Just in case, I also set the 1st cylinder at TDC as written in the book, the marks to zero, etc.
11. Loosen the belt tensioner roller, push it out and screw it on again. This operation alone requires some dexterity. Remove the timing belt.
12. Transfer the marks to the new belt. We put the belt back. We make sure that the marks match exactly.
Next, we assemble everything in reverse order, not forgetting to tighten the timing belt according to the book.
One of the difficult moments during assembly is screwing the lower part of the support to the engine (bolts 5,6,7). I changed it twice, I suffered twice.
Makeshift pulley fixation
power steering belt support and adjustment bolts
Conclusion:
Of course, I was a little wrong by buying a non-original timing belt and not changing the pulley. anyway. Those. in fact, I only replaced the timing belt and the power steering and alternator belts.
- Toyota Ractis 2005, petrol, 1500 cc, 1NZ-FE – owner review
- Sale of cars from Japan, USA, UAE, Germany, Korea
- Book manual instructions for repair and operation of Toyota Passo cars (Toyota Passo) with
- How often should you change the oil - Encyclopedia of Japanese cars - on Drom.ru
- Crash Test » Page 4 » “Authority” Auto parts for foreign cars, domestic
- Toyota Voltz (Toyota Voltz) - characteristics, modifications, photos.
- Toyota Toyota cars, Toyota Toyota car. Photos of Toyota cars, descriptions,
List of car models in which it was installed
The Toyota 3S-FE engine was produced in Japan at the Kamigo Plant, and also in the USA at Toyota Motor Manufacturing, Kentucky, Inc. at Georgetown from 1986 to 2003. 3S-FE was installed on Japanese cars of class D, E, and was also installed on minivans and SUVs with front-wheel drive and all-wheel drive. In total, more than a million cars were produced for the Japanese, European and American markets.
3S-FSE motors released after 1996 were installed on a few Corona Premio ST210, as well as Vista V50 and Nadia SXN10.
| Model Toyota | Drive unit | Years of manufacture |
| Avensis ST220 | 2WD | 1997 — 2003 |
| Caldina ST190, ST210 | 2/4WD | 1992 — 2002 |
| Camry V20, V30, V40 | 2/4WD | 1986 — 1998 |
| Carina ST170, ST190, ST215 | 2/4WD | 1987 — 2001 |
| Carina ED ST200 | 4WD | 1993 — 1998 |
| Celica ST160, ST180, ST200 | 2/4WD | 1986 — 1996 |
| Corona ST170, ST190, ST210 | 2/4WD | 1987 — 2001 |
| Corona Exiv ST200 | 2WD | 1989 — 1998 |
| Curren ST200 | 2WD | 1994 — 1999 |
| Ipsum/Picnic SXM10 | 2/4WD | 1996 — 2001 |
| Gaia SXM10 | 2/4WD | 1998 — 2002 |
| Nadia SXM10 | 2/4WD | 1998 — 2002 |
| Rav4 SXA10 | 2/4WD | 1996 — 2000 |
| Vista V55, Ardeo | 4WD | 1998 — 2002 |
Similar article VAZ 21126 engine, technical characteristics of the engine
3S-FE engine design
The 3S-FE engine consists of a mechanical part and a set of systems: lubrication, cooling, injection, starting and charging. The 3S-FE device uses the simplest and most understandable mechanisms. Electronically, the 3S-FE engine contains an EFI multi-point injection system and an ECU control system.
Cooling system
The internal combustion engine is equipped with a forced cooling system. Antifreeze or antifreeze is used as a coolant. According to the regulations, the fluid is supposed to be changed after 40,000 km. The filling volume depends on the car model and ranges from 5.9 to 7.6 liters.
Coolant circulation is provided by a pump. It is located on the cylinder block and is driven by the timing belt. The electric fan directs the heated coolant to the radiator, where excess heat is released.
The engine has 2 coolant temperature sensors. One sends data to the ECU, the other to the dashboard. To quickly warm up the coolant in winter, a thermostat is built into the system, which closes a large circulation circle until the coolant is heated to 80℃.
Gas distribution mechanism
The 3S-FE engine has a timing system built according to the DOHC scheme with two cam-type camshafts. The shafts are connected to each other via gears. The intake camshaft is driven by a belt drive, and the exhaust camshaft is driven by a gear drive.
Due to the lack of hydraulic compensators, it is necessary to check the clearances in the valve drive after 20,000 km. Adjustment is carried out by selecting adjusting washers installed on disc pushers. The thickness of the washer varies from 2.5 to 3.3 mm, which allows you to choose analogues that are cheaper than the original.
The timing belt drives the pump and oil pump, experiencing severe overloads. A broken belt does not cause serious damage to the engine: the pistons and valves in the 3S-FE do not collide. According to the regulations, the belt should be changed after 100 thousand km. Drivers often do this on their own.
Injection system
The electronic fuel injection system consists of the fuel system, air supply and electronic control. Fuel is supplied to each injector under pressure calculated by the pressure regulator. After receiving a signal from the ECU, fuel is injected into the intake manifold. Excess fuel is returned to the tank through the return tube.
The amount of air supplied depends on the degree of opening of the throttle valve and the crankshaft speed. Air enters the upper part of the intake manifold and is distributed among the cylinders. Even if the throttle is closed, the air mixture will flow through the idle air system valve.
Lubrication system
The Toyota 3S-FE engine has a combined lubrication system. For rubbing parts, oil is supplied by a gear-type oil pump with internal teeth. In less loaded components, lubricant is sprayed through oil nozzles.
Similar article Technical characteristics and operation of the 1UZ FE engine
Power supply and engine starting
The 3S-FE engine has a starter starting system. When the key is turned in the ignition switch, the electrical circuit is closed. The ECU polls the sensors and checks the health of the circuit. The fuel pump turns on.
On the next turn of the key, the battery supplies starting current to the traction relay. The relay creates a power of 1.0 - 1.2 kW, which spins the starter. The starter torque is transmitted to the crankshaft flywheel and spins the shaft until the engine accelerates to a stable speed.
The main power source for the engine is an 80A current generator.
Throttle valve and idle air valve
The throttle valve of the 3S-FE engine has a cable drive and, on later versions, a throttle position sensor. An electronic idle speed controller is used to keep the engine idling. Let us remember that thanks to it, when the mechanical damper is completely closed, the air required by the engine to idle goes bypassing the damper through the idle air control channel.
Idle problems on a 3S-FE engine are usually resolved by cleaning the governor.
The throttle valve on this engine becomes contaminated with oil vapor and soot. Oil vapors in the intake appear due to the crankcase ventilation system not screening them out very effectively. And the source of soot is the EGR system. After cleaning the throttle body, the engine response becomes noticeably livelier.
You can select and buy a throttle valve for a Toyota engine in our catalog of contract spare parts.