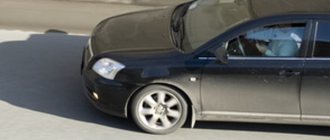
Toyota Corolla 120 how to remove the heater radiator on
It took me a long time to decide on this action, but in fact everything turned out to be much simpler.
And so easy that I couldn’t even imagine. To disassemble/remove the dashboard, you need to unscrew only 5 screws, 2 of which “hold” the tidy, everything else is on the pistons. I started by disassembling the center console: the gray “boomerangs”, then the air ducts (central), the radio frame, then the tidy, then removing 2 glove compartments, then the side air ducts, and you can actually “pull off” the dashboard. In general, I decided to remove the torpedo for 2 reasons: 1. Somewhere in the glove compartment area there was a cricket (and a good one, the sound of plastic knocking on metal). By the way, I didn’t notice any squeaks from the torpedo even in cold weather, although many people write about it. 2. I wanted to run a power wire.
In general, everything went without incident. After removing the torpedo, I went through all the insides of the torpedo; surprisingly, everything was firmly and firmly planted, all the terminals, pistons, cable ducts, etc. There’s simply nothing to cover with anti-squeak, well, that’s my opinion. As a result, I found a “cricket”. I don’t know what it is, I noted with an arrow, a plastic casing with wires, one side is adjacent to the body and is not firmly fixed, it was precisely that that was making extraneous noise. Between this box and the body I glued 4mm splen.
I ran the power wire along the right side (photo above), there was an unused plug on the interior wall, and pulled it through it into the engine compartment. Although I read other users' logs, everyone was pulling on the left side, I just couldn't find a finished hole. Well, I actually ran the control wires along the left side. I would also like to note that the cable channels of the thresholds allow you to lay fairly thick wires.
The instructions are universal - Fielders, Allexes, Ranks and regular Corolla sedan, which were produced from 2001-2006.
The sequence is shown in the diagram in numbers:
To disassemble the interior panels (and not scramble anything), we use a kit for dismantling plastic, or use electrical tape and a small flat screwdriver to make a simple gadget.
Remove the decorative panel on the right, secured with two latches.
It is better not to store the panels around the cabin, as they can be easily scratched or broken. The second decorative panel is removed in the same way (from the glass to the center). There are 4 latches on it.
I would also like to mention the removal of the side air ducts. DO THIS CAREFULLY AND GENTLY.
The idea of completely closing the restyled air ducts is cool, but the manufacture of the curtains, or rather the rotation mechanism, is VERY FRAGILE
can be easily broken. We remove it carefully. Two fastenings on top, two on bottom. It’s more convenient to use two screwdrivers, first we snap it off from the top, pull it out a little towards ourselves, then from the bottom. We pull it out. Read more: How to sew an awning with your own hands They are attached with 4 latches. Removed? Unscrew the screws (left and right)
Using a medium-sized Phillips screwdriver, unscrew the piston under the display. Don't make any effort!
We remove the glove compartment. The advertising sequence is shown.
Now we have reached the crucial moment of removing the torpedo. It’s better (more convenient) to do this together. The passenger airbag is heavy. But you can do it alone. We begin to remove the driver's side panel. We snap off the clips; in the photo they are pink.
Did you snap it off? Raise the torpedo evenly and pull it towards you. We pull it out through the passenger door. A little tip - don't forget to lower the steering wheel using the adjustment lever.
And finally. If you have a non-standard radio with a bunch of bells and whistles (watching video or having a rear view camera), be sure to check its functionality BEFORE reassembling
To do this, before starting the car, you must FIRST connect the passenger airbag! Otherwise you will get an SRS error!
We connect all the chips and only THEN connect the battery terminals and insert the key into the ignition. We are testing.
To check the 3X camera, it is not necessary to start the car; just hold down the Shift Lock button and move the lever to the “R” position.
Have you checked? Everything is working ? Let's put everything back together in reverse order!
Source
Facing Toyota Corolla, Dashboard
Removing the tunnel lining
For clarity, disassembly is shown on a car with the seats removed. You will need: a flat-blade screwdriver, a 10mm wrench. 1. Disconnect the wire from the negative terminal of the battery. 2. Use a screwdriver to pry off the latches. 3. ...pull up and remove the left side trim of the floor tunnel lining. This is where the fastening clamps for the side trim of the floor tunnel lining are located. 4. Similarly, remove the right side trim of the floor tunnel lining. 5. Use a screwdriver to pry out the fasteners of the upper lining of the floor tunnel lining. This is where the fastening clamps for the upper lining of the floor tunnel are located. 6. Pull up and detach the top trim from the floor tunnel lining. 7. From the inside of the lining, squeeze the latch and disconnect the wiring harness block of the “M-MT Es” key. 8. Remove the top trim of the floor tunnel lining. 9. Remove the ashtray block 10. Remove the two front fastening screws... 11. ...and the two rear fastening screws of the floor tunnel lining. 12. Open the glove compartment lid. 13. At the bottom of the glove box, remove the four bolts securing the floor tunnel lining. 14. Slide the protective cover onto the parking brake lever handle to subsequently remove the lining along with the cover. 15. Slide the floor tunnel lining back and up until... 16. ...until the two front latches are released. 17. Remove the floor tunnel lining. 18. Install the tunnel lining with all removed parts in the reverse order of removal.
Toyota Corolla interior trim
You will need: flat-blade and Phillips-blade screwdrivers, 14mm wrench.
The work is shown using the example of interior linings on the left side of the car. The interior trim on the right side of the car is removed and installed in the same way. 1. Using a screwdriver, pry off the fastening clamps, slide up and remove the upper trim of the front pillar. This is where the fastening clamps for the upper trim of the A-pillar are located. 2. Using a screwdriver, press out the fastening clamps and remove the front sill trim. This is where the fasteners for fastening the front sill trim are located. 3. Using a screwdriver, pry off the fastening clamps and remove the lower trim of the front pillar. 4. Use a screwdriver to pry off the fastening clips and remove the rear sill trim. This is where the fastening clamps for the lower trim of the A-pillar are located. 5. Use a screwdriver to pry up the fastening clips and remove the lower trim of the B-pillar. This is where the fastening clamps for the lower trim of the B-pillar are located. 6. Remove the two screws of the lower fastening of the upper trim of the central pillar of the body. 7. Use a screwdriver to pry up the fastening clips, slide the trim down and disconnect it from the central pillar of the body. 8. Disconnect the lower front seat belt anchor. 9. Through the hole in the trim, remove the bracket and the front seat belt mounting bracket, and then remove the upper trim of the B-pillar. 10. Using a screwdriver, press out the fasteners and remove the lower trim of the rear pillar. 11. Using a screwdriver, press out the fastening clamps, move forward and remove the middle trim of the rear pillar. 12. Using a screwdriver, press out the fastening clamps, move forward and upward and remove the upper trim of the rear pillar.
To remove the rear shelf
and trim of the rear opening of the body, do the following.
1. Remove the rear seat 2. Route the left and right seat belts through the side slots of the rear parcel shelf. 3. Overcoming the resistance of the clamps, remove the plug.. 4. ...and pull the middle seat belt through the slot. 5. Using a screwdriver, press out the fastening latches, move the cladding forward and up and lift it. This is where the fasteners for securing the rear shelf are located. 6. Slide the soundproofing padding of the rear parcel shelf, press the latch and disconnect the additional brake light wiring harness block. 7. Remove the rear parcel shelf. 8. Use a screwdriver to pry and remove the piston of the left fastening of the rear door opening trim of the body. 9. Similarly, remove the piston of the right fastening of the rear door opening of the body. 10. Using a screwdriver, pry... 11. ...and remove the three pistons of the upper fastening of the rear door opening of the body. 12. Using a screwdriver, pry off the fastening clamps, move the trim forward, remove the rear seat back fastening brackets from the slots in the trim... 13. ...and remove the trim of the rear opening of the body. 14. Install the interior trim and all removed parts in the reverse order of removal.
Toyota Corolla dashboard
The instrument panel is a collapsible structure consisting of an upper part (decorative panel), a lower part (steel frame) and removable elements. The upper part of the instrument panel is a one-piece molded plastic part, attached with screws to the frame. Attached to the upper part of the panel are control instruments, vehicle controls, elements of the heating, air conditioning and ventilation system, storage boxes, linings and trims that cover the components located under the instrument panel , or serving to install instruments and controls. The lower part of the instrument panel is a kaokas, consisting of steel reinforcement, to which the steering column, wiring harnesses, elements of the vehicle's electrical equipment, plastic caps and trims are attached. The frame, bolted to the A-pillars, the bulkhead and the body base, is included in the load-bearing structure of the body. The main removable elements of the instrument panel are elements of the central console, instrument cluster, electrical units, elements of the security system, elements of the heating, air conditioning and ventilation system, storage boxes, and trim. Complete disassembly of the instrument panel is a rather complex and time-consuming operation that requires a certain skill, so this book discusses partial disassembly of the instrument panel, allowing access to all its components and elements. When complete disassembly is still required, we recommend contacting a service station.
Toyota Corolla center console
You will need: a flat-blade screwdriver, a 10mm wrench.
1. Disconnect the wire from the negative terminal of the battery. 2. Remove the floor tunnel lining 3. To remove the ashtray block, remove the two fastening screws. 4 ...press the upper latch and, by sliding it towards you and down, move the ashtray block away from the center console. 5. From the inside of the block, press the block retainer and disconnect the cigarette lighter wiring harness block. 6. Remove the ashtray block. 7. To remove the security system indicator unit, press out the fastening clamps and, by sliding it towards you and down, move the security system indicator unit away from the center console. 8. On the inside of the unit, press the block clamp and disconnect the indicator wiring harness block. 9. Similarly, disconnect the wiring harness block for the front seat heating switches. 10. Remove the security system display unit. 11. To remove the audio system head unit, unscrew the two mounting screws on the left 12. ... and the two mounting screws on the right. 13. Overcoming the resistance of the holders, move the audio system head unit towards you and move it away from the center console. 14. From the inside of the device, disconnect the antenna plug... 15. ...push the pad clamps and disconnect the audio system head unit wiring harness connectors. 16. Remove the audio system head unit. 17. To remove the control unit for the heating, air conditioning and interior ventilation system, overcoming the resistance of the holders, move the control unit toward you and move it away from the center console. 18. From the inside of the block, press the block lock and disconnect the block of the wiring harness of the recirculation mode button. 19. Similarly, disconnect the wiring harness block of the air conditioning switch... 20. ...as well as the wiring harness block of the fan operating mode switch and the rear window wallpaper and exterior rear view mirrors switch. 21. Using a screwdriver, press out the two clamps... 22. ...and remove the wiring harness block for the air temperature regulator supplied to the passenger compartment. 23. Similarly, disconnect the wiring harness connector for the air flow distribution regulator. 24. Remove the control unit for the heating, air conditioning and interior ventilation system. 25. To remove the central block of the interior ventilation and heating system deflectors, press out the fastening clamps, and then, overcoming the resistance of the holders, move the central block of the interior ventilation and heating system deflectors towards you and move it away from the center console 26. From the inside of the block, press the block retainer and Disconnect the hazard warning switch wiring harness connector. 27. Remove the central block of deflectors for the interior ventilation and heating system. 28. Install the center console elements and all removed parts in the reverse order of removal.
REMOVAL AND INSTALLATION OF THE TOP PART OF THE INSTRUMENT PANEL You will need: flat-blade and Phillips-blade screwdrivers, a 10mm wrench.
1. Disconnect the wire from the negative terminal of the battery. 2. Remove the steering wheel 3. Remove the steering column cover 4. Remove the floor tunnel lining 5. Remove all elements of the center console 6. Remove the upper and lower trims of the front pillars 7. Press out the fastening clamps and, overcoming the resistance of the holders, remove the instrument cluster trim. 8. Remove the two screws from the upper mounting of the instrument cluster. 9. Slide the instrument cluster up, disconnect the lower holders and pull the instrument cluster forward 10. From the inside of the instrument cluster, press the block retainer and disconnect the wiring harness block. 11. Remove the instrument cluster. 12. Open the lower glove box 13. Press the stops on the sides of the box and lower the glove box all the way down. 14. On the right side of the box, squeeze the locking tabs and disconnect the lower glove box rod. 15. Pull the drawer towards you, disconnect the hinges and remove the lower glove box. 16. Remove the screw securing the upper glove box. 17. Press out the fastening clamps.. 18. ...overcoming the resistance of the holders, pull towards you and remove the upper glove compartment 19. Using a screwdriver, press out the block core and disconnect the front passenger airbag wiring harness block. 20. Remove the two screws securing the lower trim of the instrument panel. 21. Press out the fastening clamps. 22. ...overcoming the resistance of the holders, pull towards you and remove the lower trim of the instrument panel. 23. Press out the fastening clamps; overcoming the resistance of the holders, pull the trim of the light control and headlight washer unit, the exterior mirror drive control unit towards you and move it away from the instrument panel. 24. From the inside of the cladding, press the pad latches and disconnect the wiring harness pads for the exterior mirror drive control button, the headlight range control and the headlight washer switch button. 25. Remove the trim of the light control unit and headlight washer unit, as well as the exterior mirror drive control unit. 26 Press the fastening clips and remove the left side deflector of the interior ventilation and heating system. 27 Similarly, remove the right side deflector of the interior ventilation and heating system. 28. Having pressed the fastening clamps, slide back and remove the left side trim of the instrument panel. 29. Similarly, remove the right side trim of the instrument panel. 30. Remove the screw securing the top of the instrument panel, located under the instrument cluster. 31. Remove the screw securing the upper part of the instrument panel, located under the upper glove box. 32. Remove the screw securing the upper part of the instrument panel, located under the trim of the light control and headlight washer unit, and the exterior mirror drive control unit. 33. Remove the screw securing the front passenger airbag. 34. Press the fastening clamps and, overcoming the resistance of the holders, pull the upper part of the instrument panel towards you and up. 35. Remove the upper part of the instrument panel (in the photo the steering column has been removed for clarity). 36. Install the upper part of the instrument panel and all removed parts in the reverse order of removal.
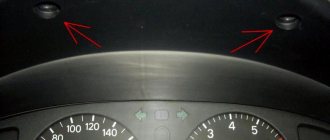
Replacing the dashboard (Instrument panel)
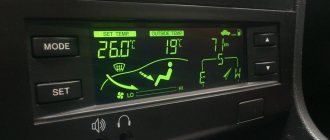
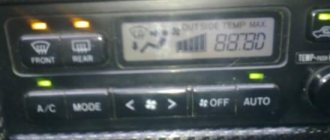
Auto configuration X on automatic. Therefore, we have a tidy device without a tachometer and without adjusting the brightness of the backlight.
In principle, I have long wanted to change the tidy.
1. Optitron; 2. White cups of cutlery; 3. Black with tachometer; 4. Optitron from a restyled Korolevka with a fashionable on-board computer.
In the end, I chose a tidy unit with white bowls. Why not an optitron? It just doesn’t have a P/S (electric power steering) malfunction indicator. And there is no O/D (over drive) indicator.
O/D can also be screwed on. But here comes a choice. Or some kind of indicator. Or to the number 3. Which is more problematic. Yes, and there is a lot of stuff there.
The optitron already came with a snake (gear shift knob). And you can already install it, but you cannot install the same O/D indication on number 3 without an additional fee.
On optitron from restyling. Everything is no problem except the tank indicator. Either it is always full or empty.)))
You can read about installing the optitron and snake here
1.
Unscrew the plastic bolt of the clip and pull out the clamp. Located above the instrument panel. Holds a decorative trim on the instrument panel.
2.
We pull the cover from the bottom first. Then we pry up the upper part and pull it towards ourselves.
Replacing climate control knobs on a Toyota Corolla 120
I read a long time ago that the stock climate control knobs on a Toyota Corolla 120 can be replaced with more modern ones.
New twists
So I ordered these control knobs on ebay, we type them into the search to find them: Air-Condition Control Panel Elegant Switch Fit For BYD F3 F3R / Toyota Corolla. Initially, they go to the Corolla analogue, the BYD F3 car. The central panel of this car is almost identical. I paid 390 rubles for them, they arrived with a small defect, the slot on the central twist was cut off. I contacted the seller and he reimbursed me $5, so in the end I bought the spinners for almost half the price - $7. So if you order something and it turns out to be defective, be sure to write to the seller, they don’t want to receive bad reviews and will definitely solve the problem in your favor so as not to spoil the reputation of a good seller. And in general the quality of the control knobs is good; it turns out they are made of metal.
Defective spinner
These control knobs will fit like native ones for right-hand drive Corollas, but you will need to slightly shorten the mount on the knobs themselves using a file or needle file, but for left-hand drive Corollas you will have to work with your own hands and redo the fastening of the knobs, since the mounts on them are smaller than on the original handles climate regulation.
Many people sharpen the fastening bushings themselves in order to install the knobs, but the original handles will no longer fit into place and will dangle. Many people cut off the fasteners from their original ones and glue them onto new twisters, but in this case the original ones can already be thrown away, or re-glued back. I didn’t want to spoil either the bushings or the spindles themselves, so I did it my own way. Here is a small instruction on how to replace climate control knobs with photos.
I cut off the standard fasteners from the new spinners and machined the bushings out of plexiglass, then inserted them into the spinner and glued them with glue, see the photo, everything is clear there. There are holes in the legs and these machined bushings hold well, but if you went too far and sharpened a lot, you can simply coat the bushings with superglue and wait until it dries, after which they will fit tightly into place without play.
I made it even easier with the central twist. Since if you bore the fastening of the twist, then just the walls will not be enough, so I decided to build up the walls. I took a 2 ml syringe, cut it, coated it with glue and pulled it onto the twist mount. After everything had dried, I took an 8mm drill and drilled out the mounting hole. Everything turned out rigid and installed tightly, no more adjustments or manipulations were required.
Central fan speed control knob
Well, then we install everything in place and enjoy the work done. The climate control has become more beautiful and modern with new knobs. I also changed the regular climate lighting bulbs to green LED ones. The photo also shows the clock on the central panel, which I wrote about earlier.
The new climate control knobs are in place.