According to reviews from most car owners, the headlights on the second generation Avensis do not shine brightly enough. The reason is that the manufacturer did not follow the technology for applying a mirror coating in the reflector.
Heating the lamp causes the protective varnish layer and reflective coating to burn out. On the second generation Avensis, the reflective coatings are made of plastic, as a result of which they fade faster. These circumstances lead to the fact that the optics shine dimly and soon become unsuitable for use.
Purchasing used or new original lighting elements will not solve the problem. There are analogues to factory Avensis headlights, however, reviews from car enthusiasts indicate fragility and susceptibility to rapid wear. A possible solution is to restore the mirror coating in the reflector, for which chrome or optics are used. Aluminum reflects light almost twice as well as chrome.
Toyota Avensis: how to change light bulbs
Good illumination of the road surface at any time of the day and in any weather conditions is a guarantee of safety not only for the driver and passengers, but also for oncoming motorists. Therefore, it is necessary to replace light optics bulbs in a timely manner, and use only high-quality ones. Let's look at how to change the lamps for side lights, fog lights and low beam headlights.
Lamp recommendations
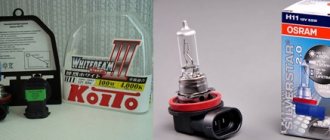
In order for new light bulbs to serve for a long time and with high quality, it is important to adhere to some rules when choosing them:
- Never try to skimp on quality. Firstly, cheap lamps cannot provide good road illumination, and secondly, they will not last long;
- Pay attention to the shade of the light emitted. When choosing between a cool white tone and a warm yellow, it is recommended to give preference to the second.
Replacing a Toyota Avensis parking light.
There are no clear instructions from the manufacturer regarding the timing of replacement of side light bulbs. There are three main reasons why you will have to install a new backlight:
- Burnout or extinction from external mechanical influence;
- The desire of the car owner to install more modern LED lamps;
- Dim lighting.
There is no need to talk about the first reason - everything is already very clear here. But as for LEDs, this is not a bad idea. They will last a long time, and they will illuminate the road surface well. In addition, they consume noticeably less electricity.
A dim stream of light cannot always be distinguished by the car owner. But, as soon as you replace at least one lamp, then you will immediately see how poorly the old element shines.
How to change a lamp in dimensions:
- At the back of the headlight there is a connector that transmits power to the light element - you need to disconnect it;
- The connector must be rotated 45–60° counterclockwise and removed;
- Remove the lamp with gentle movements, without making rotational movements;
- Install a new light bulb, checking that the contacts are connected correctly;
- Connect the wiring, checking the functioning of the part;
- Reassemble everything in reverse order.
When performing installation work, do not forget about the cleanliness of the lamps - wear thick cloth gloves on your hands, because under no circumstances should you touch the base with bare hands. Otherwise, fatty traces will remain.
Replacing the low beam bulb in a Toyota Avensis
Low beam headlights provide basic illumination of the road. Problems with them become noticeable as soon as the lights are turned on - one of the lighting fixtures will not work. Often this is due to burnout, but sometimes the problem lies in the lack of contact within the electrical circuit.
The first thing you need to do before replacing is to choose a suitable new lamp. Let's find out what they are:
- Tungsten - they shine weakly and do not last long;
- Halogen – combines optimal service life, good visibility and affordable cost;
- Xenon - expensive, reliable light sources. But they emit a not quite familiar bluish tint;
- LED - will delight the owner with efficiency and durability.
Instructions for replacing low beam lamps Toyota Avensis 2008-2009:
- Remove the rubber plug;
- Loosen the contact block left and right with gentle movements, removing the connector;
- The wire retainer securely secures the light bulb in the socket. You need to press on its end, moving it up or down, to disconnect the spring;
- The other end of the clamp is fixed to the bracket. Move the bracket to the side and remove the light bulb. Try to remember the position of the body;
- Insert the new lighting element into the socket, holding it by the base with a rag;
- Connect the connector and reinstall the plug.
Once you have finished installing the new device, reassemble all the parts in reverse order. Next, you need to connect the battery, checking the functionality of the lights. If the new element emits a brighter stream of light than the other working headlight, then it should also be replaced.
Replacing fog lights for Toyota Avensis
It is the fog lights that are responsible for lighting in bad weather conditions. Therefore, it is necessary to monitor their condition and replace them in a timely manner so that they do not fail at the wrong time.
Lamps need to be replaced if they do not light or do not light well. To do this, it is most convenient to remove the bumper completely, because It is on this that the plugs are installed. Having done this and gaining access to the brackets, you need to unscrew the mount. Next, you need to disconnect the plug, pull out the burnt-out lighting part and install a new one.
There is a second method that does not involve completely removing the bumper. It is necessary to remove the mudguard by first placing the car on an overpass or inspection hole. Armed with a screwdriver, remove the block retainer from the lamp. Now you can safely unscrew it, install a new device and reassemble the mechanism in the reverse order.
All procedures related to the installation of PTF on a 2007 Toyota Avensis can be performed by the car owner independently. But, if you don’t want to take risks due to insufficient knowledge, then you can always turn to specialists at a service station for help.
conclusions
I would like to conclude the article with several comprehensive conclusions. Few people think about it, but it is better to change lamps in pairs rather than individually. After all, an old lighting fixture will shine worse than a new one. The result: poor, uneven illumination of the road.
To avoid making a mistake when choosing a new part, take the old lamp and take it to the sellers. After all, today's optics market offers a wide selection of light bulbs that differ from each other in mounting size, base, power and other important characteristics.
And yet, it is better to contact a specialized store that can accurately provide information on the selection of lighting equipment. But in the market there is a high probability of unsuccessful purchases. Therefore, try not to save money, because you can lose a lot of time and expenses may increase.
Replacing Low Beam Bulbs Toyota Avensis 2008
Headlight for Toyota Auris, Corolla, Avensis
, Rav 4 and Camry
This review will discuss how to replace light fixtures in the most popular handicraft models, since without task lighting it is impossible to move around in poor visibility. I would like to point out right away that if you understand the specifics of the job, you can get it done in a short time if there is a glitch along the way.
In the photo: a correctly selected Toyota Auris low beam provides the best quality of lighting
Lamp recommendations
In order for your renovation to please you with high-quality lighting and a long service life, when purchasing light sources you should consider several general rules:
Adviсe! LEDs can be used instead of conventional halogen lamps, which not only provide better quality light, but are also much more durable as they are less susceptible to the elements. The only drawback is the highest price, but in the end you save money.
New models of the Russian automobile industry already have LED elements installed as standard
Workflow Description
As noted above, we will talk about the shift functions of several models, since car owners often have problems if they have never had such work done.
Auris
- First, a lamp of the appropriate configuration is purchased; this model uses the M11 version with a PGJ19-2 socket. Experts advise replacing two elements at once, since the light even in products of this configuration is different; today, in most cases, old light bulbs burn out after a month.
The low beam headlight on Toyota Auris must meet the specifications on the drawing
- First, the hood opens and locks in a stationary position, then you need to remove the protective panel that covers the front of the engine compartment, this work takes a couple of minutes.
- Then you need to position the lamp socket and turn it clockwise about 30 degrees, then, of course, the assembly can be easily removed.
Rotate the socket to align the slots on the housing and remove the lamp
Self-repair of Toyota Avensis headlights
We send ready-made sets of modules for self-installation in Toyota Avensis headlights. They are attached instead of standard modules.
They look like this for pre-restyle (2003-2006 onwards)
And like this for the restyling (after 2006 onwards)
On the car you will need to do the following:
Remove headlights from the car. We remove the plastic mudguards in the engine compartment, for which we use a screwdriver to pry up the plastic rivets. Remove the 2 bolts on top of the headlight. We unscrew the 2 bolts securing the bumper from the side of the fender liner; to do this, you will need to bend the mud flaps from the bumper - the bolts under them, one on each side.
We pull the edge of the bumper away from the car and put gloves on the ends of the bumper so as not to scratch the paint with the bumper mounting lugs. We unscrew the 3 bolts securing the radiator grille, and slightly lifting the bumper up so that the latches come out, we pull it forward from the car. It remains hanging on the mudguards, which are screwed on from below. There is no need to remove it completely.
Next, using two flat-head screwdrivers, we pull off the bottom of the headlight, which is hidden under the bumper, so that its eye is disengaged. The design is moronic and usually breaks. To prevent this from happening, you need to use a screwdriver to protrude the antennae that hold the protrusion on the headlight.
Pull the edge of the headlight, which is closer to the center of the car, up and forward. To unclip the connectors without swearing and problems, you need to remove them in three stages: - We press on the connector as if we don’t want to remove it, but rather put it on. Without stopping to press, we press the latch, and with the latch pressed, we disconnect the connector by shaking it a little. There is a lot of dirt there, if you pull immediately, the latch will not come out of the groove and will interfere with removing the chip. That's it, the headlights have been removed.
We unscrew the screws at the back of the headlights, which are on the edges - they hold the glass, and also remove the back cover and take out the chip with the turn signal lamp.
Now we need to find a cardboard box to fit a headlight, a hair dryer and a thermometer up to 100 degrees. We put the headlight in the box and blow into it with a hairdryer. You have to blow past the headlight, constantly changing direction, otherwise something will melt. You cannot blow on the glass or body.
We control the heating - it should be no more than 90 degrees. You will have to suffer for about 15 minutes until the sealant softens. You can use the oven by placing the headlight on a board - it should not touch any metal parts. You need to place a box of matches under the door so that there is a gap, and constantly monitor the temperature!
We pull off the glass with flat screwdrivers, and after removing it, use the same screwdriver to smooth the sealant into the groove of the housing. We unscrew the 4 screws that hold the lens, throw it away, and put in its place the modules from the package: Headlights 2003-2006:
All about Toyota Avensis T250 headlights
According to reviews from most car owners, the headlights on the second generation Avensis do not shine brightly enough. The reason is that the manufacturer did not follow the technology for applying a mirror coating in the reflector.
Heating the lamp causes the protective varnish layer and reflective coating to burn out. On the second generation Avensis, the reflective coatings are made of plastic, as a result of which they fade faster. These circumstances lead to the fact that the optics shine dimly and soon become unsuitable for use.
Purchasing used or new original lighting elements will not solve the problem. There are analogues to factory Avensis headlights, however, reviews from car enthusiasts indicate fragility and susceptibility to rapid wear. A possible solution is to restore the mirror coating in the reflector, for which chrome or optics are used. Aluminum reflects light almost twice as well as chrome.
How to remove optics from Toyota Avensis
Most car owners who are directly faced with the problem of automotive lighting are interested in how to remove headlights from a Toyota Avensis? In fact, you can do the dismantling yourself, without special skills, and without the need to contact a car service technician. It is impossible to remove the optics from the Avensis without dismantling the front bumper, which complicates the process, however, the procedure can be performed independently.
Under the hood, use a flat-head screwdriver to remove the clips, thus gaining access to the necessary fixing screws. Using a 10mm wrench, remove 7 bolts above the headlights and 3 bolts in the middle. It is necessary to turn the steering wheel in advance so as to gain comfortable access to the lower part of the front bumper, and also disconnect the fender liner from the bumper.
After unscrewing the bolts and clips, you need to grab the edge of the bumper and pull the wheels to the side in order to remove them from the latches. In the future, when installing, it is recommended to cover the pulled sides of the bumper so as not to damage the paintwork.
After disconnecting the bumper, we gain access to the optics, which can be easily removed by simultaneously pressing the latch and latch with two flat-head screwdrivers. Then you need to turn off the power and carefully and safely remove the element.
Covering the reflector with foil
When the low beam is no longer pleasing to the driver, it is possible to restore the lighting by covering the reflector with foil. This operation is also easy to do with your own hands.
First of all, you need to purchase a suitable sealant for gluing the block together after finishing the work. The sealant softens in the oven in 5 minutes at a temperature of 80 degrees. After dismantling the headlight unit, it is necessary to disassemble the lens and cover the burnt-out reflector from the inside with ordinary foil.
After assembling the optics, gluing them together with sealant, we mount the headlight units in place and enjoy the noticeably brighter low beam.
Adjustment
As a rule, the manufacturer does not set a regular period for checking automotive optics, since the need for such a procedure directly depends on the operating conditions of the vehicle. Adjusting Toyota headlights is necessary when problems with low beam significantly interfere with the driver. You can adjust Avensis optics on your own, without special skills and experience, as well as expensive tools. It is worth noting, however, that adjustment at a car service center is a relatively low-cost service. It is possible to use equipment that simplifies the adjustment process, however, specialized equipment costs a lot, as a result of which most people tend to manually adjust headlights.
It is necessary to fill the fuel tank and check the tire pressure, and also park the car on a flat surface. In addition, you should check the optics for damage, and before starting the adjustment, take the driver’s seat with a load corresponding to its weight. The adjustment itself should be made exclusively for the low beam, however, after completing the work, check the effectiveness of the high beam headlights.
In front of the car, vertical lines should be drawn on a flat wall, dividing the drawing into two squares in the upper corners and two rectangles below them. And also horizontally divide the central part into small (top) and large (bottom) rectangles. The car should be placed directly in front of the wall, start the engine and adjust the headlights using the adjusting screws so that the beams of light fall on the desired areas of the drawing.
Covering the reflector with foil
When the low beam is no longer pleasing to the driver, it is possible to restore the lighting by covering the reflector with foil. This operation is also easy to do with your own hands.
Burnt out reflector
First of all, you need to purchase a suitable sealant for gluing the block together after finishing the work. The sealant softens in the oven in 5 minutes at a temperature of 80 degrees. After dismantling the headlight unit, it is necessary to disassemble the lens and cover the burnt-out reflector from the inside with ordinary foil.
After assembling the optics, gluing them together with sealant, we mount the headlight units in place and enjoy the noticeably brighter low beam.
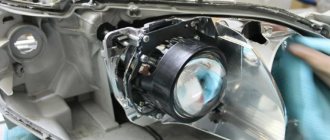
Repair of headlights Avensis II 2006-2008. Replacing lenses on Hella 3R
- Description
- Characteristics
- Reviews
This article is a continuation of our publications about the Toyota Avensis headlight defect.
Xenon Toyota Avensis is in first place among cars with problem headlights. Almost all owners note a significant decrease in light after a YEAR! operation. Many people blame dead lamps or scratched glass, but the problem is completely different.
Like many Toyota Avensis cars, it was equipped with both halogen and xenon headlights. We have developed 3 options for converting headlights on Toyota Avensis . It doesn’t matter what configuration the car was originally equipped with, xenon or halogen, the headlights can be upgraded in any case, based on the Customer’s requirements. Conversion options are possible for both the restyled version of the Toyota Avensis and the pre-restyling version. We suggest installing 3 types of modules: Hella FF DE 60mm monohalogen module, Hella R or Hella 3R bi-xenon module.
In the first chapter we will talk about the standard headlights of the restyled version of the Toyota Avensis 2006+.
So, before us are the standard headlights of Toyota Avensis 2006+. In the case of standard halogen headlights, we offer 3 options for upgrading Avensis headlights: replacement with a Hella FF DE 60mm halogen module and replacement with a Hella R or Hella 3R bilens.
Remaking and repairing Toyota Avensis headlights takes a minimum of time and money and is based on the principle of an adapter frame, which allows you to fix the module into the standard headlight holes. How is the module replaced?! We have designed a so-called bracket for a Toyota Avensis headlight, which allows you to replace the standard module with a Hella 3R bimodule with minimal difficulty and expense. The second photo on the left shows a computer model of this frame.
The brackets are made of two millimeter steel using laser cutting. From this we can conclude that the accuracy is achieved on the order of 0.1-0.2mm. This accuracy is necessary to ensure that the module has minimal deviations from the horizon. Having this bracket, you can independently replace the Toyota Avensis lens with a Hella 3R bi-xenon lens without any skills; you just need to know the basic concepts and terms for independently remaking headlights ( retrofit
). Powder coating gives the frame a more aesthetic appearance and protects against corrosion.
The Hella 3R module is designed for D2S/D4S xenon lamps. The Hella 3R low and high beam lens has high-quality low beam, medium-height high beam and uniform coverage of the road surface, while having fairly compact overall dimensions. As a result, after replacing the standard module with a Hella bilens, the headlights produce 2 beams of low beam and 4 beams of high beam: 2 xenon and 2 standard halogen. This in no way contradicts the requirements of GOST and you can undergo maintenance without much hassle.
As a result of the modification, you get better quality bi-xenon light, and the problem with low-quality standard halogen or xenon modules is solved. You can forget about the light problem for a long time; all that remains is to replace the original xenon lamps every 2-3 years (preferably).
As a result of replacing the modules, you get: - improved light quality - increased comfortable movement speed; — increasing safety at night by lighting not only your lane, but also the entire road surface, as well as roadsides and exits from the road, pedestrians and animals are better visible; — as a result, the car has 4 distant light sources: 2 xenon and 2 halogen
If, as a result of reading this article, you have any questions, you can always contact us using any of the suggested methods in the CONTACTS section.
Fog lights for Toyota Avensis: do-it-yourself replacement
Fog lights for a 2007 Toyota Avensis were not difficult to find in the store. The car is still popular today.
The front bumper of the Avensis 2 is very low and the fog lights often break when hit by the bumper.
As for replacing the foglight, it is most convenient, of course, to do this by first removing the bumper. But, sacrificing convenience, you can get to them by removing the lower protection. I'll show you the example of a removed bumper.
First of all, disconnect the two power plugs. To do this, you need to release the fender liner from the bumper (from the front). It is not necessary to remove it completely.
Unscrew the two screws on one side of the fog lamp. Then, move the fog lamp towards you from the side from which you screwed the screws and move it to the right or left, depending on which PTF you are removing.
For work we only need a shaped screwdriver.
This machine is not only reliable, but also convenient in every detail. Toyota Avensis fog lights can be removed and attached simply and reliably. If you are wondering whether a used Avensis 2 is worth buying, I support you.
To dismantle the PTF, you do not need to remove the fog light glasses
But the price is steep, the PTF for a Toyota Avensis costs 3,500 rubles each (original).
Related Posts
- Toyota Avensis: technical specifications, reviews, photos, videos
- How to remove the front bumper of a Toyota Avensis+video
- How to remove the headlights of a Hyundai Accent with your own hands: photo, video
- Front bumper on a Hyundai Accent, remove it yourself
- Replacing the rear brake pads of a Ford Focus 2 with your own hands + video
Fog lights for Toyota Avensis: do-it-yourself replacement: 2 comments
- Nikolay Vasilievich 12/09/2014
Tell me, is it worth gluing the bumper with mesh and epoxy glue, or should I solder it?
- arbi Posted by 12/09/2014
It is possible, but it is not reliable. It is better to solder this way
Add a comment Cancel reply
My name is Arbi Idirisov. I am 50 years old, of which 27 years I have been doing body work on cars of all brands.
Replacing the low beam bulb in a Toyota Avensis
The reason for the need to replace Toyota Avensis lamps may not only be an exceeded service life. Often, vibrations and shaking that occur during active use of the car lead to instability in operation, and then complete failure.
Every owner of an Avensis model can replace a faulty lamp. The procedure is not complicated. She has practically no specific differences. The only thing that makes it unique is its compact design.
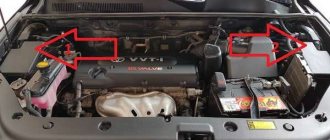
You can get to the headlights only by going through the battery and the neck of the windshield washer reservoir, located on the left and right. After this obstacle is behind, the car owner will have to remove the headlight and perform a series of procedures to replace the damaged lamp.
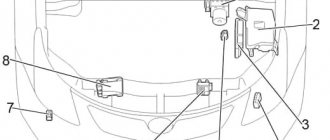
How to remove the headlight? What is the design feature of the headlight? Where is a certain type of lamp located? How to replace a xenon or halogen lighting element? The answer to these questions can be found in the detailed instructions from the manufacturer.
It describes in detail the process of replacing lamps in a Toyota Avensis. Before you begin removing the headlight and installing a new lamp, be sure to read the useful information, remembering to pay close attention to the diagram next to the instructions:
Hello everyone and have a nice weekend. I have owned an Avensis for more than 5 years, every year I went to the service to replace light bulbs, this time I decided on my own, I honestly searched a lot on the Internet to see how it was done, I had an idea of what to unscrew and how to pull, but I didn’t see it. As they say, “The eyes are afraid, but the hands are doing.” I came to the car, opened the hood, took off the plastic, removed the battery, the starter turned the Czech Bosch for 3 winters, I took it off and realized... I can’t crawl up to see how the lamp is there, I can’t bend the fastening antennae, in one headlight you can see someone is no longer disassembling the climb... one antenna fastener is broken...
In general, it’s decided, full analysis... Tools: flat/phillips screwdrivers, 10-mm head with wrench. 1. Remove the engine compartment plastic. 2. We remove the battery - we do not leave the keys in the cabin. 3. Unscrew 2 bolts from the headlights from above, 3 bolts and 2 clips from the bumper, and unscrew the corners of the bumper under the wing from the side.
Did you like the article? Watch our channel for new ideas and necessary auto tips. Subscribe to us in Yandex.Zen. Subscribe.
This review will look at how to change lamps in the most popular models in makeshift conditions, because without working light it is impossible to move in circumstances of poor visibility. I would like to point out right away that if you understand the specifics of the work, you can carry it out in a short time if a malfunction occurs on the road.
To ensure that the result of your repair pleases you with high-quality light and a long service life, you should keep in mind a few common rules that you should adhere to when purchasing light sources:
Advice! Of course, instead of using conventional halogen lamps, use LED lamps; they not only provide the best consumer quality of light, but are also much more durable, because they are the least susceptible to adverse influences. The only downside is the high price, but in the long run you will continue to save money.
As noted above, you will learn about the features of the change on several models, because car owners often have a problem if they have never done this type of work.
The process is as follows:
- First, a lamp of a suitable configuration is purchased; this model uses the M11 version with a PGJ19-2 socket. Experts advise replacing two elements at once, because the light even in products of a similar configuration differs; today, in most cases, old light bulbs burn out within a month.
Replacing xenon lamps Toyota avensis
Read
- First, the hood opens and is fixed in a stationary position, then you need to remove the protective panel that covers the front part of the engine compartment, this work takes a couple of minutes.
- Next you need to feel the lamp socket and turn it counterclockwise approximately 30 degrees, then of course you can easily remove the assembly.
Toyota Avensis Club • Cleaning and disassembling headlights
Toyota Avensis Club • Cleaning and disassembling headlights
Disassembling Toyota Avensis Optics
How to remove the headlight and how to open it. Next we prepare for installation. Carefully insert your hand into the hole between the radiator and the grille.
How to remove headlights on a Toyota Avensis model year. Pavel Pahan. 4 viewsthree years ago.
The support for “landing” the lower mount of the headlight is attached to the engine spar. The same support is larger and the direction of movement of the headlight is for removal from it. Carefully insert your hand into the hole between the radiator and the grille.
Paper does not burn at this temperature - there is no need to be afraid. The plastic parts of the headlight itself do not “float” yet when... Repairing the front bumper of a Toyota Avensis requires removing the bumper. I often encounter strange questions, such as how to open the hood.
After this, it should quickly and easily be removed from the car.
Disconnect the terminal on the front camera. Take the screwdriver again and remove the bugs from the entire surface of the bumper.
Don't forget about the fastenings on the sides of the device. Then you can easily remove the bumper from the side grooves of the body. We do not pull it out completely, but only lower it to remove the headlights, which are secured with three bolts.
We unscrew them and take out the headlights one by one, simultaneously disconnecting all the wires from them. In my case, there were slight difficulties with changing the position of the ignition unit.
The bugbear could not get through the crack of the headlight to the lamp.
Only then did it dawn on me that the block should be disassembled and only the cable with fastening should be left. He went inside perfectly.
DIY car repair and maintenance
Paper does not burn at this temperature - there is no need to be afraid. It is more convenient to start from the sharpest corner. The sealant will be very thick and the stretching process will be slow - it will be applied in increments of 0.5...1mm.
It’s interesting that a few minutes after taking it out of the oven, the outer plastic will have cooled down and you can pick it up and pull it with your hands, and the sealant will still be plastic for a few more minutes. Place the headlight back in the oven for the same 6...8 minutes, maybe 5...7, if it has not cooled down yet, and continue to pull it further.
Disassembling Toyota Avensis Optics
But this was the first time. If you “get your hands on it”, you can probably heat it up faster, longer, a little higher temperature, pull it out more boldly..., but this is for professionals: Carefully inspect both grooves - there should be no places free from sealant. Otherwise, after assembly, water will creep through them and the headlight will sweat.
If there are such places, try to apply sealant in them at least a little from those places where there is a lot of it from the corners, preheating it.
Professionals do not recommend adding foreign sealant, especially silicone - the fumes from it can seem to corrode the coating of the reflector on the plastic. Do not wipe glass or plastic reflective surfaces with anything like alcohol, etc.! Alcohol corrodes transparent plastic and makes it cloudy. Only soft cloths and water.
The halves can move relative to each other within the grooves by 1...2 mm - when pressing, you need to move them so that the tightening screws can then be tightened. Unscrew the bolts and screws that secure the headlight.
How to remove a headlight on a Toyota Avensis?
Next, turn the steering wheel so that the wheel does not interfere with access to the bottom of the bumper. At this point the fender liner is connected to the bumper and we need to unscrew this connection. Now, make sure that all the bolts, clips and screws are unscrewed and the bumper is held in place only by the latches. We grab the edge of the bumper and carefully pull it towards the wheel and at the same time towards ourselves and remove the bumper from the latches.
To avoid damaging the paintwork when working and removing headlights, I recommend using rags or towels to cover the loose edges of the bumper. As shown in the photo.
We slightly pull back the edge of the bumper and gain access to the last latch that secures the headlight.