Replacing fuses on a Toyota RAV 4 (3rd generation, 2012) is not a difficult task at all. This photo report will allow you to verify this, with which changing fuses with your own hands will not be at all difficult. In this case, you will need miniature low-profile fuses of the same rating as the ones that burned out.
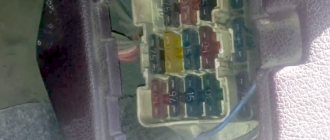
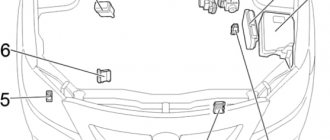
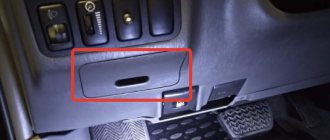
Like many other cars, RAV 4 has two fuse blocks : the first is located under the hood near the battery, the second is in the cabin under the panel, just to the right of the hood lift lever. First, remove the cover of the fuse box under the hood. There you can find replacement pliers and a diagram of the location of the fuses. If you don't have pliers, needle-nose insulated pliers will do.
Replacing fuses and relays
The operation of a vehicle does not always go without any problems. And one of them could be a faulty fuse. In this case, it is necessary to detect the faulty element as soon as possible and also replace it. If this is not done in time, the electrical circuit will short out, which will lead to much more serious consequences.
Any car enthusiast can handle replacing the fuse in this car. The sequence of actions is as follows:
- First of all, you need to turn off the engine and disconnect the battery in order to stop the flow of current through the circuits.
- Then you need to remove the cover of the block in which the broken fuse is located. Inside the unit you can see pliers intended for further removal of the fuse from the system. If you don't have pliers, you can use small insulated pliers.
- Using a tool, you need to remove the burnt fuse. You can find it by the color of the case (it will be darker than the others), as well as by the pattern that is on each cover.
- A damaged fuse must be replaced with exactly the same one, just a new one. To do this, most car owners have a supply of additional fuses with them.
When the replacement is completed, the cover must be returned to its place, the terminals must be connected to the battery and the engine must be started. If the car starts without problems, then only the fuse was faulty. If not, then it is better to seek the help of professionals to determine the additional cause of the breakdown.
Thus, the Toyota RAV4 is a car equipped with two main fuse blocks and one additional one. The presence of these elements ensures safe and uninterrupted operation of the vehicle. And any failure of a fuse or relay can be repaired with your own hands and in a fairly short time.
We disassemble, repair the cigarette lighter and replace its socket.
An option such as a car cigarette lighter is relevant not only for heavy smokers. For example, to connect a portable compressor to inflate tires, you cannot do without a working cigarette lighter socket. But what if it doesn't work? With a little knowledge, you can make this simple repair yourself.
Required tool for repair.
- Forceps, small size;
- Solder;
- Soldering iron;
- Carrying or flashlight;
- Pliers;
- PVC tape
Let's move on to repairing the cigarette lighter directly.
The first step is to de-energize the car by removing the negative wire from the battery. Open the car door and find the cigarette lighter socket. We remove the heating coil (the cigarette lighter itself) from the socket. We apply a beam of light into the formed nest; if foreign objects are detected, they must be removed using forceps or tweezers. Let's move on to checking the fuses. We find the fuse block, open the cover and pull out the required fuse from the socket (see the technical instructions of the car, or the inside of the cover). If the fuse has a blown jumper, it needs to be replaced. The next step, if the previous steps were in vain, remove the cigarette lighter from the hole. We take pliers in our hands and carefully, holding the rim, pull it towards ourselves without any effort. Under no circumstances should we make sudden jerks; you need to pull smoothly, otherwise you may damage the wires. After removing the element, we inspect the place where the wire is soldered to the cigarette lighter body. If a break or the slightest disconnect is found, it should be soldered
You also need to pay attention to the integrity of the wire insulation. Identified abrasions should be isolated with PVC tape. After making sure that the cigarette lighter is working normally, with a gentle movement, without effort, we immerse the repaired element into the hole.
Repair and replacement of cigarette lighter socket
Disconnect the battery, remove the cigarette lighter from the socket, use a thin screwdriver to bend the latches, pry up the steel inner part of the socket, carefully disconnect the connector, replace the socket, install everything in the reverse order, reconnect the battery
If you need to replace the cigarette lighter light bulb, you need to pry the socket holder with a screwdriver and remove it, replacing the light bulb.
Location of the fuse in the engine compartment of RAV4 (RAV4) since 2013
| Fuse in | Current strength, A | Switched electrical circuit |
| 1 | 25 (1) | Fuel injection system, injectors, fuel pump |
| 20 (2) | ||
| 30 (3,4) | ||
| 2 | 30 | trailer lights |
| 3 | 10 | steering lock |
| 4 | 10 | air conditioning system, car access system, ceiling module |
| 5 | 10 | instruments and indicators |
| 6 | 15 (1) | supply system |
| 20 (2) | Air flow sensor, fuel pump, oxygen sensor | |
| 20 (3) | — | |
| 20 (4) | — | |
| 7 | 30 | valvematic system |
| 8 | 30 | stability control system |
| 9 | 50 | |
| 10 | 40 | stop-start system |
| 11 | 30 | engine starting system |
| 12 | 10 | supply system |
| 13 | 10 | no chain |
| 14 | 15 | supply system |
| 15 | 7,5 | starting system |
| 16 | 7,5 | current control, generator |
| 17 | 10 | sound signal |
| 18 | 25 | supply system |
| 19 | 30 | audio system |
| 20 | 50 | additional functions |
| 21 | 80 | heating system (seat, windows, mirrors) |
| 22 | 80 | Electric power steering |
| 23 | 120 | ABS system |
| 140 | ||
| 24 | 5 | windshield cleaner |
| 25 | 10 (1) | air flow sensor |
| 10 (2) | air flow sensor | |
| 10 (3) | oil changeover valve | |
| 10 (4) | engine cooling bypass valve | |
| 26 | 10 (2) | fuel pump |
| 10 (1,3,4) | air flow sensor | |
| 27 | 10 | left headlight |
| 28 | 10 | right headlight |
| 29 | 7,5 | power supply and automatic transmission system |
| 30 | 20 | Audio system |
| 31 | 10 | steering sensor, tire pressure system, clock, door locking |
| 32 | 10 | interior light |
| 33 | 10 (5) | left headlight and headlight leveling system |
| 15 (6) | ||
| 34 | 10 (5) | right headlight |
| 15 (6) | ||
| 35 | 10 | spare fuse |
| 36 | 20 | |
| 37 | 30 |
1-engines 3ZR-FE or 3ZR-FAE2-engine 2AR-FE3-engine 1AD-FTV4-enginesb 2AD-FTV or 2AD-FHV5-without HID headlights6-with HID headlights
| Fuse | Fuse current, A | Switched circuits |
| 1 | 50 | Heater RTS |
| 30 | ||
| 2 | 50 | |
| 30 | ||
| 3 | 50 | |
| 4 | 30 | Cooling fans |
| 5 | 30 | |
| 6 | 50 | air conditioning system |
| 7 | 30 | rear window defroster |
| 8 | 5 | Daytime Running Lights |
| 9 | 30 | trailer lights |
| 10 | 7,5 | fog lights |
| 11 | 25 | additional heater |
| 12 | 20 | windshield wiper heater |
| 13 | 30 | headlight wiper |
| 14 | 10 | outside mirror heater |
Where are these parts located?
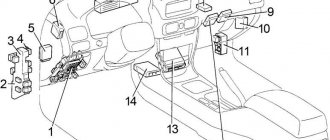
Beginners who have recently purchased a Toyota Corolla often do not know where the fuse is located that is responsible for this or that circuit. There are five places in total where these blocks can be located.
- on the left under the engine space;
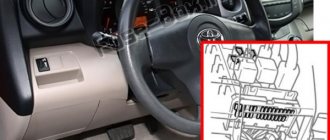
- in the cabin under the steering gear to the left of the driver;
- under the dashboard on the right;
- under the hood. This unit is not available on all modifications of cars from the Toyota manufacturer;
- another unit is responsible for the vehicle's ABS It is also not available on all car models.
Now you need to learn how to read the diagrams and understand which fuses are responsible for what.
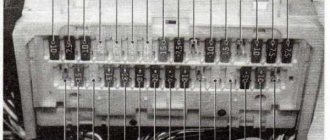
The first block includes those fusible elements that are located next to the radiator under the hood.
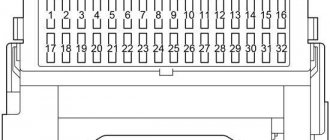
The table shows the contact name and current strength. All fuses are read from left to right.
From numbers 10 to 13, fuses remain reserve.
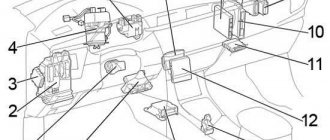
Block 2 and 3
Now we have to deal with the blocks that are located in the interior space of the Toyota Corolla.
Pin markings on the left side of the driver. 1 to 3 are backup devices.
Table for the block, which is located to the right of the driver.
The remaining blocks are not installed on all modifications. Therefore, you can find out more about them in the operating instructions for the machine. It describes in detail the role of each part of the fusible elements.
Additional block
The additional block contains only four fuses. Each of them is presented in the diagrams separately for cases where the steering wheel is located on the right or on the left. Also below is a breakdown of what each element is responsible for.
- This element is responsible for the electric drive of the left seat.
- The same thing, but for the right seat.
- In this case, the element is used to organize the operation of the tailgate.
- Fuse for front power windows.
Thus, it becomes clear that there are quite a lot of fuses in the Toyota RAV4. Then the next question arises: what to do if any of the fuses fail?
Video on repairing and replacing the entire cigarette lighter with socket
What to do if the fuse keeps blowing.
The modern market for car gadgets is increasingly filled with low-quality products, often from China.
Such devices often cause damage to the cigarette lighter and its socket; cheap devices use thin wires that are unable to withstand the power load and, as a result, burn out, shorting the electric current throughout the entire device.
There are also cases when they burn out or fail, but not completely, but halfway, so to speak, and become the result of a discharged battery.
It's simple! Good luck on the roads!!!
Vote, did you like the article?
Fuse blocks Rav 4 XA30 under the hood
There are two electrical fuse blocks mounted in the engine compartment of the Rav 4. Consider where they are located and what electrical circuits they protect.
First fuse block (at the right wing)
The Rav 4 2010 mounting block has the following layout:
- 1, 2, 3, 7, 8, 12, 17, 21, 28 – not used;
- 4 – air conditioning, electric window lifts (7.5A);
- 5 – multimed and charging (7.5A);
- 6 – steering wheel lock with keyless start (20A);
- 9 – multimedia complex (20A);
- 10 – body ECU, EUR, remote control and keyless start program, dashboard, clock, navigator, multimedia, measuring instruments (10A);
- 11 – illumination of the footwell area, individual mirrors, ignition switch, power unit start button, interior, Engine Start Stop button, trunk space (10A);
- 13, 14 – left, right high beam (10A);
- 15, 16 – left, right low beam (10A);
- 18 – 115 Volt socket (15A);
- 19 – chip for trailer wiring (30A);
- 20 – additional heating unit (25A);
- 22 – heating of the space of the front wiper blades (20A);
- 23 – air conditioner (50A);
- 24, 25, 26 – additional heating system 840, 300W (50, 30A);
- 27 – HEAD LL, RL, LH, RH (50A);
- 29, 30 – radiator cooling fan (30A);
- 31 – headlight cleaning system (30A).
It also contains relays:
- R1 – light switch lever;
- R2 – low beam;
- R3, R4, R10 – DRL;
- R5, R6, R7 – radiator cooling fan;
- R8 – not used;
- R9 – heating of the front wiper blades;
- R11, R12, R13 – additional heating unit.
Fuse links in the second housing of the engine compartment (at the left wing)
The relay and fuse block of the Rav 4 2011 consists of the following elements:
- R1, R3 – ESP;
- R2 – not used;
- R4 – ignition;
- R5 – ABS;
- R6 – compressor clutch;
- R7 – fuel pump.
- 1 – valve control system (30A);
- 2 – multimedia complex (30A);
- 3, 7 – starting system (30, 7.5A);
- 4 – MPI, power unit start function (15A);
- 5 – light alarm (10A);
- 6, 9, 10 – MPI (10A);
- 8, 17 – not used;
- 11 – MPI (7.5A);
- 12 – device for heating the engine before starting (80A);
- 13 – EUR (60A);
- 14 – DOME, RAD NO.1, ECU−B and B2 (80A);
- 15 – ABS 1, 2, TOWING, CDS, RDI, HTR (120A);
- 16 – A/F, EFl MAIN, EDU, HORN (50A);
- 18, 19 – ABS, ESP, ASR, EDS (30, 50A);
- 20 – EFI NO.1, 2, 3, MPI (20A);
- 21 – Horn (10A);
- 22, 23 – MPI (25, 20A).
How to find where the Toyota Corolla fuse is located and replace it
From this article, the car owner will learn why fuses are installed on Toyota Corolla cars. How to find them and read the location diagrams of these parts in the vehicle's operating instructions. How to replace a fuse if it is blown.
Fuses are fusible elements that connect the electrical network in a vehicle and devices powered by electricity: headlights, dashboard monitor lights, starter . They are a protective bridge between them.
However, many car owners do not know where the fuse boxes are located. Others have seen diagrams in Toyota Corolla vehicle operating manuals, but do not know how to read them. Everything will be discussed below.
16.6.1. Circuit breakers
Fuses serve to break the circuit when the current exceeds a certain value, which is necessary to protect consumer devices and wires that may be damaged by too high a current. A sudden increase in current is usually caused by a fault in the circuit, most often a short circuit.
The fuse blocks are located in the instrument panel and in the engine compartment (Fig. 15.2, 15.3, 15.4, 15.5, 15.6, 15.7, 15.8). The numbers, current and circuits protected by fuses are given in table. 15.4, 15.5, 15.6, 15.7, 15.8. The location of the fuses and the electrical circuits protected by the fuses are shown on the inside of the fuse box cover. Each fuse has an inscription indicating the value of the protected current.
If the fuse is blown, it means that the conductor connecting the fuse contacts is broken (see Fig. 15.9).
| WARNING Always replace the fuse with another fuse of the same rating. Never replace a fuse more than once without determining the cause of the blown fuse. |
To remove the fuse, use tweezers to remove it from the connector. Remove the fuse from the tweezers. The wire inside the fuse is easily visible and will be severed if the fuse blows. Install a new fuse rated for the same current. On the reverse side, each fuse has an inscription indicating the value of the protected current. In addition, the color of the fuse also corresponds to the maximum current allowed (see Table 15.9). If the installed fuse blows again, check the electrical circuit protected by the fuse.
| WARNING Never replace a fuse with a jumper wire, as the vehicle's electrical circuit may be seriously damaged. |
| WARNING Fuse ratings and electrical circuits may vary from year to year. |
Toyota cigarette lighter.
Toyota car models had different cigarette lighter designs.
Let's look at the most common modification (from Valeo, for European-assembled models) in more detail. Cigarette lighter Toyota Avensis from Valeo
By the way, Valeo supplied similar cigarette lighters to the assembly lines of other famous automakers, so the design differences between many cigarette lighters of European cars are minimal.
The Toyota Avensis cigarette lighter has a typical Valeo design.
Main parts of the Avensis cigarette lighter
- metal case
- backlight base
- contact Group
- transparent ring light guide
- decorative plastic trim
- heating element with handle
- Cigarette lighter heating element
- Valeo cigarette lighter assembly
Toyota cigarette lighter fuse
A common reason why a Toyota cigarette lighter does not work is a blown fuse.
The Avensis cigarette lighter fuse is built into the power circuit. Also, the contact group on the device body has its own separate fuse.
To find the location of the Toyota cigarette lighter fuse, it is easier to use electrical diagrams from the manual of a specific car model with a reference to the location.
Toyota Avensis T22 cigarette lighter diagram
The Toyota Avensis cigarette lighter fuse is located in the interior relay and fuse box, called RAD&CIG (cigarette lighter, clock, audio system), and has a rating of 15A. Its burnout is indicated by the simultaneous failure of the cigarette lighter and radio.
- Toyota Avensis cigarette lighter fuse (fuse box in the passenger compartment)
- Cigarette lighter fuse for Toyota Avensis (fuse box in the passenger compartment)
To check the thermal fuse, you will have to remove the Avensis cigarette lighter. You can “ring” with a tester or a light bulb. If you cannot find a fuse similar to the faulty one, you can replace it with a jumper.
Thermal fuse for Toyota cigarette lighter as part of a contact groupThermal fuse for Toyota cigarette lighter in the body of a contact groupScrew holding the contact group for Toyota cigarette lighter assembly
How to remove a Toyota cigarette lighter
Removing the Toyota cigarette lighter from the console seems to be quite a problematic task. However, this procedure is not so complicated! First you need to remove the radio and the front decorative panel, disconnect the power plugs, and carefully remove the cigarette lighter light socket.
The next sequence of actions is as follows:
1). Rotate the cigarette lighter body 20° - 30° relative to the light guide counterclockwise, overcoming the holding action against the rotation of the light guide beads.
Turn counterclockwise to remove the Toyota cigarette lighter. Light guide flanges prevent rotation of the cigarette lighter body.
2). Pull the cigarette lighter socket towards you until it stops (0.5-1 cm), releasing the latches holding the cigarette lighter in the console (front panel). The entire cigarette lighter structure begins to dangle freely in the panel hole.
Pull the Toyota cigarette lighter socket towards you until it stops. Light guide latches hold the cigarette lighter in the dashboard
3). Rotate the cigarette lighter housing 20° - 30° relative to the light guide clockwise until the guides of the contact group body align with the internal groove of the light guide. The decorative overlay can be held by hand.
Rotate the cigarette lighter housing until the guides align with the internal groove of the light guide
4). Pull the cigarette lighter socket towards you. The guides of the contact group will fit into the internal groove of the light guide. The cigarette lighter housing will come out freely.
Pull the Toyota cigarette lighter socket towards you, remove the housing from the light guide. The guides of the contact group are aligned with the groove of the light guide when removing
5). Remove the light guide with the decorative cover from the console. Press the light guide latches and remove the decorative trim along the outer guide of the light guide.
Press the light guide latches and remove the decorative trim of the Toyota cigarette lighter
Assembling and installing the cigarette lighter into the console is done in the reverse order.
Toyota wrote in detail about the cigarette lighter illumination earlier.
Types of automobile fuses
Each individual Toyota Rav 4 4th generation fuse is designed to protect against overload currents and short circuits of a certain list of electrical equipment. They are assembled into a mounting block, which ensures the functioning of all electrical circuits of the car.
Each protective element has its own current rating, which also corresponds to a specific color. The design of fuses may differ. The following are the most common types:
Plug-in - a fusible insert is installed between two open contacts, which is protected by a plastic casing. If the rated current value is exceeded, the fuse-link burns out;
Thermobimetallic - instead of a fuse-link, sensitive plates with a silver-plated contact part are used. When the set current value is exceeded, the plates open and close after cooling.
Thermobimetallic
Some car enthusiasts use so-called bugs instead of factory protective elements. A bug is a piece of wire that closes an electrical circuit. Using such methods can damage all electrical wiring, which may result in the vehicle catching fire.
Tech Doc Toyota
Design and maintenance of Toyota cars
Replacing antifreeze in Toyota Corolla
Where is Toyota Corolla assembled?
How to open a Toyota Corolla without a key
How to change the oil in a Toyota Rav 4 engine and automatic transmission
Which oil is suitable for the Toyota Rav 4 engine
How to replace lamps on a Toyota Corolla
How Toyota Rav 4 assembly in different countries affects the performance and safety
Oil change for Toyota Verso
What is the ground clearance of Toyota Verso?
What oil is used in the variator and Toyota Verso engine
What kind of wheels for Toyota Rav 4
What is the ground clearance of the 2021 Toyota Rav 4
- home
- How to find where the Toyota Corolla fuse is located and replace it
Location of fuses in the mounting block under the instrument panel (in the cabin) RAV4 from 2013
| Fuse | Rated current for fuse, A | Switched circuit |
| 1 | 7,5 | stop lights |
| 2 | 10 | Luke |
| 3 | 5 | — |
| 4 | 7,5 | diagnostic system |
| 5 | 20 | locking doors |
| 6 | 7,5 | rear fog lamp |
| 7 | 10 | door locking system |
| 8 | 15 | electrical sockets (cigarette lighters) number 1 |
| 9 | 20 | electric driver's window |
| 10 | 20 | electric window right rear |
| 11 | 20 | electric window left rear |
| 12 | 15 | rear window wiper |
| 13 | 15 | windshield and rear window washer |
| 14 | 7,5 | reversing lights |
| 15 | 25 | windshield wiper and rain sensor |
| 16 | 5 | transmission lock |
| 17 | 15 | electrical sockets (cigarette lighter) number 2 |
| 18 | 7,5 | audio system, exterior mirrors, stop-start, clock |
| 19 | heater, instrument cluster, all-wheel drive, fuel injection system, parking sensor, seat heaters, headlight height adjustment, air conditioning system, driver module switch... | |
| 20 | 10 | dimensions, license plate illumination |
| 21 | 5 | electric power steering warning lamp |
| 22 | 10 | steering sensor |
| 23 | 5 | rain sensor, tailgate, tire pressure... |
| 24 | 7,5 | air conditioning system, heated rear window, additional heater |
| 25 | 10 | heated left seat |
| 26 | 10 | heated right seat |
| 27 | 7,5 | fuel pump, injection system |
| 28 | 7,5 | airbags |
| 29 | 5 | instruments and indicators for instrument clusters |
| 30 | 7,5 | generator, headlight cleaner, brake lights, heated windshield wiper area |
| Fuse | Rated fuse current, A | Switched electrical circuit |
| 1 | 30 | Electric left seat |
| 2 | 30 | Electric right seat |
| 3 | 30 | power tailgate |
| 4 | 30 | Main switch for electric front windows |
So, guided by the materials in this article, you can find the fuse responsible for certain functions in the car. In addition, you can find out about the fuse rating
It is important to note here that when replacing a fuse, it is necessary to install a new one of exactly the same rating as was previously installed.
How to control and replace fusible elements
The car owner can check whether the fuse is working or not using a multimeter. He must set the device knob to the “Diode” or “Ring” position.
Attention! The resistance measurement mode should be at the lowest point.
How is the operating state of a fusible contact determined:
- if the part is working, then the resistance will always show 0;
- if the element burns out, the car owner will see a unit on the multimeter display.
Once the car owner has discovered that the fuse is not working, it needs to be replaced.
How to change them
Experts recommend replacing fuses with the same rating. Or use fusible elements with a rating of up to 40 percent higher than required. Only in this case will the part burn out in time before the heat spreads throughout the wiring and causes a fire.
Experienced mechanics do not recommend installing paper clips, bugs and other devices that are homemade and unreliable. Not only will they not prevent a fire, but they can also cause the entire vehicle to catch fire.
When replacing, you need to pay attention not to one contact, but to the whole contact group. If the block is worn out or destroyed, then it is necessary to replace the group of fusible elements.
To change the contact you do not need to buy special tools. Experienced mechanics use regular tweezers to remove the fuse from its socket. Based on the current strength, a beginner will also not be able to confuse the parts. Since each of them is painted in its own color. Of course, you only need to install a part of the same color in one slot.
The blocks are covered with plastic covers. It will not be difficult for the car owner to take them off and put them on again.
Attention! Modern modifications of the Toyota Corolla have complicated fusible element block diagrams. Therefore, it is not recommended for a beginner to do this himself.
- Open the hood of the vehicle and remove the cover from the fusible unit, which is located next to the radiator.
- Or sit in the driver's or passenger's seat (depending on the location of the required part) and reach the air vent grille.
- Take it off. Open the block with fusible elements.
- Use tweezers to remove the burnt one that needs to be replaced.
- Insert new one.
- Start the engine. Check whether the devices for which the part is responsible are working.
Attention! All work must be done with the ignition off.
Toyota RAV4 fuses
Toyota RAV4 is a car launched into production back in 1994 by the famous Toyota company.
This model is a compact crossover designed for long-distance travel and providing a comfortable trip to each owner.
Like other cars, the RAV4 is equipped with fuse and relay blocks, thanks to which it is possible to avoid overloading the electrical circuit. Thus, these elements are used to maintain the integrity of the wiring between devices and sensors.
As for the overloads themselves, the chance of their occurrence in the Toyota RAV 4 is quite low, and basically this problem arises due to a severe accident or breakdown of any of the devices. The consequence of this may be overheating of the fuse, which will require its immediate replacement. Otherwise, the performance of the car will deteriorate, if not stop altogether.
More details about the types of fuse and relay blocks, as well as the method of replacing elements in the event of a breakdown, will be discussed in this article.