For road safety, a car is required to meet a number of technical requirements. Using the example of the operation of the Toyota Rav4 low beam lamp, you can understand the degree of reliability of the car itself.
During the entire production of Rav4, Toyota used only high-quality and reliable materials and equipment for this model. Despite its place in the middle of the hierarchy of models of this Japanese brand, Toyota has never allowed itself to make mistakes in the lighting equipment installed on the car. But sometimes problems happen, and then it’s useful to know what kind of light bulbs are installed on the Rav4.
Based on technological and safety standards, the Toyota automaker uses only modern lighting on its cars. In 1994, when the first generation of Rav4 was released, the headlights were equipped only with halogen bulbs. Later, when automakers around the world began to introduce xenon and later LED headlights, Toyota did not stand aside.
The Toyota Rav4 low beam lamp is now xenon, and on the latest generations it is LED. The main beam from the factory is halogen, but it is possible to switch to other types of lamps.
The turn signals use baseless bulbs, and the headlamps are equipped with halogen and later LED bulbs.
The correct selection of the 2nd generation of light bulbs required for the Toyota Rav4 requires the owner to know the base models:
- high/low beam – H4;
- license plate lights, side turn signals – W5W;
- front direction indicators – WY21W;
- fog lights – HB4;
- brake light – W21/5W;
- reversing lights – W16W;
- rear direction indicators – W21W;
- rear foglights – P21W;
The second generation Rav4 was produced from 2000 to 2005, so finding the listed types and models of bases on the automotive spare parts market is not difficult.
Since generations of Toyota Rav4 differ from each other not only in design and technical equipment, but also in the use of different types of lighting, owners should take a responsible approach to the choice of light bulbs. Until the 3rd generation, there were no significant differences in lighting technology. Starting with the Rav4 low beam lamps produced in 2007, the manufacturer began to actively introduce new technologies.
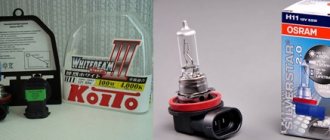
- low beam on the Toyota Rav4 3rd generation, as well as the low beam lamp on the Rav4 2008 (restyling) - 55H11 Philips CrystalVision bulbs;
- low beam lamp "Toyota Rav4" 2011 - 65HB3, recommended model - Philips DiamondVision (the 2011 car is a deep restyling of the 2007 model, but the manufacturer has changed the type of lighting installed);
- low beam lamp "Rav4" 2012 - 65HB3, it is recommended to install the Philips DiamondVision lamp model (the manufacturer did not change the type of bulbs and left the same lights as on the 2011 model).
On subsequent generations, models are used for lighting that are close to those installed on 4th generation 2012 cars. They also install modern LED lamps and additional LED strips for illumination.
If you need to independently replace the low beam lamp on the Rav4 2007, you must follow the instructions prescribed by the manufacturer. For this procedure on the third generation Rav4, no tools are needed:
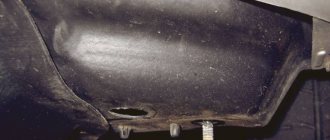
- For convenience, the washer reservoir can be removed from the passenger side.
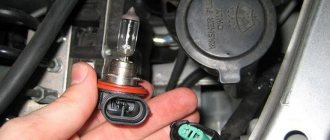
- Before starting work, you need to disconnect the electrical connector from the headlight by pressing the locking bracket.
- Then, after turning, remove the plastic protective cover.
- Disconnect the electrical connector leading to the light bulb itself, rotate the socket and pull it out entirely.
Replacement with a new light bulb is done in the same way. The low beam lamp of the 2011 Toyota Rav4 changes according to the same principle as for cars produced in 2008 and 2010.
With prolonged use or malfunctions in the car's electrical system, the headlights may stop shining at any time, including at night and while driving. If the problem cannot be resolved, then you can continue driving with the side and fog lights on. On car forums, when the headlights dim, they advise checking the fuse box, namely the fuse that is responsible for their operation.
Also, the lamps may not light up due to problems in the wiring of the steering column switch. But the most common cause is the usual burnout of old light bulbs.
Professionals advise changing light bulbs regularly. For example, a standard low-beam light bulb "Rav4" 2011 is cheaper in price, and buying and installing it is easier than repairing the entire lighting system.
Replacing the lamps in the headlight of a Toyota RAV 4 is not a difficult task - you can easily change the lamps yourself. This detailed photo report will help with this, which will show in detail the replacement process using the example of the 2013 Toyota RAV4 (4th generation). Next, we will show you how to replace the low beam, high beam, turn signal, and parking lamps.
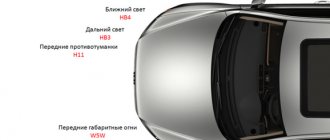
Toyota RAV 4 headlight bulb numbers:
- low beam lamp - HB3 (9005);
- high beam lamp - HB3 (9005);
- turn signal lamp - WY21W/5W (7444NA);
- lamp size - 2825, W5W or 168.
*The applicability of the lamps should be clarified before purchasing - depending on the year of manufacture and the country of manufacture of the car, they may differ slightly.
You don't need any tools to replace the driver's side bulbs. To replace the bulbs on the passenger side, it would be better if you remove the washer fluid reservoir.
Replacing the low beam lamp Toyota RAV 4
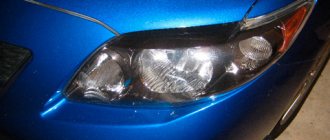
The low beam lamp is located near the outer edge of the headlight housing. First, press the latch and disconnect the electrical connector. Then turn the protective cover counterclockwise and remove it.
Next, you need to disconnect the blue electrical connector, turn the lamp socket a quarter turn counterclockwise and pull out the lamp. Installation in reverse order.
Do not touch the glass of the halogen lamp being installed with your fingers - the marks left behind will lead to the lamp burning out. You can clean the lamp with a cloth moistened with alcohol.
Actions if the low beam goes out on the road
If your headlights suddenly turn off, turn on your hazard lights and pull over to the side of the road. At the initial stage, it is necessary to check the integrity of the fuse jumpers located in the passenger compartment inside the instrument panel. If the inserts are intact and there are spare bulbs, then the headlights can be serviced on the road. Otherwise, you will have to move with side lighting. In poor visibility conditions, you need to use the hazard warning lights and fog lights. The driving speed should not exceed 60–70 km/h.
Precautionary measures
To begin with, we list the basic safety rules when replacing lamps in Rav 4:
- All lighting must be turned off.
- Light bulbs must cool down (especially gas discharge ones), otherwise you can get burned on them.
- When manipulating lighting fixtures in Rav 4, they are held not by the glass bulb, but by the base, so as not to get injured when the glass cracks and not to leave greasy marks.
- At the end of the work, you should carefully check the strength of the fasteners and the tightness of the standard protection.
Selection of lamp bases for Toyota cars
In the list we have given the most common models of the selected car brand. (Abbreviation PTF - fog lights)
| Brand | Lamp type | Base |
| Altezza with halogen | Near | HB4 |
| Further | HB3 | |
| PTF | HB4 | |
| Altezza with xenon | Near | D2R |
| Further | HB3 | |
| PTF | HB4 | |
| Avensis (T25) with halogen (2002 - 2006) | Near | H7 |
| Further | H1 | |
| PTF | HB4 | |
| Avensis (T25) with halogen (2006 - 2008) | Near | H7 |
| Further | H1 | |
| PTF | H11 | |
| Avensis (T25) with xenon (2002 - 2006) | Near | D2S |
| Further | H1 | |
| PTF | HB4 | |
| Avensis (T25) with xenon (2006 - 2008) | Near | D4S |
| Further | H1 | |
| PTF | H11 | |
| Avensis (T27) with halogen (2009 - present) | Near | H11 |
| Further | HB3 | |
| PTF | H11 | |
| Avensis (T27) with xenon (2009 - present) | Near | D4S |
| Further | HB3 | |
| PTF | H11 | |
| Camry V30 (2002 - 2006) | Near | H7 |
| Further | HB3 | |
| PTF | HB4 | |
| Camry V40 with halogen (2006 - 2011) | Near | H11 |
| Further | H11 | |
| PTF | H11 | |
| Camry V40 with xenon (2006 - 2011) | Near | D4S |
| Further | HB3 | |
| PTF | H11 | |
| Camry V50 with halogen (2012 - present) | Near | H11 |
| Further | H11 | |
| PTF | H11 | |
| Camry V50 with xenon (2012 - present) | Near | D4S |
| Further | HB3 | |
| PTF | H11 | |
| Corolla (2001 - 2004) | Near | H4 |
| Further | H4 | |
| PTF | HB4 | |
| Corolla (2004 - 2006) | Near | H7 |
| Further | H7 | |
| PTF | H11 | |
| Corolla (1997 - 2000) | Near | H4 |
| Further | H4 | |
| PTF | H3 | |
| Corolla (2011 - present) | Near | HB4 |
| Further | HB3 | |
| PTF | H11 | |
| Corolla with halogen (2006 - 2010) | Near | HB4 |
| Further | HB3 | |
| PTF | H11 | |
| Corolla with xenon (2006 - 2010) | Near | D2R |
| Further | HB3 | |
| PTF | H11 | |
| Corolla Verso (2004 - present) | Near | HB4 |
| Further | HB3 | |
| PTF | HB4 | |
| Cresta | Near | H4 |
| Further | H4 | |
| PTF | — | |
| Crown | Near | H4 |
| Further | H4 | |
| PTF | — | |
| Highlander 2 (2007 - present) | Near | H11 |
| Further | HB3 | |
| PTF | P13W | |
| Land Cruiser 200 (2007 - 2011) | Near | H11 |
| Further | HB3 | |
| PTF | HB4 | |
| Land Cruiser 200 (2012 - present) | Near | D4S |
| Further | HB3 | |
| PTF | H16 | |
| Land Cruiser 70 | Near | H4 |
| Further | H4 | |
| PTF | H3 | |
| Land Cruiser 80 | Near | H4 |
| Further | H4 | |
| PTF | — | |
| Land Cruiser 90 | Near | H4 |
| Further | H4 | |
| PTF | HB4 | |
| Land Cruiser 100 (1998 - present) | Near | HB4 |
| Further | HB3 | |
| PTF | HB4 | |
| Land Cruiser Prado 120 | Near | H4 |
| Further | H4 | |
| PTF | HB4 | |
| Land Cruiser Prado 150 with halogen | Near | H11 |
| Further | HB3 | |
| PTF | H11 | |
| Land Cruiser Prado 150 with xenon | Near | D4S |
| Further | HB3 | |
| PTF | H11 | |
| Land Cruiser Station Wagon 100 | Near | HB4 |
| Further | HB3 | |
| PTF | HB4 | |
| Land Cruiser Station Wagon 60 | Near | H4 |
| Further | H4 | |
| PTF | — | |
| Land Cruiser Station Wagon 80 | Near | H4 |
| Further | H4 | |
| PTF | — | |
| Mark II (X100) with halogen | Near | H4 |
| Further | H4 | |
| PTF | HB4 | |
| Mark II (X100) with xenon | Near | D2R |
| Further | HB3 | |
| PTF | HB4 | |
| Mark II (X110) with halogen | Near | HB4 |
| Further | HB3 | |
| PTF | HB4 | |
| Mark II (X110) with xenon | Near | D2R |
| Further | HB3 | |
| PTF | HB4 | |
| Mark II (X90) | Near | H4 |
| Further | H4 | |
| PTF | HB4 | |
| Mark X (X12) with halogen | Near | H4 |
| Further | HB3 | |
| PTF | HB4 | |
| Mark X (X12) with xenon | Near | D4S |
| Further | HB3 | |
| PTF | HB4 | |
| Mark X (X13) with halogen | Near | H11 |
| Further | HB3 | |
| PTF | H11 | |
| Mark X (X13) with xenon | Near | D4S |
| Further | HB3 | |
| PTF | H11 | |
| MR2 | Near | H4 |
| Further | H4 | |
| PTF | H3 | |
| Passeo | Near | H4 |
| Further | H4 | |
| PTF | — | |
| Picnic | Near | H7 |
| Further | HB3 | |
| PTF | — | |
| Previa | Near | H4 |
| Further | H4 | |
| PTF | H1 | |
| RAV 4 (2000 - 2005) | Near | H4 |
| Further | H4 | |
| PTF | HB4 | |
| RAV 4 (2006 - 2010) | Near | H11 |
| Further | HB3 | |
| PTF | H11 | |
| RAV 4 (2010 - 2013) | Near | H11 |
| Further | HB3 | |
| PTF | H11 | |
| RAV 4 (2013 - present) | Near | HB3 |
| Further | — | |
| PTF | H11/H16 | |
| Starlet | Near | H4 |
| Further | H4 | |
| PTF | — | |
| Supra Turbo | Near | H4 |
| Further | H4 | |
| PTF | H3 | |
| Verso with halogen (2009 - present) | Near | H11 |
| Further | HB3 | |
| PTF | H11 | |
| Verso with xenon (2009 - present) | Near | D4R |
| Further | HB3 | |
| PTF | H11 | |
| Verso S (2010 - present) | Near | H4 |
| Further | H4 | |
| PTF | H11 | |
| Vista with halogen (1998 - 2003) | Near | HB4 |
| Further | HB3 | |
| PTF | HB4 | |
| Yaris (2001 - 2005) | Near | H4 |
| Further | H4 | |
| PTF | HB4 | |
| Yaris (2005 - 2008) | Near | H4 |
| Further | H4 | |
| PTF | H11 | |
| Yaris (2008 - 2011) | Near | H4 |
| Further | H4 | |
| PTF | H11 |
Return to product page
ATTENTION!!! This information is for informational purposes only. There may be differences between the installed lamps in your car and in the table. To more accurately determine the lamp base, we recommend that you check in more detail in the manual for your car, or look at the lamp markings by directly pulling it out of the headlight. Some types of headlights have a marking (or sticker) on the housing of the headlight itself.
Bulbs used in Rav 4 4th generation
D4S
HIR2 - in bi-halogen headlights for low and high beam (in one lens)
HB3 - in halogen headlights for low beam, high beam, in bi-xenon headlights - only for high beam.
D4S - in bi-xenon for the neighbor.
H16 – for Rav 4 fog lights.
LED – for parking lights, brake lights, daytime running lights, fog lights.
W5W – for dimensions, brake lights, interior lighting, license plate, trunk in Rav 4.
HB3
W16W – reverse.
W21W – for brake lights, rear (until 2015/10) turn signals, fog lights Rav 4.
WY21W – for front, rear (from 2015/10) turn signals.
Selection depending on car variations
You should purchase lamps that match the design of the headlight. The head optics of RAV4 crossovers are not designed for the use of LED-based light sources. When installing such lamps, road illumination deteriorates and there is a risk of blinding drivers of oncoming vehicles. It is not allowed to install products with increased power.
Overloading electrical wiring leads to destruction of insulation, followed by a short circuit and fire.
Second generation
For RAV4 vehicles, you can use H4 format halogen lamps (P43t-38):
- Osram H4 12V 60/55W Night Breaker +200% (DuoBox) with increased light output and color temperature 3900K;
- Philips H4 12V 60/55W X-treme Vision Pro150% with warm white radiation having a temperature of 3600K;
- Narva H4 12V 60/55W RANGE POWER +150% with increased luminous flux and color temperature 3500K.
For RAV4 cars you can use Osram lamps.
Third generation
For Toyota RAV4 cars, any halogen incandescent lamps with an H11 socket with a power of 55 W and rated for a voltage of 12 V are suitable:
- Philips H11 B1 LongLife EcoVision with yellow glow and extended service life;
- Osram H11 PGJ19-2 Night breaker laser Next Generation with a road illumination range increased to 150 m and a luminous flux increased by 150%;
- Philips H11 PGJ19-2 B1 WhiteVision, having a color temperature of 3700K, which is close to the performance of xenon lamps.
Fourth generation
When purchasing bulbs for crossovers of the XA40 generation, you should consider the type of headlights:
- For standard halogen light sources, light sources with HB3 sockets are suitable. The owner can install Philips HB3 9005 DV 65W P20d B1 Dimond Vision or Osram HB3 60W P20d Night Breaker Laser Next Generation lamps. The products are characterized by increased resistance to ultraviolet radiation and are equipped with flasks made of heat-resistant quartz glass. Light sources provide improved visibility without increasing the load on the vehicle's electrical network.
- When using a headlight with a lens, combination lamps of the HIR2 standard are required, which are equipped with low and high beam filaments in a single bulb. For RAV4, suitable lamps are Osram 55W 12V PX22D 10X10X1 1A Original Line with yellowish light or Philips HIR2 55W PX22d Standard with white emission. Product life is within 850–900 hours.
- When installing bi-xenon optics, you must purchase DS4 standard bulbs. The Osram D4S 42V 35W P32D–5 Xenarc Night Breaker Unlimited or Philips D4S 42V 35W P32d–5 C1 Vision products, which have a color temperature of 4200 and 4400K respectively, are of good quality. The lifespan of the lamps does not exceed 2500 hours; a voltage of 42 V is required to ignite and maintain combustion. Car headlights are equipped with converters and starting devices that ensure reliable operation of the lighting equipment.
The owner of a Toyota RAV4 can install Philips lamps.
Replacing front headlight bulbs Rav 4
To replace the lamps on the right, i.e. on the passenger side, it is better to remove the washer fluid reservoir. On the driver's side (left), replacement is possible without any tools.
Removing the washer fluid filler neck (photo)
The low beam is installed at the outer edge of the headlight. The latch is released and the electrical connector is disconnected. The protective cover is turned counterclockwise and removed. After this, the blue electrical connector is disconnected, the socket is unscrewed a quarter turn, and the light source is removed.
The new one is installed in the reverse order, but the halogen lamp should not be touched with your fingers on the glass , otherwise it will quickly burn out due to the grease and sweat marks left by your fingers. Contaminated glass should be degreased with alcohol.
Middle (photo)
The high beam lamp HB3 is in the middle of the headlight, it changes in exactly the same way as the previous one. In RAV 4 4th generation, low and high beam lighting devices are interchangeable.
Dalny (photo)
The turn signals are located at the bottom at the inner edge. The gray turn signal bulb socket WY21W/5W is turned ¼ to the left and pulled out along with the bulb. It is removed from the cartridge and replaced with a new one. Next is the reverse assembly order.
The side lights are located at the outer edge and have orange sockets. The W5W size lamp is changed in the same way as the turn signals.
Changing light sources in fog lights
For Rav 4 2014, fog lights with a power of 19 W type C (halogen H16) are suitable.
To ensure there is enough space when replacing a light bulb, turn the steering wheel in the opposite direction. Those. if the right fog light changes, the steering wheel turns to the left, and vice versa.
- The wing protection is removed after removing the clamp.
- After pressing the latch, the connector is removed.
- The base is unscrewed counterclockwise.
- When installing a new light source, its three protrusions must be connected to the mounting recesses and turned clockwise.
- Having installed the connector in place, shake the lamp by the base and check the strength of the fastening. Then turn it on and make sure that the headlight works and the light does not leak through the mount.
- The wing protection is put in place, secured and turned with a lock.
H16
Criteria for choosing light bulbs: what to look for
When selecting, you should consider:
- compliance with the manufacturer’s requirements for power and base format;
- the quality of manufacture of the light bulb and packaging, which should contain information about the manufacturer and technical parameters;
- presence of a certification mark in accordance with UNECE rules (use of products marked Not for use in Europe or Offroad use only on public roads is not allowed).
When selecting light bulbs, the manufacturer's power requirements are taken into account.