Some Toyota Corolla car owners complain that the factory-assembled low beam of the latest car model does not suit them; the minions shine dimly, not providing the necessary visibility. This problem is easily solved. The lighting in the Corolla headlights can be easily changed.
To do this, you just need to change the light bulbs, in our case the low beam. Burnt out minions also need replacing. This process is simple and takes from 2 to 5 minutes if you know how to do it. The only problem is that the lighting fixtures are located in hard-to-reach places. But this can also be solved.
How to change the low beam light bulb on a Toyota Corolla
Replacing a low beam lamp on a Toyota Corolla 120 (2000–2006) and 150 (2006–2013) does not require professional knowledge of an electrician. This operation is not at all complicated, and if you follow the instructions below, you won’t have to wonder how to change the light bulbs.
Before purchasing new lamps, you need to know which ones are included in the Corolla optics.
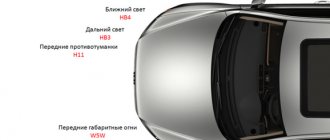
For clarity, below is a picture indicating suitable light bulbs for the Corolla.
Important! Middle HB4 not to be confused with H4
Selecting lamps for Corolla 150
When choosing low beam lamps for a Toyota Corolla, remember that a feature of the car’s optics is that not every type of base (the part that fixes the lamp in the body and conducts current) will fit it. Therefore, when selecting lights, you should focus on the lamp base suitable for the Toyota Corolla.
The ideal low beam lamp option for the Corolla 150 is HB4 Koito Whitebeam 12V 55W lamps. Few lamps can compete with them in reliability and, at the same time, brightness of lighting. However, they also have a minus - not all car owners can afford them.
A good solution would be to equip the Corolla with Philips Crystal Vision HB4 lamps, which can provide illumination.
- You can select a specific type (lighting) of low beam lamps
- All-season
- Durable
- With increased light output
- Blue lighting.
- All-season lamps
They are also known as all-weather. All-season lamps are suitable for those whose road runs along city highways. The main difference between all-season models is the yellow-coated bulb. The yellow light emitted by such lamps is many times more effective than white light when it comes to wet weather. Due to the fact that yellow light has a 20% lower scattering coefficient than white light, light from all-weather light is less scattered by wet particles. Using these lamps, you don’t have to worry about your visibility in bad weather.
Durable
The name Long life also appears. Ideal for those who often have to drive in the dark. It’s not for nothing that they are called “durable” - their service life is twice as long as ordinary ones. The secret of their long life lies in the high vibration resistance of the base and the special composition of the gas in the flask.
With increased light output
Over time, headlights become less transparent than before and their ability to transmit light decreases. In this case, you should seriously think about replacing it with lamps with increased light output. The filament of such lamps is heated to a higher temperature than conventional ones, which provides a more intense and powerful flow of light. And the special composition of the gas inside the flask protects such a thread from burning out.
Blue color
A real salvation for those whose eyes get very tired when driving. The blue light does not cause eye fatigue. The blue glow is provided by a blue coating on the bulb. Do not under any circumstances confuse such lamps with xenon lamps, which, although similar, are incomparably more powerful.
For information
The white light of the lamp (over 5000K) is more aesthetic than practical. In conditions of fog and increased dampness, visibility will remain limited and the effectiveness of such lighting is minimal. Consider this factor when purchasing.
A lighting device with increased brightness serves less than its counterparts with a standard coefficient. If you need additional light, be prepared for a short life.
Xenon lamps are officially prohibited for installation on the Toyota Corolla 150, as well as other modifications. Instead, they are actively installing LED analogues. Of course, they are not comparable to halogen ones, but in low beam they illuminate the road well.
Popular manufacturers of diode lamps for Toyota Corolla: KOITO, GE, MTF, NARVA, OSRAM, PHILIPS, VALEO, DiaLUCH. The cost of original diode ones varies from 7,000 rubles, while Chinese alternative optics offer a cheaper option, for 1,500 – 2,000 rubles.
Replacing low and high beam bulbs, fog lights and dimensions on a Toyota Corolla 150
The service life of standard lamps is quite long; they rarely burn out if damaged, hit, or ignited. The same cannot be said about those purchased at a car store or car market. Consumable material of low quality, non-original production. By default, Toyota Corolla 150/140 is equipped with Philips Long Life lighting elements. The average period of use exceeds 3 – 4 years.
Requirements for lamps when choosing standard analogues:
- long-term operation;
- xenon effect;
- increased light brightness;
- LED (for PTF).
conclusions
It's easy to modify the bumper to accommodate fog lights. Indeed, in sedan, station wagon, and hatchback bodies of the Toyota Corolla 150, the manufacturer took into account everything that allows the PTF installation to be carried out quickly and without specialized skills. So, the Corolla 150 is provided with: a connector for the headlight and for the button, as well as a plug for connecting to the standard wiring. The main thing here is the high quality of fog lights. Such lamps work longer, and the brightness of the glow will not disappoint. The main thing is to remember that the permitted colors of lights are white and yellow; other color variations are prohibited for installation.
Sequence of actions when replacing lighting elements on a Toyota Corolla 150
We carry out preventive maintenance in advance, identify faulty elements, and check (call) the electrical wiring as necessary. For such purposes, it is better to use a special device - a multimeter.
Every driver should have it, as it is used to carry out comprehensive preventive maintenance of the electrical power system and troubleshoot problems. If not, contact the service center specialists for help.
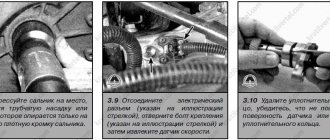
We install the Toyota Corolla 150 on a flat surface, turn the steering wheel in the opposite direction of the burnt-out headlight. Use a Phillips screwdriver to unscrew the plastic splash guard. We remove the two latches and lower the mudguard down. We turn the PTF base counterclockwise, remove it, and replace it with a new one. We do not touch the flask with our hands.
Recommendations for the care and maintenance of power system elements
- carry out a technical inspection of the car, its components and assemblies strictly in accordance with the schedule in the operating instructions and service book;
- Always check the condition of the wiring and connectors after an accident, impact, collision, or long drive through puddles;
- identified melted connectors must be immediately replaced with new ones;
- After activating the ignition and starting the engine, always inspect the instrument panel. On most modern cars, the on-board computer will promptly notify the driver of a malfunction in the lighting system of the vehicle.
Polishing dim car headlights
Spread the love How to repair dim lamps? Spotlights with scratched frosted glass look bad and have an even worse shine. We advise you how to restore their beautiful appearance and correct parameters. You can do this yourself without removing the lights from the car. Sometimes the plastic is matte and discolored from the inside - this is the case, for example, with headlights that […]
How to treat a car with anticorrosion agent yourself
Published: March 29, 2018 Spread the love
Spread the love Do-it-yourself body anticorrosiveContents1 Do-it-yourself body anticorrosive1.0.1 Types of anticorrosive for cars:1.1 How to properly make an anticorrosive underbody with your own hands1.2 Anticorrosive for wheel arches1.3 Anticorrosive in the car interior Do-it-yourself anticorrosive will help you keep your car in its original form for as long as possible . After all, a new body as soon as it comes off the assembly line begins to mercilessly age and return [...]
Replacing lamps for Toyota Corolla Restyle (E150)
We install the Toyota Corolla PTF on a flat surface, turn the steering wheel in the opposite direction of the burnt-out headlight. Use a Phillips screwdriver to unscrew the plastic splash guard. We remove the two latches and lower the mudguard. We turn the PTF base counterclockwise, remove it, and replace it with a new one.
Replacing the Toyota Corolla Dimensions Light Bulb
We do not touch the flask with our hands. If necessary, lightly press with your finger in the center for ease of dismantling.
We unscrew the faulty lamp and replace it with a new one. If there is damage, replace it with new ones. Interior lighting You can quickly and easily change the lamps in the interior! We choose lamps with W5W t10 socket for the front lamp and C5W for the passenger lamp or universal LED panels.
By the way, the panels provide much more light into the interior than lamps! In this car, we installed W5W t10 LED lamps in front and Toyota Corolla E150 replacement dimensions 31mm HP above the passenger row of seats. The replacement process is simple. You will need a flathead screwdriver or trim removal tool. It is necessary to pry up the outer cover of the lampshade and remove it.
License plate illumination To illuminate the license plate, we specifically choose W5W COB-1 lamps because others simply do not fit there. Very small space in this lantern. In its space you will see a plastic protection that is held on by six clips. Each clip in the Toyota Corolla E150 has a plug that needs to be lifted by pressing on its core. This is best done with a knife with a thin blade. Remove the entire protection panel and set it aside.
Now we have access to the low beam headlight unit and the sidelights.
Looking there, you can see that each headlight has a chip with two wires. Carefully remove it, trying not to damage the wires.
The chip came to the base of the light bulb, which was unscrewed with a quarter turn counterclockwise. The headlight with low beam lamp on the Corolla E, E and Fielder may have a rubber plug that can also be unscrewed counterclockwise.
As soon as you unscrew the base with the light bulb and install a new one, do not hold onto the light bulb itself, because it may fail. The fact is that if finger oil gets on the glass, the thread can burn out. Now the low beam lamp for Toyota Corolla is installed.
Similar operations for Toyota Corolla E150 are replacing dimensions for versions of other years.
This instruction is suitable for both right and left headlights. Because if moisture gets on the lamp contacts, it may fail. In bad weather, it is better to install in a dry garage. If, with the replaced bulb, the low beam Toyota Corolla E150 replacement of dimensions still does not light, then the problem lies in the rest of the electrical part: Low beam not lit: There are several reasons for this malfunction: This problem can be solved simply: Replacing the Nissan chain is usually required after a certain mileage, o The degree of wear of parts can be judged by various signs.
Interior lighting
We carry out the replacement ourselves, the process is simple and intuitive. If difficulties arise, we involve workshop specialists.
Using a flat-tip screwdriver, carefully pry off the outer cover of the lamp. It is tightly fitted to the ceiling trim with three latches. Careless actions or excessive force will damage the plastic, be careful. We remove the cover, remove two diodes, install new ones. Ready.
We carry out troubleshooting of the cover, check the tightness of fit and fixation.
Replacement e150 body
On a Toyota Coral car, low beam bulbs can be changed in two ways:
- Internal replacement.
- External replacement.
From the inside
First of all, the hood opens; you can open it from inside the car, after which you need to do the following:
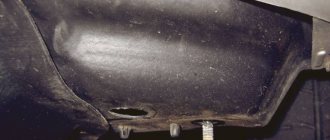
- You need to remove the plastic protection that is held on by clips, you can remove them by pressing the middle button at the bottom, as a result of this the mechanism will work and the clip together with the spring can be easily disconnected. You can also pull them out simply by picking them up with a knife or a flat-head screwdriver. When all the clips are disconnected, you can remove the protection.
- When the protective cover is removed, access to the headlight unit, which is responsible for the high and low beam of the Toyota Corolla 150, opens. It is much easier to replace light bulbs on the left side than on the right. To remove the low beam lamp, it must be disconnected from the power supply, since its wiring with a plug is inserted into the base itself with a special socket. To do this, the latch is pressed, and the lamp is quietly removed from the base by turning it counterclockwise from the mounting socket.
- The new one is installed as simply as removing the old lamp; to do this, the new light element must be taken by the base and installed in its seat; for convenience and correct installation, there are special guides on it. When the lamp is installed in the socket, the base turns clockwise until it clicks, which means that it is locked in the socket. Then the power is connected.
After replacement, you should check the serviceability of the headlights; if everything works, you can put everything back together. If suddenly the light does not come on, you need to check the fuses and relays
.
It is important to know that when replacing an old light bulb with a new one, holding onto the light bulb itself is not recommended, since there is a high probability that it will fail. It is also not recommended to replace it in high humidity, since trapped moisture can also cause rapid failure of the lamp.
If the right low beam lamp of a Toyota Corolla has burned out, then in addition to the protective casing, you also need to remove the expansion tank. To remove it you need:
- Unscrew the two bolts, this can be done using a 10mm wrench, and remove the tank.
- In addition to the reservoir, the neck of the washer can prevent you from getting to the light bulb, since it makes the view very poor, but there is no need to remove it, just take a mirror and place it on the side, this way you can see where the lamp is located. Once the location is certain, you can start replacing. It changes in the same way as the left light bulb.
Outside
This replacement method involves removing the front bumper, as well as the presence of a jack or pit. The bumper must be removed to gain access to the headlight mounts. When access is obtained, you can proceed to replacement:
- All five plugs that supply them with electricity are disconnected from the headlight. Using a 10mm wrench, unscrew the fastening bolts, there are three in total, two on the side and one under the headlight, you also need to remember to unscrew one self-tapping screw.
- There are five bulbs in the headlight itself; the one on the edge is responsible for the low beam; it is removed and replaced with a new one.
Lamp selection
Only certain types of lamp bases are suitable for Toyota Corolla optics. The base itself is designed to fix the light bulb in the housing and also transmit current to it.
The best option for the Toyota Corolla 2013 of all is the HB4 Koito Whitebeam 12V 55W from the Japanese manufacturer. This lighting is reliable and very catchy. It is especially recommended to take this brand for high beams. The only disadvantage of Koito is the high price.
The Philips Crystal Vision HB4 is another great option that will glow a very bright white light.
For Toyota Corolla there are several types of lighting that can be supplied, depending on your consumer needs:
- All-season.
- Durable.
- With increased light output.
- Blue lighting.
Let's consider the main features characteristic of each of these types of lamps.
All-season
All-season, or all-weather, lamps are best installed by car owners who drive a lot outside the city at night. A special feature of all-season models is that their bulb is covered with a yellow layer. It turns out that the luminous flux of the lamp becomes yellow, which is much more effective than white in humid weather. If white light is scattered from moist particles in the air, then in yellow light this problem will not be so acute: yellow light has a scattering coefficient of 20 percent less. This will give you greater visibility in fog, snow or rain.
Durable
Recommended for those who spend a lot of time driving at night. Such lamps can work as much as twice as much as ordinary ones. Durability is ensured due to the vibration resistance of the base and the special gas contained in the flask. Manufacturers designate such headlights as Long Life.
With increased light output
Replacing old lamps with these is recommended for people whose headlights have lost their transparency and are less capable of transmitting fire. A more powerful light stream (30 percent stronger than conventional ones) is achieved due to the higher filament temperature. It may seem that such a thread will burn out much faster, but this will not happen, because a special gas is introduced into the flask, which protects it.
Blue color
In fact, their color is close to blue, but sellers still call them blue lamps. Unskilled people confuse their light with xenon, because it is really similar, just not as powerful. This illumination is achieved by blue coating on the bulb. The advantage of such light is that it tires the eyes much less than ordinary light.
The selection of lamps with HB4 socket is limited.
List of light bulbs Toyota Corolla 150
With prolonged use, the lamp bulb dims. The problem is that this process occurs gradually, and the car owner does not notice the difference. For example, in the year the headlight shines brightly, in the year it’s a little worse, and in the year it’s very bad, but over such a period of time it’s difficult to notice gradual changes.
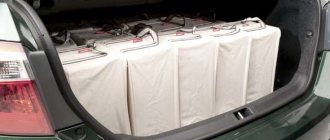
Replacing rear lights To carry out this operation, we will need to open the trunk and pay attention to the plastic cover, which is located directly behind the headlight. We open it by lifting the two latches on which it is fixed.
A little about security
During the replacement process, follow some safety rules:
- When replacing, do not touch the glass of the new lamp with your hands. There may be particles of fat from your fingers or oil left on it, which you may inadvertently stain your hands with. The thin glass of the lamp heats up to very high temperatures and grease that gets on it will easily damage the lamp. Before installation, it is advisable to wipe it with a dry, lint-free cloth.
- Never work under voltage. In addition to the fact that you may receive an electric shock (and this in itself is unpleasant), there is a danger that even a burnt-out minion may shatter into small pieces (and there have been such precedents). Therefore, whenever possible, wear safety glasses.