How to change the low beam light bulb on a Toyota Corolla
Replacing a low beam lamp on a Toyota Corolla 120 (2000–2006) and 150 (2006–2013) does not require professional knowledge of an electrician. This operation is not at all complicated, and if you follow the instructions below, you won’t have to wonder how to change the light bulbs.
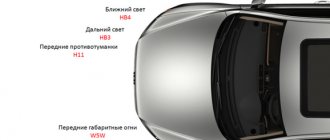
Before purchasing new lamps, you need to know which ones are included in the Corolla optics.
For clarity, below is a picture indicating suitable light bulbs for the Corolla.
Important! Middle HB4 not to be confused with H4
Selecting lamps for Corolla 150
When choosing low beam lamps for a Toyota Corolla, remember that a feature of the car’s optics is that not every type of base (the part that fixes the lamp in the body and conducts current) will fit it. Therefore, when selecting lights, you should focus on the lamp base suitable for the Toyota Corolla.
The ideal low beam lamp option for the Corolla 150 is HB4 Koito Whitebeam 12V 55W lamps. Few lamps can compete with them in reliability and, at the same time, brightness of lighting. However, they also have a minus - not all car owners can afford them.
A good solution would be to equip the Corolla with Philips Crystal Vision HB4 lamps, which can provide illumination.
- You can select a specific type (lighting) of low beam lamps
- All-season
- Durable
- With increased light output
- Blue lighting.
- All-season lamps
They are also known as all-weather. All-season lamps are suitable for those whose road runs along city highways. The main difference between all-season models is the yellow-coated bulb. The yellow light emitted by such lamps is many times more effective than white light when it comes to wet weather. Due to the fact that yellow light has a 20% lower scattering coefficient than white light, light from all-weather light is less scattered by wet particles. Using these lamps, you don’t have to worry about your visibility in bad weather.
Durable
The name Long life also appears. Ideal for those who often have to drive in the dark. It’s not for nothing that they are called “durable” - their service life is twice as long as ordinary ones. The secret of their long life lies in the high vibration resistance of the base and the special composition of the gas in the flask.
With increased light output
Long-lasting lamp with HB4 socket
Over time, headlights become less transparent than before and their ability to transmit light decreases. In this case, you should seriously think about replacing it with lamps with increased light output. The filament of such lamps is heated to a higher temperature than conventional ones, which provides a more intense and powerful flow of light. And the special composition of the gas inside the flask protects such a thread from burning out.
Blue color
A light bulb with a blue HB4 socket.
A real salvation for those whose eyes get very tired when driving. The blue light does not cause eye fatigue. The blue glow is provided by a blue coating on the bulb. Do not under any circumstances confuse such lamps with xenon lamps, which, although similar, are incomparably more powerful.
First way. Replacing lamps from the inside
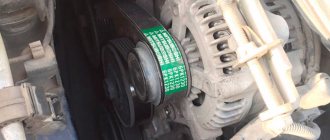
So, we are changing the low beam lamp in a Toyota Corolla. To do this, open the hood of the car from inside the car. The front part of the hood is covered with a plastic casing (cover), which complicates access to the internal components. This cover provides some degree of sound insulation, softening the sounds of operating components and the closing of the hood. We first need to remove this cover, and to do this we take out the clips.
- The clips are removed in two ways. Either by pressing the middle button down, as a result of which the spring inside the mechanism is activated and the clip pops out, or they can be lifted by picking them up with a knife and then calmly pulled out. Once you have pulled out all the clips, the cover can be removed very easily.
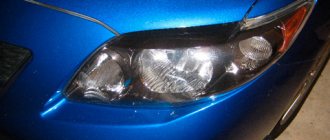
In the left headlight of a Toyota Corolla, replacing the lamps is much easier than in the right one. To begin with, the low beam lamp is disconnected from the power source, whose plug with wiring is inserted directly into the base, which has a special socket. You remove the plug from the base by moving it towards you, not forgetting to press the latch first, then move the lamp itself from its socket with a slight turn counterclockwise and calmly remove it.
- Holding it by the base, take the new one out of the box and insert it into its place. It is equipped with guides that will help you install it correctly. By turning it slightly clockwise until it clicks, the minion base is fixed in the socket. Connect the power supply. That's all. It is done. You can check how the new lamp works. Is it burning? This means everything was done correctly. Now you can replace the cover, insert and secure the clips, and close the hood.
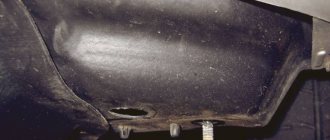
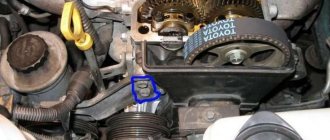
To replace the low beam on the right headlight of a Toyota Corolla, in addition to the casing, it is necessary to remove the engine expansion tank.
- To do this, unscrew 2 bolts (you will need a #10 wrench) and remove the tank from the car.
After replacement, install the expansion tank in its place and tighten the bolts. You also put the casing in place. The whole job may take you no more than 5 minutes.
Replacement procedure
Replacing a light bulb can be done in two ways. Each of them will be discussed in this block.
So, the first method. With its help, the car owner will be able to change the device from the inside. To do this you will have to open the hood of the car. The next steps are:
- Remove the left terminal from the battery.
- Remove the plastic cover. It is made specifically to increase the sound insulation of the car and prohibit open access to some components. To remove it you need to pull out all the clips that secure it to the metal of the car.
- First, the light bulb is replaced on the left side. Since in this direction it is much easier to change the device. Disconnect the glass device from the power supply.
- Remove the lamp base from the socket by moving it towards you.
- Turn the lamp counterclockwise and remove it.
- Pull the new light fixture out by the base and insert it into the socket. This is easy to do since the device is equipped with guides. Lock it inside and turn it until you hear a click.
- Now go to the right side if it doesn't light up either.
- Remove the engine expansion tank by unscrewing the 2 bolts that hold it in place.
- Next, the car owner will see the washer fluid reservoir. But you can't touch her. You need to take a mirror and use it to find the location of the light bulb.
- Repeat all the same steps that were done on the left side of the car with the lighting fixture.
- Install the removed components in reverse order.
For information
The white light of the lamp (over 5000K) is more aesthetic than practical. In conditions of fog and increased dampness, visibility will remain limited and the effectiveness of such lighting is minimal. Consider this factor when purchasing.
A lighting device with increased brightness serves less than its counterparts with a standard coefficient. If you need additional light, be prepared for a short life.
Xenon lamps are officially prohibited for installation on the Toyota Corolla 150, as well as other modifications. Instead, they are actively installing LED analogues. Of course, they are not comparable to halogen ones, but in low beam they illuminate the road well.
Popular manufacturers of diode lamps for Toyota Corolla: KOITO, GE, MTF, NARVA, OSRAM, PHILIPS, VALEO, DiaLUCH. The cost of original diode ones varies from 7,000 rubles, while Chinese alternative optics offer a cheaper option, for 1,500 – 2,000 rubles.
Replacement e150 body
On a Toyota Coral car, low beam bulbs can be changed in two ways:
From the inside
First of all, the hood opens; you can open it from inside the car, after which you need to do the following:
- You need to remove the plastic protection that is held on by clips, you can remove them by pressing the middle button at the bottom, as a result of this the mechanism will work and the clip together with the spring can be easily disconnected. You can also pull them out simply by picking them up with a knife or a flat-head screwdriver. When all the clips are disconnected, you can remove the protection.
- When the protective cover is removed, access to the headlight unit, which is responsible for the high and low beam of the Toyota Corolla 150, opens. It is much easier to replace light bulbs on the left side than on the right. To remove the low beam lamp, it must be disconnected from the power supply, since its wiring with a plug is inserted into the base itself with a special socket. To do this, the latch is pressed, and the lamp is quietly removed from the base by turning it counterclockwise from the mounting socket.
- The new one is installed as simply as removing the old lamp; to do this, the new light element must be taken by the base and installed in its seat; for convenience and correct installation, there are special guides on it. When the lamp is installed in the socket, the base turns clockwise until it clicks, which means that it is locked in the socket. Then the power is connected.
Installing fog lights on a Toyota Corolla 150
Installation of PTF on a Toyota Corolla car will include the installation of fog lights and, in fact, the connection.
To replace, you will need an inspection hole or a lift.
To install fog lights you need to install a relay
First remove the plastic cover. To do this, unscrew the three large bolts that secure it. It is behind it that all the wiring is located, to which our fog lights will be connected.
After removing the fender liner, the main plug will be revealed, to which we will connect the lighting.
Unscrew the bolts securing the plastic plugs. The holes for these bolts are identical to those needed for the foglights, so no drilling is necessary.
Next we connect the fog lights to the plug. To simplify the work, two letters “L” and “R” (Left and Right) are written on the PTF. So you haven't mixed them up.
Relay installation
To install the relay, we need to climb inside and disassemble the main console. To do this, you just need to unfasten all the latches and pull it towards you, without fear of breaking it. To remove the radio, you need to unscrew four small bolts. Then we take it out and disconnect all the wires. Also, to make everything convenient, we take out the climate control plate. It is attached with latches and screws.
On the left side we see a small bolt, which we unscrew and connect there to the relay from the Coroll fog light.
Then we assemble everything in the same way as we took it apart, but in the reverse order.
Installing a button
The first thing you need to check is whether there is a fuse that is responsible for the PTF. He is usually the first one there. When checking, it is best to study the diagram, where which fuses are located. If you don’t find anything in the right place, you need to install a fuse.
Fuse box Corolla 150
To do this, you need to remove the bottom panel, which is held on by two small screws. We disconnect the adjacent panels in the same way, and disconnect the buttons from the plugs. Next you will need exactly the same plug as there, and a green wire. The wire that goes with the rest has three wires that need to be soldered. Don't forget to disconnect the negative terminal from the Corolla 150 battery before soldering.
The blue wire must be soldered to the green one, the black one to the green one of the first plug, and the red one to the body ground anywhere.
The button is installed and will be displayed on the dashboard when turned on.
How to treat a car with anticorrosion agent yourself
Published: March 29, 2018 Spread the love
Spread the love Do-it-yourself body anticorrosiveContents1 Do-it-yourself body anticorrosive1.0.1 Types of anticorrosive for cars:1.1 How to properly make an anticorrosive underbody with your own hands1.2 Anticorrosive for wheel arches1.3 Anticorrosive in the car interior Do-it-yourself anticorrosive will help you keep your car in its original form for as long as possible . After all, a new body as soon as it comes off the assembly line begins to mercilessly age and return [...]
Do-it-yourself dismantling and replacement of low beam lamps
To replace light bulbs on a Toyota Corolla, you need to remove the headlight.
The procedures for removing and replacing lamps consist of the following sequence of actions:
- First you need to dismantle the bumper to have access to the optics.
- To remove the headlight, you need to unscrew the mounting bolts.
- When dismantling the headlight unit, you need to disconnect 5 power connectors.
- In order to remove the lamp, you need to turn it to the left.
- Next, install the new light bulb without touching the glass with your bare hands.
- Insert it into the socket and turn it to the right to secure it.
- We connect the plugs and check the operation in 5 modes.
- If everything is fine, we reassemble in reverse order.
This completes the replacement process and you can use the car.
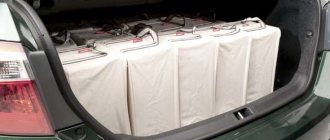
Replacing rear lights
To carry out this operation, we will need to open the trunk and pay attention to the plastic cover, which is located directly behind the headlight. We open it by lifting the two latches on which it is fixed. By opening this cover we have direct access to all the rear lamps.
The next step: removing the chip from the one we want to replace.
When removing, you must pull not by the wire, but by the plastic head.
Next, simply unscrew the rear marker socket ¼ turn counterclockwise and replace the light bulb. This technique is also typical for the Carolla 160 body, produced since 2016.
How to replace a headlight bulb?
The low beam on the left headlight has burned out, tell me how to change the lamp? Body 121. I read it in the book, I can’t figure it out and I don’t want to break anything. Maybe someone has replaced the lamps - tell me!
There are 11 replies to this topic
Where the battery is, I understand, you remove the plug and turn it, I don’t remember where, but it won’t break. Shine a flashlight, headlamp or pocket flashlight into your teeth. because the first time and if the battery is ours, i.e. It is better to remove large dimensions. Keep in mind that it is difficult to insert a new lamp without scratching the surface of the glass of the lamp, practice on a burnt one that has been removed.
Yaruzh, thank you, I’ll try it! In the store there is an Osram 310 wooden lamp, they also say they need a sample. They give it. And my battery is the same size, I tried it, my hand fits through it. I unfasten the clasp, so I can turn it.
The main thing is, when you insert a new lamp, do not touch the glass bulb with your hands.
how to insert? what to wrap a light bulb in?
I didn’t wrap it with anything, very neatly around the base
All! Replaced the lamp! In fact, everything is very simple. I came to the store (without advertising) and bought a low beam bulb. On our cars they are separate from the distant one, everyone knows that. It costs 420 rubles, not 310 as I wrote above. The lamp is sold together with a socket. Immediately at the store, I raised the hood and stuck my hand in, not very convenient, but possible. Carefully unfastened the plug. First he was pushed up, then he pressed the locking tab and he easily got off. Then he slightly turned the “socket” on the lamp upwards (if you stand facing the car, it will turn out clockwise) and carefully removed the lamp from the socket. He inserted the new one carefully, without touching or touching anything, turned it counterclockwise (while facing the car) until it stops, put it on and snapped the plug. Voila, let there be light. Everything works wonderfully. What a mini renovation!
To everyone who responded - thanks for the tips!
Has anyone tried LED lights in the middle? https://www.dled. 18_SMD5050
They blind, but do not shine. Tests were carried out both on the Main Road and Behind the Wheel. Don't waste your money. LEDs are best used in sidelights and daytime running lights.
if memory serves, then we have hb3 in the high beam, and hb4 in the low beam, I like Philips ultra vision lamps, good white light
ps: it’s good that when my hand can fit in, I could barely reach the right side to change the light bulb
Sticking your hand into the lamp, of course, will be a little problematic, although you can get the hang of removing the connector - here it’s a little more than problematic, there are certain inconveniences, but everything can be solved quickly.
online now
- Mikeken
based on activity data for the last 5 minutes.
Which lamps to choose
Before you go to the store and buy light bulbs, you need to remember two rules:
- Headlights should not blind road users traveling towards the driver.
- If there is no lighting along the entire roadway, then the lamps should provide a view of forty meters ahead.
After this, it is advisable to familiarize yourself with the table of original components for the Toyota Corolla.
| Lamp designation | EAK number |
| For high beam | NVZ |
| Low beam | HB4 |
| Front turn signal | WY21W |
| Fog lights | H11 |
| Front dimensions | W5W |
| Rear fog light | W21W |
| Reversing light | W16W |
| Rear turn signals | P21W |
| Stop signal | W21 |
| Room lighting | W5W |
Replacement of lamps is carried out only with high-quality and original devices. They will last longer and will not create other worries.
To replace the old ones, they are suitable from the Koito Whitebeam company. In addition, they have good recommendations from experienced mechanics. They came to the Russian market from Japan and have a range one and a half times greater than the brightness of conventional 55W lamps.
Attention! Koito Whitebeam cooperates with the Japanese manufacturer Toyota . Therefore, these lamps are tailored for cars from this manufacturer.