Repair of headlights Avensis II 2006-2008. Replacing lenses on Hella 3R
This article is a continuation of our publications about the Toyota Avensis headlight defect.
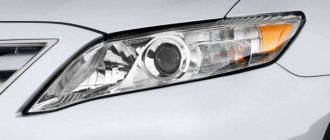
Xenon Toyota Avensis is in first place among cars with problem headlights. Almost all owners note a significant decrease in light after a YEAR! operation. Many people blame dead lamps or scratched glass, but the problem is completely different.
Like many Toyota Avensis cars, it was equipped with both halogen and xenon headlights. We have developed 3 options for converting headlights on Toyota Avensis . It doesn’t matter what configuration the car was originally equipped with, xenon or halogen, the headlights can be upgraded in any case, based on the Customer’s requirements. Conversion options are possible for both the restyled version of the Toyota Avensis and the pre-restyling version. We suggest installing 3 types of modules: Hella FF DE 60mm monohalogen module, Hella R or Hella 3R bi-xenon module.
In the first chapter we will talk about the standard headlights of the restyled version of the Toyota Avensis 2006+.
So, before us are the standard headlights of Toyota Avensis 2006+. In the case of standard halogen headlights, we offer 3 options for upgrading Avensis headlights: replacement with a Hella FF DE 60mm halogen module and replacement with a Hella R or Hella 3R bilens.
Remaking and repairing Toyota Avensis headlights takes a minimum of time and money and is based on the principle of an adapter frame, which allows you to fix the module into the standard headlight holes. How is the module replaced?! We have designed a so-called bracket for a Toyota Avensis headlight, which allows you to replace the standard module with a Hella 3R bimodule with minimal difficulty and expense. The second photo on the left shows a computer model of this frame.
The brackets are made of two millimeter steel using laser cutting. From this we can conclude that the accuracy is achieved on the order of 0.1-0.2mm. This accuracy is necessary to ensure that the module has minimal deviations from the horizon. Having this bracket, you can independently replace the Toyota Avensis lens with a Hella 3R bi-xenon lens without any skills; you just need to know the basic concepts and terms for independently remaking headlights ( retrofit
). Powder coating gives the frame a more aesthetic appearance and protects against corrosion.
Options
Interior with fabric trim and without monitor
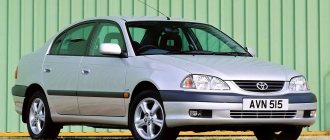
The second generation Toyota Avensis was offered in three trim levels: Sol, Terra, Lux. The basic version included:
- front and rear foglights;
- headlight washer system;
- electrically adjustable exterior mirrors, heated and painted to match the body color;
- heated rear window;
- door handles in body color;
- steering wheel position adjuster;
- halogen lamps in headlights;
- wooden spacer in the interior;
- fabric upholstery;
- electric windows;
- heated front seats;
- electrically adjustable front seats;
- cruise control, ABS, TCS, EBD, ESP;
- on-board computer;
- car radio with the function of listening to cassettes and CDs.
All trim levels included the installation of a full set of airbags. In the maximum configuration of the 2006 Avensis, fabric upholstery was replaced with leather. The BAS system has been added. Halogen headlights have been replaced with xenon ones. A duplicate turn signal was mounted in the side mirrors. An electric trunk drive and rain sensors are installed.
Low beam bulb Toyota Avensis 2007
Today the bulb in the low beam lens in the left headlight burned out. Very unpleasant: I looked at the headlights when cleaning the throttle valve and was not particularly happy, assessing the possible hemorrhoids with replacing the lamps. Anyway…
After searching for information on the Internet, I found that the low beam lenses contain lamps with an H7 base. If this is really the case, I am incredibly happy, because I have as many as 4 Osram Night Breaker lamps.
OSRAM Night Breaker Unlimited® is the brightest car lamp in the world!
OSRAM offers the world's brightest halogen automotive lamps in low light conditions. The new lamps are even more efficient: Night Breaker Unlimited lamps now provide up to 110% more light compared to standard halogen lamps.
Benefits: NIGHT BREAKER UNLIMITED
110% more light on the road1) Light cone is 40m longer1) 20% whiter light1) Silver cap and contacts - visual difference between NBU and NBL Color temperature up to 4000K with the same service life2) Wide range: H1, H3, H4, H7, H11, HB3, HB4 Made in Germany
And even though this is a copy-paste from some online store, I can say from personal experience that these lamps are very good. How sooooo bad the light is on the Audi A6 C5, and how these lamps improved the situation... I’m thinking, if my Avensis really has H7 lamps, then I’ll improve the light on it by simply replacing it with Osram... Yes, they are a little expensive, but they are definitely pay for their cost.
And also, dear Avensis drivers, share your experience:
1. What kind of lamps are on the main beam? 2. What is the easiest way to get to the light bulbs without breaking or messing up anything?
Toyota Avensis T27, like the previous generation, is available in two types - with near xenon and halogen. For these two models, all the lamps are the same, except for the low beam lamps. I will tell you about which lamps are installed in Avensis in this article.
Minuses
Despite the positive characteristics of the second generation Avensis, it was not without its drawbacks. Among them are:
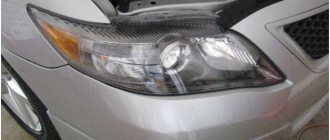
- Fogging of the headlights is observed, which negatively affects their illuminating ability. Moreover, after three years of using the car, the reflector mirror often falls off;
- Seat padding and upholstery lose their original appearance after a mileage of 100,000 km;
- Small resource of the worm pair of electric power steering, approximately 50,000 km;
- Increased oil consumption on engines from 2003 to 2005. For Toyota Avensis models since 2006, this problem has been eliminated;
- The fastidiousness of diesel engines to the quality of the fuel used;
- A common problem with manual transmissions is failure of the primary and secondary shaft bearings. As a rule, after 60,000 - 100,000 km they begin to hum. Delaying repairs can lead to detrimental consequences;
- Problems with struts and front stabilizer bushings arise when the car runs from 20,000 to 40,000 km.
Which lamps to choose for low beam on Avensis
So, if you have H11 halogen in your neighbor, the following lamps will suit you
Lamps H11 Standard
- VALEO H11-12-55 Standart 032525 from 450 rub.
- PHILIPS H11-12-55 +30% Vision 12362PRC1 from 450 rub.
- KOITO H11-12-55 0110K from 450 rub.
- GE H11-12-55 53110 from 490 rub.
- MTF H11-12-55 +30% Standard Long Life HS1211 from 300 rub.
- OSRAM H11-12-55 64211 from 470 rub.
Long life H11 lamps
- OSRAM H11-12-55 +60% SILVERSTAR 2.0 (2x resource) from 1300 rub.
- NARVA H11-12-55 LONG LIFE 48078LL from 490 rub.
- PHILIPS H11-12-55 LLECO VISION 12362LLECOC1 from 550 rub.
H11 lamps with increased brightness
- DiaLUCH H11-12-55 +90% PGJ19-2 Megalight Ultra PR from 850 rub.
- KOITO H11-12-55 W (100 W) Other Brand price per set from 2000 rub.
- OSRAM H11-12-55 +110% NIGHT BREAKER UNLIMITED from 1700 RUR set.
When choosing lamps for low beam H11, you should determine for yourself which lamps you need: ones that shine brightly and last a long time, or standard lamps.
Standard xenon lamps D4S
- Osram D4S Xenarc Original from RUB 2,400
- MTF-Light D4S Xenon - SBD4S4 from 1500 RUR
- Osram D4S Xenarc Night Breaker Unlimited (+70%) — 66440XNB from 3300 RUR
- Philips D4S Xenon Vision - 42402VIC1 from RUB 3,300
- Osram D4S Xenarc Ultra Life - 66440ULT from RUB 3,000 - with extended service life
- Koito D4S Xenon - 3510K from 3500 RUR
Note that lamps with increased brightness are not only halogen. Famous manufacturers such as Philips and Osram have also developed standard xenon lamps that shine brighter than standard ones or last longer than standard ones. It’s true that their price is not low.
Similar articles:
Share “Lamps used in Toyota Avensis T27”
How to remove optics from Toyota Avensis
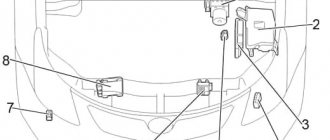
Most car owners who are directly faced with the problem of automotive lighting are interested in how to remove headlights from a Toyota Avensis? In fact, you can do the dismantling yourself, without special skills, and without the need to contact a car service technician. It is impossible to remove the optics from the Avensis without dismantling the front bumper, which complicates the process, however, the procedure can be performed independently.
Under the hood, use a flat-head screwdriver to remove the clips, thus gaining access to the necessary fixing screws. Using a 10mm wrench, remove 7 bolts above the headlights and 3 bolts in the middle. It is necessary to turn the steering wheel in advance so as to gain comfortable access to the lower part of the front bumper, and also disconnect the fender liner from the bumper.
After unscrewing the bolts and clips, you need to grab the edge of the bumper and pull the wheels to the side in order to remove them from the latches. In the future, when installing, it is recommended to cover the pulled sides of the bumper so as not to damage the paintwork.
After disconnecting the bumper, we gain access to the optics, which can be easily removed by simultaneously pressing the latch and latch with two flat-head screwdrivers. Then you need to turn off the power and carefully and safely remove the element.
Toyota Avensis Club • Cleaning and disassembling headlights
Toyota Avensis Club • Cleaning and disassembling headlights
Disassembling Toyota Avensis Optics
How to remove the headlight and how to open it. Next we prepare for installation. Carefully insert your hand into the hole between the radiator and the grille.
How to remove headlights on a Toyota Avensis model year. Pavel Pahan. 4 viewsthree years ago.
The support for “landing” the lower mount of the headlight is attached to the engine spar. The same support is larger and the direction of movement of the headlight is for removal from it. Carefully insert your hand into the hole between the radiator and the grille.
Paper does not burn at this temperature - there is no need to be afraid. The plastic parts of the headlight itself do not “float” yet when... Repairing the front bumper of a Toyota Avensis requires removing the bumper. I often encounter strange questions, such as how to open the hood.
After this, it should quickly and easily be removed from the car.
Disconnect the terminal on the front camera. Take the screwdriver again and remove the bugs from the entire surface of the bumper.
Don't forget about the fastenings on the sides of the device. Then you can easily remove the bumper from the side grooves of the body. We do not pull it out completely, but only lower it to remove the headlights, which are secured with three bolts.
We unscrew them and take out the headlights one by one, simultaneously disconnecting all the wires from them. In my case, there were slight difficulties with changing the position of the ignition unit.
The bugbear could not get through the crack of the headlight to the lamp.
Only then did it dawn on me that the block should be disassembled and only the cable with fastening should be left. He went inside perfectly.
DIY car repair and maintenance
Paper does not burn at this temperature - there is no need to be afraid. It is more convenient to start from the sharpest corner. The sealant will be very thick and the stretching process will be slow - it will be applied in increments of 0.5...1mm.
It’s interesting that a few minutes after taking it out of the oven, the outer plastic will have cooled down and you can pick it up and pull it with your hands, and the sealant will still be plastic for a few more minutes. Place the headlight back in the oven for the same 6...8 minutes, maybe 5...7, if it has not cooled down yet, and continue to pull it further.
Disassembling Toyota Avensis Optics
But this was the first time. If you “get your hands on it”, you can probably heat it up faster, longer, a little higher temperature, pull it out more boldly..., but this is for professionals: Carefully inspect both grooves - there should be no places free from sealant. Otherwise, after assembly, water will creep through them and the headlight will sweat.
If there are such places, try to apply sealant in them at least a little from those places where there is a lot of it from the corners, preheating it.
Professionals do not recommend adding foreign sealant, especially silicone - the fumes from it can seem to corrode the coating of the reflector on the plastic. Do not wipe glass or plastic reflective surfaces with anything like alcohol, etc.! Alcohol corrodes transparent plastic and makes it cloudy. Only soft cloths and water.
The halves can move relative to each other within the grooves by 1...2 mm - when pressing, you need to move them so that the tightening screws can then be tightened. Unscrew the bolts and screws that secure the headlight.
How to remove a headlight on a Toyota Avensis?
Next, turn the steering wheel so that the wheel does not interfere with access to the bottom of the bumper. At this point the fender liner is connected to the bumper and we need to unscrew this connection. Now, make sure that all the bolts, clips and screws are unscrewed and the bumper is held in place only by the latches. We grab the edge of the bumper and carefully pull it towards the wheel and at the same time towards ourselves and remove the bumper from the latches.
To avoid damaging the paintwork when working and removing headlights, I recommend using rags or towels to cover the loose edges of the bumper. As shown in the photo.
We slightly pull back the edge of the bumper and gain access to the last latch that secures the headlight.
Covering the reflector with foil
When the low beam is no longer pleasing to the driver, it is possible to restore the lighting by covering the reflector with foil. This operation is also easy to do with your own hands.
First of all, you need to purchase a suitable sealant for gluing the block together after finishing the work. The sealant softens in the oven in 5 minutes at a temperature of 80 degrees. After dismantling the headlight unit, it is necessary to disassemble the lens and cover the burnt-out reflector from the inside with ordinary foil.
After assembling the optics, gluing them together with sealant, we mount the headlight units in place and enjoy the noticeably brighter low beam.
Adjustment
As a rule, the manufacturer does not set a regular period for checking automotive optics, since the need for such a procedure directly depends on the operating conditions of the vehicle. Adjusting Toyota headlights is necessary when problems with low beam significantly interfere with the driver. You can adjust Avensis optics on your own, without special skills and experience, as well as expensive tools. It is worth noting, however, that adjustment at a car service center is a relatively low-cost service. It is possible to use equipment that simplifies the adjustment process, however, specialized equipment costs a lot, as a result of which most people tend to manually adjust headlights.
It is necessary to fill the fuel tank and check the tire pressure, and also park the car on a flat surface. In addition, you should check the optics for damage, and before starting the adjustment, take the driver’s seat with a load corresponding to its weight. The adjustment itself should be made exclusively for the low beam, however, after completing the work, check the effectiveness of the high beam headlights.
In front of the car, vertical lines should be drawn on a flat wall, dividing the drawing into two squares in the upper corners and two rectangles below them. And also horizontally divide the central part into small (top) and large (bottom) rectangles. The car should be placed directly in front of the wall, start the engine and adjust the headlights using the adjusting screws so that the beams of light fall on the desired areas of the drawing.
Checking and adjusting optics on Toyota Corolla
First of all, let's start the engine. After this, we turn on the optics and check whether the boundary lines of light coincide with the lines on whatman paper. We do everything exactly as indicated in the diagram below.
You only need to adjust one beam of light, either the high beam or the low beam - this is due to the fact that the optics are a single unit, where adjusting one parameter automatically adjusts the second parameter.
To adjust vertically, we need to turn the screw, which is located on the optics, exactly in the same place as indicated in the photo.
Adjustments must be made using a screwdriver. It is necessary to adjust in accordance with the above scheme, where it is necessary to achieve correspondence in the lines of light with the lines on whatman paper.
The screw turns clockwise, but if the headlights are turned up too high, the screw must be unscrewed slightly.
Having adjusted the vertical glow, we move on to horizontal adjustment. Again, using a screwdriver, we adjust by tightening another screw, the location of which is indicated in the figure.
Having adjusted the horizontal according to whatman paper, the process of adjusting the head optics can be considered complete. We roll up the Whatman paper, but don’t throw it away. Perhaps it will be useful to you or your friends. Whether the process is complex or not is up to you to judge, but there is no denying that you will have to try to do everything right.
Top