Payment for goods and downloading of the book in electronic form (PDF format) is made on the website.
To do this, you need to find the book you are interested in and click on the “Buy” button. The price of the book is indicated on the button.
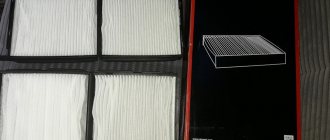
For convenience, the price on the website for residents of Russia, Belarus and Kazakhstan is presented in rubles.
For residents of Ukraine in hryvnias, and for all other countries - dollars.
After clicking on the “BUY” button, a payment window will open where you can select a payment system with which you can pay for the selected book using any bank card (Visa, MasterCard, MIR, etc.)
When you click on the “Pay by bank card” button, the Portmone payment system will open, which is the easiest way to make a payment.
In addition, the website offers four payment systems for payment:
- Yandex (payment from any bank cards, Yandex Money account, QIWI Wallet, terminals, etc.);
- Portmone (payment from any bank cards, Portmone account);
- PayPal (payment from any bank cards, PayPal account);
- WebMoney (payment from any bank cards, payment from WebMoney wallets).
Payment via Yandex Cashier
After selecting payment via Yandex, the Yandex Cashier payment system will launch, where you need to select a convenient payment method (bank card, QIWI, Yandex Money account, etc.)
After specifying payment details and confirming payment, payment for the goods will occur.
If you have a bank card in a currency other than the ruble, then the money will be debited from the card at the rate of the Central Bank of Russia at the time of the purchase.
This payment method is optimal for residents of Russia, Kazakhstan and Belarus.
Official website of the Yandex Kassa payment system https://kassa.yandex.ru
How to remove a Toyota Fielder hub
I'm working out a step-by-step analysis procedure.
Since September, the front wheel bearing began to hum, I kept dragging and pulling to replace it, because... My friend and I were planning to buy a press (the reason for the purchase: it will still be useful on the farm and “stop feeding car repair shops”). And now, finally, the press has been purchased, all that remains is to remove the steering knuckle, press out the bearing and press in a new one.
1. An incomplete set of tools that are necessary for this task (this does not include pliers, screwdrivers, chisels, and a grinder.)
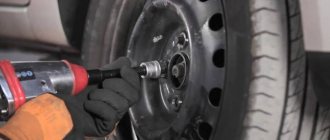
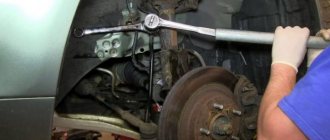
2. First, loosen the hub nut; for this you need a 32 head with a deep bottom (the standard head that was included in the kit did not fit, I bought it for 350 rubles (SATA)).
3. Raise the car with a jack and don’t forget to put up insurance.
5. Unscrew the 2 bolts of the brake caliper using a 17mm wrench.
6. Take an aluminum wire, screw one end onto the spring and fix the caliper with the other end.
7. Then remove the brake disc.
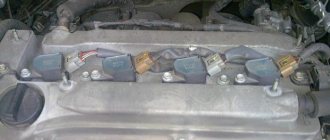
8. Unscrew the ABS sensor with a 10mm head.
9. Next comes the ball joint, 2 nuts and 1 bolt.
10. Steering rod. We take out the cotter pin with pliers and unscrew the nut.
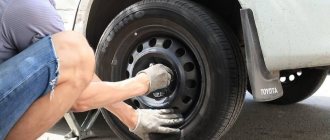
11. Now unscrew the hub nut.
12. All that remains is to unscrew the 2 steering knuckle nuts that are attached to the strut.
13. Well, that's all, the steering knuckle is separated from the drive.
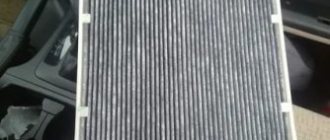
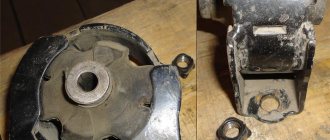
14.Well, here is the bearing itself in the steering knuckle. All that remains is to press it out and press in a new one.
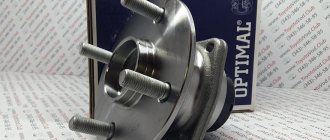
15. A new wheel bearing was purchased for 1600 rubles, and there were also Chinese ones for 800 rubles.
I installed this bearing on the left wheel for 1600 rubles. (koyo), and on the right Chinese one for 800 rubles. (NSK), let's see who can hold out longer.
16. Let's begin the procedure of pressing the bearing out of the steering knuckle. First, remove the retaining ring. The book says to use special tools, but pliers and a screwdriver will do.
17. First, we separate the hub itself from the steering knuckle. We find a pipe of suitable diameter and get to work.
But here again there is an ambush, the inner ring of the bearing remains in the hub; in order to pull it out, a puller is required. But I don’t have a puller, I’ll have to do it differently. We take a grinder and carefully make a notch on the bearing ring.
20. Let's return to the steering knuckle. Using a 10mm wrench, remove the protective casing so that it does not interfere with the pressing process in the future.
21. Turn it over, find a washer of suitable diameter and press it out.
23. It’s time for a new bearing. Turn the steering knuckle over and press it in.
24. We put back the retaining ring, and do not forget to screw on the protective casing, and then insert the hub.
25. Well, that’s all, the bearing is in place.
Source
Payment via Portmone
After selecting payment through Portmone, the payment system will launch, where you need to select the payment method: bank card or Portmone account.
The price in the Portmone payment system is converted into dollars at the exchange rate of the Central Bank of the country where you are located.
If you have a bank card in a currency other than the dollar, then the money will be debited from the card at the rate of the Central Bank of your country at the time of the purchase.
After specifying payment details and confirming payment, payment for the goods will occur.
Official website of the Portmone payment system https://www.portmone.com
Signs of a part failure
The main sign of imminent bearing failure is a hum when driving. It buzzes from the side where the element begins to break. There may also be wheel play. True, it is difficult to notice it on your own when moving. Therefore, if something buzzes, you need to make a sharp turn at a speed of no more than 15 km/h. If the sound disappears, the faulty part is on the other side. In this case, you should turn in the other direction to confirm your guesses.
The best way to determine a breakdown is to lift the car on a lift and spin the wheels on each side. A booming sound will indicate exactly where it broke.
In particularly advanced cases, the driver may hear a grinding and crunching sound while driving. This indicates that the wheel may be about to fall off, and the bearing has completely fallen apart. In such a situation, further movement is prohibited. Therefore, it is better not to let it come to this, but to change the part much earlier, at the first manifestation of the hum.
Payment via PayPal
After selecting payment via PayPal, the PayPal payment system will launch, where you need to select the payment method: bank card or PayPal account.
If you already have a PayPal account, then you need to log into it and make a payment.
If you do not have a PayPal account and you want to pay using a bank card via PayPal, you need to click on the “Create an Account” button - shown with an arrow in the picture.
PayPal will then prompt you to select your country and provide your credit card information.
After specifying the information required to make the payment, you must click on the “Pay Now” button.
Official website of the PayPal payment system https://www.paypal.com
Payment via WebMoney
After selecting payment via WebMoney, the payment system will launch, where you need to select the payment method: bank card or WebMoney wallet.
If you already have a WebMoney wallet, then you need to log into it and make a payment.
If you do not have a WebMoney wallet and you want to pay in another way, you need to select any of the methods that WebMoney offers and make the payment
After specifying payment details and confirming payment, payment for the goods will occur.
Official website of the WebMoney payment system https://www.webmoney.ru/
Downloading a book
After successfully completing the payment (by any method) and returning to the KrutilVertel store from the payment system website, you will be taken to the successful payment page:
On this page you need to indicate your e-mail, where access to download the book will be sent.
If you are already registered on our website, then simply follow the link to your personal account.
The book you purchased will be in your personal account, from where you can always download it.
Please note that after making the payment, you need to return back from the payment system website to the KrutilVertel website.
If for some reason you did not return back to the site and closed the payment system tab with a message about the successful completion of the payment, please let us know - we will send you a letter indicating access to download the book.
What to prepare for dismantling?
If you are sure that the part needs to be removed, then stock up on the following tools:
- a set of socket wrenches, and it is advisable that it be supplemented with a long pipe;
- passages, they are necessary in order to remove the locking rings;
- a spanner wrench, with its help the guide pins of the brake drum are unscrewed;
- a wooden block to soften the blow;
- hammer;
- pry bar and chisel.
It is worth considering that by contacting a service station you will not always receive guaranteed quality work. And an incorrectly replaced bearing will fail quite quickly, so it’s quite possible to dismantle this part yourself, and no one will worry about your “iron horse” better than you yourself. So that you don't feel shy, we offer detailed instructions.
Problems when paying with bank cards
Sometimes difficulties may arise when paying with Visa/MasterCard bank cards. The most common of them:
- There is a restriction on the card for paying for online purchases
- A plastic card is not intended for making payments online.
- The plastic card is not activated for making payments online.
- There are not enough funds on the plastic card.
In order to solve these problems, you need to call or write to the technical support of the bank where you are served. Bank specialists will help you resolve them and make payments.
That's basically it. The entire process of paying for a book in PDF format on car repair on our website takes 1-2 minutes.
If you still have any questions, you can ask them using the feedback form, or write us an email at [email protected]
Rear hub assembly with bearing - removal and installation
Attention! Dust generated during brake operation may contain carcinogenic asbestos, which is hazardous to health. Do not blow it out with compressed air or inhale it. When working on the brakes, wear a respirator. Do not wash mechanisms with petroleum-based solvents - there are special liquids for this.
Removal
1. On all-wheel drive (4WD) models, loosen the drive shaft/hub nut of the appropriate wheel (see Chapter 8).
2. Loosen the nuts on the appropriate wheel, raise the rear of the vehicle, install secure jackstands, and chock the front wheels to prevent the vehicle from rolling off the jackstands. Remove the wheel.
3. Remove the brake drum (see Chapter 9). On 1996 and 1997 models and pre-2000 4WD models, remove the brake pads, disconnect the parking brake cable from the brake guard, and disconnect the brake line from the wheel cylinder (see Chapter 9).
4. On 4WD models, remove the rear drive shaft (see Chapter 8).
5. Unscrew the four bolts securing the hub to the trailing arm of the suspension (models up to 2000) or nuts (models from 2001). The bolts (nuts) can be accessed by rotating the hub flange so that the large circular cutouts in the flange are positioned opposite each bolt (nut) (see Figure 13.5).
Rice. 13.5. Turn the hub flange until the holes on the flange align with the bolts (nuts)
6. Remove the hub and bearing assembly. On 1996 and 1997 models and 4WD models up to 2000, the hub assembly is removed along with the brake shield. If you are working with a model
2. WD1998-2000, tighten one of the mounting bolts to secure the brake shield in place.
7. On 1996 or 1997 models and pre-2000 4WD models, the hub can be removed from the bearing to replace the bearing. Since this will require special tools, seek help from a professional auto repair shop, where they will press the old bearing out of the hub assembly and press in a new one (the hub itself can be reused if it is in good condition). On all other models, the rear hub and bearing assembly is replaced with a completely single unit. Note. If you are working on a 2W0 model from 2001 equipped with an ABS system, remove the ABS wheel speed sensor from the old hub and replace it with the new one (see Chapter 9).
Installation
8. Install the rear hub and bearing assembly onto the trailing arm. Screw in all bolts (nuts), then tighten them to the specified torque.
9. On 1996 and 1997 models and pre-2000 4WD models, install the brake pads and connect the brake line to the slave cylinder (see Chapter 9).
10. If you are working with a 4WD model, install the drive shaft (see Chapter 8).
11. Install the brake drum and wheel.
12. On 1996 and 1997 models and pre-2000 4WD models, bleed the brakes (see Chapter 9).
13. Lower the car and tighten the wheel nuts to the torque prescribed in the Specifications. If you are working on a 4WD model, tighten the driveshaft/hub nut to the specified torque in Chapter 8 Specifications, then install a new cotter pin.