For many cars, especially those made in Japan, the wheels are attached to the hub using nuts placed on studs. And they are an endless headache for both car owners and tire fitters, since they break not only while driving, but also when the wheels are unscrewed to change shoes. We won’t find out who is to blame for this, but we’ll just figure out how to change the stud on the front wheel of a Toyota.
Removing a wheel from a Toyota
Can I replace it myself?
Most car owners prefer to replace the hub stud themselves. This is done as follows:
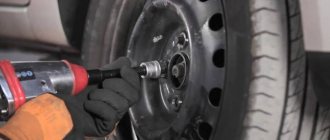
- We remove the front wheel from the car.
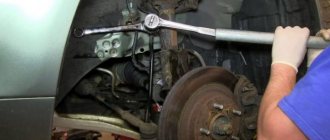
- Remove the lower caliper bolt.
- We lower the upper caliper bolt so that in the future it will be possible to raise it.
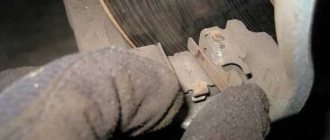
- We take out the old pin or part of it.
- Install a new stud and tighten it with a nut.
- We fix the caliper in place.
- Install the wheel.
Installation of non-original studs may vary slightly. Usually the necessary materials and instructions are supplied in the kit.
What is the price?
The Toyota Corolla hub stud can hardly be called an expensive spare part. Even an original hairpin costs only 200 rubles, let alone analogues, the price of which starts at 50 rubles apiece. You can buy a stud for the Toyota Corolla 150 and Spasio at the same prices. For cars produced in 2007, 2008, the price is no different.
If the reason for replacing the stud is its failure, it is recommended to purchase original Toyota Corolla wheel studs.
As for non-original studs, they usually differ in length from the factory ones. Before purchasing such a stud, it is better to consult with the seller and clarify whether it is suitable for your car. Usually there are no problems when installing them.
Precautions for use
The hub stud cannot be called an element particularly susceptible to damage. The main cause of broken studs is that the bolts are over-tightened when installing the wheel. Take this moment carefully. When installing wheels, maintain a balance between securing them firmly and tightening the bolts.
Perhaps this is the case when you should not completely trust tire service employees, since their qualifications are not always high. There are even would-be craftsmen who tighten secret bolts with a “pistol.”
The consequence of overtightened bolts can be damage not only to the stud, but also to the hub itself. In this case, repairs will cost significantly more than several hundred rubles.
Preparing for work
- To successfully complete the replacement work, you need a garage or box, preferably closed, and in winter also heated. No, of course, our craftsmen can perform the procedure simply on the asphalt in the yard. But it’s better to choose more comfortable conditions;
- Also, it would be a good idea to thoroughly wash the dirt from underneath the car if it is stuck and dry (at least do this with the wheel on which you are going to change this spare part);
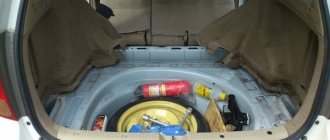
- Of course, you will also need a new pin itself (or pins, if several of them have fallen off). It must be selected from the catalogue. In our case it will be No. 90942-02049. You can take an analogue - No. 90942-02081, which will also work. The part is inexpensive. After purchasing the stud, you can begin to carry out the main work.
Preparatory stage
Of course, you don’t have to worry about how to properly swap wheels, but simply entrust this work to specialists in a car service center. But you should remember that:
- this kind of work costs money;
- there is no guarantee that the technician will make the replacement correctly;
- You will always have to contact the same car service center.
Meanwhile, you can do everything yourself. In order to rotate the wheels technically competently, to perform all operations independently, without resorting to the services of a car service, it is necessary to carry out certain preparatory measures:
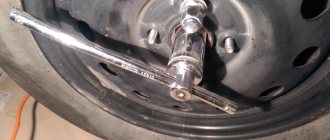
- We prepare the necessary tools: a jack, a stand, a wheel wrench.
- We place the car on a flat surface with a hard surface.
- Selecting the correct permutation scheme.
If you have a little practical experience, changing wheels from a set of tires will take 1.5-2 hours, no more.
Cases of replacing a Toyota Corolla hub stud
The hub stud is usually changed in two cases:
- It was damaged when changing wheels.
- Installation of non-original rims that require a longer stud.
What kind of studs are installed on a Toyota Corolla?
Which studs to choose depends on the specific situation. If you are installing new disks for which the stud is not suitable, the choice should be made according to the characteristics of the disks. If you damage an old stud, it is recommended to purchase original Toyota spare parts, as they are considered to be of higher quality and more durable.
This section is not under development
autodelo. info
autodelo. info Passenger Motorcycles Trucks and Commercial Engines
- For novice drivers
- Code of Administrative Offenses
- Region codes
- Legal issues
- Insurance
- Adviсe
- News
- Test Drive
- Interesting
- Online services
Sorry…
To main
- about the project
- Rules
- Contacts
“Car catalog and all the news from the world of car lovers”
Catalog
ALFA ROMEO AUTO UNION AUDI AUSTIN BEDFORD BMW CHRYSLER CITROËN DAF DAIHATSU DAIMLER DODGE FIAT FORD GMC HONDA INNOCENTI ISUZU IVECO JAGUAR LADA (VAZ) LANCIA MAN MAZDA MERCEDES-BENZ MG MITSUBISHI MORRIS NISSAN NSU OPEL PEUGEOT PORSCHE RENAULT ROVER SA AB SEAT SKODA SUBARU SUZUKI TALBOT TOYOTA TRIUMPH VAUXHALL VOLVO VOLKSWAGEN ZASTAVA AVIA BARKAS BORGWARD CHEVROLET DACIA EBRO GAZ SANTANA SSANGYONG STEYR TATA PIAGGIO HYUNDAI KIA DAEWOO WARTBURG TRABANT AC RENAULT TRUCKS FERRARI LAMBORGHINI ROLLS-ROYCE MASERATI RELIANT PONTIAC FSO FORD USA PROTON BUGATTI AUTOBIANCHI HOLDEN LOTUS MORGAN FORD OTOSAN ALPINE GLAS MOSKVICH BENTLEY BUICK CADILLAC GEO LEXUS MEGA PLYMOUTH PREMIER TVR ALPINA ASIA MOTORS ASTON MARTIN JEEP WESTFIELD SMART ZAZ OLDSMOBILE LINCOLN MAHINDRA ARO LDV AIXAM BERTONE BITTER BRISTOL CALLAWAY CARBODIES CATERHAM CHECKER DALLAS DE LOREAN DE TOMASO GINETTA HINDUSTAN HOBBYCAR ACURA HUMMER INDIGO IRMSCHER ISDERA JENSEN LIGIER MARCOS MCLAREN METROCAB MIDDLEBRIDGE MINELLI MINI INFINITI OLTCIT OSCA PANOZ PANTHER PAYKAN PERODUA RANGER RAYTON FISSORE BOND AUSTIN-HEALEY RILEY WOLSELEY SAO SHELBY SIPANI SPECTRE STANDARD TOFAS UAZ UMM VECTOR WIESMANN YULON PUCH LAND ROVER MAYBACH ASHOK LEYLAND ASKAM (FARGO/DESOTO) AMC LANDWIND (JMC) GEELY SUN BEAM SPYKER KTM HILLMAN YUGO DONGFENG ( DFAC) EUNOS FORD ASIA / OCEANIA FOTON GREAT WALL MITSUOKA PININFARINA LTI IRAN KHODRO (IKCO) FPV MAXUS (SAIC MOTOR) TESLA TAZZARI ARTEGA THINK NOBLE FISKER KING LONG ABARTH MIA DS (CAPSA) STREETSCOOTER RUF MICROCAR DFSK DS ZENOS CARS IZH
autodelo. info
autodelo. info Passenger Motorcycles Trucks and Commercial Engines
- Traffic rules
- Code of Administrative Offenses
- Region codes
- Legal issues
- Adviсe
- News
- Reviews
- Interesting
- Online services
How to change the front wheel bearing Matiz 0.8
Preparatory operations for repairing the hub assembly:
- Place the car on a flat surface, provide lighting;
- Engage first gear, release the handbrake;
- Install wheel chocks under the rear chassis;
- Clean the wheel or mechanism being repaired from dirt;
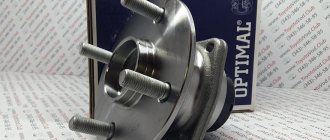
- Familiarize yourself with the structure and location of wheel roller bearings in the mechanism, as well as the part numbers:
- Prepare a set of tools according to the list:
- A set of wrenches and sockets with a ratchet; - A pipe for extending the wrench; - A vice - A jack; - A screwdriver, pliers; - A mandrel or socket head with an outer diameter of 37-40 mm. - Hammer, chisel. — A torque wrench for tightening the hub nut to the required torque.
Instructions for removing and replacing the old wheel bearing
- First, loosen the wheel bolts, then remove the hub locknut.
- Then we lift the car with a jack, install a support under the body, for the safety of work.
- We immediately move on to dismantling the brake caliper. Find the two caliper mounting bolts and unscrew them.
- Now we disconnect the brake hose, which is held on a special mount at the rack.
- We remove the ABS sensor plug (if equipped), then remove the brake caliper. Place it aside so that it does not interfere with further disassembly.
- Then unscrew the hub nut completely.
- We move on to the steering tip, using pliers, remove the cotter pin nut.
- Now unscrew the tip nut, having previously treated it with penetrating lubricant (WD-40).
- Then we will use a tip remover to press it out.
- Using the installed device, we compress the steering tip mount.
- Loosen the fastening of the ball joint with the pin.
- Now use a screwdriver to open the connection and disconnect the fist from the ball.
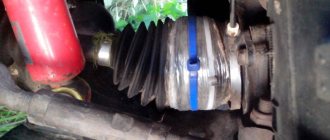
- The removed rotary housing contains our faulty roller bearing, which needs to be removed and replaced. First, use a screwdriver to remove the dirt seal.
- Now we knock the hub out of the rotating mechanism using a mandrel with a hammer. The internal components of the product (separator with rollers) will remain on the trunnion.
- We remove the small ring of the tapered roller bearing, clamp the hub in a vice, and then use a claw puller (or cage puller) to pull it off the axle.
- We remove the internal component of the second roller bearing, already from the rotary block, it can be removed easily.
- The external components of the product will remain in the rotating mechanism; they are clamped by the fit.
- If you don’t have a cup puller and a press, then use a chisel to remove the clips, trying not to damage the seating surface inside.
Causes of failure
Failures of these fasteners are not uncommon (especially on cars with frequent tire changes). Other reasons:
- installation work with violations of technological processes;
- refusal of the car owner to perform maintenance and lack of proper care;
- the appearance of abrasive plaque;
- Incorrectly installed wheel rim.
Fasteners can break or become deformed due to overtightening or, conversely, poor tightening. In addition, its thread may be stripped. Most often, replacing the stud is required on the Toyota front wheel hub, since it is subject to thermal stress due to heating of the brake pad.
Toyota Corolla 2008 l. With. - with your own hands
Krasnodar
Toyota Corolla, 2007
475 000 ₽
Barnaul
Toyota Corolla, 2007
475 000 ₽
Astrakhan
Toyota Corolla, 2010
610 000 ₽
Naberezhnye Chelny
Toyota Corolla, 2012
670 000 ₽
See more cars on Drome
Participate in the discussion can only registered users.
Login Register
What is a car wheel made of?
One of the greatest inventions of mankind is the wheel. Created thousands of years ago, it opened the way to other discoveries, to development, to progress. If there were no wheel, there would be nothing that we call mechanisms, since they are all built on rotation technology.
And, of course, without wheels there would be no car. The wheel receives the torque of the motor, causing the vehicle to move. Despite their apparent simplicity, the wheels are quite complex. The basis is the disk. At the moment there are three types of disks.
- Stamped ones, which, although simple in appearance, have important qualities: reliability, durability, wear resistance, endurance.
- Alloy wheels. Much more aesthetically pleasing than the previous ones, and are installed on most modern foreign cars, but they are not as strong as stamped ones.
- Forged are the latest development, not yet fully studied. Such discs are beautiful and strong, but expensive; this fact prevents the forged disc design from occupying a niche of mass consumption.
The second element of the wheel is the tire. Tires come in two types: tubed and tubeless. Chamber ones are outdated; they were used in the first models of cars. In Russia they were used until the mid-twentieth century. A tube tire consists of a chamber that is filled with air inside.
It is important that the chamber holds this air. When the seal is compromised, the tire is no longer effective.
The disadvantage of a tubed tire is that it is very unreliable because a puncture can happen at any time. Tubeless (there is another name - tire) in this regard is much stronger and more practical. There are so-called sealing elements here. Air is pumped between the disc and tire.
The foundation of the tire is a metal frame, cord. In appearance, the cord resembles lace made of thin metal wire. The cord has an important function - it relieves pressure from the inside of the tire, which arises as a result of powerful pressure from the outside during high-speed driving.
There are two types of cords: with threads located diagonally and threads located radially. These two types have both advantages and disadvantages and are used based on the specific driving situation. For example, radial threads are arranged perpendicularly, which guarantees reliable adhesion to the road surface, but they are very sensitive to road imperfections, and this is their disadvantage.
So, the wheel consists of a cord, sidewalls, beads and a tread, the pattern of which determines the quality of road grip, vehicle handling and its dynamics. The tire is put on the disk to the wheel hub. The hub is a kind of column that supports a complex massive structure.
When it or associated parts like a stud suddenly fail, break or even become slightly deformed, the wheel becomes a potential hazard that can cause the vehicle to lose control. Let's look at how to repair a wheel stud.
A little about the reasons
If a wheel or tire is damaged (read the article for what pressure should be in a Gazelle Next tire), or the tires are changed seasonally, you have to remove the wheel to make repairs. But for cars whose wheels are secured with nuts, such as the Gazelle Next, they often have another problem added to them - a broken wheel stud.
Broken hairpin
- Most often this happens due to excessive tightening during installation.
- On the other hand, if the nuts are not tightened well, they can become stuck, and when you try to unscrew such a nut, the stud breaks off. Vicious circle.
- To avoid claims from car owners, it comes to the point that tire fitters sometimes offer the client to remove the wheel fasteners themselves. Accordingly, if you break a pin yourself, buy a new one yourself.
- However, the studs are not always damaged when the nuts are unscrewed; there are other reasons. For example, when a wheel hits a hole, a sudden force can cut off a stud like a knife - and sometimes not even one, but several at once. Such things rarely happen with bolts.
- Also, due to an impact on the disk, the seat for the nut may be deformed, which loses its correct geometry and becomes oval instead of round. This can provoke repeated breakages of the studs, which will continue until a defect is discovered.
The replacement process itself
- Loosen the nuts securing the wheel and jack up the car. Completely unscrew and remove the wheel. We place it under the bottom of the car near the front end to provide insurance against a possible fall of the car from the jack. By the way, it is advisable to have a more powerful hydraulic jack, not a standard one: with a large handle and a good gripping plane. Read more in the article “Which is the best car jack to buy”;
- The brake caliper opens up to our view. We will need to remove it in the future. We unscrew the 2 bolts that hold it in place (using a 17mm wrench). If it gets too stuck, you can spray it with WD-40 and let it sit for about 15 minutes. After which – continue the withdrawal procedure;
- After removing the caliper,
it is important to place it on a small stool or box, placed upside down. This is done in order to prevent rupture of the brake hoses, on which the caliper would otherwise simply hang. Therefore, we move the part on the hoses (without removing them) to the side and place it on a stool; - In the place where the caliper stood, there is a place intended for replacing and knocking out the pins (as if, a special hole). We rotate the wheel so that the hole coincides with the broken stud. Next, use the thin end of a small hammer to knock out the rest of the pin. Perhaps she has become attached to the disk again. Then use the magic VD remedy again. A couple of sprays and wait for it to limp;
- You can also use a small screwdriver or a round chisel to help with the procedure by hitting it with a hammer. You just need to hit, as they say in the classics, “strongly, but carefully,” trying not to damage the surrounding parts. But usually the pin comes out quite easily.
- You can also remove the brake disc
. But some dispute the appropriateness of such an action. After all, you can put a new pin in place of the old one without this (although it is a little more difficult, and there is a chance of slightly denting the protection). In our above case, we did not remove the brake disc, but inserted a new pin into the hole and adjusted it with the sharp edge of a hammer. Then the protection was adjusted with a screwdriver to the desired position; - To get the new stud into place, you need to screw the nut on top of it and tighten it, but not too much. Then it will be good. Then the nut must be unscrewed back;
- If more than one pin has fallen off, then we perform exactly the same actions with the second or third (you can even change everything to new ones if the car is old enough);
- We put the brake caliper in its proper place, screwing it on. If he doesn’t get up, then we spread the blocks, then he will get in easily, without effort;
- Screw the wheel into place, tightening the nuts. We lower the car from the jack. Check the tightness again. Replacing the front wheel stud of a Toyota Corolla RUNX was completed successfully. You can go.
How to change the stud on the front wheel of a Toyota
For many cars, especially those made in Japan, the wheels are attached to the hub using nuts placed on studs.
And they are an endless headache for both car owners and tire fitters, since they break not only while driving, but also when the wheels are unscrewed to change shoes. We won’t find out who is to blame for this, but we’ll just figure out how to change the stud on the front wheel of a Toyota. Removing a wheel from a Toyota
Stud repair
Often, motorists do not recommend repairing bolts. Firstly, this is not always possible to do (broken and distorted). Secondly, the safety of driving a vehicle is reduced. But they can still be restored.
In order not to encounter such a problem as breaking and replacing the front wheel stud, it is necessary to monitor the degree of tightening of the nuts. When released, the disc hits the studs. This leads to their breakage and wear of the threads. Before removing the wheel from the car, you need to thoroughly clean the bolts of dirt so that it does not get on the threads of the threaded connection. The same operation should be carried out before screwing on the nut.
Additionally, be sure to check the tightness of the nuts and bolts after visiting a tire shop. There is a high probability that in a hurry the service worker may not reach the wheel and this will lead to damage to the studs at best.